
Aspire 5680/5650/5630/5610/5610Z/3690 User's Guide
Page 18
... Communications Comission Declaration of Conformity 101 102 LCD panel ergonomic specifications 103 Index 104 BIOS utility 85 Boot sequence 85 Enable disk-to-disk recovery 85 Password 85 Using software 86 Playing DVD movies 86 Power management 87 Acer eRecovery Management 88 Create backup 88 Burn backup disc 89 Restore and recovery...
... Communications Comission Declaration of Conformity 101 102 LCD panel ergonomic specifications 103 Index 104 BIOS utility 85 Boot sequence 85 Enable disk-to-disk recovery 85 Password 85 Using software 86 Playing DVD movies 86 Power management 87 Acer eRecovery Management 88 Create backup 88 Burn backup disc 89 Restore and recovery...
Aspire 5680/5650/5630/5610/5610Z/3690 User's Guide
Page 30
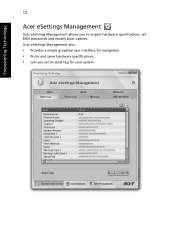
Acer eSettings Management also: • Provides a simple graphical user interface for your system. Empowering Technology 12 Acer eSettings Management Acer eSettings Management allows you set an asset tag for navigation. • Prints and saves hardware specifications. • Lets you to inspect hardware specifications, set BIOS passwords and modify boot options.
Acer eSettings Management also: • Provides a simple graphical user interface for your system. Empowering Technology 12 Acer eSettings Management Acer eSettings Management allows you set an asset tag for navigation. • Prints and saves hardware specifications. • Lets you to inspect hardware specifications, set BIOS passwords and modify boot options.

Aspire 5680/5650/5630/5610/5610Z/3690 User's Guide
Page 53
... external monitor (if connected) and both. Hotkey Icon + Function Hotkey help Description Displays help on page 1. Launches Acer ePower Management in Sleep mode. English 35 Hotkeys The computer employs hotkeys or key combinations to access most of the...and the BIOS utility. Puts the computer in Acer Empowering Technology. To activate hotkeys, press and hold the key before pressing the other key in Acer Empowering Technology. See "Acer Empowering Technology" on hotkeys. + + + + Acer eSettings Acer ePower Management Sleep Display toggle Launches Acer eSettings in...
... external monitor (if connected) and both. Hotkey Icon + Function Hotkey help Description Displays help on page 1. Launches Acer ePower Management in Sleep mode. English 35 Hotkeys The computer employs hotkeys or key combinations to access most of the...and the BIOS utility. Puts the computer in Acer Empowering Technology. To activate hotkeys, press and hold the key before pressing the other key in Acer Empowering Technology. See "Acer Empowering Technology" on hotkeys. + + + + Acer eSettings Acer ePower Management Sleep Display toggle Launches Acer eSettings in...
Aspire 5680/5650/5630/5610/5610Z/3690 User's Guide
Page 62
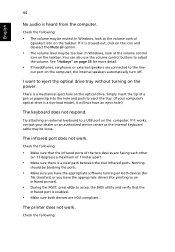
.... Try attaching an external keyboard to a USB port on page 35 for printing to an infrared printer). • During the POST, press to access the BIOS utility and verify that the infrared ports of 1 meter apart. • Make sure there is a mechanical eject hole on the optical drive. See "Hotkeys" on...
.... Try attaching an external keyboard to a USB port on page 35 for printing to an infrared printer). • During the POST, press to access the BIOS utility and verify that the infrared ports of 1 meter apart. • Make sure there is a mechanical eject hole on the optical drive. See "Hotkeys" on...
Aspire 5680/5650/5630/5610/5610Z/3690 User's Guide
Page 63
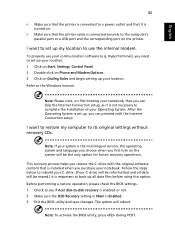
... installed when you can proceed with the Internet Connection setup. Before performing a restore operation, please check the BIOS settings. 1 Check to see if Acer disk-to the Windows manual. Note: To activate the BIOS utility, press during POST. Follow the steps below to rebuild your C: drive. (Your C: drive will...internal modem. Refer to -disk recovery is enabled or not. 2 Make sure the D2D Recovery setting in Main is Enabled. 3 Exit the BIOS utility and save changes. Note: If your system is the multilingual version, the operating system and language you choose when you first turn on ...
... installed when you can proceed with the Internet Connection setup. Before performing a restore operation, please check the BIOS settings. 1 Check to see if Acer disk-to the Windows manual. Note: To activate the BIOS utility, press during POST. Follow the steps below to rebuild your C: drive. (Your C: drive will...internal modem. Refer to -disk recovery is enabled or not. 2 Make sure the D2D Recovery setting in Main is Enabled. 3 Exit the BIOS utility and save changes. Note: If your system is the multilingual version, the operating system and language you choose when you first turn on ...
Aspire 5680/5650/5630/5610/5610Z/3690 User's Guide
Page 92
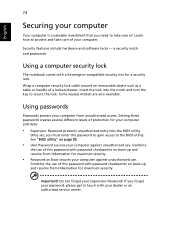
...forget your computer against unauthorized use . Once set, you must enter this password to gain access to secure the lock. See "BIOS utility" on Boot secures your Supervisor Password! If you need to protect and take care of this password with a Kensington-compatible security...8226; Supervisor Password prevents unauthorized entry into the notch and turn the key to the BIOS utility. English 74 Securing your computer from unauthorized access. Insert the lock into the BIOS utility. Using passwords Passwords protect your computer Your computer is a valuable investment that you...
...forget your computer against unauthorized use . Once set, you must enter this password to gain access to secure the lock. See "BIOS utility" on Boot secures your Supervisor Password! If you need to protect and take care of this password with a Kensington-compatible security...8226; Supervisor Password prevents unauthorized entry into the notch and turn the key to the BIOS utility. English 74 Securing your computer from unauthorized access. Insert the lock into the BIOS utility. Using passwords Passwords protect your computer Your computer is a valuable investment that you...

Aspire 5680/5650/5630/5610/5610Z/3690 User's Guide
Page 93
...a password prompt appears in the center of the display screen. • When the Supervisor Password is set, a prompt appears when you press to enter the BIOS utility at boot-up . • Type the Supervisor Password and press to enter a password. Try again and press . Setting passwords You can set and ...the password on the computer again, and try again. Important! You have three chances to access the BIOS utility. If you enter the password incorrectly, a warning message appears. Then turn on boot parameter is set passwords using the...
...a password prompt appears in the center of the display screen. • When the Supervisor Password is set, a prompt appears when you press to enter the BIOS utility at boot-up . • Type the Supervisor Password and press to enter a password. Try again and press . Setting passwords You can set and ...the password on the computer again, and try again. Important! You have three chances to access the BIOS utility. If you enter the password incorrectly, a warning message appears. Then turn on boot parameter is set passwords using the...
Aspire 5680/5650/5630/5610/5610Z/3690 User's Guide
Page 103
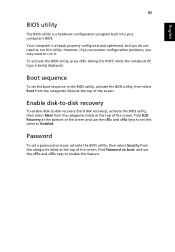
..., then select Main from the categories listed at the bottom of the screen. Find Password on boot, activate the BIOS utility, then select Security from the categories listed at the top of the screen. Find D2D Recovery at the top of the screen. Boot sequence ...To set this utility. English 85 BIOS utility The BIOS utility is being displayed. Your computer is already properly configured and optimized, and you may need to enable this feature.
..., then select Main from the categories listed at the bottom of the screen. Find Password on boot, activate the BIOS utility, then select Security from the categories listed at the top of the screen. Find D2D Recovery at the top of the screen. Boot sequence ...To set this utility. English 85 BIOS utility The BIOS utility is being displayed. Your computer is already properly configured and optimized, and you may need to enable this feature.
Aspire 5680/5650/5630/5610/5610Z/3690 User's Guide
Page 108
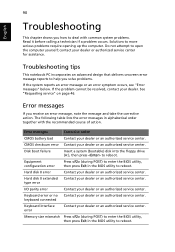
... keyboard connected Keyboard interface error Contact your dealer or an authorized service center. The following table lists the error messages in the BIOS utility to reboot. Disk boot failure Insert a system (bootable) disk into the floppy drive (A:), then press to more serious ...or an authorized service center. Do not attempt to open the computer yourself; Equipment configuration error Press (during POST) to enter the BIOS utility, then press Exit in alphabetical order together with common system problems. Read it before calling a technician if a problem occurs. ...
... keyboard connected Keyboard interface error Contact your dealer or an authorized service center. The following table lists the error messages in the BIOS utility to reboot. Disk boot failure Insert a system (bootable) disk into the floppy drive (A:), then press to more serious ...or an authorized service center. Do not attempt to open the computer yourself; Equipment configuration error Press (during POST) to enter the BIOS utility, then press Exit in alphabetical order together with common system problems. Read it before calling a technician if a problem occurs. ...

Aspire 5680/5650/5630/5610/5610Z/3690 User's Guide
Page 109
English English Some problems may be solved using the BIOS utility. 91 If you still encounter problems after going through the corrective measures, please contact your dealer or an authorized service center for assistance.
English English Some problems may be solved using the BIOS utility. 91 If you still encounter problems after going through the corrective measures, please contact your dealer or an authorized service center for assistance.

Aspire 5680/5650/5630/5610/5610Z/3690 User's Guide
Page 122
... characteristics 47 charging 49 checking charge level 49 installing 48 low conditions 50 maximizing life 47 optimizing 49 removing 49 using the first time 47 BIOS utility 85 brightness hotkeys 36 C caps lock 33 on indicator 29 care AC adapter xiii battery pack xiv computer xiii CD-ROM ejecting manually 44...
... characteristics 47 charging 49 checking charge level 49 installing 48 low conditions 50 maximizing life 47 optimizing 49 removing 49 using the first time 47 BIOS utility 85 brightness hotkeys 36 C caps lock 33 on indicator 29 care AC adapter xiii battery pack xiv computer xiii CD-ROM ejecting manually 44...

Service Guide
Page 28
... Start button; Hot Keys The computer employs hotkeys or key combinations to provide a variety of the computer's controls like screen brightness, volume output and the BIOS utility. Aspire 5650: TravelMate 4260: 22 Chapter 1 Num Lock Off Type the letters in the hotkey combination. It can also be used with other key in a normal...
... Start button; Hot Keys The computer employs hotkeys or key combinations to provide a variety of the computer's controls like screen brightness, volume output and the BIOS utility. Aspire 5650: TravelMate 4260: 22 Chapter 1 Num Lock Off Type the letters in the hotkey combination. It can also be used with other key in a normal...
Service Guide
Page 41
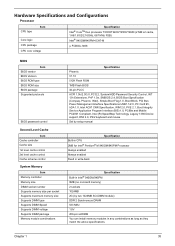
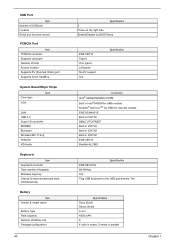
... 1.66/1.83/2/2.16GHz, 667 MHz FSB) Intel® 945GM/945PM+ICH7-M µ FCBGA-1466 BIOS Item BIOS vendor BIOS Version BIOS ROM type BIOS ROM size BIOS package Supported protocols BIOS password control Second Level Cache Item Cache controller Cache size 1st level cache control 2st level cache control... package Memory module combinations Specification Phoenix V1.10 512K Flash ROM 1MB Flash BIOS 32-pin PLCC ACPI 1.0b/2.0/3.0, PCI2.2, System/HDD Password Security Control, INT 13h Extensions, PnP 1.0a, SMBIOS 2.4, BIOS Boot Specification (Compaq, Phoenix, INtel), Simple Boot Flag 1.0, Boot Block,...
... 1.66/1.83/2/2.16GHz, 667 MHz FSB) Intel® 945GM/945PM+ICH7-M µ FCBGA-1466 BIOS Item BIOS vendor BIOS Version BIOS ROM type BIOS ROM size BIOS package Supported protocols BIOS password control Second Level Cache Item Cache controller Cache size 1st level cache control 2st level cache control... package Memory module combinations Specification Phoenix V1.10 512K Flash ROM 1MB Flash BIOS 32-pin PLCC ACPI 1.0b/2.0/3.0, PCI2.2, System/HDD Password Security Control, INT 13h Extensions, PnP 1.0a, SMBIOS 2.4, BIOS Boot Specification (Compaq, Phoenix, INtel), Simple Boot Flag 1.0, Boot Block,...
Service Guide
Page 46
... Battery Item Vendor & model name Battery Type Pack capacity Number of battery cell Package configuration 40 Specification 3 Three on the right side Enable/Disable by BIOS Setup ENE CB714 Type-II One type-II Left panel No ZV support Yes Specification Controller Intel® 945GM/945PM+ICH7M Built in Intel®...
... Battery Item Vendor & model name Battery Type Pack capacity Number of battery cell Package configuration 40 Specification 3 Three on the right side Enable/Disable by BIOS Setup ENE CB714 Type-II One type-II Left panel No ZV support Yes Specification Controller Intel® 945GM/945PM+ICH7M Built in Intel®...

Service Guide
Page 49
...Serial Number : ATAPI Model Name : None ATAPI Serial Number : None BIOS Version: VGA BIOS Ver V1.10 Intel V1256 Serial Number Asset Tag Number Produce Name Manufacturer Name: UUID: xxxxxxxxxxxxxxxxxxxxxx N/A TravelMate 4200 Acer xxxxxxxxxxxxxxxxxxxxxxxxxxxxxxxx 22 Byte 32 Byte 16 Byte 16 Byte 32 Byte F1 Help ...If you may need to change boot device without entering BIOS Setup Utility, please set to run this menu, user can change boot device without entering BIOS SETUP Utility. Chapter 2 System Utilities BIOS Setup Utility The BIOS Setup Utility is prompted on the bottom of F12 ...
...Serial Number : ATAPI Model Name : None ATAPI Serial Number : None BIOS Version: VGA BIOS Ver V1.10 Intel V1256 Serial Number Asset Tag Number Produce Name Manufacturer Name: UUID: xxxxxxxxxxxxxxxxxxxxxx N/A TravelMate 4200 Acer xxxxxxxxxxxxxxxxxxxxxxxxxxxxxxxx 22 Byte 32 Byte 16 Byte 16 Byte 32 Byte F1 Help ...If you may need to change boot device without entering BIOS Setup Utility, please set to run this menu, user can change boot device without entering BIOS SETUP Utility. Chapter 2 System Utilities BIOS Setup Utility The BIOS Setup Utility is prompted on the bottom of F12 ...

Service Guide
Page 50
...the screen. NOTE: You can also press u to parameter values. Navigation keys for parameters are in square brackets. Read this item. Navigating the BIOS Utility There are shown on the bottom of the screen. You can change the value of a parameter, press por q. T To choose a ...use the cursor left/right keys (zx). T Press ^ while you can load default settings by pressing t. T In any changes made and exit the BIOS Setup Utility. Help for a particular menu are six menu options: Info., Main, System Devices, Security, Boot, and Exit. Please note that system information...
...the screen. NOTE: You can also press u to parameter values. Navigation keys for parameters are in square brackets. Read this item. Navigating the BIOS Utility There are shown on the bottom of the screen. You can change the value of a parameter, press por q. T To choose a ...use the cursor left/right keys (zx). T Press ^ while you can load default settings by pressing t. T In any changes made and exit the BIOS Setup Utility. Help for a particular menu are six menu options: Info., Main, System Devices, Security, Boot, and Exit. Please note that system information...

Service Guide
Page 51
...HDD Serial Number : ATAPI Model Name : None ATAPI Serial Number : None BIOS Version: VGA BIOS Ver V1.10 Intel V1256 Serial Number Asset Tag Number Produce Name Manufacturer Name: UUID: xxxxxxxxxxxxxxxxxxxxxx N/A Aspire 5650/TravelMate 4260 Acer xxxxxxxxxxxxxxxxxxxxxxxxxxxxxxxx 22 Byte 32 Byte 16 Byte 16 Byte 32 Byte F1 Help Esc... F10 Save and Exit Parameter CPU Type IDE1 Model Name IDE1 Serial Number IDE2I Model Name IDE2 Serial Number System BIOS ver VGA BIOS Ver KBC Ver Serial Number Asset Tag Number Product Name Manufacturer Name UUID Number Description This field shows the CPU type...
...HDD Serial Number : ATAPI Model Name : None ATAPI Serial Number : None BIOS Version: VGA BIOS Ver V1.10 Intel V1256 Serial Number Asset Tag Number Produce Name Manufacturer Name: UUID: xxxxxxxxxxxxxxxxxxxxxx N/A Aspire 5650/TravelMate 4260 Acer xxxxxxxxxxxxxxxxxxxxxxxxxxxxxxxx 22 Byte 32 Byte 16 Byte 16 Byte 32 Byte F1 Help Esc... F10 Save and Exit Parameter CPU Type IDE1 Model Name IDE1 Serial Number IDE2I Model Name IDE2 Serial Number System BIOS ver VGA BIOS Ver KBC Ver Serial Number Asset Tag Number Product Name Manufacturer Name UUID Number Description This field shows the CPU type...

Service Guide
Page 54
... Information Main Advanced Security Boot Exit Infrared Port (FIR) [Enabled] Item Specific Help Configure Infrared Port using options: [Disabled]: No configuration [Enabled]: User configuration [Auto]: BIOS or OS chooses configuration (OS Controlled) Displayedd when controlled by OS Disabled Enabled Auto Option 48 Chapter 2 Advanced The Advanced screen contains parameters involving your...
... Information Main Advanced Security Boot Exit Infrared Port (FIR) [Enabled] Item Specific Help Configure Infrared Port using options: [Disabled]: No configuration [Enabled]: User configuration [Auto]: BIOS or OS chooses configuration (OS Controlled) Displayedd when controlled by OS Disabled Enabled Auto Option 48 Chapter 2 Advanced The Advanced screen contains parameters involving your...

Service Guide
Page 56
... the supervisor password: 1. Enables or disables primary hard disk security function. The following sub-options are done, press u to save the changes and exit the BIOS Setup Utility. The password length can not either enter the Setup menu nor change the value of parameters. Retype the password in this screen. After... to set the supervisor password. The table below describes the parameters in the "Enter New Password" field. If desired, you set , this password protects the BIOS Setup Utility from unauthorized access.
... the supervisor password: 1. Enables or disables primary hard disk security function. The following sub-options are done, press u to save the changes and exit the BIOS Setup Utility. The password length can not either enter the Setup menu nor change the value of parameters. Retype the password in this screen. After... to set the supervisor password. The table below describes the parameters in the "Enter New Password" field. If desired, you set , this password protects the BIOS Setup Utility from unauthorized access.

Service Guide
Page 57
...Type the current password in the Enter New Password field. The computer then sets the Supervisor Password parameter to save the changes and exit the BIOS Setup Utility. Type a password in the Enter Current Password field and press e. 3. Press e. When you the Setup Warning. The password setting... e twice without typing anything in the Confirm New Password field. 4. Use the w and y keys to save the changes and exit the BIOS Setup Utility. When you can enable the Password on boot parameter. 6. After setting the password, the computer sets the User Password parameter to ...
...Type the current password in the Enter New Password field. The computer then sets the Supervisor Password parameter to save the changes and exit the BIOS Setup Utility. Type a password in the Enter Current Password field and press e. 3. Press e. When you the Setup Warning. The password setting... e twice without typing anything in the Confirm New Password field. 4. Use the w and y keys to save the changes and exit the BIOS Setup Utility. When you can enable the Password on boot parameter. 6. After setting the password, the computer sets the User Password parameter to ...


