

Aspire 5235 / 5535 Service Guide
Page 7
... Management 22 Windows Mobility Center 23 Using the System Utilities 24 Acer GridVista (dual-display compatible 24 Hardware Specifications and Configurations 26 System Utilities 33 BIOS Setup Utility 33 Navigating the BIOS Utility 34 Information 35 Main 36 Security 38 Boot 42 Exit 43 BIOS Flash Utility 44 Remove HDD/BIOS Utility...
... Management 22 Windows Mobility Center 23 Using the System Utilities 24 Acer GridVista (dual-display compatible 24 Hardware Specifications and Configurations 26 System Utilities 33 BIOS Setup Utility 33 Navigating the BIOS Utility 34 Information 35 Main 36 Security 38 Boot 42 Exit 43 BIOS Flash Utility 44 Remove HDD/BIOS Utility...
Aspire 5235 / 5535 Service Guide
Page 32
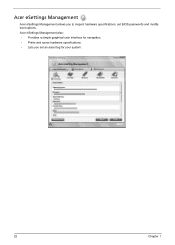
Acer eSettings Management Acer eSettings Management allows you set BIOS passwords and modify boot options. Acer eSettings Management also: • Provides a simple graphical user interface for navigation. • Prints and saves hardware specifications. • Lets you to inspect hardware specifications, set an asset tag for your system. 22 Chapter 1
Acer eSettings Management Acer eSettings Management allows you set BIOS passwords and modify boot options. Acer eSettings Management also: • Provides a simple graphical user interface for navigation. • Prints and saves hardware specifications. • Lets you to inspect hardware specifications, set an asset tag for your system. 22 Chapter 1
Aspire 5235 / 5535 Service Guide
Page 45
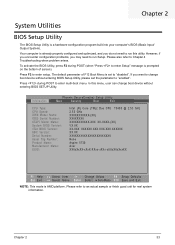
... need to enter setup. Please refer to Chapter 4 Troubleshooting when problem arises. Chapter 2 33 Information Phoenix SecureCore(tm) Setup Utility Main Security Boot Exit CPU Type: CPU Speed: IDE0 Model Name: IDE0 Serial Number: ATAPI Model Name: System BIOS Version: VGA BIOS Version: KBC Version... XXXXXXXXXXX-(XX) XXXXXXXX XXXXXXXXXXX-XXX XX-XXXX-(XX) VX.XX XX-XXX XXXXXX.XXX.XXX.XXX.XXXXXX XX.XX XXXXXXXXXXXXXXXXXXXXXXX None Aspire 5730 Acer XXXxXxXX-xXxX-XXxx-xXXx-xXXxXXxXxxXX F1 Help Esc Exit Select Item -/+ Change Values F9 Setup Defaults Select Menu Enter Select Sub-Menu...
... need to enter setup. Please refer to Chapter 4 Troubleshooting when problem arises. Chapter 2 33 Information Phoenix SecureCore(tm) Setup Utility Main Security Boot Exit CPU Type: CPU Speed: IDE0 Model Name: IDE0 Serial Number: ATAPI Model Name: System BIOS Version: VGA BIOS Version: KBC Version... XXXXXXXXXXX-(XX) XXXXXXXX XXXXXXXXXXX-XXX XX-XXXX-(XX) VX.XX XX-XXX XXXXXX.XXX.XXX.XXX.XXXXXX XX.XX XXXXXXXXXXXXXXXXXXXXXXX None Aspire 5730 Acer XXXxXxXX-xXxX-XXxx-xXXx-xXXxXXxXxxXX F1 Help Esc Exit Select Item -/+ Change Values F9 Setup Defaults Select Menu Enter Select Sub-Menu...
Aspire 5235 / 5535 Service Guide
Page 46
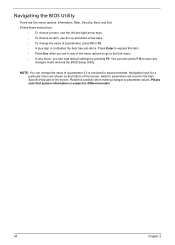
... screen. Read this item. • Press Esc while you can also press F10 to save any menu, you are five menu options: Information, Main, Security, Boot, and Exit. Help for a particular menu are found in the Item Specific Help part of the screen. Follow these instructions: • To choose a menu, use...
... screen. Read this item. • Press Esc while you can also press F10 to save any menu, you are five menu options: Information, Main, Security, Boot, and Exit. Help for a particular menu are found in the Item Specific Help part of the screen. Follow these instructions: • To choose a menu, use...
Aspire 5235 / 5535 Service Guide
Page 47
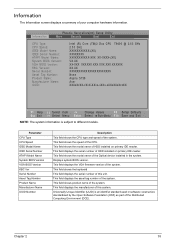
Information Phoenix SecureCore(tm) Setup Utility Main Security Boot Exit CPU Type: CPU Speed: IDE0 Model Name: IDE0 Serial Number: ATAPI Model Name: System BIOS Version: VGA BIOS Version: KBC Version: Serial Number: Asset ... GHz 2.53 GHz XXXXXXXXXXX-(XX) XXXXXXXX XXXXXXXXXXX-XXX XX-XXXX-(XX) VX.XX XX-XXX XXXXXX.XXX.XXX.XXX.XXXXXX XX.XX XXXXXXXXXXXXXXXXXXXXXXX None Aspire 5730 Acer XXXxXxXX-xXxX-XXxx-xXXx-xXXxXXxXxxXX F1 Help Esc Exit Select Item -/+ Change Values F9 Setup Defaults Select Menu Enter Select Sub-Menu F10 Save and...
Information Phoenix SecureCore(tm) Setup Utility Main Security Boot Exit CPU Type: CPU Speed: IDE0 Model Name: IDE0 Serial Number: ATAPI Model Name: System BIOS Version: VGA BIOS Version: KBC Version: Serial Number: Asset ... GHz 2.53 GHz XXXXXXXXXXX-(XX) XXXXXXXX XXXXXXXXXXX-XXX XX-XXXX-(XX) VX.XX XX-XXX XXXXXX.XXX.XXX.XXX.XXXXXX XX.XX XXXXXXXXXXXXXXXXXXXXXXX None Aspire 5730 Acer XXXxXxXX-xXxX-XXxx-xXXx-xXXxXXxXxxXX F1 Help Esc Exit Select Item -/+ Change Values F9 Setup Defaults Select Menu Enter Select Sub-Menu F10 Save and...
Aspire 5235 / 5535 Service Guide
Page 48
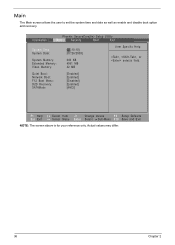
... the user to set the system time and date as well as enable and disable boot option and recovery. Actual values may differ. 36 Chapter 2 Information Phoenix SecureCore(tm) Setup Utility Main Security Boot Exit System Time: System Date: System Memory: Extended Memory: Video Memory: [10:...10:10] [07/26/2008] 640 KB 4061 MB 32 MB Item Specific Help , , or selects field. Quiet Boot: Network Boot: F12 Boot Menu: D2D Recovery: SATAMode [Enabled] [Enabled] [Disabled] [Enabled] [AHCI] F1 Help Esc Exit Select Item -/+ Change Values F9 Setup Defaults Select...
... the user to set the system time and date as well as enable and disable boot option and recovery. Actual values may differ. 36 Chapter 2 Information Phoenix SecureCore(tm) Setup Utility Main Security Boot Exit System Time: System Date: System Memory: Extended Memory: Video Memory: [10:...10:10] [07/26/2008] 640 KB 4061 MB 32 MB Item Specific Help , , or selects field. Quiet Boot: Network Boot: F12 Boot Menu: D2D Recovery: SATAMode [Enabled] [Enabled] [Disabled] [Enabled] [AHCI] F1 Help Esc Exit Select Item -/+ Change Values F9 Setup Defaults Select...

Aspire 5235 / 5535 Service Guide
Page 49
...Enables, disables D2D Recovery function. Option: Enabled or Disabled Control the mode in this screen. Option: Enabled or Disabled Enables, disables Boot Menu during POST. Extended Memory size=Total memory size-1MB Shows the VGA memory size. Settings in these cases. Chapter 2 37 The...device control is not allowed to disable or auto. Parameter System Time System Date System Memory Extended Memory VGA Memory Quiet Boot Network Boot F12 Boot Menu D2D Recovery SATA Mode Description Format/Option Sets the system time. Format: HH:MM:SS (hour:minute:second) ...
...Enables, disables D2D Recovery function. Option: Enabled or Disabled Control the mode in this screen. Option: Enabled or Disabled Enables, disables Boot Menu during POST. Extended Memory size=Total memory size-1MB Shows the VGA memory size. Settings in these cases. Chapter 2 37 The...device control is not allowed to disable or auto. Parameter System Time System Date System Memory Extended Memory VGA Memory Quiet Boot Network Boot F12 Boot Menu D2D Recovery SATA Mode Description Format/Option Sets the system time. Format: HH:MM:SS (hour:minute:second) ...

Aspire 5235 / 5535 Service Guide
Page 50
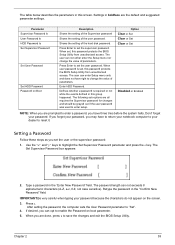
... Supervisor Password is: User Password is: HDD Password is: Set Supervisor Password Set User Password Set HDD Password Password on boot is enabled. It can be used to remove HDD/BIOS Password. 38 Chapter 2 F1 Help Esc Exit Select Item -/+ Change Values F9 Setup Defaults Select... Select Sub-Menu F10 Save and Exit NOTE: Please refer to "Remove HDD/BIOS Password" section if you need to know how to boot up when Password on Boot: Clear Clear Clear [Enter] [Enter] [Enter] [Disabled] Item Specific Help Supervisor Password controls access of the whole setup utility. Security The Security ...
... Supervisor Password is: User Password is: HDD Password is: Set Supervisor Password Set User Password Set HDD Password Password on boot is enabled. It can be used to remove HDD/BIOS Password. 38 Chapter 2 F1 Help Esc Exit Select Item -/+ Change Values F9 Setup Defaults Select... Select Sub-Menu F10 Save and Exit NOTE: Please refer to "Remove HDD/BIOS Password" section if you need to know how to boot up when Password on Boot: Clear Clear Clear [Enter] [Enter] [Enter] [Disabled] Item Specific Help Supervisor Password controls access of the whole setup utility. Security The Security ...
Aspire 5235 / 5535 Service Guide
Page 51
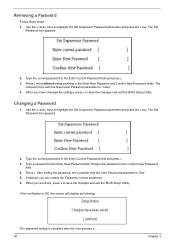
... to enter a password, you may have to return your notebook computer to your password, you have right to enable the Password on boot parameter. 5. If you forget your dealer to set the supervisor password. The user can not exceeds 8 alphanumeric characters (A-Z, a-z, 0-9, ...not case sensitive). Enter HDD Password. Don't forget your password because the characters do not appear on Boot Description Shows the setting of the Supervisor password Shows the setting of the hard disk password. The Set Supervisor Password box appears: 2. ...
... to enter a password, you may have to return your notebook computer to your password, you have right to enable the Password on boot parameter. 5. If you forget your dealer to set the supervisor password. The user can not exceeds 8 alphanumeric characters (A-Z, a-z, 0-9, ...not case sensitive). Enter HDD Password. Don't forget your password because the characters do not appear on Boot Description Shows the setting of the Supervisor password Shows the setting of the hard disk password. The Set Supervisor Password box appears: 2. ...
Aspire 5235 / 5535 Service Guide
Page 52
... and press e. 3. Use the w and y keys to highlight the Set Supervisor Password parameter and press the e key. Press e. When you can enable the Password on boot parameter. 6. The password setting is OK, the screen will display as following. Use the w and y keys to highlight the Set Supervisor Password parameter and press...
... and press e. 3. Use the w and y keys to highlight the Set Supervisor Password parameter and press the e key. Press e. When you can enable the Password on boot parameter. 6. The password setting is OK, the screen will display as following. Use the w and y keys to highlight the Set Supervisor Password parameter and press...
Aspire 5235 / 5535 Service Guide
Page 54
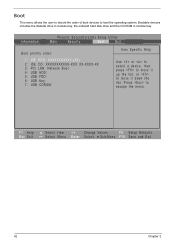
... order: 1: IDE HDD: XXXXXXXXXXX-(XX) 2: IDE CD: XXXXXXXXXXX-XXX XX-XXXX-XX 3: PCI LAN: Network Boot 4: USB HDD: 5: USB FDD: 6: USB Key: 7: USB CDROM: Item Specific Help Use < > or < > to select a device, then press to move it up the list, or ... Exit Select Item -/+ Change Values F9 Setup Defaults Select Menu Enter Select Sub-Menu F10 Save and Exit 42 Chapter 2 Boot This menu allows the user to decide the order of boot devices to move it down the list. Bootable devices includes the diskette drive in module bay, the onboard hard disk...
... order: 1: IDE HDD: XXXXXXXXXXX-(XX) 2: IDE CD: XXXXXXXXXXX-XXX XX-XXXX-XX 3: PCI LAN: Network Boot 4: USB HDD: 5: USB FDD: 6: USB Key: 7: USB CDROM: Item Specific Help Use < > or < > to select a device, then press to move it up the list, or ... Exit Select Item -/+ Change Values F9 Setup Defaults Select Menu Enter Select Sub-Menu F10 Save and Exit 42 Chapter 2 Boot This menu allows the user to decide the order of boot devices to move it down the list. Bootable devices includes the diskette drive in module bay, the onboard hard disk...
Aspire 5235 / 5535 Service Guide
Page 55
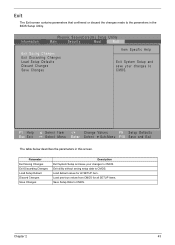
Information Phoenix SecureCore(tm) Setup Utility Main Security Boot Exit Exit Saving Changes Exit Discarding Changes Load Setup Defaults Discard Changes Save Changes Item Specific Help Exit System Setup and save your changes to ...
Information Phoenix SecureCore(tm) Setup Utility Main Security Boot Exit Exit Saving Changes Exit Discarding Changes Load Setup Defaults Discard Changes Save Changes Item Specific Help Exit System Setup and save your changes to ...
Aspire 5235 / 5535 Service Guide
Page 56
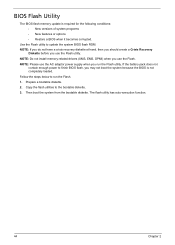
... diskette. 2. BIOS Flash Utility The BIOS flash memory update is not completely loaded. NOTE: Please use the AC adaptor power supply when you may not boot the system because the BIOS is required for the following conditions: • New versions of system programs • New features or options • Restore a BIOS... you use the Flash. Fellow the steps below to the bootable diskette. 3. Use the Flash utility to finish BIOS flash, you run the Flash. 1. Then boot the system from the bootable diskette.
... diskette. 2. BIOS Flash Utility The BIOS flash memory update is not completely loaded. NOTE: Please use the AC adaptor power supply when you may not boot the system because the BIOS is required for the following conditions: • New versions of system programs • New features or options • Restore a BIOS... you use the Flash. Fellow the steps below to the bootable diskette. 3. Use the Flash utility to finish BIOS flash, you run the Flash. 1. Then boot the system from the bootable diskette.
Aspire 5235 / 5535 Service Guide
Page 110
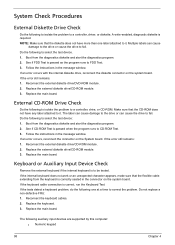
... the drive or can cause damage to the drive or cause the drive to a controller, driver, or diskette. If the keyboard cable connection is required. Boot from the diagnostics diskette and start the diagnostics program. 2. See if CD-ROM Test is correctly seated in the connector on the System board. Reconnect... Check Procedures External Diskette Drive Check Do the following to isolate the problem to fail. Multiple labels can cause the drive to CD-ROM Test. 3. Boot from the keyboard is passed when the program runs to fail.
... the drive or can cause damage to the drive or cause the drive to a controller, driver, or diskette. If the keyboard cable connection is required. Boot from the diagnostics diskette and start the diagnostics program. 2. See if CD-ROM Test is correctly seated in the connector on the System board. Reconnect... Check Procedures External Diskette Drive Check Do the following to isolate the problem to fail. Multiple labels can cause the drive to CD-ROM Test. 3. Boot from the keyboard is passed when the program runs to fail.
Aspire 5235 / 5535 Service Guide
Page 111
... keyboard If any of the following list: q "Check the Power Adapter" on page 100 q "Check the Battery Pack" on the screen, or hang the system. 1. Boot from the diagnostics diskette and start the diagnostic program (please refer to the diagnostic memory in the message window. If you suspect a power problem, see...
... keyboard If any of the following list: q "Check the Power Adapter" on page 100 q "Check the Battery Pack" on the screen, or hang the system. 1. Boot from the diagnostics diskette and start the diagnostic program (please refer to the diagnostic memory in the message window. If you suspect a power problem, see...
Aspire 5235 / 5535 Service Guide
Page 116
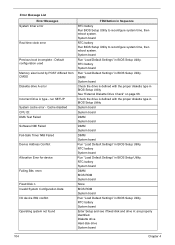
... "Load Default Settings" in BIOS Setup Utility. run SETUP System cache error - Error Message List Error Messages System timer error Real time clock error Previous boot incomplete - System board Run "Load Default Settings" in BIOS Setup Utility. Check the drive is defined with the proper diskette type in BIOS Setup Utility...
... "Load Default Settings" in BIOS Setup Utility. run SETUP System cache error - Error Message List Error Messages System timer error Real time clock error Previous boot incomplete - System board Run "Load Default Settings" in BIOS Setup Utility. Check the drive is defined with the proper diskette type in BIOS Setup Utility...

Aspire 5235 / 5535 Service Guide
Page 118
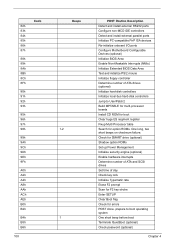
... POST values Initialize I/O component Initialize the local bus IDE Initialize Power Management Load alternate registers with initial POST values Restore CPU control word during warm boot Initialize PCI Bus Mastering devices Initialize keyboard controller BIOS ROM checksum Initialize cache before memory autosize 8254 timer initialization 8237 DMA controller initialization Reset Programmable...
... POST values Initialize I/O component Initialize the local bus IDE Initialize Power Management Load alternate registers with initial POST values Restore CPU control word during warm boot Initialize PCI Bus Mastering devices Initialize keyboard controller BIOS ROM checksum Initialize cache before memory autosize 8254 timer initialization 8237 DMA controller initialization Reset Programmable...
Aspire 5235 / 5535 Service Guide
Page 120
... ATA and SCSI drives Set time of ATA drives (optional) Initialize hard-disk controllers Initialize local-bus hard-disk controllers Jump to boot operating system One short beep before boot Terminate QuietBoot (optional) Check password (optional) Chapter 4 82h 83h 84h 85h 86h 87h 88h 89h 8Ah 8Bh 8Ch 8Fh 90h 91h 92h.../2 mouse Initialize floppy controller Determine number of day Check key lock Initialize Typematic rate Erase F2 prompt Scan for F2 key stroke Enter SETUP Clear Boot flag Check for errors POST done- prepare to UserPatch2 Build MPTABLE for multi-processor boards Install CD ROM for...
... ATA and SCSI drives Set time of ATA drives (optional) Initialize hard-disk controllers Initialize local-bus hard-disk controllers Jump to boot operating system One short beep before boot Terminate QuietBoot (optional) Check password (optional) Chapter 4 82h 83h 84h 85h 86h 87h 88h 89h 8Ah 8Bh 8Ch 8Fh 90h 91h 92h.../2 mouse Initialize floppy controller Determine number of day Check key lock Initialize Typematic rate Erase F2 prompt Scan for F2 key stroke Enter SETUP Clear Boot flag Check for errors POST done- prepare to UserPatch2 Build MPTABLE for multi-processor boards Install CD ROM for...
Aspire 5235 / 5535 Service Guide
Page 121
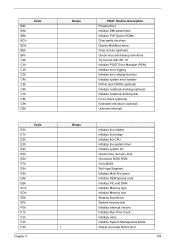
...E8h E9h EAh EBh ECh EDh EEh EFh F0h F1h F2h F3h F4h Chapter 4 Beeps Beeps 1 POST Routine Description Prepare Boot Initialize DMI parameters Initialize PnP Option ROMs Clear parity checkers Display MultiBoot menu Clear screen (optional) Check virus and backup reminders Try ...checksum (optional) Unknown interrupt Initialize the chipset Initialize the bridge Initialize the CPU Initialize the system timer Initialize system I/O Check force recovery boot Checksum BIOS ROM Go to BIOS Set Huge Segment Initialize Multi Processor Initialize OEM special code Initialize PIC and DMA Initialize Memory type ...
...E8h E9h EAh EBh ECh EDh EEh EFh F0h F1h F2h F3h F4h Chapter 4 Beeps Beeps 1 POST Routine Description Prepare Boot Initialize DMI parameters Initialize PnP Option ROMs Clear parity checkers Display MultiBoot menu Clear screen (optional) Check virus and backup reminders Try ...checksum (optional) Unknown interrupt Initialize the chipset Initialize the bridge Initialize the CPU Initialize the system timer Initialize system I/O Check force recovery boot Checksum BIOS ROM Go to BIOS Set Huge Segment Initialize Multi Processor Initialize OEM special code Initialize PIC and DMA Initialize Memory type ...

Aspire 5235 / 5535 Service Guide
Page 122
Code F5h F6h F7h Beeps Boot to Mini DOS Clear Huge Segment Boot to Full DOS 110 Chapter 4
Code F5h F6h F7h Beeps Boot to Mini DOS Clear Huge Segment Boot to Full DOS 110 Chapter 4


