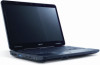
Acer Aspire 5517 Series Service Guide
Page 7
Table of Contents System Specifications 1 Features 1 System Block Diagram 4 Your Acer Notebook tour 5 Front View 5 Closed Front View 6 Rear View 7 Left View 7 Right View 8 Bottom View 8 Indicators 10 TouchPad Basics 11 Using the Keyboard 12 ...Keys 14 Special Key 15 Using the System Utilities 16 Acer GridVista (dual-display compatible 16 Hardware Specifications and Configurations 17 System Utilities 25 BIOS Setup Utility 25 Navigating the BIOS Utility 25 Aspire 5517 BIOS 26 Information 26 Main 27 Security 28 Boot 31 Exit 32 BIOS Flash Utilities 33 DOS Flash Utility...
Table of Contents System Specifications 1 Features 1 System Block Diagram 4 Your Acer Notebook tour 5 Front View 5 Closed Front View 6 Rear View 7 Left View 7 Right View 8 Bottom View 8 Indicators 10 TouchPad Basics 11 Using the Keyboard 12 ...Keys 14 Special Key 15 Using the System Utilities 16 Acer GridVista (dual-display compatible 16 Hardware Specifications and Configurations 17 System Utilities 25 BIOS Setup Utility 25 Navigating the BIOS Utility 25 Aspire 5517 BIOS 26 Information 26 Main 27 Security 28 Boot 31 Exit 32 BIOS Flash Utilities 33 DOS Flash Utility...
Acer Aspire 5517 Series Service Guide
Page 28
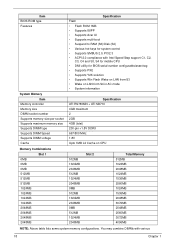
... memory size Supports DIMM type Supports DIMM Speed Supports DIMM voltage Cache Specification Flash • Flash ROM 1MB • Supports ISIPP • Supports Acer UI • Supports multi-boot • Suspend to RAM (S3)/Disk (S4) • Various hot-keys for system control • Supports SMBUS 2.0, PCI2.3 • ACPI 2.0 compliance with various...
... memory size Supports DIMM type Supports DIMM Speed Supports DIMM voltage Cache Specification Flash • Flash ROM 1MB • Supports ISIPP • Supports Acer UI • Supports multi-boot • Suspend to RAM (S3)/Disk (S4) • Various hot-keys for system control • Supports SMBUS 2.0, PCI2.3 • ACPI 2.0 compliance with various...
Acer Aspire 5517 Series Service Guide
Page 35
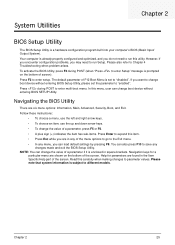
... screen. You can load default settings by pressing F9. Press during POST (when "Press to run Setup. Read this menu, user can change boot device without entering BIOS Setup Utility, please set to the Exit menu. • In any of the screen. Please also refer to enter setup...Setup Utility. However, if you encounter configuration problems, you do not need to different models. In this carefully when making changes to enter multi-boot menu. NOTE: You can change the value of a parameter if it is prompted on the bottom of the menu options to go to "disabled...
... screen. You can load default settings by pressing F9. Press during POST (when "Press to run Setup. Read this menu, user can change boot device without entering BIOS Setup Utility, please set to the Exit menu. • In any of the screen. Please also refer to enter setup...Setup Utility. However, if you encounter configuration problems, you do not need to different models. In this carefully when making changes to enter multi-boot menu. NOTE: You can change the value of a parameter if it is prompted on the bottom of the menu options to go to "disabled...
Acer Aspire 5517 Series Service Guide
Page 36
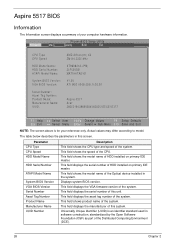
... Boot Exit CPU Type CPU Speed HDD Model Name: HDD Serial Number: ATAPI Model Name: System BIOS Version: VGA BIOS Version: Serial Number: Asset Tag Number: Product Name: Manufacturer Name: UUID: AMD Athlon(tm) X2 ZM-84 2300 Mhz ST960821A-(PM) 3LF005DB MATSHITADVD V1.00 ATI M92 V008.050I.0-26.00 Aspire 5517 Acer... used in the system. This field shows the speed of this unit. This field displays the serial number of the CPU. Displays system BIOS version. Aspire 5517 BIOS Information The Information screen displays a summary of this screen. Actual values may differ according to model.
... Boot Exit CPU Type CPU Speed HDD Model Name: HDD Serial Number: ATAPI Model Name: System BIOS Version: VGA BIOS Version: Serial Number: Asset Tag Number: Product Name: Manufacturer Name: UUID: AMD Athlon(tm) X2 ZM-84 2300 Mhz ST960821A-(PM) 3LF005DB MATSHITADVD V1.00 ATI M92 V008.050I.0-26.00 Aspire 5517 Acer... used in the system. This field shows the speed of this unit. This field displays the serial number of the CPU. Displays system BIOS version. Aspire 5517 BIOS Information The Information screen displays a summary of this screen. Actual values may differ according to model.
Acer Aspire 5517 Series Service Guide
Page 37
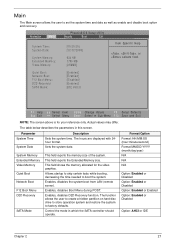
...for the video graphics. This field reports the Extended Memory size. Enables, disables Boot Menu during POST. Parameter System Time System Date System Memory Extended Memory Video Memory Quiet Boot Network Boot F12 Boot Menu D2D Recovery SATA Mode Description Sets the system time. The hours are ... The function allows the user to create a hidden partition on hard disc drive to store operation system and restore the system to boot the system. The table below describes the parameters in which the SATA controller should operate. Control the mode in this screen. Allows...
...for the video graphics. This field reports the Extended Memory size. Enables, disables Boot Menu during POST. Parameter System Time System Date System Memory Extended Memory Video Memory Quiet Boot Network Boot F12 Boot Menu D2D Recovery SATA Mode Description Sets the system time. The hours are ... The function allows the user to create a hidden partition on hard disc drive to store operation system and restore the system to boot the system. The table below describes the parameters in which the SATA controller should operate. Control the mode in this screen. Allows...
Acer Aspire 5517 Series Service Guide
Page 38
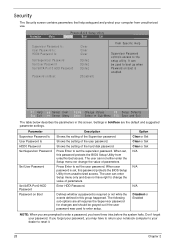
...The user can not either enter the Setup menu nor change the value of parameters. Information M a i n PhoenixBIOS Setup Utility Security Boot Exit Supervisor Password Is: User Password Is: HDD0 Password Is: Set Supervisor Password Set User Password Set SATA Port 0 HDD Password Password on... this group happened. Parameter Supervisor Password Is User Password Is HDD0 Password Set Supervisor Password Set User Password Set SATA Port0 HDD Password Password on boot is enabled. Press Enter to reset it. 28 Chapter 2 Option Clear or Set Clear or Set Clear or Set N/A N/A N/A Disabled or...
...The user can not either enter the Setup menu nor change the value of parameters. Information M a i n PhoenixBIOS Setup Utility Security Boot Exit Supervisor Password Is: User Password Is: HDD0 Password Is: Set Supervisor Password Set User Password Set SATA Port 0 HDD Password Password on... this group happened. Parameter Supervisor Password Is User Password Is HDD0 Password Set Supervisor Password Set User Password Set SATA Port0 HDD Password Password on boot is enabled. Press Enter to reset it. 28 Chapter 2 Option Clear or Set Clear or Set Clear or Set N/A N/A N/A Disabled or...

Acer Aspire 5517 Series Service Guide
Page 39
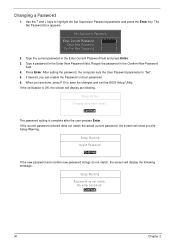
... [ ] 2. If desired, you set the user or the supervisor password: 1. IMPORTANT:Be very careful when typing your password because the characters do not appear on boot parameter. 5. Removing a Password Follow these steps as you can not exceed 8 alphanumeric characters (A-Z, a-z, 0-9, not case sensitive). Press Enter twice without typing anything in the Enter...
... [ ] 2. If desired, you set the user or the supervisor password: 1. IMPORTANT:Be very careful when typing your password because the characters do not appear on boot parameter. 5. Removing a Password Follow these steps as you can not exceed 8 alphanumeric characters (A-Z, a-z, 0-9, not case sensitive). Press Enter twice without typing anything in the Enter...
Acer Aspire 5517 Series Service Guide
Page 40
... the current password entered does not match the actual current password, the screen will display the following . If desired, you can enable the Password on boot parameter. 6.
... the current password entered does not match the actual current password, the screen will display the following . If desired, you can enable the Password on boot parameter. 6.
Acer Aspire 5517 Series Service Guide
Page 41
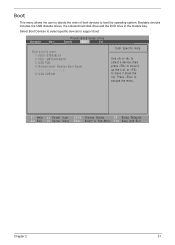
...: xxxx USB 6: USB CDROM: Item Specific Help Use < > or < > to select a device, then press to move it down the list. Boot This menu allows the user to decide the order of boot devices to move it up the List, or to load the operating system. Bootable devices includes the USB diskette drives..., the onboard hard disk drive and the DVD drive in the module bay. Select Boot Devices to select specific devices to escape the menu. Press to support boot. F1 Help Esc Exit Select Item F5/F6 Change Values F9 Setup Defaults Select Menu Enter Select Sub-Menu...
...: xxxx USB 6: USB CDROM: Item Specific Help Use < > or < > to select a device, then press to move it down the list. Boot This menu allows the user to decide the order of boot devices to move it up the List, or to load the operating system. Bootable devices includes the USB diskette drives..., the onboard hard disk drive and the DVD drive in the module bay. Select Boot Devices to select specific devices to escape the menu. Press to support boot. F1 Help Esc Exit Select Item F5/F6 Change Values F9 Setup Defaults Select Menu Enter Select Sub-Menu...
Acer Aspire 5517 Series Service Guide
Page 42
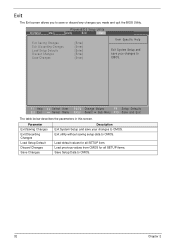
Information M a i n PhoenixBIOS Setup Utility Security Boot Exit Exit Saving Changes Exit Discarding Changes Load Setup Defaults Discard Changes Save Changes [Enter] [Enter] [Enter] [Enter] [Enter] Item Specific Help Exit System Setup ...
Information M a i n PhoenixBIOS Setup Utility Security Boot Exit Exit Saving Changes Exit Discarding Changes Load Setup Defaults Discard Changes Save Changes [Enter] [Enter] [Enter] [Enter] [Enter] Item Specific Help Exit System Setup ...
Acer Aspire 5517 Series Service Guide
Page 43
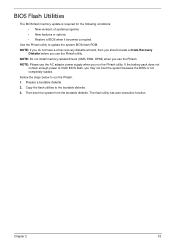
Then boot the system from the bootable diskette. Copy the flash utilities to update the system BIOS flash ROM. Prepare a bootable diskette. 2. Chapter 2 33 The flash utility ... utility. Fellow the steps below to finish BIOS flash, you run the Phlash. 1. NOTE: Please use the AC adaptor power supply when you may not boot the system because the BIOS is required for the following conditions: • New versions of system programs • New features or options • Restore a BIOS...
Then boot the system from the bootable diskette. Copy the flash utilities to update the system BIOS flash ROM. Prepare a bootable diskette. 2. Chapter 2 33 The flash utility ... utility. Fellow the steps below to finish BIOS flash, you run the Phlash. 1. NOTE: Please use the AC adaptor power supply when you may not boot the system because the BIOS is required for the following conditions: • New versions of system programs • New features or options • Restore a BIOS...
Acer Aspire 5517 Series Service Guide
Page 44
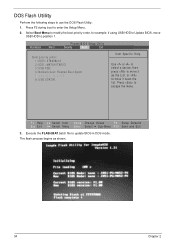
.... Press to enter the Setup Menu. 2. Execute the FLASH.BAT batch file to use the DOS Flash Utility: 1. Select Boot Menu to modify the boot priority order, for example, if using USB HDD to Update BIOS, move it up the List, or to move USB HDD...Values F9 Setup Defaults Select Menu Enter Select Sub-Menu F10 Save and Exit 3. Information M a i n PhoenixBIOS Setup Utility Security Boot Exit Boot priority order: 1: IDE0: ST960821A 2: IDE1: MATSHITADVD 3: USB FDD: 4: Network boot: Realtek Boot Agent 5: USB HDD: xxxx USB 6: USB CDROM: Item Specific Help Use < > or < > to select a device,...
.... Press to enter the Setup Menu. 2. Execute the FLASH.BAT batch file to use the DOS Flash Utility: 1. Select Boot Menu to modify the boot priority order, for example, if using USB HDD to Update BIOS, move it up the List, or to move USB HDD...Values F9 Setup Defaults Select Menu Enter Select Sub-Menu F10 Save and Exit 3. Information M a i n PhoenixBIOS Setup Utility Security Boot Exit Boot priority order: 1: IDE0: ST960821A 2: IDE1: MATSHITADVD 3: USB FDD: 4: Network boot: Realtek Boot Agent 5: USB HDD: xxxx USB 6: USB CDROM: Item Specific Help Use < > or < > to select a device,...
Acer Aspire 5517 Series Service Guide
Page 48
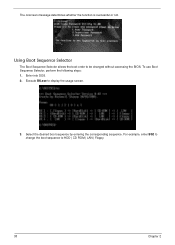
To use Boot Sequence Selector, perform the following steps: 1. Select the desired boot sequence by entering the corresponding sequence. Execute BS.exe to HDD | CD ROM | LAN | Floppy. 38 Chapter 2 The onscreen message determines whether the function is successful or not. For example, enter BS2 to change the boot sequence to display the usage screen. 3. Using Boot Sequence Selector The Boot Sequence Selector allows the boot order to be changed without accessing the BIOS. Enter into DOS. 2.
To use Boot Sequence Selector, perform the following steps: 1. Select the desired boot sequence by entering the corresponding sequence. Execute BS.exe to HDD | CD ROM | LAN | Floppy. 38 Chapter 2 The onscreen message determines whether the function is successful or not. For example, enter BS2 to change the boot sequence to display the usage screen. 3. Using Boot Sequence Selector The Boot Sequence Selector allows the boot order to be changed without accessing the BIOS. Enter into DOS. 2.
Acer Aspire 5517 Series Service Guide
Page 49
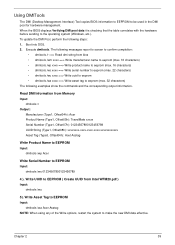
...Boot into DOS. 2. Read DMI Information from Memory Input: dmitools /r Output: Manufacturer (Type1, Offset04h): Acer Product Name (Type1, Offset05h): TravelMate xxxxx Serial Number (Type1, Offset07h): 01234567890123456789 UUID String (Type1, Offset08h): xxxxxxxx-xxxx-xxxx-xxxx-xxxxxxxxxxxx Asset Tag (Type3, Offset04h): Acet Asstag Write Product Name to EEPROM Input: dmitools /wp Acer... before sending to make the new DMI data effective. Write Asset Tag to EEPROM Input: dmitools /wa Acer Asstag NOTE: When using any of the Write options, restart the system to the operating system (Windows,...
...Boot into DOS. 2. Read DMI Information from Memory Input: dmitools /r Output: Manufacturer (Type1, Offset04h): Acer Product Name (Type1, Offset05h): TravelMate xxxxx Serial Number (Type1, Offset07h): 01234567890123456789 UUID String (Type1, Offset08h): xxxxxxxx-xxxx-xxxx-xxxx-xxxxxxxxxxxx Asset Tag (Type3, Offset04h): Acet Asstag Write Product Name to EEPROM Input: dmitools /wp Acer... before sending to make the new DMI data effective. Write Asset Tag to EEPROM Input: dmitools /wa Acer Asstag NOTE: When using any of the Write options, restart the system to the operating system (Windows,...
Acer Aspire 5517 Series Service Guide
Page 132
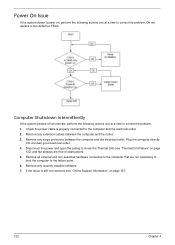
... free of obstructions. 5. Check the power cable is still not resolved, see "Thermal Unit Failure" on page 132) and fan airways are not necessary to boot the computer to the computer and the electrical outlet. 2. Disconnect the power and open the casing to correct the problem. If the Issue is properly...
... free of obstructions. 5. Check the power cable is still not resolved, see "Thermal Unit Failure" on page 132) and fan airways are not necessary to boot the computer to the computer and the electrical outlet. 2. Disconnect the power and open the casing to correct the problem. If the Issue is properly...
Acer Aspire 5517 Series Service Guide
Page 133
Disconnect power and all external devices including port replicators or docking stations. Reseat the memory modules. 7. Reference Product pages for 10 seconds. If the computer boots correctly, add the devices one by pressing Fn+F5. Reconnect the power and reboot the computer. 4. Drain any memory cards and CD/DVD discs. Chapter 4 ...
Disconnect power and all external devices including port replicators or docking stations. Reseat the memory modules. 7. Reference Product pages for 10 seconds. If the computer boots correctly, add the devices one by pressing Fn+F5. Reconnect the power and reboot the computer. 4. Drain any memory cards and CD/DVD discs. Chapter 4 ...

Acer Aspire 5517 Series Service Guide
Page 138
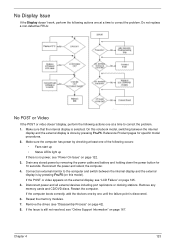
...at a time to locate and resolve issues with the computer. Disconnect all cables and jumpers on the HDD and ODD are set as the first boot device on page 42. 128 Chapter 4 Run the Windows Vista Startup Repair Utility: a. d. Click Next. g. If an issue is set correctly.... time and date. 11. For more information see Windows Help and Support. 10. If the issue is virus free. 3. See "Disassembly Process" on the Boot menu. 6. e. h. c. Select the appropriate operating system, and click Next. Startup Repair attempts to correct the problem. 1. Run a complete virus scan using...
...at a time to locate and resolve issues with the computer. Disconnect all cables and jumpers on the HDD and ODD are set as the first boot device on page 42. 128 Chapter 4 Run the Windows Vista Startup Repair Utility: a. d. Click Next. g. If an issue is set correctly.... time and date. 11. For more information see Windows Help and Support. 10. If the issue is virus free. 3. See "Disassembly Process" on the Boot menu. 6. e. h. c. Select the appropriate operating system, and click Next. Startup Repair attempts to correct the problem. 1. Run a complete virus scan using...
Acer Aspire 5517 Series Service Guide
Page 145
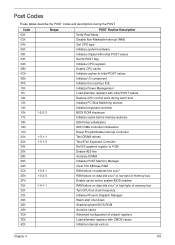
Post Codes These tables describe the POST codes and descriptions during warm boot Initialize PCI Bus Mastering devices Initialize keyboard controller BIOS ROM checksum Initialize cache before memory autosize 8254 timer initialization 8237 DMA controller initialization Reset Programmable ...
Post Codes These tables describe the POST codes and descriptions during warm boot Initialize PCI Bus Mastering devices Initialize keyboard controller BIOS ROM checksum Initialize cache before memory autosize 8254 timer initialization 8237 DMA controller initialization Reset Programmable ...
Acer Aspire 5517 Series Service Guide
Page 147
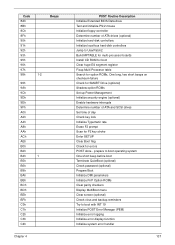
...rate Erase F2 prompt Scan for F2 key stroke Enter SETUP Clear Boot flag Check for errors POST done - prepare to boot operating system One short beep before boot Terminate QuietBoot (optional) Check password (optional) Prepare Boot Initialize DMI parameters Initialize PnP Option ROMs Clear parity checkers Display ... menu Clear screen (optional) Check virus and backup reminders Try to UserPatch2 Build MPTABLE for multi-processor boards Install CD ROM for boot Clear huge ES segment register Fixup Multi Processor table Search for option ROMs. One long, two short beeps on checksum failure Check ...
...rate Erase F2 prompt Scan for F2 key stroke Enter SETUP Clear Boot flag Check for errors POST done - prepare to boot operating system One short beep before boot Terminate QuietBoot (optional) Check password (optional) Prepare Boot Initialize DMI parameters Initialize PnP Option ROMs Clear parity checkers Display ... menu Clear screen (optional) Check virus and backup reminders Try to UserPatch2 Build MPTABLE for multi-processor boards Install CD ROM for boot Clear huge ES segment register Fixup Multi Processor table Search for option ROMs. One long, two short beeps on checksum failure Check ...

Acer Aspire 5517 Series Service Guide
Page 148
...Flash ROM Initialize the chipset E1h Initialize the bridge E2h Initialize the CPU E3h Initialize system timer E4h Initialize system I/O E5h Check force recovery boot E6h Checksum BIOS ROM E7h Go to the port-80 LED display. "2E 1020" means data bits 12 and 5 (bits 12 and... Multi Processor EAh Initialize OEM special code EBh Initialize PIC and DMA ECh Initialize Memory type EDh Initialize Memory size EEh Shadow Boot Block EFh System memory test F0h Initialize interrupt vectors F1h Initialize Run Time Clock F2h Initialize video F3h F4h 1 F5h Initialize ...
...Flash ROM Initialize the chipset E1h Initialize the bridge E2h Initialize the CPU E3h Initialize system timer E4h Initialize system I/O E5h Check force recovery boot E6h Checksum BIOS ROM E7h Go to the port-80 LED display. "2E 1020" means data bits 12 and 5 (bits 12 and... Multi Processor EAh Initialize OEM special code EBh Initialize PIC and DMA ECh Initialize Memory type EDh Initialize Memory size EEh Shadow Boot Block EFh System memory test F0h Initialize interrupt vectors F1h Initialize Run Time Clock F2h Initialize video F3h F4h 1 F5h Initialize ...


