Aspire 5510 Service Guide
Page 6
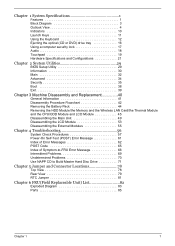
... Audio 18 Touchpad 19 Hardware Specifications and Configurations 21 Chapter 2 System Utilities 29 BIOS Setup Utility 29 Information 30 Main 32 Advanced 34 Security 35 Boot 38 Exit 39 Chapter 3 Machine Disassembly and Replacement 40 General Information 41 Disassembly Procedure Flowchart 42 Removing the Battery Pack 44 Removing the HDD Module...
... Audio 18 Touchpad 19 Hardware Specifications and Configurations 21 Chapter 2 System Utilities 29 BIOS Setup Utility 29 Information 30 Main 32 Advanced 34 Security 35 Boot 38 Exit 39 Chapter 3 Machine Disassembly and Replacement 40 General Information 41 Disassembly Procedure Flowchart 42 Removing the Battery Pack 44 Removing the HDD Module...
Aspire 5510 Service Guide
Page 35
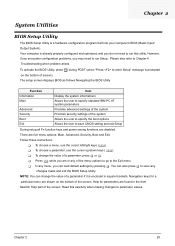
...settings by pressing t. You can change the value of screen). Navigation keys for parameters are five menu options: Main, Advanced, Security, Boot and Exit. However, if you encounter configuration problems, you do not need to run this carefully when making changes to save CMOS setting...values. Chapter 2 29 Read this utility. Your computer is prompted on the bottom of the system Allows the user to specify the boot options Allows the user to specify standard IBM PC AT system parameters Provides advanced settings of the system Provides security settings of the screen....
...settings by pressing t. You can change the value of screen). Navigation keys for parameters are five menu options: Main, Advanced, Security, Boot and Exit. However, if you encounter configuration problems, you do not need to run this carefully when making changes to save CMOS setting...values. Chapter 2 29 Read this utility. Your computer is prompted on the bottom of the system Allows the user to specify the boot options Allows the user to specify standard IBM PC AT system parameters Provides advanced settings of the system Provides security settings of the screen....
Aspire 5510 Service Guide
Page 36
... Boot Exit CPU Type: : CPU Speed: Intel(R) Pentium(R) M processor 1.86GHz 1866 MHz HDD Model Name: ST9100822A HDD Serial Number: 3LG0Y4FE HATAPI Device: Slimtype DVDRW S0SW-833S System BIOS Version: 3A02 VGA BIOS Version: ATi 009.010.002.023 KBC Version: Serial Number: 1A11 LXT123456705270008EF00 Asset Tag Number: Product Name: Aspire 5510 Manufacturer Name: Acer...
... Boot Exit CPU Type: : CPU Speed: Intel(R) Pentium(R) M processor 1.86GHz 1866 MHz HDD Model Name: ST9100822A HDD Serial Number: 3LG0Y4FE HATAPI Device: Slimtype DVDRW S0SW-833S System BIOS Version: 3A02 VGA BIOS Version: ATi 009.010.002.023 KBC Version: Serial Number: 1A11 LXT123456705270008EF00 Asset Tag Number: Product Name: Aspire 5510 Manufacturer Name: Acer...
Aspire 5510 Service Guide
Page 38
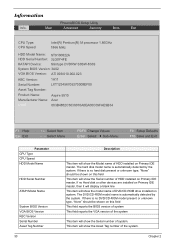
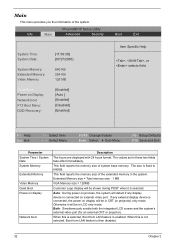
...Enter Select 4 Sub-Menu F9 Setup Defaults F10 Save and Exit Parameter System Time / System Date System Memory Extended Memory Video Memory Quiet Boot Power on Display: Network boot F12 Boot Menu: D2D Recovery: [11:59:38] [07/27/2005] 640 KB 254 KB 128 MB [Enabled] [Auto ] [Enabled] ... you the information of system base memory. Main Advanced Security System Time: System Date: System Memory: Extended Memory: Video Memory Quiet Boot: Power on display Network boot Description The hours are displayed with 24 hours format. Extended Memory size = Total memory size - 1 MB VGA Memory size = ...
...Enter Select 4 Sub-Menu F9 Setup Defaults F10 Save and Exit Parameter System Time / System Date System Memory Extended Memory Video Memory Quiet Boot Power on Display: Network boot F12 Boot Menu: D2D Recovery: [11:59:38] [07/27/2005] 640 KB 254 KB 128 MB [Enabled] [Auto ] [Enabled] ... you the information of system base memory. Main Advanced Security System Time: System Date: System Memory: Extended Memory: Video Memory Quiet Boot: Power on display Network boot Description The hours are displayed with 24 hours format. Extended Memory size = Total memory size - 1 MB VGA Memory size = ...

Aspire 5510 Service Guide
Page 39
When this is not selected, device boot priority will not be adjustable during POST. Parameter F12 Boot Menu D2D Recovery Processor Power Management Description When this is selected, users can modify device boot priority by pressing F12 key during POST. Allow user to enable/disable the Disk-to-Disk recovery Selects the Processor Power Management desired: Disabled= C states and GV1/GV3 are disabled GV1/GV3 only= C states are disabled C States Only= GV1/GV3 are disabled Enabled= C States and GV1/GV3 are enabled Chapter 2 33
When this is not selected, device boot priority will not be adjustable during POST. Parameter F12 Boot Menu D2D Recovery Processor Power Management Description When this is selected, users can modify device boot priority by pressing F12 key during POST. Allow user to enable/disable the Disk-to-Disk recovery Selects the Processor Power Management desired: Disabled= C states and GV1/GV3 are disabled GV1/GV3 only= C states are disabled C States Only= GV1/GV3 are disabled Enabled= C States and GV1/GV3 are enabled Chapter 2 33
Aspire 5510 Service Guide
Page 40
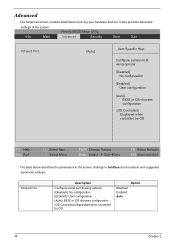
... configuration (OS Controlled) Displayed when controlled by OS Option Disabled Enabled Auto 34 Chapter 2 It also provides advanced settings of the system. Main Advanced Security Boot Exit Infrared Port:: [Auto] Item Specific Help Configure serial port B using options: [Disabled]: No configuration [Enabled]: User configuration [Auto]: BIOS or OS chooses configuration (OS...
... configuration (OS Controlled) Displayed when controlled by OS Option Disabled Enabled Auto 34 Chapter 2 It also provides advanced settings of the system. Main Advanced Security Boot Exit Infrared Port:: [Auto] Item Specific Help Configure serial port B using options: [Disabled]: No configuration [Enabled]: User configuration [Auto]: BIOS or OS chooses configuration (OS...
Aspire 5510 Service Guide
Page 41
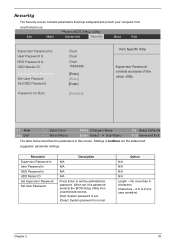
... Supervisor Password Is: User Password Is: HDD Password Is: HDD Master ID: Set Supervisor Password Set User Passord Set HDD Password Password on Boot: Clear Clear Clear 19894480 [Enter] [Enter] [Enter] [Disabled] Item Specific Help Supervisor Password controls accesses of the setup utility. PhoenixBIOS Setup Utility Info. F1 Help &#...
... Supervisor Password Is: User Password Is: HDD Password Is: HDD Master ID: Set Supervisor Password Set User Passord Set HDD Password Password on Boot: Clear Clear Clear 19894480 [Enter] [Enter] [Enter] [Disabled] Item Specific Help Supervisor Password controls accesses of the setup utility. PhoenixBIOS Setup Utility Info. F1 Help &#...
Aspire 5510 Service Guide
Page 42
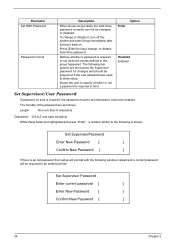
To change , or disable hard drive password. Option Enter Disabled Enabled Set Supervisor/User Password If password on boot is required or not while the events defined in this group happened. Defines whether a password is required, the ...first: Set Supervisor Password Enter current password [ ] Enter New Password [ ] Confirm New Password [ ] 36 Chapter 2 Parameter Set HDD Password Password on boot Description When shown as follows: Length No more than 8 characters Characters 0-9,A-Z (not case sensitive) While these fields are highlighted and press "Enter", a window...
To change , or disable hard drive password. Option Enter Disabled Enabled Set Supervisor/User Password If password on boot is required or not while the events defined in this group happened. Defines whether a password is required, the ...first: Set Supervisor Password Enter current password [ ] Enter New Password [ ] Confirm New Password [ ] 36 Chapter 2 Parameter Set HDD Password Password on boot Description When shown as follows: Length No more than 8 characters Characters 0-9,A-Z (not case sensitive) While these fields are highlighted and press "Enter", a window...
Aspire 5510 Service Guide
Page 44
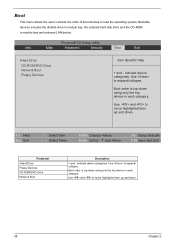
... collapse. Use to expand/collapse. Main Advanced Security Boot Exit +Hard Drive CD-ROM/DVD Drive Network Boot Floppy Devices Item Specific Help + and - Use and to move highlighted item up and down using only the top device in each category. Boot order is top-down . 38 Chapter 2 Use ...and to load the operating system. indicate device categories. Boot order is top-down . Boot This menu allows the user to decide the order of boot devices to move highlighted item up and down using only the top device in module bay and onboard ...
... collapse. Use to expand/collapse. Main Advanced Security Boot Exit +Hard Drive CD-ROM/DVD Drive Network Boot Floppy Devices Item Specific Help + and - Use and to move highlighted item up and down using only the top device in each category. Boot order is top-down . 38 Chapter 2 Use ...and to load the operating system. indicate device categories. Boot order is top-down . Boot This menu allows the user to decide the order of boot devices to move highlighted item up and down using only the top device in module bay and onboard ...
Aspire 5510 Service Guide
Page 45
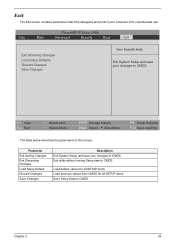
... Exit Discarding Changes Load Setup Default Discard Changes Save Changes Description Exit System Setup and save your changes to CMOS Chapter 2 39 Main Advanced Security Boot Exit Exit Saving Changes Exit Dicarding Changes Load Setup Defaults Discard Changes Save Changes Item Specific Help Exit System Setup and save your computer from...
... Exit Discarding Changes Load Setup Default Discard Changes Save Changes Description Exit System Setup and save your changes to CMOS Chapter 2 39 Main Advanced Security Boot Exit Exit Saving Changes Exit Dicarding Changes Load Setup Defaults Discard Changes Save Changes Item Specific Help Exit System Setup and save your computer from...
Aspire 5510 Service Guide
Page 63
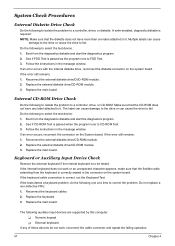
...to CD-ROM Test. 3. The label can cause damage to the drive or can cause damage to the drive or cause the drive to fail. Boot from the diagnostics diskette and start the diagnostics program. 2. If the error still remains: 1. Reconnect the external diskette drive/CD-ROM module. 2. ...-ROM does not have more than one at a time to it . Do the following to isolate the problem to a controller, driver, or diskette. Boot from the diagnostics diskette and start the diagnostics program. 2. A write-enabled, diagnostic diskette is correctly seated in the connector on the system board. System ...
...to CD-ROM Test. 3. The label can cause damage to the drive or can cause damage to the drive or cause the drive to fail. Boot from the diagnostics diskette and start the diagnostics program. 2. If the error still remains: 1. Reconnect the external diskette drive/CD-ROM module. 2. ...-ROM does not have more than one at a time to it . Do the following to isolate the problem to a controller, driver, or diskette. Boot from the diagnostics diskette and start the diagnostics program. 2. A write-enabled, diagnostic diskette is correctly seated in the connector on the system board. System ...
Aspire 5510 Service Guide
Page 64
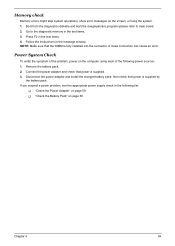
... Memory errors might stop system operations, show error messages on the computer using each of the problem, power on the screen, or hang the system. 1. Boot from the diagnostics diskette and start the doagmpstotics program (please refer to the diagnostic memory in the test items. 4. NOTE: Make sure that the DIMM...
... Memory errors might stop system operations, show error messages on the computer using each of the problem, power on the screen, or hang the system. 1. Boot from the diagnostics diskette and start the doagmpstotics program (please refer to the diagnostic memory in the test items. 4. NOTE: Make sure that the DIMM...
Aspire 5510 Service Guide
Page 69
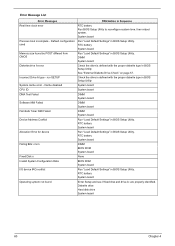
System board Previous boot incomplete - DIMM System board Diskette drive A error Check the drive is defined with the proper diskette type in BIOS Setup Utility. RTC battery System board ...
System board Previous boot incomplete - DIMM System board Diskette drive A error Check the drive is defined with the proper diskette type in BIOS Setup Utility. RTC battery System board ...
Aspire 5510 Service Guide
Page 71
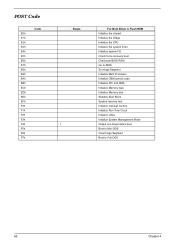
... E3h E4h E5h E6h E7h E8h E9h EAh EBh ECh EDh EEh EFh F0h F1h F2h F3h F4h F5h F6h F7h Beeps 1 For Boot Block in Flash ROM Initialize the chipset Initialize the bridge Initialize the CPU Initialize the system timer Initialize system I/O Check force recovery... boot Checksum BIOS ROM Go to BIOS Set Huge Segment Initialize Multi Processor Initialize OEM special code Initialize PIC and DMA Initialize Memory type Initialize Memory size Shadow Boot Block System memory test Initialize interrupt vectors Initialize Run Time Clock...
... E3h E4h E5h E6h E7h E8h E9h EAh EBh ECh EDh EEh EFh F0h F1h F2h F3h F4h F5h F6h F7h Beeps 1 For Boot Block in Flash ROM Initialize the chipset Initialize the bridge Initialize the CPU Initialize the system timer Initialize system I/O Check force recovery... boot Checksum BIOS ROM Go to BIOS Set Huge Segment Initialize Multi Processor Initialize OEM special code Initialize PIC and DMA Initialize Memory type Initialize Memory size Shadow Boot Block System memory test Initialize interrupt vectors Initialize Run Time Clock...
Aspire 5510 Service Guide
Page 77
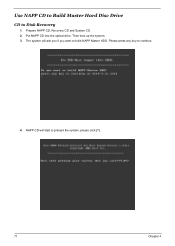
The system will start to build NAPP Master HDD. Please press any key to Disk Recovery 1. Use NAPP CD to Build Master Hard Disc Drive CD to continue. 4. Then boot up the system. 3. NAPP CD will ask you if you want to preload the system, please click [Y]. 71 Chapter 4 Put NAPP CD into the optical drive. Prepare NAPP CD, Recovery CD and System CD. 2.
The system will start to build NAPP Master HDD. Please press any key to Disk Recovery 1. Use NAPP CD to Build Master Hard Disc Drive CD to continue. 4. Then boot up the system. 3. NAPP CD will ask you if you want to preload the system, please click [Y]. 71 Chapter 4 Put NAPP CD into the optical drive. Prepare NAPP CD, Recovery CD and System CD. 2.
Aspire 5510 Service Guide
Page 80
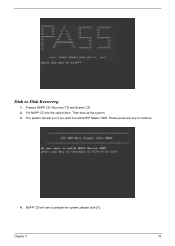
NAPP CD will ask you if you want to Disk Recovery 1. Put NAPP CD into the optical drive. Chapter 4 74 Please press any key to preload the system, please click [Y]. Then boot up the system. 3. The system will start to continue. 4. Disk to build NAPP Master HDD. Prepare NAPP CD, Recovery CD and System CD. 2.
NAPP CD will ask you if you want to Disk Recovery 1. Put NAPP CD into the optical drive. Chapter 4 74 Please press any key to preload the system, please click [Y]. Then boot up the system. 3. The system will start to continue. 4. Disk to build NAPP Master HDD. Prepare NAPP CD, Recovery CD and System CD. 2.
Aspire 5510 User's Guide
Page 9
... 60 Installing memory 61 Connecting your TV and AV-in cables 63 BIOS utility 65 Boot sequence 65 Enable disk-to-disk recovery 65 Password 66 Using software 66 Playing DVD movies 66 Power management 67 Acer eRecovery Management 67 Create backup 68 Restore from backup 68 Create factory default image CD...
... 60 Installing memory 61 Connecting your TV and AV-in cables 63 BIOS utility 65 Boot sequence 65 Enable disk-to-disk recovery 65 Password 66 Using software 66 Playing DVD movies 66 Power management 67 Acer eRecovery Management 67 Create backup 68 Restore from backup 68 Create factory default image CD...

Aspire 5510 User's Guide
Page 16
...match your needs, simply by right-clicking on your PC. Acer eNet Management automatically detects the best settings for power users. • Logs when a hardware component has been removed or replaced. • Permits you boot up your notebook, or start automatically when you to migrate ...personal settings. • Keeps a history log of locations. To access this utility, either click on the "Acer eNet Management" icon on the icon in a variety of...
...match your needs, simply by right-clicking on your PC. Acer eNet Management automatically detects the best settings for power users. • Logs when a hardware component has been removed or replaced. • Permits you boot up your notebook, or start automatically when you to migrate ...personal settings. • Keeps a history log of locations. To access this utility, either click on the "Acer eNet Management" icon on the icon in a variety of...
Aspire 5510 User's Guide
Page 42
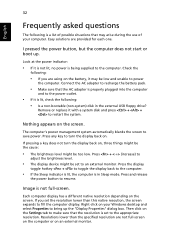
.... Resolutions lower than this native resoution, the screen expands to fill the computer display. I pressed the power button, but the computer does not start or boot up the "Display Properties" dialog box. Look at the power indicator: • If it with a system disk and press + + to restart the system. The computer...
.... Resolutions lower than this native resoution, the screen expands to fill the computer display. I pressed the power button, but the computer does not start or boot up the "Display Properties" dialog box. Look at the power indicator: • If it with a system disk and press + + to restart the system. The computer...
Aspire 5510 User's Guide
Page 44
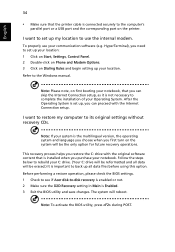
... is Enabled. 3 Exit the BIOS utility and save changes. Before performing a restore operation, please check the BIOS settings. 1 Check to see if Acer disk-to-disk recovery is enabled or not. 2 Make sure the D2D Recovery setting in Main is set up, you can skip the Internet Connection... Settings, Control Panel. 2 Double-click on Phone and Modem Options. 3 Click on the printer. This recovery process helps you first turn on first booting your notebook, that you can proceed with the original software content that the printer cable is important to back up your location. Refer to the...
... is Enabled. 3 Exit the BIOS utility and save changes. Before performing a restore operation, please check the BIOS settings. 1 Check to see if Acer disk-to-disk recovery is enabled or not. 2 Make sure the D2D Recovery setting in Main is set up, you can skip the Internet Connection... Settings, Control Panel. 2 Double-click on Phone and Modem Options. 3 Click on the printer. This recovery process helps you first turn on first booting your notebook, that you can proceed with the original software content that the printer cable is important to back up your location. Refer to the...

