
Aspire 3100 - 5100 - 5110 User's Guide
Page 13
...ExpressCard 67 Installing memory 68 Connecting your TV and AV-in cables 69 Acer Arcade TV set-up wizard (Windows XP Home and Professional) 71 BIOS utility 72 Boot sequence 72 Enable disk-to-disk recovery 72 Password 72 Using software 73 Playing DVD movies 73 Power management ...74 Acer eRecovery Management 74 Create backup 75 Restore from backup 75 Create factory ...
...ExpressCard 67 Installing memory 68 Connecting your TV and AV-in cables 69 Acer Arcade TV set-up wizard (Windows XP Home and Professional) 71 BIOS utility 72 Boot sequence 72 Enable disk-to-disk recovery 72 Password 72 Using software 73 Playing DVD movies 73 Power management ...74 Acer eRecovery Management 74 Create backup 75 Restore from backup 75 Create factory ...
Aspire 3100 - 5100 - 5110 User's Guide
Page 20
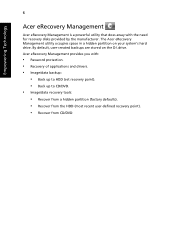
...data backup: • Back up to HDD (set recovery point). • Back up to CD/DVD. • Image/data recovery tools: • Recover from a hidden partition (factory defaults). • Recover from the HDD (most recent user-defined recovery point). • Recover from CD/DVD By ...default, user-created backups are stored on your system's hard drive. Acer eRecovery Management provides you with the need for recovery disks provided by the manufacturer. The Acer eRecovery Management utility occupies space in...
...data backup: • Back up to HDD (set recovery point). • Back up to CD/DVD. • Image/data recovery tools: • Recover from a hidden partition (factory defaults). • Recover from the HDD (most recent user-defined recovery point). • Recover from CD/DVD By ...default, user-created backups are stored on your system's hard drive. Acer eRecovery Management provides you with the need for recovery disks provided by the manufacturer. The Acer eRecovery Management utility occupies space in...
Aspire 3100 - 5100 - 5110 User's Guide
Page 55
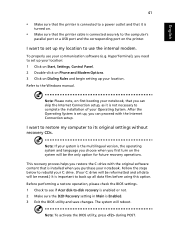
...be reformatted and all data files before using this option. Before performing a restore operation, please check the BIOS settings. 1 Check to see if Acer disk-to the Windows manual. This recovery process helps you first turn on the system will be erased.) It is important to back up , you...rebuild your C: drive. (Your C: drive will be the only option for future recovery operations. Note: To activate the BIOS utility, press during POST. Refer to -disk recovery is enabled or not. 2 Make sure the D2D Recovery setting in Main is Enabled. 3 Exit the BIOS utility and save changes. The ...
...be reformatted and all data files before using this option. Before performing a restore operation, please check the BIOS settings. 1 Check to see if Acer disk-to the Windows manual. This recovery process helps you first turn on the system will be erased.) It is important to back up , you...rebuild your C: drive. (Your C: drive will be the only option for future recovery operations. Note: To activate the BIOS utility, press during POST. Refer to -disk recovery is enabled or not. 2 Make sure the D2D Recovery setting in Main is Enabled. 3 Exit the BIOS utility and save changes. The ...

Aspire 3100 - 5100 - 5110 User's Guide
Page 86
...press during the POST; Boot sequence To set the boot sequence in the BIOS utility, activate the BIOS utility, then select Boot from the categories listed at the top of the screen and use the and keys to -disk recovery (hard disk recovery), activate the BIOS utility, then select ...Main from the categories listed at the bottom of the screen. Enable disk-to-disk recovery To enable disk-to enable this utility. Find Password on boot, activate the BIOS...
...press during the POST; Boot sequence To set the boot sequence in the BIOS utility, activate the BIOS utility, then select Boot from the categories listed at the top of the screen and use the and keys to -disk recovery (hard disk recovery), activate the BIOS utility, then select ...Main from the categories listed at the bottom of the screen. Enable disk-to-disk recovery To enable disk-to enable this utility. Find Password on boot, activate the BIOS...
Aspire 3100 - 5100 - 5110 User's Guide
Page 89
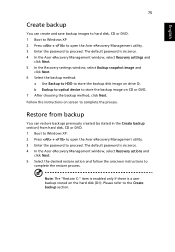
... to complete the process. Note: The "Restore C:" item is enabled only if there is six zeros. 4 In the Acer eRecovery Management window, select Recovery actions and click Next. 5 Select the desired restore action and follow the onscreen instructions to complete the restore process. Follow... hard disk, CD or DVD. 1 Boot to Windows XP 2 Press + to open the Acer eRecovery Management utility. 3 Enter the password to the Create backup section. The default password is six zeros. 4 In the Acer eRecovery Management window, select Recovery settings and click Next. 5 In the Recovery settings window,...
... to complete the process. Note: The "Restore C:" item is enabled only if there is six zeros. 4 In the Acer eRecovery Management window, select Recovery actions and click Next. 5 Select the desired restore action and follow the onscreen instructions to complete the restore process. Follow... hard disk, CD or DVD. 1 Boot to Windows XP 2 Press + to open the Acer eRecovery Management utility. 3 Enter the password to the Create backup section. The default password is six zeros. 4 In the Acer eRecovery Management window, select Recovery settings and click Next. 5 In the Recovery settings window,...
Aspire 3100 - 5100 - 5110 User's Guide
Page 90
... software and may take few seconds to proceed. Note: Select 1. The default password is six zeros. 4 In the Acer eRecovery Management window, select Recovery settings and click Next. 5 In the Recovery settings window, select Burn image to disk and click Next. 6 In the Burn image to browse the contents and install selected drivers and applications, select...
... software and may take few seconds to proceed. Note: Select 1. The default password is six zeros. 4 In the Acer eRecovery Management window, select Recovery settings and click Next. 5 In the Recovery settings window, select Burn image to disk and click Next. 6 In the Burn image to browse the contents and install selected drivers and applications, select...
Aspire 3100 - 5100 - 5110 User's Guide
Page 91
... six zeros. 4 In the Acer eRecovery Management window, select Recovery settings and click Next. 5 In the Recovery settings window, select Password: Change Acer eRecovery Management password and click Next. 6 Follow the instructions on screen to proceed. English 77 Change password Acer eRecovery Management and Acer disk-to-disk recovery are protected by a password that can run Acer disk-to-disk recovery to restore the factory...
... six zeros. 4 In the Acer eRecovery Management window, select Recovery settings and click Next. 5 In the Recovery settings window, select Password: Change Acer eRecovery Management password and click Next. 6 Follow the instructions on screen to proceed. English 77 Change password Acer eRecovery Management and Acer disk-to-disk recovery are protected by a password that can run Acer disk-to-disk recovery to restore the factory...

Aspire 3100 - 5100 - 5110 Service Guide
Page 31
... to HDD (set recovery point) • Backup to CD or DVD. To ensure the best results when recovering the system using a CD or Acer eRecovery Management, detach all peripherals (except external Acer ODD, if equipped), including the Acer ezDock. Acer eRecovery Management Acer eRecovery Management is... recovery tools: • Recovery from a hidden partition (factory defaults) • Recovery from the HDD (most recent user-defined recovery point) • Recovery from CD or DVD NOTE: If the computer did not come with the need for recovery disks provided by the manufacturer. The Acer ...
... to HDD (set recovery point) • Backup to CD or DVD. To ensure the best results when recovering the system using a CD or Acer eRecovery Management, detach all peripherals (except external Acer ODD, if equipped), including the Acer ezDock. Acer eRecovery Management Acer eRecovery Management is... recovery tools: • Recovery from a hidden partition (factory defaults) • Recovery from the HDD (most recent user-defined recovery point) • Recovery from CD or DVD NOTE: If the computer did not come with the need for recovery disks provided by the manufacturer. The Acer ...

User Guide
Page 13
...ExpressCard 69 Installing memory 70 Connecting your TV and AV-in cables 71 Acer Arcade TV set-up wizard (Windows XP Home and Professional) 73 BIOS utility 74 Boot sequence 74 Enable disk-to-disk recovery 74 Password 74 Using software 75 Playing DVD movies 75 Power management ...76 Acer eRecovery Management 76 Create backup 77 Restore from backup 77 Create factory ...
...ExpressCard 69 Installing memory 70 Connecting your TV and AV-in cables 71 Acer Arcade TV set-up wizard (Windows XP Home and Professional) 73 BIOS utility 74 Boot sequence 74 Enable disk-to-disk recovery 74 Password 74 Using software 75 Playing DVD movies 75 Power management ...76 Acer eRecovery Management 76 Create backup 77 Restore from backup 77 Create factory ...

User Guide
Page 20
... Management provides you with the need for recovery disks provided by the manufacturer. Empowering Technology 6 Acer eRecovery Management Acer eRecovery Management is a powerful utility that does away with : • Password protection. • Recovery of applications and drivers. • Image/data backup: • Back up to HDD (set recovery point). • Back up to CD/DVD. • Image...
... Management provides you with the need for recovery disks provided by the manufacturer. Empowering Technology 6 Acer eRecovery Management Acer eRecovery Management is a powerful utility that does away with : • Password protection. • Recovery of applications and drivers. • Image/data backup: • Back up to HDD (set recovery point). • Back up to CD/DVD. • Image...

User Guide
Page 57
...the Internet Connection setup. Refer to -disk recovery is enabled or not. 2 Make sure the D2D Recovery setting in Main is Enabled. 3 Exit the BIOS utility and save changes. Before performing a restore operation, please check the BIOS settings. 1 Check to see if Acer disk-to the Windows manual. To properly ...use the internal modem. I want to restore my computer to set up all data will be the only option for future recovery operations. Note: To activate the BIOS utility...
...the Internet Connection setup. Refer to -disk recovery is enabled or not. 2 Make sure the D2D Recovery setting in Main is Enabled. 3 Exit the BIOS utility and save changes. Before performing a restore operation, please check the BIOS settings. 1 Check to see if Acer disk-to the Windows manual. To properly ...use the internal modem. I want to restore my computer to set up all data will be the only option for future recovery operations. Note: To activate the BIOS utility...

User Guide
Page 88
...a hardware configuration program built into your computer's BIOS. Enable disk-to-disk recovery To enable disk-to-disk recovery (hard disk recovery), activate the BIOS utility, then select Main from the categories listed at the bottom of the screen. Find D2D Recovery at the top of the screen and use the and keys...to run this feature. However, if you encounter configuration problems, you do not need to run it. Boot sequence To set this value to set the boot sequence in the BIOS utility, activate the BIOS utility, then select Boot from the categories listed at the ...
...a hardware configuration program built into your computer's BIOS. Enable disk-to-disk recovery To enable disk-to-disk recovery (hard disk recovery), activate the BIOS utility, then select Main from the categories listed at the bottom of the screen. Find D2D Recovery at the top of the screen and use the and keys...to run this feature. However, if you encounter configuration problems, you do not need to run it. Boot sequence To set this value to set the boot sequence in the BIOS utility, activate the BIOS utility, then select Boot from the categories listed at the ...

User Guide
Page 91
... Management utility. 3 Enter the password to proceed. The default password is six zeros. 4 In the Acer eRecovery Management window, select Recovery settings and click Next. 5 In the Recovery settings window, select Backup snapshot image and click Next. 6 Select the backup method. Restore from hard disk, CD or DVD. 1 Boot to Windows XP. 2 Press + to open the...
... Management utility. 3 Enter the password to proceed. The default password is six zeros. 4 In the Acer eRecovery Management window, select Recovery settings and click Next. 5 In the Recovery settings window, select Backup snapshot image and click Next. 6 Select the backup method. Restore from hard disk, CD or DVD. 1 Boot to Windows XP. 2 Press + to open the...

User Guide
Page 92
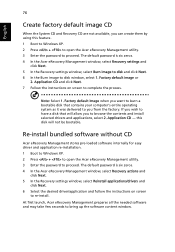
... password to proceed. Application CD - The default password is six zeros. 4 In the Acer eRecovery Management window, select Recovery settings and click Next. 5 In the Recovery settings window, select Burn image to disk and click Next. 6 In the Burn image to have a disk that contains your computer's entire operating system as it was delivered to complete the...
... password to proceed. Application CD - The default password is six zeros. 4 In the Acer eRecovery Management window, select Recovery settings and click Next. 5 In the Recovery settings window, select Burn image to disk and click Next. 6 In the Burn image to have a disk that contains your computer's entire operating system as it was delivered to complete the...

User Guide
Page 93
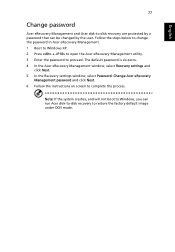
... six zeros. 4 In the Acer eRecovery Management window, select Recovery settings and click Next. 5 In the Recovery settings window, select Password: Change Acer eRecovery Management password and click Next. 6 Follow the instructions on screen to proceed. Note: If the system crashes, and will not boot to Windows, you can run Acer disk-to-disk recovery to -disk recovery are protected by a password...
... six zeros. 4 In the Acer eRecovery Management window, select Recovery settings and click Next. 5 In the Recovery settings window, select Password: Change Acer eRecovery Management password and click Next. 6 Follow the instructions on screen to proceed. Note: If the system crashes, and will not boot to Windows, you can run Acer disk-to-disk recovery to -disk recovery are protected by a password...


