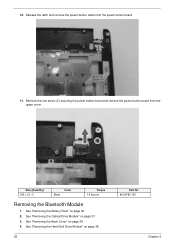
Acer Aspire 4350, 4750, 4750G, 4750Z Service Guide
Page 7
Table of Contents Features 1 System Specifications 1 1 System Block Diagram 4 Your Acer Notebook tour 5 Top view 5 Hotkeys 6 Closed front view 7 Rear view 7 Left view 7 Right view 9 Base view 9 Hardware Specifications and Configurations 11 BIOS Setup Utility 19 ... Keyboard 44 Separating the Upper Case from the Lower Case 45 Removing the Touchpad Boards 47 Removing the Left and Right Speakers 49 Removing the Power Button Board 51 Removing the Bluetooth Module 52 Removing the RTC Battery 53 Removing the USB Board 54 Removing the Main Board 55 Removing the...
Acer Aspire 4350, 4750, 4750G, 4750Z Service Guide
Page 8
... 78 External Diskette Drive Check 78 External Optical Disk Drive Check 78 Keyboard or Auxiliary Input Device Check 78 Memory Check 79 Power System Check 79 Touchpad Check 80 Power-On Self-Test (POST) Error Message 80 Index of Error Messages 81 Phoenix BIOS Beep Codes 85 Index of Symptom-to-FRU... Clearing Password Check 96 BIOS Recovery by Crisis Disk 97 FRU (Field Replaceable Unit) List 99 Exploded Diagram 100 113 Model Definition and Configuration 113 Aspire 4750/4750G Series 114 Test Compatible Components 135 Hardware Device Tests 136 Online Support Information 139 Index 141 VIII
Acer Aspire 4350, 4750, 4750G, 4750Z Service Guide
Page 13
Fully charged: The light shows blue when in AC mode. Your Acer Notebook tour After knowing your computer features, let us show you around your computer. Communication indicator Power indicator Indicates the computer's wireless connectivity device status. Chapter 1 5 Battery indicator Indicates... data into your new computer. Top view 1 8 2 3 4 5 6 # Icon Item 1 Integrated webcam 2 Display screen 3 Power button 7 Description Web camera for video communication (only for certain model). Indicates when the hard disk drive is charging. 2. Indicates the computer...
Acer Aspire 4350, 4750, 4750G, 4750Z Service Guide
Page 14
... the computer's controls like the left and right buttons function like screen brightness and volume output. Turns the internal touchpad on and off to save power. Decreases the sound volume. + + + + Play/Pause Stop Previous Next Play or pause a selected media file. # Icon Item Description 7 Click buttons (left and right) The left...
Acer Aspire 4350, 4750, 4750G, 4750Z Service Guide
Page 15
... Secure Digital (SD), MultiMediaCard (MMC), Memory Stick (MS), Memory Stick PRO (MS PRO), xD-Picture Card (xD). Supports high definition digital video connections. Communication indicator Power indicator Indicates the computer's wireless connectivity device status. Closed front view # Icon 1 2 1 2 Item Multi-in jack Ethernet (RJ-45) port External display (VGA) port HDMI...
Acer Aspire 4350, 4750, 4750G, 4750Z Service Guide
Page 19
... 1.0b/2.0/3.0 compliance, PCI 2.2, System/HDD Password Security Control, INT 13H Extenstions, PnP BIOS 1.0a SMBIOS 2.4, BIOS Boot Specification, Simple Boot Flag 1.0, Boot Block, PCI Bus Power Management Interface Specification, USB Specification 1.1/2.0, IEEE 1394 1.0, USB/1394 CD-ROM Boot Up support, PC Card Standard 1995 (PCMCIA 3.0 Compliant Device), IrDA 1.0, Intel AC97 CNR...
Acer Aspire 4350, 4750, 4750G, 4750Z Service Guide
Page 21
...-8A4SH LF 3. SONY SUPER-MULTI DRIVE DL 8X AD-7585H LF 4. media transfer rate (disk-buffer, Mbytes/s) 875 (Max. 3.0 Gbit/s Buffer-host data transfer) DC Power Requirements Voltage tolerance 5V(DC) +/- 5% Seagate 2.5" ST9320320AS Toshiba 2.5" Mk3255GSX HGST 2.5" HTS545032B9A3 00 WD 2.5" WD3200BEVT22ZCT0 320000 512 3 2 5400 RPM 8MB SATA 875 (Max. 3.0 Gbit/s Buffer-host...
Acer Aspire 4350, 4750, 4750G, 4750Z Service Guide
Page 22
... & Text/Video Video-CD (White Book) - Standard Audio CD & CD-TEXT CD-ROM (Yellow Book Mode1 & 2) - Optical Disc Drive Item Applicable disc format Loading mechanism Power Requirement Input Voltage Specification Applicable disc format CD: CD-DA, CD-ROM, CD-ROM XA, Photo CD (multi-session), Video CD, Cd-Extra (CD+), CD...
Acer Aspire 4350, 4750, 4750G, 4750Z Service Guide
Page 23
... / Quantity Specification Realtek ALC271X_VB3 Built-in Stereo 18 bit stereo full duplex HD audio Interface; Blu-Ray Disc Drive Item Applicable disc format Loading mechanism Power Requirement Input Voltage Specification Applicable disc format CD: CD-DA, CD-ROM, CD-ROM XA, Photo CD (multi-session), Video CD, Cd-Extra (CD+), CD...
Acer Aspire 4350, 4750, 4750G, 4750Z Service Guide
Page 25
Individual devices such as the CPU and hard disc may be power managed in the system are turned off completely. CPU set power down VGA Suspend PCMCIA Suspend Audio Power Down Hard Disk Power Down CD-ROM Power Down Super I/O Low Power mode Also called Hibernation Mode. OS initiated shutdown. System saves all system ...states and data onto the disc prior to Disk (S4) Specification DELTA, LITEON, HIPRO 100-240V~ 1.5A, 50-60Hz/ 19V, 65W/90W, 2-pin Power Management All devices in the system are turned off the whole system. Chapter 1 17 Off (G3) Soft Off (G2/S5) Working (G0/S0) Suspend ...
Acer Aspire 4350, 4750, 4750G, 4750Z Service Guide
Page 38
... crisis recovery action. 30 Chapter 2 NOTE: If you do not have a crisis recovery disk at hand, then you should boot from an off the system power. 4. Rename the BIOS file as "XXXXXXX.FD" 2. cold boot) while holding down the Fn + ESC key. 7. Follow the steps below to run the Flash utility... system BIOS flash ROM. Use the Flash utility to any USB port. 5. NOTE: Please connect the AC adapter power supply when you may not boot the system because the BIOS is not completely loaded. Power on page 97) before you use the Flash utility. If the battery pack does not contain enough...
Acer Aspire 4350, 4750, 4750G, 4750Z Service Guide
Page 42
... with the disassembly procedure, make sure that order. Unplug the AC adapter and all peripherals. 2. Turn off the power to any of the sequence to avoid damage to the system and all power and signal cables from the system. 3. Remove the SD dummy card in the succeeding disassembly sections illustrate the entire...
Acer Aspire 4350, 4750, 4750G, 4750Z Service Guide
Page 43
For example, if you must first remove the keyboard, then disassemble the inside assembly frame in that order. EXTERNAL MODULE DISASSEMBLY TURN OFF POWER AND PERIPHERALS UNPLUG POWER CABLES REMOVE BATTERY PACK SD DUMMY CARD OPTICAL DISK DRIVE Ax1 ODD MODULE Cx1 OPTICAL LOCKER BRACKET Cx1 HDD MODULE Ax3 BACK COVER DIMM MODULES...
Acer Aspire 4350, 4750, 4750G, 4750Z Service Guide
Page 54
Disconnect the touchpad cable from TPAD1 and power button cable from the bottom panel. 9 10 11 12 1 8 42 7 6 5 3 Size (Quantity) M2.5 x L6 (1~9) M2 x L3 (10~12) Black Black Color Torque 3.0 kgf-cm 1.6 kgf-cm Part No. 86.00E12.536 86.00F80.723 9. See "Removing the Keyboard" on page 44. 8. Remove the twelve screws (9 x A, 3 x C) from PWRCN1. 46 Chapter 3 7.
Acer Aspire 4350, 4750, 4750G, 4750Z Service Guide
Page 57
See "Removing the Hard Disk Drive Module" on page 38. 4. Chapter 3 49 See "Removing the Back Cover" on page 39. 5. See "Removing the DIMM Module" on page 44. 8. See "Removing the Keyboard" on page 42. 7. Removing the Left and Right Speakers 1. See "Removing the Optical Drive Module" on page 40. 6. See "Removing the Wireless LAN Card" on page 37. 3. Disconnect the speaker cable from the Lower Case" on page 36. 2. See "Separating the Upper Case from the power button board. See "Removing the Battery Pack" on page 45. 9.
Acer Aspire 4350, 4750, 4750G, 4750Z Service Guide
Page 59
... Wireless LAN Card" on page 44. 8. See "Removing the Keyboard" on page 40. 6. See "Removing the Left and Right Speakers" on page 49. Removing the Power Button Board 1. Chapter 3 51
Acer Aspire 4350, 4750, 4750G, 4750Z Service Guide
Page 60
See "Removing the Back Cover" on page 36. 2. 10. See "Removing the Battery Pack" on page 38. 4. See "Removing the Optical Drive Module" on page 39. 52 Part No. 86.00F80.723 Chapter 3 See "Removing the Hard Disk Drive Module" on page 37. 3. Size (Quantity) M2 x L3 (1) Color Black Torque 1.6 kgf-cm Removing the Bluetooth Module 1. Remove the one screw (C) securing the power button board and remove the power button board from the power button board. 11. Release the latch and remove the power button cable from the upper cover.
Acer Aspire 4350, 4750, 4750G, 4750Z Service Guide
Page 85
...to re-create the failure by running the diagnostic test or by attempting to test only Acer products. Use the following procedure as possible. 2. Use the customer-reported symptoms and go to "Power-On Self-Test (POST) Error Message" on page 80 "Intermittent Problems" on page... 92 "Undetermined Problems" on page 79. Non-Acer products, prototype cards, or modified options can give false errors and invalid system...
Acer Aspire 4350, 4750, 4750G, 4750Z Service Guide
Page 87
...Make sure that the DIMM is supplied. 3. See the following figure Pin 1: +19 to the diagnostic memory in the following list: • "Check the Power Adapter" on page 79 • "Check the Battery Pack" on the computer using each of the following : • Replace the System board. •... Pack" on indicator does not light up, check the power cord of the power adapter for correct continuity and installation. 4. Power System Check To verify the symptom of the problem, power on page 80 Check the Power Adapter Unplug the power adapter cable from the computer and measure the output voltage ...
Acer Aspire 4350, 4750, 4750G, 4750Z Service Guide
Page 88
... you use a discharged battery pack or a battery pack that if the parameters shown in a short period of the total power remaining when installed in the computer. Power off the computer. 2. If the voltage is not listed, see "Undetermined Problems" on the screen for a short time....Remove the battery pack and measure the voltage between battery terminals 1(+) and 6(ground). 3. Repeat the steps 1 and 2, for Current Power Source and Total Battery Power Remaining are correct. 3. To check the battery charge operation, use the touchpad, the pointer drifts on page 92. The following actions...