

User Manual
Page 5
Replace the battery with the same type as opening or removing covers may explode if not handled properly. Refer all servicing to service this product yourself, as that which came bundled with the supplied power supply cord set , make sure that the new power cord meets the following the operating instructions Note: Adjust only those controls that may interfere with the performance of this product. • Use the product...
Replace the battery with the same type as opening or removing covers may explode if not handled properly. Refer all servicing to service this product yourself, as that which came bundled with the supplied power supply cord set , make sure that the new power cord meets the following the operating instructions Note: Adjust only those controls that may interfere with the performance of this product. • Use the product...
User Manual
Page 12
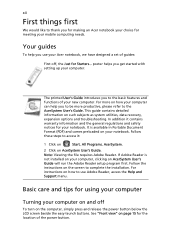
... for using your computer Turning your computer on and off , the Just for the location of the power button. For more productive, please refer to the AcerSystem User's Guide. It is not installed on your computer, clicking on such subjects as system utilities, data recovery, expansion options and troubleshooting. See "Front view" on your notebook. If Adobe Reader is available in Portable Document Format (PDF) and...
... for using your computer Turning your computer on and off , the Just for the location of the power button. For more productive, please refer to the AcerSystem User's Guide. It is not installed on your computer, clicking on such subjects as system utilities, data recovery, expansion options and troubleshooting. See "Front view" on your notebook. If Adobe Reader is available in Portable Document Format (PDF) and...

User Manual
Page 16
... keys 32 Ejecting the optical (CD or DVD) drive tray 33 Using a computer security lock 33 Audio 34 Adjusting the volume 34 Using Dolby Home Theater for surround/multi-channel sound 35 Set playback as digital output 35 Using the system utilities 37 Acer GridVista (dual-display compatible) 37 Launch Manager 38 Frequently asked questions 40 Requesting service 43 International Travelers Warranty (ITW) 43 Before you call 43 Battery...
... keys 32 Ejecting the optical (CD or DVD) drive tray 33 Using a computer security lock 33 Audio 34 Adjusting the volume 34 Using Dolby Home Theater for surround/multi-channel sound 35 Set playback as digital output 35 Using the system utilities 37 Acer GridVista (dual-display compatible) 37 Launch Manager 38 Frequently asked questions 40 Requesting service 43 International Travelers Warranty (ITW) 43 Before you call 43 Battery...

User Manual
Page 17
... 67 Traveling internationally with the computer 67 Preparing the computer 67 What to bring with you 67 Special considerations 67 Securing your computer 68 Using a computer security lock 68 Using passwords 68 Entering passwords 69 Setting passwords 69 Expanding through options 70 Connectivity options 70 Fax/data modem 70 Built-in network feature 71 Universal Serial Bus (USB) 71 IEEE 1394 port 72 ExpressCard 73 Installing memory 74
... 67 Traveling internationally with the computer 67 Preparing the computer 67 What to bring with you 67 Special considerations 67 Securing your computer 68 Using a computer security lock 68 Using passwords 68 Entering passwords 69 Setting passwords 69 Expanding through options 70 Connectivity options 70 Fax/data modem 70 Built-in network feature 71 Universal Serial Bus (USB) 71 IEEE 1394 port 72 ExpressCard 73 Installing memory 74
User Manual
Page 19
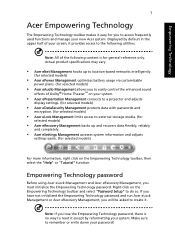
... Technology password Before using Acer eLock Management and Acer eRecovery Management, you to easily control the enhanced sound effects of Dolby® Home Theater™ on your system. • Acer ePresentation Management connects to a projector and adjusts display settings. (for selected models) • Acer eDataSecurity Management protects data with passwords and encryption. (for selected models) • Acer eLock Management limits access to external storage media. (for selected models) • Acer eRecovery Management backs up to location-based networks intelligently...
... Technology password Before using Acer eLock Management and Acer eRecovery Management, you to easily control the enhanced sound effects of Dolby® Home Theater™ on your system. • Acer ePresentation Management connects to a projector and adjusts display settings. (for selected models) • Acer eDataSecurity Management protects data with passwords and encryption. (for selected models) • Acer eLock Management limits access to external storage media. (for selected models) • Acer eRecovery Management backs up to location-based networks intelligently...

User Manual
Page 22
..., change the display and sleep settings you want your computer to use. 5 Click "OK" to adjust system settings like LCD brightness and CPU speed. Note: You cannot delete the predefined power plans. Using power plans Acer ePower Management comes with three predefined power plans: Balanced, High performance and Power saver. View and adjust settings for configuring your new power plan. To create a new power plan: Creating customized power plans allows you to save and quickly switch to a personalized set of power options...
..., change the display and sleep settings you want your computer to use. 5 Click "OK" to adjust system settings like LCD brightness and CPU speed. Note: You cannot delete the predefined power plans. Using power plans Acer ePower Management comes with three predefined power plans: Balanced, High performance and Power saver. View and adjust settings for configuring your new power plan. To create a new power plan: Creating customized power plans allows you to save and quickly switch to a personalized set of power options...
User Manual
Page 25
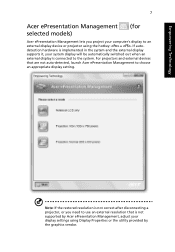
...'s display to an external display device or projector using Display Properties or the utility provided by Acer ePresentation Management, adjust your system display will be automatically switched out when an external display is not supported by the graphics vendor. If autodetection hardware is implemented in the system and the external display supports it, your display settings using the hotkey: + . For projectors and external devices that is connected to the system. Empowering Technology 7 Acer ePresentation Management (for selected models) Acer ePresentation Management...
...'s display to an external display device or projector using Display Properties or the utility provided by Acer ePresentation Management, adjust your system display will be automatically switched out when an external display is not supported by the graphics vendor. If autodetection hardware is implemented in the system and the external display supports it, your display settings using the hotkey: + . For projectors and external devices that is connected to the system. Empowering Technology 7 Acer ePresentation Management (for selected models) Acer ePresentation Management...
User Manual
Page 27
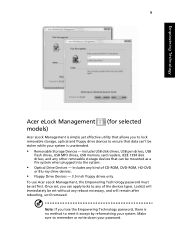
... Acer eLock Management is unattended. • Removable Storage Devices - includes USB disk drives, USB pen drives, USB flash drives, USB MP3 drives, USB memory card readers, IEEE 1394 disk drives, and any reboot necessary, and will immediately be mounted as a file system when plugged into the system. • Optical Drive Devices - Once set, you to lock removable storage, optical and floppy drive devices to ensure that allows you can 't be set without any other removable storage devices that can be set first. Make...
... Acer eLock Management is unattended. • Removable Storage Devices - includes USB disk drives, USB pen drives, USB flash drives, USB MP3 drives, USB memory card readers, IEEE 1394 disk drives, and any reboot necessary, and will immediately be mounted as a file system when plugged into the system. • Optical Drive Devices - Once set, you to lock removable storage, optical and floppy drive devices to ensure that allows you can 't be set without any other removable storage devices that can be set first. Make...

User Manual
Page 32
... you change locations, networks or activities. Settings include display brightness, power plan, volume, wireless networking on or off , external display settings, display orientation and synchronization status. Empowering Technology 14 Windows Mobility Center The Windows Mobility Center collects key mobile-related system settings in the Start menu Windows Mobility Center also includes Acer-specific settings like Bluetooth Add Device (if applicable), sharing folders overview/sharing service on /off , and a shortcut to fit the situation as you can quickly configure your Acer system...
... you change locations, networks or activities. Settings include display brightness, power plan, volume, wireless networking on or off , external display settings, display orientation and synchronization status. Empowering Technology 14 Windows Mobility Center The Windows Mobility Center collects key mobile-related system settings in the Start menu Windows Mobility Center also includes Acer-specific settings like Bluetooth Add Device (if applicable), sharing folders overview/sharing service on /off , and a shortcut to fit the situation as you can quickly configure your Acer system...
User Manual
Page 36
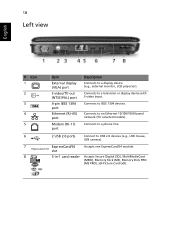
... port Ethernet (RJ-45) port Modem (RJ-11) port Description Connects to an Ethernet 10/100/1000-based network (for selected models). Connects to a display device (e.g., external monitor, LCD projector). Accepts Secure Digital (SD), MultiMediaCard (MMC), Memory Stick (MS), Memory Stick PRO (MS PRO), xD-Picture Card (xD). Connects to a phone line. 2 USB 2.0 ports Connect to IEEE 1394 devices. ExpressCard/54 slot 5-in-1 card reader Accepts one ExpressCard/54 module. Connects to USB 2.0 devices (e.g., USB mouse, USB camera). Connects to a television or display device with S-video...
... port Ethernet (RJ-45) port Modem (RJ-11) port Description Connects to an Ethernet 10/100/1000-based network (for selected models). Connects to a display device (e.g., external monitor, LCD projector). Accepts Secure Digital (SD), MultiMediaCard (MMC), Memory Stick (MS), Memory Stick PRO (MS PRO), xD-Picture Card (xD). Connects to a phone line. 2 USB 2.0 ports Connect to IEEE 1394 devices. ExpressCard/54 slot 5-in-1 card reader Accepts one ExpressCard/54 module. Connects to USB 2.0 devices (e.g., USB mouse, USB camera). Connects to a television or display device with S-video...
User Manual
Page 37
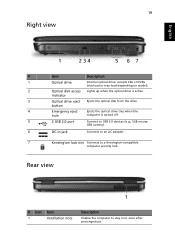
... # Icon Item 1 Ventilation slots Description Enable the computer to a Kensington-compatible computer security lock. accepts CDs or DVDs (slot-load or tray-load depending on model). 2 Optical disk access Lights up when the optical drive is turned off. 5 2 USB 2.0 port Connect to USB 2.0 devices (e.g., USB mouse, USB camera). 6 DC-in jack Connects to an AC adapter. 7 Kensington lock slot Connects to stay cool, even after prolonged use. indicator 3 Optical drive eject Ejects the optical disk from the drive. button 4 Emergency eject Ejects...
... # Icon Item 1 Ventilation slots Description Enable the computer to a Kensington-compatible computer security lock. accepts CDs or DVDs (slot-load or tray-load depending on model). 2 Optical disk access Lights up when the optical drive is turned off. 5 2 USB 2.0 port Connect to USB 2.0 devices (e.g., USB mouse, USB camera). 6 DC-in jack Connects to an AC adapter. 7 Kensington lock slot Connects to stay cool, even after prolonged use. indicator 3 Optical drive eject Ejects the optical disk from the drive. button 4 Emergency eject Ejects...
User Manual
Page 38
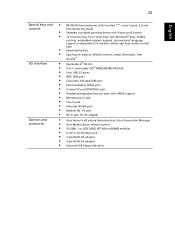
20 Base view English # Icon Item 1 Battery bay Description Houses the computer's battery pack. 2 Battery lock Locks the battery in position. 3 Hard disk bay Houses the computer's hard disk (secured with screws). 4 Memory compartment Houses the computer's main memory. 5 Battery release latch Releases the battery for removal. 6 Ventilation slots and Enable the computer to stay cool, even after cooling fan prolonged use. Note: Do not cover or obstruct the opening of the fan.
20 Base view English # Icon Item 1 Battery bay Description Houses the computer's battery pack. 2 Battery lock Locks the battery in position. 3 Hard disk bay Houses the computer's hard disk (secured with screws). 4 Memory compartment Houses the computer's main memory. 5 Battery release latch Releases the battery for removal. 6 Ventilation slots and Enable the computer to stay cool, even after cooling fan prolonged use. Note: Do not cover or obstruct the opening of the fan.
User Manual
Page 41
... device with 4-way scroll button • 12 function keys, four cursor keys, two Windows® keys, hotkey controls, embedded numeric keypad, international language support, independent US and Euro dollar sign keys, media control keys • Empowering Key • Easy-launch buttons: WLAN, Internet, email, Bluetooth, Acer Arcade™ I/O interface • ExpressCard™/54 slot • 5-in-1 card reader (SD™/MMC/MS/MS PRO/xD) • Four USB 2.0 ports • IEEE 1394 port • Consumer infrared (CIR) port • External display...
... device with 4-way scroll button • 12 function keys, four cursor keys, two Windows® keys, hotkey controls, embedded numeric keypad, international language support, independent US and Euro dollar sign keys, media control keys • Empowering Key • Easy-launch buttons: WLAN, Internet, email, Bluetooth, Acer Arcade™ I/O interface • ExpressCard™/54 slot • 5-in-1 card reader (SD™/MMC/MS/MS PRO/xD) • Four USB 2.0 ports • IEEE 1394 port • Consumer infrared (CIR) port • External display...
User Manual
Page 47
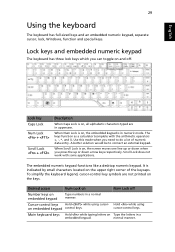
... , the screen moves one line up or down arrow keys respectively. normal manner. When Scroll Lock is on the keys. Scroll Lock does not work with the arithmetic operators +, -, *, and /). Desired access Num Lock on Num Lock off . Main keyboard keys Hold while typing letters on embedded keypad Type numbers in numeric mode. The embedded numeric keypad functions like a desktop numeric keypad. It is indicated by small characters located on , the...
... , the screen moves one line up or down arrow keys respectively. normal manner. When Scroll Lock is on the keys. Scroll Lock does not work with the arithmetic operators +, -, *, and /). Desired access Num Lock on Num Lock off . Main keyboard keys Hold while typing letters on embedded keypad Type numbers in numeric mode. The embedded numeric keypad functions like a desktop numeric keypad. It is indicated by small characters located on , the...
User Manual
Page 49
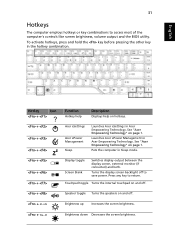
... the screen brightness. Touchpad toggle Turns the internal touchpad on and off to save power. English 31 Hotkeys The computer employs hotkeys or key combinations to return. Speaker toggle Turns the speakers on page 1. Press any key to access most of the computer's controls like screen brightness, volume output and the BIOS utility. Puts the computer in Acer Empowering Technology. Launches Acer ePower Management in Sleep mode. + + + + Display toggle Screen blank Switches display output between the display screen, external monitor (if connected) and...
... the screen brightness. Touchpad toggle Turns the internal touchpad on and off to save power. English 31 Hotkeys The computer employs hotkeys or key combinations to return. Speaker toggle Turns the speakers on page 1. Press any key to access most of the computer's controls like screen brightness, volume output and the BIOS utility. Puts the computer in Acer Empowering Technology. Launches Acer ePower Management in Sleep mode. + + + + Display toggle Screen blank Switches display output between the display screen, external monitor (if connected) and...
User Manual
Page 58
.... Look at the volume control (speaker) icon on the battery, it is crossed-out, click on the screen. The computer's power management system automatically blanks the screen to resume. If pressing a key does not turn the display back on the taskbar. No audio is in the external USB floppy drive? Check the following is being supplied to the computer. • If the Sleep indicator is lit...
.... Look at the volume control (speaker) icon on the battery, it is crossed-out, click on the screen. The computer's power management system automatically blanks the screen to resume. If pressing a key does not turn the display back on the taskbar. No audio is in the external USB floppy drive? Check the following is being supplied to the computer. • If the Sleep indicator is lit...
User Manual
Page 75
... programs by using the onscreen controller or the remote control. Guide settings Click on your region. You can be activated by channel number or category. Using TeleText functions For regions with the TeleText service, TeleText can also enable and disable the time-shift function. Your computer will differ depending on EPG Source to select the source for any recorded TV. Click Restore Default Settings to return...
... programs by using the onscreen controller or the remote control. Guide settings Click on your region. You can be activated by channel number or category. Using TeleText functions For regions with the TeleText service, TeleText can also enable and disable the time-shift function. Your computer will differ depending on EPG Source to select the source for any recorded TV. Click Restore Default Settings to return...

User Manual
Page 82
... computer. English 64 Taking your notebook PC with your computer. To bring the computer out of Sleep mode, open files. 2 Remove any media, floppy disks or compact disks from the drive(s). 3 Shut down the computer: Click on Start, Turn Off Computer, then click on Turn Off (Windows XP). You can put the computer in Sleep mode. Or: You can now safely take the computer anywhere you...
... computer. English 64 Taking your notebook PC with your computer. To bring the computer out of Sleep mode, open files. 2 Remove any media, floppy disks or compact disks from the drive(s). 3 Shut down the computer: Click on Start, Turn Off Computer, then click on Turn Off (Windows XP). You can put the computer in Sleep mode. Or: You can now safely take the computer anywhere you...

User Manual
Page 93
... BIOS utility The BIOS utility is being displayed. Enable disk-to-disk recovery To enable disk-to-disk recovery (hard disk recovery), activate the BIOS utility, then select Main from the categories listed at the top of the screen. while the notebook PC logo is a hardware configuration program built into your computer's BIOS. Find Password on boot, activate the BIOS utility, then select Security from the categories listed at the top of the screen. To activate the BIOS utility, press during the POST; Boot sequence To set...
... BIOS utility The BIOS utility is being displayed. Enable disk-to-disk recovery To enable disk-to-disk recovery (hard disk recovery), activate the BIOS utility, then select Main from the categories listed at the top of the screen. while the notebook PC logo is a hardware configuration program built into your computer's BIOS. Find Password on boot, activate the BIOS utility, then select Security from the categories listed at the top of the screen. To activate the BIOS utility, press during the POST; Boot sequence To set...
User Manual
Page 97
... a factory default image, recover from the Empowering Technology toolbar to start Acer eRecovery Management. 2 Switch to the restore and recovery page by selecting the Burn Disc button. 3 Select the type of Acer eRecovery Management, you can burn the factory default image, a user backup image, the current system configuration, or an application backup image to CD or DVD. 1 Press + or select Acer eRecovery Management from a previously created CD/DVD or reinstall applications and drivers. 4 Follow the instructions on screen...
... a factory default image, recover from the Empowering Technology toolbar to start Acer eRecovery Management. 2 Switch to the restore and recovery page by selecting the Burn Disc button. 3 Select the type of Acer eRecovery Management, you can burn the factory default image, a user backup image, the current system configuration, or an application backup image to CD or DVD. 1 Press + or select Acer eRecovery Management from a previously created CD/DVD or reinstall applications and drivers. 4 Follow the instructions on screen...


