

Aspire 4560 Service Guide
Page 5
... 1-14 Right View 1-15 Base View 1-16 Indicators 1-17 Touchpad Basics 1-18 Keyboard 1-18 Hotkeys 1-21 Special Keys 1-22 Specification Tables 1-25 CHAPTER 2 System Utilities BIOS Setup Utility 2-3 Navigating the BIOS Utility 2-3 BIOS Menus 2-4 BIOS Flash Utilities 2-11 v
... 1-14 Right View 1-15 Base View 1-16 Indicators 1-17 Touchpad Basics 1-18 Keyboard 1-18 Hotkeys 1-21 Special Keys 1-22 Specification Tables 1-25 CHAPTER 2 System Utilities BIOS Setup Utility 2-3 Navigating the BIOS Utility 2-3 BIOS Menus 2-4 BIOS Flash Utilities 2-11 v

Aspire 4560 Service Guide
Page 6
DOS Flash Utility 2-12 WinFlash Utility 2-12 Remove HDD/BIOS Password Utilities 2-13 Removing the HDD Password 2-13 Removing the BIOS Passwords 2-14 Clearing the BIOS Passwords 2-15 Using DMI Tools 2-16 LAN EEPROM Utility 2-16 CHAPTER 3 Machine Maintenance Machine Disassembly and Replacement 3-5 Recommended Equipment 3-5 Replacement Requirements 3-5 Pre-disassembly Instructions 3-6 Disassembly ...
DOS Flash Utility 2-12 WinFlash Utility 2-12 Remove HDD/BIOS Password Utilities 2-13 Removing the HDD Password 2-13 Removing the BIOS Passwords 2-14 Clearing the BIOS Passwords 2-15 Using DMI Tools 2-16 LAN EEPROM Utility 2-16 CHAPTER 3 Machine Maintenance Machine Disassembly and Replacement 3-5 Recommended Equipment 3-5 Replacement Requirements 3-5 Pre-disassembly Instructions 3-6 Disassembly ...

Aspire 4560 Service Guide
Page 8
... Intermittent Problems 4-19 Undetermined Problems 4-19 Error Codes 4-20 BIOS Beep Codes 4-21 POST Codes 4-26 Component Codes 4-26 Progress Codes 4-30 CHAPTER 5 Jumper and Connector Locations Mainboard Layout 5-3 Clearing Password Check and BIOS Recovery 5-5 Clearing the BIOS Passwords 5-5 Performing a BIOS Recovery 5-6 CHAPTER 6 FRU List Aspire 4560/4560G Exploded Diagram 6-4 Main Assembly 6-4 LCD Assembly 6-6 FRU List...
... Intermittent Problems 4-19 Undetermined Problems 4-19 Error Codes 4-20 BIOS Beep Codes 4-21 POST Codes 4-26 Component Codes 4-26 Progress Codes 4-30 CHAPTER 5 Jumper and Connector Locations Mainboard Layout 5-3 Clearing Password Check and BIOS Recovery 5-5 Clearing the BIOS Passwords 5-5 Performing a BIOS Recovery 5-6 CHAPTER 6 FRU List Aspire 4560/4560G Exploded Diagram 6-4 Main Assembly 6-4 LCD Assembly 6-6 FRU List...

Aspire 4560 Service Guide
Page 12
... Keys 1-22 Specification Tables 1-25 Computer Specifications 1-25 Processor 1-26 Processor Specifications 1-27 System Memory 1-27 Graphics Controller 1-28 VRAM (Discrete models only 1-28 System BIOS 1-29 Keyboard 1-29 Hard Disk Drive 1-30 Super-Multi Drive 1-31 1-2
... Keys 1-22 Specification Tables 1-25 Computer Specifications 1-25 Processor 1-26 Processor Specifications 1-27 System Memory 1-27 Graphics Controller 1-28 VRAM (Discrete models only 1-28 System BIOS 1-29 Keyboard 1-29 Hard Disk Drive 1-30 Super-Multi Drive 1-31 1-2

Aspire 4560 Service Guide
Page 17
...640×480 resolution online video calls Wireless and networking 0 WLAN: IEEE 802.11b/g/n Supports Acer SignalUp technology WPAN: Bluetooth® 3.0 + HS LAN: Gigabit Ethernet, Wake...-on-LAN ready Broadcom NetLink® BCM57785 controller Privacy Control 0 BIOS supervisor, user, and HDD passwords Kensington lock slot Power Adapter and Battery 0 19 V 3-pin AC adapter; ...
...640×480 resolution online video calls Wireless and networking 0 WLAN: IEEE 802.11b/g/n Supports Acer SignalUp technology WPAN: Bluetooth® 3.0 + HS LAN: Gigabit Ethernet, Wake...-on-LAN ready Broadcom NetLink® BCM57785 controller Privacy Control 0 BIOS supervisor, user, and HDD passwords Kensington lock slot Power Adapter and Battery 0 19 V 3-pin AC adapter; ...

Aspire 4560 Service Guide
Page 33
... to Enabled. 5. Press F10 to enter the system recovery partition. Restart the computer. 2. During POST, press Alt+F10 to save settings and close the BIOS Setup screen. 6. Follow the onscreen instructions to return your computer to troubleshoot your computer. 1. Hardware Specifications and Configurations 1-23 D2D Recovery 0 The...
... to Enabled. 5. Press F10 to enter the system recovery partition. Restart the computer. 2. During POST, press Alt+F10 to save settings and close the BIOS Setup screen. 6. Follow the onscreen instructions to return your computer to troubleshoot your computer. 1. Hardware Specifications and Configurations 1-23 D2D Recovery 0 The...

Aspire 4560 Service Guide
Page 39
... size Protocols supported Specification Phoenix v1.07 Hardware 4 MB Legacy BIOS and EFI architectures ACPI 3.0b compliance PXE specification v2.1 SMBIOS reference specification v2.5 or later USB ... Specifications and Configurations 1-29 and 3.0 ASF specification v2.0 or later PCI Express base specification revision 2.1 PCI BIOS specification revision 2.1 BIOS Boot specification v1.01 Simple boot flag specification v2.1 System management bus specification v2.0 AHCI support ...
... size Protocols supported Specification Phoenix v1.07 Hardware 4 MB Legacy BIOS and EFI architectures ACPI 3.0b compliance PXE specification v2.1 SMBIOS reference specification v2.5 or later USB ... Specifications and Configurations 1-29 and 3.0 ASF specification v2.0 or later PCI Express base specification revision 2.1 PCI BIOS specification revision 2.1 BIOS Boot specification v1.01 Simple boot flag specification v2.1 System management bus specification v2.0 AHCI support ...

Aspire 4560 Service Guide
Page 52
BIOS Setup Utility 2-3 Navigating the BIOS Utility 2-3 BIOS Flash Utilities 2-11 WinFlash Utility 2-12 Remove HDD/BIOS Password Utilities 2-13 Removing the HDD Password 2-13 Removing the BIOS Passwords 2-14 Clearing the BIOS Passwords 2-15 Using DMI Tools 2-16 LAN EEPROM Utility 2-16 2-2
BIOS Setup Utility 2-3 Navigating the BIOS Utility 2-3 BIOS Flash Utilities 2-11 WinFlash Utility 2-12 Remove HDD/BIOS Password Utilities 2-13 Removing the HDD Password 2-13 Removing the BIOS Passwords 2-14 Clearing the BIOS Passwords 2-15 Using DMI Tools 2-16 LAN EEPROM Utility 2-16 2-2

Aspire 4560 Service Guide
Page 53
...(power-on self-test), press F2 when the prompt appears on the computer model. The default setting of the screen. Navigating the BIOS Utility 0 The BIOS Setup Utility has five menu options, namely: Information Main Security Boot ...;Exit Perform the following actions to navigate through the BIOS Setup Utility: Press the to select items in the menu bar. Press to select an item in the ...
...(power-on self-test), press F2 when the prompt appears on the computer model. The default setting of the screen. Navigating the BIOS Utility 0 The BIOS Setup Utility has five menu options, namely: Information Main Security Boot ...;Exit Perform the following actions to navigate through the BIOS Setup Utility: Press the to select items in the menu bar. Press to select an item in the ...
Aspire 4560 Service Guide
Page 54
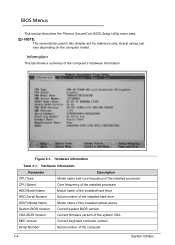
Figure 2-1. Hardware Information Parameter CPU Type CPU Speed HDD Model Name HDD Serial Number ATAPI Model Name System BIOS Version VGA BIOS Version KBC Version Serial Number Description Model name and core frequency of the installed processor Core frequency of the installed ...processor Model name of the installed hard drive Serial number of the installed hard drive Model name of the installed optical device Current system BIOS version Current firmware version of the system VGA Current keyboard controller version Serial number of the computer's hardware information. Information 0 This tab ...
Figure 2-1. Hardware Information Parameter CPU Type CPU Speed HDD Model Name HDD Serial Number ATAPI Model Name System BIOS Version VGA BIOS Version KBC Version Serial Number Description Model name and core frequency of the installed processor Core frequency of the installed ...processor Model name of the installed hard drive Serial number of the installed hard drive Model name of the installed optical device Current system BIOS version Current firmware version of the system VGA Current keyboard controller version Serial number of the computer's hardware information. Information 0 This tab ...

Aspire 4560 Service Guide
Page 55
Table 2-2. Figure 2-2. BIOS Main Parameter System Time Description System time expressed in 24-hour format System Date System date Total Memory Video Memory Total system memory available System ... 0 Use this tab to set the system time and date, enable or disable boot options, and enable or disable the D2D recovery feature. System Utilities 2-5 BIOS Main. Table 2-1.
Table 2-2. Figure 2-2. BIOS Main Parameter System Time Description System time expressed in 24-hour format System Date System date Total Memory Video Memory Total system memory available System ... 0 Use this tab to set the system time and date, enable or disable boot options, and enable or disable the D2D recovery feature. System Utilities 2-5 BIOS Main. Table 2-1.

Aspire 4560 Service Guide
Page 56
BIOS Main (Continued) Parameter Description Quiet Boot Show the original equipment manufacturer (OEM) screen during POST D2D Recovery Option to use the D2D Recovery function SATA ...: AHCI or IDE Security 0 Use this tab to set the supervisor password 2-6 Option Clear or Set Clear or Set Clear or Set - BIOS Security Table 2-3. Figure 2-3. System Utilities Table 2-2. BIOS Security Parameter Supervisor Password Is User Password Is HDD Password State Set Supervisor Password Description Supervisor password setting User password setting Hard...
BIOS Main (Continued) Parameter Description Quiet Boot Show the original equipment manufacturer (OEM) screen during POST D2D Recovery Option to use the D2D Recovery function SATA ...: AHCI or IDE Security 0 Use this tab to set the supervisor password 2-6 Option Clear or Set Clear or Set Clear or Set - BIOS Security Table 2-3. Figure 2-3. System Utilities Table 2-2. BIOS Security Parameter Supervisor Password Is User Password Is HDD Password State Set Supervisor Password Description Supervisor password setting User password setting Hard...

Aspire 4560 Service Guide
Page 57
...the password in the Enter New Password field and press Enter. Press Enter. Resetting the BIOS password may require the user to return the computer to save changes and exit from the BIOS Setup Utility. NOTE: NOTE: Users can choose to enable the Password on Boot Option... on Boot parameter. 5. Press F10 to its dealer. Passwords are allowed before system halts. The Set _______ Password dialog box appears. BIOS Security (Continued) Parameter Description Set User Password Option to set a user password Set HDD Password Option to highlight a Set _______ Password ...
...the password in the Enter New Password field and press Enter. Press Enter. Resetting the BIOS password may require the user to return the computer to save changes and exit from the BIOS Setup Utility. NOTE: NOTE: Users can choose to enable the Password on Boot Option... on Boot parameter. 5. Press F10 to its dealer. Passwords are allowed before system halts. The Set _______ Password dialog box appears. BIOS Security (Continued) Parameter Description Set User Password Option to set a user password Set HDD Password Option to highlight a Set _______ Password ...

Aspire 4560 Service Guide
Page 58
.... Retype the password in the Enter Current Password field and press Enter. 3. Set Supervisor Password 2. Changing a Password 0 1. Press to save changes and exit from the BIOS Setup Utility. Press Enter twice without typing anything in the Enter New Password field. 4. Type the new password in the Enter New Password and Confirm...
.... Retype the password in the Enter Current Password field and press Enter. 3. Set Supervisor Password 2. Changing a Password 0 1. Press to save changes and exit from the BIOS Setup Utility. Press Enter twice without typing anything in the Enter New Password field. 4. Type the new password in the Enter New Password and Confirm...

Aspire 4560 Service Guide
Page 59
... on Boot parameter. 6. 5. Computer sets Supervisor Password parameter to move it up or down the list. Press F10 to save changes and exit from the BIOS Setup Utility. BIOS Boot System Utilities 2-9 External USB optical drive 6.
... on Boot parameter. 6. 5. Computer sets Supervisor Password parameter to move it up or down the list. Press F10 to save changes and exit from the BIOS Setup Utility. BIOS Boot System Utilities 2-9 External USB optical drive 6.

Aspire 4560 Service Guide
Page 60
Exit 0 Use the Exit tab to save the setup changes. Figure 2-9. Exit Parameters Parameter Description Exit Saving Changes Close the BIOS Setup Utility and save or discard changes and close the BIOS Setup Utility. BIOS Exit Table 2-4. Exit Discarding Changes Close the BIOS Setup Utility without saving the setup changes. Load Setup Default Load the default values for all setup items. Discard Changes Load the previous values for all setup items. Save Changes Save the setup changes. 2-10 System Utilities
Exit 0 Use the Exit tab to save the setup changes. Figure 2-9. Exit Parameters Parameter Description Exit Saving Changes Close the BIOS Setup Utility and save or discard changes and close the BIOS Setup Utility. BIOS Exit Table 2-4. Exit Discarding Changes Close the BIOS Setup Utility without saving the setup changes. Load Setup Default Load the default values for all setup items. Discard Changes Load the previous values for all setup items. Save Changes Save the setup changes. 2-10 System Utilities

Aspire 4560 Service Guide
Page 61
...: NOTE: If a Crisis Recovery Disc is not available, create one before Flash utility is used . Rename the BIOS file as "XXXXXXX.FD". 2. BIOS Flash Utilities 0 BIOS Flash memory updates are required for the following to a bootable USB device containing the Crisis Recovery disk files. 3. ...Perform the following conditions: New versions of system programs New features or options Restore a BIOS when it becomes corrupted. Copy the "XXXXXXX.FD" file to run Flash. 1. NOTE: NOTE: Do not install memory related drivers (XMS, ...
...: NOTE: If a Crisis Recovery Disc is not available, create one before Flash utility is used . Rename the BIOS file as "XXXXXXX.FD". 2. BIOS Flash Utilities 0 BIOS Flash memory updates are required for the following to a bootable USB device containing the Crisis Recovery disk files. 3. ...Perform the following conditions: New versions of system programs New features or options Restore a BIOS when it becomes corrupted. Copy the "XXXXXXX.FD" file to run Flash. 1. NOTE: NOTE: Do not install memory related drivers (XMS, ...

Aspire 4560 Service Guide
Page 62
Example: If using USB HDD to Update BIOS, move USB HDD to begin the update. 2-12 System Utilities Insert the USB HDD and reboot computer. 4. Click OK to position 1. Press F2 during boot to update BIOS. BIOS Boot 3. Execute to enter Setup Menu. 2. Select Boot Menu to use the DOS Flash Utility: 1. Figure 2-10. WinFlash Utility 0 Perform the following to use the WinFlash Utility: 1. Double click the WinFlash executable file. 2. DOS Flash Utility 0 Perform the following to modify boot priority order.
Example: If using USB HDD to Update BIOS, move USB HDD to begin the update. 2-12 System Utilities Insert the USB HDD and reboot computer. 4. Click OK to position 1. Press F2 during boot to update BIOS. BIOS Boot 3. Execute to enter Setup Menu. 2. Select Boot Menu to use the DOS Flash Utility: 1. Figure 2-10. WinFlash Utility 0 Perform the following to use the WinFlash Utility: 1. Double click the WinFlash executable file. 2. DOS Flash Utility 0 Perform the following to modify boot priority order.

Aspire 4560 Service Guide
Page 63
Type the following command: A\> unlock6 XXXXX 00 Figure 2-12. Removing the HDD Password 0 NOTE: NOTE: If the incorrect HDD password is entered three times in a DOS environment. 2. Password Error Status To reset the HDD password: 1. Press Enter to remove the HDD and BIOS passwords. Open the computer in succession, an error is generated. (Figure 2-11) Password Error Status HDD password error code Figure 2-11. Figure 2-13. Remove HDD/BIOS Password Utilities 0 This section explains how to display the command options. Unlock Key Code 3. Password Encoding System Utilities 2-13
Type the following command: A\> unlock6 XXXXX 00 Figure 2-12. Removing the HDD Password 0 NOTE: NOTE: If the incorrect HDD password is entered three times in a DOS environment. 2. Password Error Status To reset the HDD password: 1. Press Enter to remove the HDD and BIOS passwords. Open the computer in succession, an error is generated. (Figure 2-11) Password Error Status HDD password error code Figure 2-11. Figure 2-13. Remove HDD/BIOS Password Utilities 0 This section explains how to display the command options. Unlock Key Code 3. Password Encoding System Utilities 2-13

Aspire 4560 Service Guide
Page 64
4. In the HDD password prompt, type the master password generated in step 5, then press Enter. Removing the BIOS Passwords 0 To clear a lost BIOS password (user or supervisor password), you need to the "Clearing the BIOS Passwords" on the mainboard. G1901 Hardware Gap 2-14 System Utilities Reboot the computer. 7. Select option 2 (upper case ASCII code) and press Enter. 5. Refer to short the clear password hardware gap (G1901) located on page 5-5 section for detailed instructions. Figure 2-14. Write down the generated master password. 6.
4. In the HDD password prompt, type the master password generated in step 5, then press Enter. Removing the BIOS Passwords 0 To clear a lost BIOS password (user or supervisor password), you need to the "Clearing the BIOS Passwords" on the mainboard. G1901 Hardware Gap 2-14 System Utilities Reboot the computer. 7. Select option 2 (upper case ASCII code) and press Enter. 5. Refer to short the clear password hardware gap (G1901) located on page 5-5 section for detailed instructions. Figure 2-14. Write down the generated master password. 6.


