
Aspire 3680/5570/5570Z/5580 User's Guide EN
Page 12
... Document Format (PDF) and comes preloaded on your computer, clicking on AcerSystem User's Guide will run the Adobe Reader setup program first. See "Front view" on such subjects as system utilities, data recovery, expansion options and troubleshooting. Your guides To help you use Adobe Reader, access the Help and Support menu. poster helps you to the AcerSystem User's Guide. The printed User's Guide introduces you get started with setting up your Acer notebook, we...
... Document Format (PDF) and comes preloaded on your computer, clicking on AcerSystem User's Guide will run the Adobe Reader setup program first. See "Front view" on such subjects as system utilities, data recovery, expansion options and troubleshooting. Your guides To help you use Adobe Reader, access the Help and Support menu. poster helps you to the AcerSystem User's Guide. The printed User's Guide introduces you get started with setting up your Acer notebook, we...

Aspire 3680/5570/5570Z/5580 User's Guide EN
Page 18
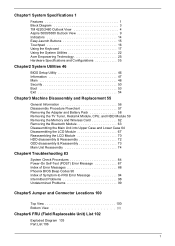
... through options 79 Connectivity options 79 Fax/data modem 79 Built-in network feature 80 Fast Infrared (FIR) (for selected models) 80 Universal Serial Bus (USB) 81 IEEE 1394 port (for selected models) 81 PC Card slot 82 Installing memory 82 BIOS utility 83 Boot sequence 83 Enable disk-to-disk recovery 84 Password 84 Using software 85 Playing DVD movies 85 Acer eRecovery Management 86 Create backup 86 Burn backup disc 87 Restore and recovery 87 87 Troubleshooting 88 Troubleshooting tips 88 Error messages...
... through options 79 Connectivity options 79 Fax/data modem 79 Built-in network feature 80 Fast Infrared (FIR) (for selected models) 80 Universal Serial Bus (USB) 81 IEEE 1394 port (for selected models) 81 PC Card slot 82 Installing memory 82 BIOS utility 83 Boot sequence 83 Enable disk-to-disk recovery 84 Password 84 Using software 85 Playing DVD movies 85 Acer eRecovery Management 86 Create backup 86 Burn backup disc 87 Restore and recovery 87 87 Troubleshooting 88 Troubleshooting tips 88 Error messages...

Aspire 3680/5570/5570Z/5580 User's Guide EN
Page 36
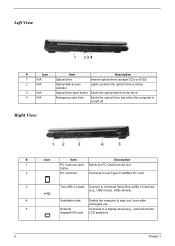
... display Connects to a display device (e.g., external (VGA) port monitor, LCD projector). 2 Ventilation slots Enable the computer to stay cool, even after prolonged use. 3 S-video/TV-out Connects to a television or display device (NTSC/PAL) port with infrared devices (e.g., infrared printer and IR-aware computer). (for selected models) 6 Infrared port Interfaces with S-video input. 4 USB 2.0 port Connects to USB 2.0 devices (e.g., USB mouse, USB camera). 5 4-pin IEEE 1394 Connects to IEEE 1394 devices. port (for selected models) 7 5-in-1 card reader Accepts Memory...
... display Connects to a display device (e.g., external (VGA) port monitor, LCD projector). 2 Ventilation slots Enable the computer to stay cool, even after prolonged use. 3 S-video/TV-out Connects to a television or display device (NTSC/PAL) port with infrared devices (e.g., infrared printer and IR-aware computer). (for selected models) 6 Infrared port Interfaces with S-video input. 4 USB 2.0 port Connects to USB 2.0 devices (e.g., USB mouse, USB camera). 5 4-pin IEEE 1394 Connects to IEEE 1394 devices. port (for selected models) 7 5-in-1 card reader Accepts Memory...
Aspire 3680/5570/5570Z/5580 User's Guide EN
Page 65
Connect the AC adapter to recharge the battery pack. • Make sure that the AC adapter is properly plugged into the computer and to adjust the brightness level. • The display device might be too low. Press + (increase) to the power outlet. • If it is not lit, no power is in the external USB floppy drive? Press and release the power button to save power. Right-click...
Connect the AC adapter to recharge the battery pack. • Make sure that the AC adapter is properly plugged into the computer and to adjust the brightness level. • The display device might be too low. Press + (increase) to the power outlet. • If it is not lit, no power is in the external USB floppy drive? Press and release the power button to save power. Right-click...
Aspire 3680/5570/5570Z/5580 User's Guide EN
Page 107
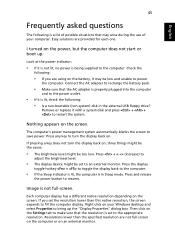
... install selected drivers and applications, create an application backup image instead - English 87 Burn backup disc Using the Burn Disc page of Acer eRecovery Management, you can burn the factory default image, a user backup image, the current system configuration, or an application backup image to CD or DVD. 1 Press + or select Acer eRecovery Management from the Empowering Technology toolbar to start Acer eRecovery Management. 2 Switch to the restore and recovery page by selecting the Burn Disc button...
... install selected drivers and applications, create an application backup image instead - English 87 Burn backup disc Using the Burn Disc page of Acer eRecovery Management, you can burn the factory default image, a user backup image, the current system configuration, or an application backup image to CD or DVD. 1 Press + or select Acer eRecovery Management from the Empowering Technology toolbar to start Acer eRecovery Management. 2 Switch to the restore and recovery page by selecting the Burn Disc button...
Aspire 5600 - 3680 User's Guide
Page 8
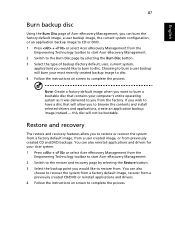
... Document Format (PDF) and comes preloaded on your notebook. For instructions on how to thank you use Adobe Reader, access the Help and Support menu. This guide contains detailed information on such subjects as system utilities, data recovery, expansion options and troubleshooting. The printed User's Guide introduces you get started with setting up your computer. It is not installed on your computer, clicking on AcerSystem User's Guide will run the Adobe Reader setup...
... Document Format (PDF) and comes preloaded on your notebook. For instructions on how to thank you use Adobe Reader, access the Help and Support menu. This guide contains detailed information on such subjects as system utilities, data recovery, expansion options and troubleshooting. The printed User's Guide introduces you get started with setting up your computer. It is not installed on your computer, clicking on AcerSystem User's Guide will run the Adobe Reader setup...

Aspire 5600 - 3680 User's Guide
Page 13
... Traveling internationally with the computer61 Preparing the computer 61 What to bring with you 61 Special considerations 61 Securing your computer 62 Using a computer security lock 62 Using passwords 62 Entering passwords 63 Setting passwords 63 Expanding through options 64 Connectivity options 64 Fax/data modem 64 Built-in network feature 65 Universal Serial Bus (USB) 65 PC Card slot 66 Installing memory 67 BIOS utility 67 Boot sequence 67 Enable disk-to-disk recovery 68 Password...
... Traveling internationally with the computer61 Preparing the computer 61 What to bring with you 61 Special considerations 61 Securing your computer 62 Using a computer security lock 62 Using passwords 62 Entering passwords 63 Setting passwords 63 Expanding through options 64 Connectivity options 64 Fax/data modem 64 Built-in network feature 65 Universal Serial Bus (USB) 65 PC Card slot 66 Installing memory 67 BIOS utility 67 Boot sequence 67 Enable disk-to-disk recovery 68 Password...
Aspire 5600 - 3680 User's Guide
Page 59
... following is a list of your Windows desktop and select Properties to resume. Remove or replace it is in the external USB floppy drive? Press any key to the power outlet. • If it with a system disk and press + + to power the computer. Image is being supplied to fill the computer display. I turned on an external monitor. Connect the AC adapter to recharge the battery pack. • Make sure that...
... following is a list of your Windows desktop and select Properties to resume. Remove or replace it is in the external USB floppy drive? Press any key to the power outlet. • If it with a system disk and press + + to power the computer. Image is being supplied to fill the computer display. I turned on an external monitor. Connect the AC adapter to recharge the battery pack. • Make sure that...
Aspire 3680, Aspire 5600, TravelMate 4220, and TravelMate 2480 Service Guide
Page 6
... 9 Indicators 14 Easy-Launch Buttons 15 Touchpad 16 Using the Keyboard 17 Using the System Utilities 22 Acer Empowering Technology 25 Hardware Specifications and Configurations 35 Chapter2 System Utilities 46 BIOS Setup Utility 46 Information 47 Main 48 Security 50 Boot 53 Exit 54 Chapter3 Machine Disassembly and Replacement 55 General Information 56 Disassembly Procedure Flowchart 57 Removing the Adapter and Battery Pack 58 Removing the TV Tuner, Heatsink Module, CPU, and HDD Module 59 Removing the Memory and Wireless Card...
... 9 Indicators 14 Easy-Launch Buttons 15 Touchpad 16 Using the Keyboard 17 Using the System Utilities 22 Acer Empowering Technology 25 Hardware Specifications and Configurations 35 Chapter2 System Utilities 46 BIOS Setup Utility 46 Information 47 Main 48 Security 50 Boot 53 Exit 54 Chapter3 Machine Disassembly and Replacement 55 General Information 56 Disassembly Procedure Flowchart 57 Removing the Adapter and Battery Pack 58 Removing the TV Tuner, Heatsink Module, CPU, and HDD Module 59 Removing the Memory and Wireless Card...
Aspire 3680, Aspire 5600, TravelMate 4220, and TravelMate 2480 Service Guide
Page 12
... Serial Bus (USB) 2.0 devices (e.g., USB mouse, USB camera). 4 Ventilation slots Enable the computer to stay cool, even after prolonged use. 5 External Connects to a display device(e.g., external monitor, display(VGA) port LCD projector) # Icon Item Description 6 # Icon Item Description Chapter 1 Right View # Item Description # Icon Item Description # Icon Item Description 1 PC Card slot eject Ejects the PC Card from the drive. 4 N/A Emergency eject hole Ejects the optical drive tray when the computer is active. 3 N/A Optical drive eject button...
... Serial Bus (USB) 2.0 devices (e.g., USB mouse, USB camera). 4 Ventilation slots Enable the computer to stay cool, even after prolonged use. 5 External Connects to a display device(e.g., external monitor, display(VGA) port LCD projector) # Icon Item Description 6 # Icon Item Description Chapter 1 Right View # Item Description # Icon Item Description # Icon Item Description 1 PC Card slot eject Ejects the PC Card from the drive. 4 N/A Emergency eject hole Ejects the optical drive tray when the computer is active. 3 N/A Optical drive eject button...
Aspire 3680, Aspire 5600, TravelMate 4220, and TravelMate 2480 Service Guide
Page 38
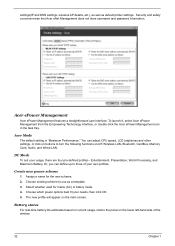
... of the window. 32 Chapter 1 Acer Mode The default setting is "Maximum Performance." Or, you can adjust CPU speed, LCD brightness and other settings, or click on buttons to use as default printer settings. Choose existing scheme to turn the following functions on/off: Wireless LAN, Bluetooth, CardBus, Memory Card, Audio, and Wired LAN. Security and safety concerns mean that Acer eNet Management does not store username and password information. Create new power scheme 1. Select whether used for the new scheme. 2.
... of the window. 32 Chapter 1 Acer Mode The default setting is "Maximum Performance." Or, you can adjust CPU speed, LCD brightness and other settings, or click on buttons to use as default printer settings. Choose existing scheme to turn the following functions on/off: Wireless LAN, Bluetooth, CardBus, Memory Card, Audio, and Wired LAN. Security and safety concerns mean that Acer eNet Management does not store username and password information. Create new power scheme 1. Select whether used for the new scheme. 2.

Aspire 3680, Aspire 5600, TravelMate 4220, and TravelMate 2480 Service Guide
Page 60
Information Main PhoenixBIOS Setup Utility Security Boot Exit Exit Saving Changes Exit Dicarding Changes Load Setup Defaults Discard Changes Save Changes Item Specific Help Exit System Setup and save your changes to CMOS Exit utility without saving Setup data to CMOS Load default values for all SETUP items Load previous values from unauthorized use. Parameter Exit Saving Changes Exit Discarding Changes Load Setup Default Discard Changes Save Changes Description Exit System Setup and save your changes to CMOS. F1...
Information Main PhoenixBIOS Setup Utility Security Boot Exit Exit Saving Changes Exit Dicarding Changes Load Setup Defaults Discard Changes Save Changes Item Specific Help Exit System Setup and save your changes to CMOS Exit utility without saving Setup data to CMOS Load default values for all SETUP items Load previous values from unauthorized use. Parameter Exit Saving Changes Exit Discarding Changes Load Setup Default Discard Changes Save Changes Description Exit System Setup and save your changes to CMOS. F1...
Aspire 3680, Aspire 5600, TravelMate 4220, and TravelMate 2480 Service Guide
Page 66
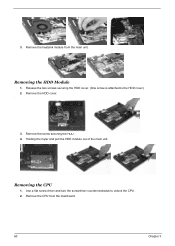
Remove the screw securing the HDD. 4. Holding the mylar and pull the HDD module out of the main unit. Remove the HDD cover. . 3. 3. Remove the heatsink module from the mainboard. 60 Chapter 3 Remove the CPU from the main unit. Release the two screws securing the HDD cover. (One screw is attached to unlock the CPU. 2. Removing the HDD Module 1. Use a flat screw driver and turn the screwdriver counterclockwise to the HDD cover) 2. Removing the CPU 1.
Remove the screw securing the HDD. 4. Holding the mylar and pull the HDD module out of the main unit. Remove the HDD cover. . 3. 3. Remove the heatsink module from the mainboard. 60 Chapter 3 Remove the CPU from the main unit. Release the two screws securing the HDD cover. (One screw is attached to unlock the CPU. 2. Removing the HDD Module 1. Use a flat screw driver and turn the screwdriver counterclockwise to the HDD cover) 2. Removing the CPU 1.

Aspire 3680, Aspire 5600, TravelMate 4220, and TravelMate 2480 Service Guide
Page 98
... QuietBoot start (optional) Shadow video BIOS ROM Display BIOS copyright notice Display CPU type and speed Initialize EISA board Test keyboard Set key click if enabled Enable USB devices Test for unexpected interrupts Initialize POST display service Display prompt "Press F2 to enter SETUP" Disable CPU cache Test RAM between 512 and 640 KB Test extended memory Test extended memory address lines Jump to User Patch1 Configure advanced cache registers Initialize Multi Processor APIC Enable external and CPU caches Setup System Management Mode (SMM) area Display external L2...
... QuietBoot start (optional) Shadow video BIOS ROM Display BIOS copyright notice Display CPU type and speed Initialize EISA board Test keyboard Set key click if enabled Enable USB devices Test for unexpected interrupts Initialize POST display service Display prompt "Press F2 to enter SETUP" Disable CPU cache Test RAM between 512 and 640 KB Test extended memory Test extended memory address lines Jump to User Patch1 Configure advanced cache registers Initialize Multi Processor APIC Enable external and CPU caches Setup System Management Mode (SMM) area Display external L2...
Aspire 3680, Aspire 5600, TravelMate 4220, and TravelMate 2480 Service Guide
Page 102
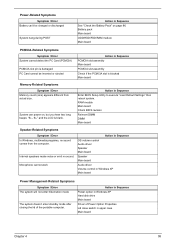
... Sequence Enter BIOS Setup Utility to execute "Load Default Settings" then reboot system. Internal speakers make noise or emit no sound comes from actual size. Action in Sequence Power option in Windows XP Hard disk drive Main board Driver of the portable computer. System can 't be inserted or ejected Action in Sequence PCMCIA slot assembly Main board PCMCIA slot assembly Check if the PCMCIA slot is blocked Main board Memory-Related Symptoms Symptom / Error Memory count...
... Sequence Enter BIOS Setup Utility to execute "Load Default Settings" then reboot system. Internal speakers make noise or emit no sound comes from actual size. Action in Sequence Power option in Windows XP Hard disk drive Main board Driver of the portable computer. System can 't be inserted or ejected Action in Sequence PCMCIA slot assembly Main board PCMCIA slot assembly Check if the PCMCIA slot is blocked Main board Memory-Related Symptoms Symptom / Error Memory count...

Aspire 3680/5570/5580 Service Guide
Page 62
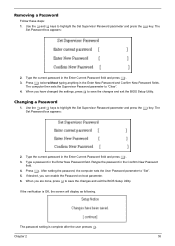
Enables or disables primary hard disk security function. Don't forget your dealer to reset it. Retype the password in the "Enter New Password" field. Press e. When you can enter Setup menu only and does not have right to enable the Password on the screen. 3. The user can opt to change the value of the user password. Defines whether a password is Set User Password Set Supervisor Password Primary HardDisk Security Password on Boot Description Shows the setting of parameters. Type a password in the...
Enables or disables primary hard disk security function. Don't forget your dealer to reset it. Retype the password in the "Enter New Password" field. Press e. When you can enter Setup menu only and does not have right to enable the Password on the screen. 3. The user can opt to change the value of the user password. Defines whether a password is Set User Password Set Supervisor Password Primary HardDisk Security Password on Boot Description Shows the setting of parameters. Type a password in the...
Aspire 3680/5570/5580 Service Guide
Page 63
... current password in the Enter New Password and Confirm New Password fields. Retype the password in the Enter New Password field. When you are done, press u to save the changes and exit the BIOS Setup Utility. Type a password in the Confirm New Password field. 4. Press e. If desired, you have changed the settings, press u to save the changes and exit the BIOS Setup Utility. Use the w and y keys to "Set". 5. Removing a Password Follow these steps: 1. After setting the password, the computer sets the User Password...
... current password in the Enter New Password and Confirm New Password fields. Retype the password in the Enter New Password field. When you are done, press u to save the changes and exit the BIOS Setup Utility. Type a password in the Confirm New Password field. 4. Press e. If desired, you have changed the settings, press u to save the changes and exit the BIOS Setup Utility. Use the w and y keys to "Set". 5. Removing a Password Follow these steps: 1. After setting the password, the computer sets the User Password...
Aspire 3680/5570/5580 Service Guide
Page 66
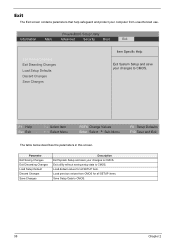
...; → Select Menu F5/F6 Change Values Enter Select 4 Sub-Menu F9 Setup Defaults F10 Save and Exit The table below describes the parameters in this screen. Load default values for all SETUP item. Parameter Exit Saving Changes Exit Discarding Changes Load Setup Default Discard Changes Save Changes Description Exit System Setup and save your changes to CMOS. Load previous values from unauthorized use. Exit utility without saving setup data to...
...; → Select Menu F5/F6 Change Values Enter Select 4 Sub-Menu F9 Setup Defaults F10 Save and Exit The table below describes the parameters in this screen. Load default values for all SETUP item. Parameter Exit Saving Changes Exit Discarding Changes Load Setup Default Discard Changes Save Changes Description Exit System Setup and save your changes to CMOS. Load previous values from unauthorized use. Exit utility without saving setup data to...
Aspire 3680/5570/5580 Service Guide
Page 93
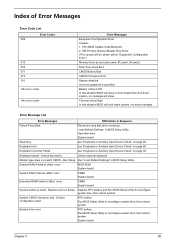
... page 80. Keyboard locked - "Load Default Settings" in BIOS Setup Utility. Replace and run Setup Replace RTC battery and Run BIOS Setup Utility to reconfigure system time, then reboot system. Hard disk drive System board Stuck Key see "Keyboard or Auxiliary Input Device Check" on page 80. Unlock key switch Unlock external keyboard Monitor type does not match CMOS - System board Chapter 4 85 Battery critical LOW In this situation BIOS will shut down system, no message will be shown before "Equipment Configuration Error") Memory Error at offset: nnnn...
... page 80. Keyboard locked - "Load Default Settings" in BIOS Setup Utility. Replace and run Setup Replace RTC battery and Run BIOS Setup Utility to reconfigure system time, then reboot system. Hard disk drive System board Stuck Key see "Keyboard or Auxiliary Input Device Check" on page 80. Unlock key switch Unlock external keyboard Monitor type does not match CMOS - System board Chapter 4 85 Battery critical LOW In this situation BIOS will shut down system, no message will be shown before "Equipment Configuration Error") Memory Error at offset: nnnn...
Aspire 3680/5570/5580 Service Guide
Page 101
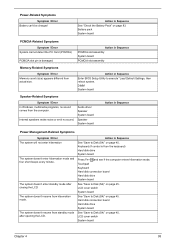
... Sequence Enter BIOS Setup Utility to Disk (S4)" on page 45. DIMM System board Speaker-Related Symptoms Symptom / Error In Windows, multimedia programs, no sound. The system doesn't enter standby mode after closing the LCD The system doesn't resume from standby mode after opening the LCD. Touchpad Keyboard Hard disk connection board Hard disk drive System board See "Save to execute "Load Default Settings, then reboot system. Audio driver Speaker System board Speaker System board Action in Sequence Power Management-Related Symptoms Symptom / Error The...
... Sequence Enter BIOS Setup Utility to Disk (S4)" on page 45. DIMM System board Speaker-Related Symptoms Symptom / Error In Windows, multimedia programs, no sound. The system doesn't enter standby mode after closing the LCD The system doesn't resume from standby mode after opening the LCD. Touchpad Keyboard Hard disk connection board Hard disk drive System board See "Save to execute "Load Default Settings, then reboot system. Audio driver Speaker System board Speaker System board Action in Sequence Power Management-Related Symptoms Symptom / Error The...


