
Acer Aspire 1410, 1810T, and 1810TZ Service Guide
Page 7
... Diagram 4 Your Notebook Tour 5 Front View 5 Left View 7 Right View 7 Base View 8 Rear View 8 Indicators 9 TouchPad Basics 10 Using the Keyboard 11 Lock Keys and embedded numeric keypad 11 Windows Keys 12 Hot Keys 13 Special Keys 14 Hardware Specifications and Configurations 15 System Utilities 25 BIOS Setup Utility 25 Navigating the BIOS Utility 25 Information 26 Main 27 Security 28 Boot 31 Exit 32 BIOS Flash Utility 33 DOS Flash Utility 34 WinFlash Utility 35 Remove HDD/BIOS Password Utilities 36 Removing BIOS Passwords 37 Miscellaneous Utilities...
... Diagram 4 Your Notebook Tour 5 Front View 5 Left View 7 Right View 7 Base View 8 Rear View 8 Indicators 9 TouchPad Basics 10 Using the Keyboard 11 Lock Keys and embedded numeric keypad 11 Windows Keys 12 Hot Keys 13 Special Keys 14 Hardware Specifications and Configurations 15 System Utilities 25 BIOS Setup Utility 25 Navigating the BIOS Utility 25 Information 26 Main 27 Security 28 Boot 31 Exit 32 BIOS Flash Utility 33 DOS Flash Utility 34 WinFlash Utility 35 Remove HDD/BIOS Password Utilities 36 Removing BIOS Passwords 37 Miscellaneous Utilities...
Acer Aspire 1410, 1810T, and 1810TZ Service Guide
Page 8
... Bluetooth Module 110 Replacing the LED Board 111 Replacing the LCD Module 113 Replacing the Button Board 115 Replacing the Upper Cover 118 Replacing the Keyboard 121 Replacing the Wireless LAN Module 122 Replacing the DIMM Module 124 Replacing the Hard Disk Drive 126 Replacing the Battery 128 Replace the Dummy Card 129 Troubleshooting 131 Common Problems 131 Power On Issue 132 No Display Issue 133 Random Loss of BIOS Settings 134 LCD Failure 135 Built-In Keyboard Failure 136 TouchPad Failure 137 Internal Speaker Failure 138 Internal Microphone Failure 139 HDD...
... Bluetooth Module 110 Replacing the LED Board 111 Replacing the LCD Module 113 Replacing the Button Board 115 Replacing the Upper Cover 118 Replacing the Keyboard 121 Replacing the Wireless LAN Module 122 Replacing the DIMM Module 124 Replacing the Hard Disk Drive 126 Replacing the Battery 128 Replace the Dummy Card 129 Troubleshooting 131 Common Problems 131 Power On Issue 132 No Display Issue 133 Random Loss of BIOS Settings 134 LCD Failure 135 Built-In Keyboard Failure 136 TouchPad Failure 137 Internal Speaker Failure 138 Internal Microphone Failure 139 HDD...
Acer Aspire 1410, 1810T, and 1810TZ Service Guide
Page 17
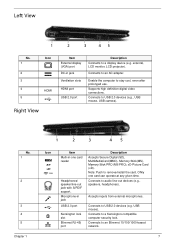
external, LCD monitor, LCD projector). Connects to remove/install the card. Supports high definition digital video connections. Note: Push to audio line-out devices (e.g., speakers, headphones). Connects to USB 2.0 devices (e.g., USB mouse, USB camera). USB mouse). Connects to USB 2.0 devices (e.g. No. 1 2 3 4 5 Chapter 1 Icon Item Multi-in jack USB 2.0 port Kensington lock slot Ethernet RJ-45) port Description Accepts Secure Digital (SD), MultiMediaCard(MMC), Memory Stick(MS), Memory Stick PRO (MS PRO), xD-Picture Card (xD). Connects to a Kensington-compatible ...
external, LCD monitor, LCD projector). Connects to remove/install the card. Supports high definition digital video connections. Note: Push to audio line-out devices (e.g., speakers, headphones). Connects to USB 2.0 devices (e.g., USB mouse, USB camera). USB mouse). Connects to USB 2.0 devices (e.g. No. 1 2 3 4 5 Chapter 1 Icon Item Multi-in jack USB 2.0 port Kensington lock slot Ethernet RJ-45) port Description Accepts Secure Digital (SD), MultiMediaCard(MMC), Memory Stick(MS), Memory Stick PRO (MS PRO), xD-Picture Card (xD). Connects to a Kensington-compatible ...
Acer Aspire 1410, 1810T, and 1810TZ Service Guide
Page 23
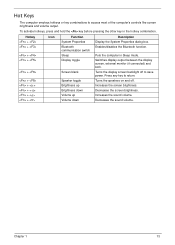
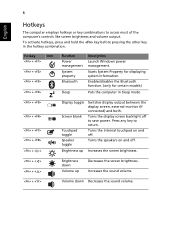
... any key to access most of the computer's controls like screen brightness and volume output. Increases the sound volume. Decreases the sound volume. To activate hotkeys, press and hold the key before pressing the other key in Sleep mode. Enables/disables the Bluetooth function. Hotkey + + + + + + + < > + < > + < > + < > Icon Function System Properties Bluetooth communication switch Sleep Display toggle Screen blank Speaker toggle Brightness up Brightness down Volume up Volume down Description Display the System Properties dialog box. Turns the display screen...
... any key to access most of the computer's controls like screen brightness and volume output. Increases the sound volume. Decreases the sound volume. To activate hotkeys, press and hold the key before pressing the other key in Sleep mode. Enables/disables the Bluetooth function. Hotkey + + + + + + + < > + < > + < > + < > Icon Function System Properties Bluetooth communication switch Sleep Display toggle Screen blank Speaker toggle Brightness up Brightness down Volume up Volume down Description Display the System Properties dialog box. Turns the display screen...
Acer Aspire 1410, 1810T, and 1810TZ Service Guide
Page 25
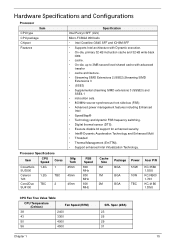
...) • Advanced power management features including Enhanced Intel • SpeedStep® • Technology and dynamic FSB frequency switching. • Digital thermal sensor (DTS). • Execute disable bit support for enhanced security. • Intel® Dynamic Acceleration Technology and Enhanced Multi • Threaded • Thermal Management (EmTTM). • Support enhanced Intel Virtualization Technology. Processor Specifications Item CPU Speed Cores Core2Solo...
...) • Advanced power management features including Enhanced Intel • SpeedStep® • Technology and dynamic FSB frequency switching. • Digital thermal sensor (DTS). • Execute disable bit support for enhanced security. • Intel® Dynamic Acceleration Technology and Enhanced Multi • Threaded • Thermal Management (EmTTM). • Support enhanced Intel Virtualization Technology. Processor Specifications Item CPU Speed Cores Core2Solo...
Acer Aspire 1410, 1810T, and 1810TZ Service Guide
Page 31
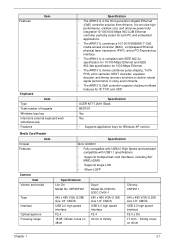
..., decoder, and timing recovery functions to deliver robust signal performance in noisy environments. • The AR8131L GbE controller supports checksum offload features for IP, TCP, and UDP, Specification ACER NT1T JM11 Black 86/87/91 Yes Yes • Supports application keys for Windows XP version Media Card Reader Chipset Features Item Camera Item Vendor and model Type Interface Optical aperture Focusing range Specification Alcor AU6433 • Fully...
..., decoder, and timing recovery functions to deliver robust signal performance in noisy environments. • The AR8131L GbE controller supports checksum offload features for IP, TCP, and UDP, Specification ACER NT1T JM11 Black 86/87/91 Yes Yes • Supports application keys for Windows XP version Media Card Reader Chipset Features Item Camera Item Vendor and model Type Interface Optical aperture Focusing range Specification Alcor AU6433 • Fully...

Acer Aspire 1410, 1810T, and 1810TZ Service Guide
Page 35
.... Follow these instructions: • To choose a menu, use the left and right arrow keys. • To choose an item, use the up and down arrow keys. • To change boot device without entering BIOS SETUP Utility. Your computer is prompted on the bottom of the screen. The default parameter of F12 Boot Menu is subject to "disabled". Help for a particular menu are six menu options: Information, Main, Advanced, Security, Power, Boot, and Exit...
.... Follow these instructions: • To choose a menu, use the left and right arrow keys. • To choose an item, use the up and down arrow keys. • To change boot device without entering BIOS SETUP Utility. Your computer is prompted on the bottom of the screen. The default parameter of F12 Boot Menu is subject to "disabled". Help for a particular menu are six menu options: Information, Main, Advanced, Security, Power, Boot, and Exit...

Acer Aspire 1410, 1810T, and 1810TZ Service Guide
Page 39
...). Removing a Password Follow these steps: 1. When you are done, press F10 to save the changes and exit the BIOS Setup Utility. Press Enter. When you have changed the settings, press u to enable the Password on the screen. 3. Use the ↑ and ↓ keys to "Set". 4. Type the current password in the "Enter New Password" field. 1. After setting the password, the computer sets the User Password parameter to highlight the Set Supervisor Password parameter and press the Enter key. Type a password in...
...). Removing a Password Follow these steps: 1. When you are done, press F10 to save the changes and exit the BIOS Setup Utility. Press Enter. When you have changed the settings, press u to enable the Password on the screen. 3. Use the ↑ and ↓ keys to "Set". 4. Type the current password in the "Enter New Password" field. 1. After setting the password, the computer sets the User Password parameter to highlight the Set Supervisor Password parameter and press the Enter key. Type a password in...

Acer Aspire 1410, 1810T, and 1810TZ Service Guide
Page 40
The Set Password box appears. Set Supervisor Password Enter Current Password [ ] Enter New Password [ ] Confirm New Password [ ] 2. Retype the password in the Enter New Password field. If desired, you the Setup Warning. Re-enter password. [Continue] 30 Chapter 2 Type a password in the Confirm New Password field. 4. If the current password entered does not match the actual current password, the screen will display as following message. Use the ↑ and ↓ keys to save the changes and exit the BIOS Setup Utility. Setup Warning Invalid Password. [Continue...
The Set Password box appears. Set Supervisor Password Enter Current Password [ ] Enter New Password [ ] Confirm New Password [ ] 2. Retype the password in the Enter New Password field. If desired, you the Setup Warning. Re-enter password. [Continue] 30 Chapter 2 Type a password in the Confirm New Password field. 4. If the current password entered does not match the actual current password, the screen will display as following message. Use the ↑ and ↓ keys to save the changes and exit the BIOS Setup Utility. Setup Warning Invalid Password. [Continue...
Acer Aspire 1410, 1810T, and 1810TZ Service Guide
Page 42
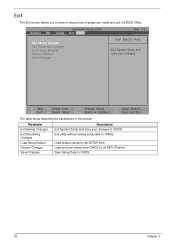
InsydeH20 Setup Utility Information Main Security Boot Exit Rev. 3.5 Exit Saving Changes Exit Discarding Changes Load Setup Defaults Discard Changes Save Changes Item Specific Help Exit System Setup and save or discard any changes you made and quit the BIOS Utility. Exit utility without saving setup data to CMOS. Load previous values from CMOS for all SETUP items. Save Setup Data to CMOS. 32 Chapter 2 Exit The Exit screen allows you to save...
InsydeH20 Setup Utility Information Main Security Boot Exit Rev. 3.5 Exit Saving Changes Exit Discarding Changes Load Setup Defaults Discard Changes Save Changes Item Specific Help Exit System Setup and save or discard any changes you made and quit the BIOS Utility. Exit utility without saving setup data to CMOS. Load previous values from CMOS for all SETUP items. Save Setup Data to CMOS. 32 Chapter 2 Exit The Exit screen allows you to save...
Acer Aspire 1410, 1810T, and 1810TZ Service Guide
Page 141
Symptoms (Verified) Go To Power On Issue Page 132 No Display Issue Page 133 LCD Failure Page 135 Internal Keyboard Failure Page 136 TouchPad Failure Page 137 Internal Speaker Failure Page 138 Internal Microphone Failure Page 139 USB Failure Page 141 Other Function Failure Page 141 4. Use the following procedure as possible. 2. Troubleshooting Chapter 4 Common Problems Use the following table with the verified symptom to determine...
Symptoms (Verified) Go To Power On Issue Page 132 No Display Issue Page 133 LCD Failure Page 135 Internal Keyboard Failure Page 136 TouchPad Failure Page 137 Internal Speaker Failure Page 138 Internal Microphone Failure Page 139 USB Failure Page 141 Other Function Failure Page 141 4. Use the following procedure as possible. 2. Troubleshooting Chapter 4 Common Problems Use the following table with the verified symptom to determine...
Acer Aspire 1410, 1810T, and 1810TZ Service Guide
Page 143
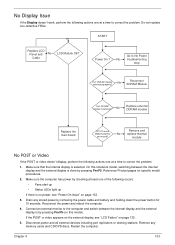
Do not replace non-defective FRUs: START Replace LCD Panel and No Cable LCD Module OK? Drain any memory cards and CD/DVD discs. Connect an external monitor to correct the problem. 1. Make sure the computer has power by removing the power cable and battery and holding down the power button for specific model procedures. 2. No troubleshooting step Ext. DDRAM module connected properly? Make sure that the internal display is no power, see "LCD Failure" on this notebook model, switching between the internal display and the external display is done by pressing...
Do not replace non-defective FRUs: START Replace LCD Panel and No Cable LCD Module OK? Drain any memory cards and CD/DVD discs. Connect an external monitor to correct the problem. 1. Make sure the computer has power by removing the power cable and battery and holding down the power button for specific model procedures. 2. No troubleshooting step Ext. DDRAM module connected properly? Make sure that the internal display is no power, see "LCD Failure" on this notebook model, switching between the internal display and the external display is done by pressing...

Acer Aspire 1410, 1810T, and 1810TZ Service Guide
Page 144
See the User Manual for instructions on page 34). 8. b. Check the Device Manager to determine that the computer is more than one year old, replace the CMOS battery. 2. If the Issue is properly installed. Replace the Motherboard. 134 Chapter 4 Remove the drives (see "Online Support Information" on the desktop and select Personalize´ Display Settings. See "Disassembly Process" on page 34. 3. Adjust the brightness to the desired resolution. c. d. Click Apply...
See the User Manual for instructions on page 34). 8. b. Check the Device Manager to determine that the computer is more than one year old, replace the CMOS battery. 2. If the Issue is properly installed. Replace the Motherboard. 134 Chapter 4 Remove the drives (see "Online Support Information" on the desktop and select Personalize´ Display Settings. See "Disassembly Process" on page 34. 3. Adjust the brightness to the desired resolution. c. d. Click Apply...

Acer Aspire 1410, 1810T, and 1810TZ Service Guide
Page 150
... the problem. 1. Run the Windows Disk Defragmenter. If the issue is virus free. 3. d. Run the Windows Vista Startup Repair Utility: a. The System Recovery Options screen displays. Select the appropriate operating system, and click Next. Select Startup Repair. Run the Windows Memory Diagnostic Tool. For more information see "Online Support Information" on page 165. When prompted, press any recently added hardware and associated software. 8. i. Ensure all external devices. 2. c. Select the microphone type from a command prompt. HDD Not Operating...
... the problem. 1. Run the Windows Disk Defragmenter. If the issue is virus free. 3. d. Run the Windows Vista Startup Repair Utility: a. The System Recovery Options screen displays. Select the appropriate operating system, and click Next. Select Startup Repair. Run the Windows Memory Diagnostic Tool. For more information see "Online Support Information" on page 165. When prompted, press any recently added hardware and associated software. 8. i. Ensure all external devices. 2. c. Select the microphone type from a command prompt. HDD Not Operating...

Acer Aspire 1410, 1810T, and 1810TZ Service Guide
Page 159
... short the G2 pad. 4. Reconnect the RTC battery and reassemble the unit. Clearing Password Check and BIOS Recovery This section provides a procedure for clearing the password and BIOS. Disassemble the notebook and take out the Mainboard. Remove the RTC battery. The Hardware Open Gap on page 75. 3. Mainboard CMOS Discharge Discharging the CMOS clears all user settings and restores factory defaults. See "Removing the RTC Battery" on the main board clears the CMOS of all user settings. 1. See "Removing the Mainboard...
... short the G2 pad. 4. Reconnect the RTC battery and reassemble the unit. Clearing Password Check and BIOS Recovery This section provides a procedure for clearing the password and BIOS. Disassemble the notebook and take out the Mainboard. Remove the RTC battery. The Hardware Open Gap on page 75. 3. Mainboard CMOS Discharge Discharging the CMOS clears all user settings and restores factory defaults. See "Removing the RTC Battery" on the main board clears the CMOS of all user settings. 1. See "Removing the Mainboard...

Acer Aspire 1410, 1810T, and 1810TZ Service Guide
Page 235
... Utility 25-33 Advanced 28 Boot 31 Exit 32 Navigating 25 Power 31 Save and Exit 32 Security 28 System Security 32 brightness hotkeys 13 Button Board Removing 61 C Camera Board Removing 82, 97 caps lock on indicator 9 Common Problems 132 CRT Cable Removing 71 D DIMM Module Removing 50 Display 4 display hotkeys 13 E Euro Key 14 External Module Disassembly Index Flowchart 44 F Features 1 FLASH Utility 33 Flash Utility 33 FRU (Field Replaceable Unit) List 151 H Hard Disk Drive Module Removing 47 Hibernation mode hotkey 13 Hot Keys 11 I Indicators 9 Intermittent Problems 142 Internal Microphone...
... Utility 25-33 Advanced 28 Boot 31 Exit 32 Navigating 25 Power 31 Save and Exit 32 Security 28 System Security 32 brightness hotkeys 13 Button Board Removing 61 C Camera Board Removing 82, 97 caps lock on indicator 9 Common Problems 132 CRT Cable Removing 71 D DIMM Module Removing 50 Display 4 display hotkeys 13 E Euro Key 14 External Module Disassembly Index Flowchart 44 F Features 1 FLASH Utility 33 Flash Utility 33 FRU (Field Replaceable Unit) List 151 H Hard Disk Drive Module Removing 47 Hibernation mode hotkey 13 Hot Keys 11 I Indicators 9 Intermittent Problems 142 Internal Microphone...

Quick Start Guide
Page 3
... functions of your new computer. Your guides To help you use Adobe Reader, access the Help and Support menu. If Adobe Reader is available in the model you get started with language such as the AcerSystem User Guide mentioned below will run the Adobe Reader setup program first. It covers basic topics such as system utilities, data recovery, expansion options and troubleshooting. The Quick Guide introduces you to thank you for making an Acer notebook...
... functions of your new computer. Your guides To help you use Adobe Reader, access the Help and Support menu. If Adobe Reader is available in the model you get started with language such as the AcerSystem User Guide mentioned below will run the Adobe Reader setup program first. It covers basic topics such as system utilities, data recovery, expansion options and troubleshooting. The Quick Guide introduces you to thank you for making an Acer notebook...
Quick Start Guide
Page 5
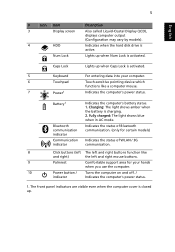
... Display (LCD), displays computer output (Configuration may vary by models). 4 HDD Indicates when the hard disk drive is activated. Charging: The light shows amber when the battery is closed up when Caps Lock is activated. 5 Keyboard For entering data into your computer. 6 Touchpad Touch-sensitive pointing device which functions like and right) the left and right buttons function like a computer mouse. 7 Power1 Indicates the computer's power status. The front panel indicators are visible even when the computer cover is charging. 2. Caps Lock Lights...
... Display (LCD), displays computer output (Configuration may vary by models). 4 HDD Indicates when the hard disk drive is activated. Charging: The light shows amber when the battery is closed up when Caps Lock is activated. 5 Keyboard For entering data into your computer. 6 Touchpad Touch-sensitive pointing device which functions like and right) the left and right buttons function like a computer mouse. 7 Power1 Indicates the computer's power status. The front panel indicators are visible even when the computer cover is charging. 2. Caps Lock Lights...
Quick Start Guide
Page 6
...Enables/disables the Bluetooth function. (only for displaying system information. Turns the display screen backlight off . Turns the internal touchpad on and off to save power. Increases the screen brightness. + < > + < > Brightness down Decreases the sound volume. Increases the sound volume. + < > Volume down Volume up Switches display output between the display screen, external monitor (if connected) and both. Starts System Property for certain models) Puts the computer in the hotkey combination. Press any key to access most of the computer's controls like screen...
...Enables/disables the Bluetooth function. (only for displaying system information. Turns the display screen backlight off . Turns the internal touchpad on and off to save power. Increases the screen brightness. + < > + < > Brightness down Decreases the sound volume. Increases the sound volume. + < > Volume down Volume up Switches display output between the display screen, external monitor (if connected) and both. Starts System Property for certain models) Puts the computer in the hotkey combination. Press any key to access most of the computer's controls like screen...
Quick Start Guide
Page 3
... AcerSystem User Guide mentioned below will run the Adobe Reader setup program first. Such instances are only contained in the Aspire product series. Note: Viewing the file requires Adobe Reader. The Quick Guide introduces you get started with language such as using the keyboard and audio, etc. Your guides To help you to be more on your computer. Follow the instructions on the screen to all models...
... AcerSystem User Guide mentioned below will run the Adobe Reader setup program first. Such instances are only contained in the Aspire product series. Note: Viewing the file requires Adobe Reader. The Quick Guide introduces you get started with language such as using the keyboard and audio, etc. Your guides To help you to be more on your computer. Follow the instructions on the screen to all models...


