Acer Aspire 1660 Service Guide
Page 8
...Upgrade Procedure 71 Base Unit to Wireless Unit 71 Chapter 4 Troubleshooting 72 System Check Procedures 73 External Diskette Drive Check 73 External CD-ROM Drive Check 73 Keyboard or Auxiliary Input Device Check 73 Memory check 74 Power System Check 74 Touchpad Check 76 Power-...89 How to Build NAPP Master Hard Disc Drive 90 CD to Disk Recovery 90 Disk to Disk Recovery 93 Chapter 5 Jumper and Connector Locations 98 Top View 98 Bottom View 99 Chapter 6 FRU (Field Replaceable Unit) List 100 Aspire 1660 Exploded Diagram 101 Appendix A Model Definition and Configuration 112...
...Upgrade Procedure 71 Base Unit to Wireless Unit 71 Chapter 4 Troubleshooting 72 System Check Procedures 73 External Diskette Drive Check 73 External CD-ROM Drive Check 73 Keyboard or Auxiliary Input Device Check 73 Memory check 74 Power System Check 74 Touchpad Check 76 Power-...89 How to Build NAPP Master Hard Disc Drive 90 CD to Disk Recovery 90 Disk to Disk Recovery 93 Chapter 5 Jumper and Connector Locations 98 Top View 98 Bottom View 99 Chapter 6 FRU (Field Replaceable Unit) List 100 Aspire 1660 Exploded Diagram 101 Appendix A Model Definition and Configuration 112...
Acer Aspire 1660 Service Guide
Page 99
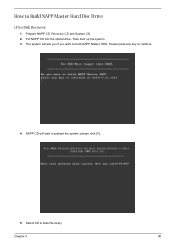
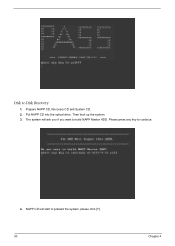
Select CD to Disk Recovery 1. How to Build NAPP Master Hard Disc Drive CD to Disk Revocery. Prepare NAPP CD, Recovery CD and System CD. 2. Then boot up the system. 3. NAPP CD will ask you if you want to build NAPP Master HDD. Chapter 4 90 Please press any key to preload the system, please click [Y]. 5. Put NAPP CD into the optical drive. The system will start to continue. 4.
Select CD to Disk Recovery 1. How to Build NAPP Master Hard Disc Drive CD to Disk Revocery. Prepare NAPP CD, Recovery CD and System CD. 2. Then boot up the system. 3. NAPP CD will ask you if you want to build NAPP Master HDD. Chapter 4 90 Please press any key to preload the system, please click [Y]. 5. Put NAPP CD into the optical drive. The system will start to continue. 4.
Acer Aspire 1660 Service Guide
Page 100
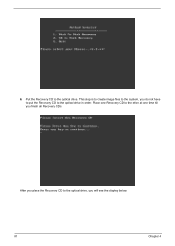
Put the Recovery CD to the optical drive, you will see the display below. 91 Chapter 4 After you finish all Recovery CDs. This step is to create image files to the system, you do not have to put the Recovery CD to the drive at one time till you place the Recovery CD to the optical drive. 6. Place one Recovery CD to the optical drive in order.
Put the Recovery CD to the optical drive, you will see the display below. 91 Chapter 4 After you finish all Recovery CDs. This step is to create image files to the system, you do not have to put the Recovery CD to the drive at one time till you place the Recovery CD to the optical drive. 6. Place one Recovery CD to the optical drive in order.
Acer Aspire 1660 Service Guide
Page 102
Prepare NAPP CD, Recovery CD and System CD. 2. Put NAPP CD into the optical drive. Please press any key to Disk Recovery 1. Then boot up the system. 3. The system will start to build NAPP Master HDD. Disk to continue. 4. NAPP CD will ask you if you want to preload the system, please click [Y]. 93 Chapter 4
Prepare NAPP CD, Recovery CD and System CD. 2. Put NAPP CD into the optical drive. Please press any key to Disk Recovery 1. Then boot up the system. 3. The system will start to build NAPP Master HDD. Disk to continue. 4. NAPP CD will ask you if you want to preload the system, please click [Y]. 93 Chapter 4
Acer Aspire 1660 Service Guide
Page 103
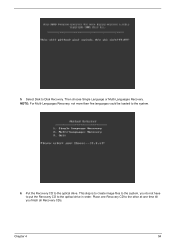
Then choose Single Language or Multi-Languages Recovery. This step is to create image files to the system, you finish all Recovery CDs. Select Disk to the system. 6. 5. NOTE: For Multi-Languages Recovery, not more than five languages could be loaded to Disk Recovery. Place one Recovery CD to the drive at one time till you do not have to put the Recovery CD to the optical drive. Chapter 4 94 Put the Recovery CD to the optical drive in order.
Then choose Single Language or Multi-Languages Recovery. This step is to create image files to the system, you finish all Recovery CDs. Select Disk to the system. 6. 5. NOTE: For Multi-Languages Recovery, not more than five languages could be loaded to Disk Recovery. Place one Recovery CD to the drive at one time till you do not have to put the Recovery CD to the optical drive. Chapter 4 94 Put the Recovery CD to the optical drive in order.
Acer Aspire 1660 Service Guide
Page 104
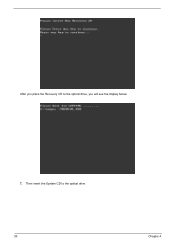
Then insert the System CD to the optical drive, you place the Recovery CD to the optical drive. 95 Chapter 4 After you will see the display below. 7.
Then insert the System CD to the optical drive, you place the Recovery CD to the optical drive. 95 Chapter 4 After you will see the display below. 7.
Aspire 1660 User Guide
Page 9
English Software 55 System software 57 Launch Manager 57 BIOS Setup Utility 58 OneButton Recovery (OBR) 59 Multilingual operating system installation 59 Restore without a Recovery CD 59 Setup password and exit 60 Troubleshooting 61 Frequently asked questions 63 Requesting service 66 International Traveler's Warranty (ITW) 66 Before you call 66 Appendix A Specifications 67 Appendix B Regulation & safety notices 73 Index 87
English Software 55 System software 57 Launch Manager 57 BIOS Setup Utility 58 OneButton Recovery (OBR) 59 Multilingual operating system installation 59 Restore without a Recovery CD 59 Setup password and exit 60 Troubleshooting 61 Frequently asked questions 63 Requesting service 66 International Traveler's Warranty (ITW) 66 Before you call 66 Appendix A Specifications 67 Appendix B Regulation & safety notices 73 Index 87
Aspire 1660 User Guide
Page 69
... BIOS Setup Utility, press during POST. The system will reboot. b Make sure the [Hard Disk Recovery] setting in [Advanced] is installed when you purchase your notebook. Restore without a Recovery CD This recovery process helps you restore the C: drive with the original software content that is [Enabled]. a Check ...use when you first power-on the system. 1 Turn on certain models. English English 59 OneButton Recovery (OBR) Note: This feature is only available on the system. 2 Acer multilingual operating system selection menu will pop-up all data will be erased.) It is enabled or...
... BIOS Setup Utility, press during POST. The system will reboot. b Make sure the [Hard Disk Recovery] setting in [Advanced] is installed when you purchase your notebook. Restore without a Recovery CD This recovery process helps you restore the C: drive with the original software content that is [Enabled]. a Check ...use when you first power-on the system. 1 Turn on certain models. English English 59 OneButton Recovery (OBR) Note: This feature is only available on the system. 2 Acer multilingual operating system selection menu will pop-up all data will be erased.) It is enabled or...


