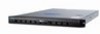
Acer Altos R520 User's Guide EN
Page 8
... PCI riser assembly 56 Removing and installing a PCI card 58 Upgrading the CPU 61 CPU upgrading guidelines 61 Upgrading the system memory 67 Memory module installation guidelines 68 Memory module population guidelines 68 Memory configuration overview 70 Installing and removing a power supply module 76 ...Entering BIOS setup Using the BIOS menus Main Advanced Security Server Management Boot Options Boot Manager Error Manager Exit Upgrading the BIOS 5 Troubleshooting Troubleshooting Resetting the system Problems following initial system installation First steps checklist 89 91 92...
... PCI riser assembly 56 Removing and installing a PCI card 58 Upgrading the CPU 61 CPU upgrading guidelines 61 Upgrading the system memory 67 Memory module installation guidelines 68 Memory module population guidelines 68 Memory configuration overview 70 Installing and removing a power supply module 76 ...Entering BIOS setup Using the BIOS menus Main Advanced Security Server Management Boot Options Boot Manager Error Manager Exit Upgrading the BIOS 5 Troubleshooting Troubleshooting Resetting the system Problems following initial system installation First steps checklist 89 91 92...

Acer Altos R520 User's Guide EN
Page 49
.... 6 Remove any hardware structure or cable that block access to the component you must replace or upgrade. See the following sections. ESD precautions Electrostatic discharge (ESD) can damage the processor, disk drives, expansion boards, motherboard, memory modules and other server components. These sections contain important ESD precautions along with the server throughout...
.... 6 Remove any hardware structure or cable that block access to the component you must replace or upgrade. See the following sections. ESD precautions Electrostatic discharge (ESD) can damage the processor, disk drives, expansion boards, motherboard, memory modules and other server components. These sections contain important ESD precautions along with the server throughout...

Acer Altos R520 User's Guide EN
Page 57
TP02227 4 Store it in a protective packaging. 5 To install a second CPU to your system, see "Upgrading the CPU" section on page 61 for detailed instructions. 6 Observe the post-installation instructions described on page 39. 2 Turn the CPU air duct over. 3 Remove ...: Important: Do not remove the CPU air dam from the CPU air duct except when installing a second CPU to the system. Do not remove the memory air deflector. 1 Observe the ESD precautions and pre-installation instructions described on page 40.
TP02227 4 Store it in a protective packaging. 5 To install a second CPU to your system, see "Upgrading the CPU" section on page 61 for detailed instructions. 6 Observe the post-installation instructions described on page 39. 2 Turn the CPU air duct over. 3 Remove ...: Important: Do not remove the CPU air dam from the CPU air duct except when installing a second CPU to the system. Do not remove the memory air deflector. 1 Observe the ESD precautions and pre-installation instructions described on page 40.
Acer Altos R520 User's Guide EN
Page 77
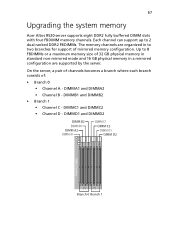
... support up to 2 dual ranked DDR2 FBDIMMs. The memory channels are organized in to 8 FBDIMMs or a maximum memory size of 32 GB physical memory in standard non-mirrored mode and 16 GB physical memory in a mirrored configuration are supported by the server. 67 Upgrading the system memory Acer Altos R520 server supports eight DDR2 fully buffered DIMM slots with...
... support up to 2 dual ranked DDR2 FBDIMMs. The memory channels are organized in to 8 FBDIMMs or a maximum memory size of 32 GB physical memory in standard non-mirrored mode and 16 GB physical memory in a mirrored configuration are supported by the server. 67 Upgrading the system memory Acer Altos R520 server supports eight DDR2 fully buffered DIMM slots with...

Acer Altos R520 User's Guide EN
Page 78
Attempts to the server: • The system must be identical with gold-plated edge connectors only. 68 3 System upgrade Memory module installation guidelines The following order: • Channel A: DIMM slots A1 and A2 • Channel B: DIMM slots B1 and B2 • Channel C: DIMM slots... a non-DDR2 FBDIMM into the socket. Do not touch the components or gold edge connectors. • Install FBDIMMs with respect to the tables on "Memory module population order" on page 69 for proper population order. • Use only DDR2 FBDIMMs. Other DIMMs will not fit into a socket will damage...
Attempts to the server: • The system must be identical with gold-plated edge connectors only. 68 3 System upgrade Memory module installation guidelines The following order: • Channel A: DIMM slots A1 and A2 • Channel B: DIMM slots B1 and B2 • Channel C: DIMM slots... a non-DDR2 FBDIMM into the socket. Do not touch the components or gold edge connectors. • Install FBDIMMs with respect to the tables on "Memory module population order" on page 69 for proper population order. • Use only DDR2 FBDIMMs. Other DIMMs will not fit into a socket will damage...

Acer Altos R520 User's Guide EN
Page 80
... (Sparing) 2 GB 2 GB (Sparing) 16 GB 8 GB Memory configuration overview The system supports the following memory configuration that allow flexibility in performance, redundancy, and ability to upgrade. • Standard configuration • Memory mirroring • Memory sparing Memory mirroring and memory sparing features are mutually exclusive, only one of these memory modes can be enabled at one time and...
... (Sparing) 2 GB 2 GB (Sparing) 16 GB 8 GB Memory configuration overview The system supports the following memory configuration that allow flexibility in performance, redundancy, and ability to upgrade. • Standard configuration • Memory mirroring • Memory sparing Memory mirroring and memory sparing features are mutually exclusive, only one of these memory modes can be enabled at one time and...

Acer Altos R520 User's Guide EN
Page 82
... be added to the system. All four memory modules in reserve so it can be use to replace a failed FBDIMM. Sparing is not supported across branches. 72 3 System upgrade To upgrade to a four FBDIMM mirrored memory configuration, four additional FBDIMMs must be populated... and must comply with the exception of speed. The memory controller hub (MCH) will be selected as the spare pair unit....
... be added to the system. All four memory modules in reserve so it can be use to replace a failed FBDIMM. Sparing is not supported across branches. 72 3 System upgrade To upgrade to a four FBDIMM mirrored memory configuration, four additional FBDIMMs must be populated... and must comply with the exception of speed. The memory controller hub (MCH) will be selected as the spare pair unit....

Acer Altos R520 User's Guide EN
Page 83
...proper installation sequence. 1 Observe the ESD precautions and pre-installation instructions described on page 101 for more information. Note: After upgrading system memory to this feature, the memory RAS setting in the BIOS setup must be identical in organization, size and speed. • DIMM slots A1 and B1... D1 and D2 • Sparing should be enabled in the BIOS setup utility • BIOS will configure rank sparing mode. • The largest memory size among the DIMM pairs (DIMM_A1, DIMM_B1) and (DIMM_A2, DIMM_B2) and (DIMM_C1, DIMM_D1) and (DIMM_C2, DIMM_D2), will be selected as the...
...proper installation sequence. 1 Observe the ESD precautions and pre-installation instructions described on page 101 for more information. Note: After upgrading system memory to this feature, the memory RAS setting in the BIOS setup must be identical in organization, size and speed. • DIMM slots A1 and B1... D1 and D2 • Sparing should be enabled in the BIOS setup utility • BIOS will configure rank sparing mode. • The largest memory size among the DIMM pairs (DIMM_A1, DIMM_B1) and (DIMM_A2, DIMM_B2) and (DIMM_C1, DIMM_D1) and (DIMM_C2, DIMM_D2), will be selected as the...

Acer Altos R520 User's Guide EN
Page 92
... its protective packaging. 4 Align then insert the activation key into the RAID activation key connector on the active mid-plane board (A). 5 Locate the RAID cache memory (DDR-2) slot on page 39. 2 Remove the power distribution board cover. The server platform supports SAS hardware RAID 0, 1, 5, 6 (when available), 10, and 50 levels. 82...
... its protective packaging. 4 Align then insert the activation key into the RAID activation key connector on the active mid-plane board (A). 5 Locate the RAID cache memory (DDR-2) slot on page 39. 2 Remove the power distribution board cover. The server platform supports SAS hardware RAID 0, 1, 5, 6 (when available), 10, and 50 levels. 82...

Acer Altos R520 User's Guide EN
Page 135
...automatically when the BIOS update process is completed. 125 Upgrading the BIOS The upgrade utility allows you need to record the current BIOS settings and download the BIOS image file to a temporary folder on your hard drive or a USB flash memory device. To download the BIOS image file: Download the... image file to a temporary folder on page 92. 2 Write down the current settings in the Readme file that you performed the upgrade. To upgrade the BIOS: Follow the instructions in the BIOS ...
...automatically when the BIOS update process is completed. 125 Upgrading the BIOS The upgrade utility allows you need to record the current BIOS settings and download the BIOS image file to a temporary folder on your hard drive or a USB flash memory device. To download the BIOS image file: Download the... image file to a temporary folder on page 92. 2 Write down the current settings in the Readme file that you performed the upgrade. To upgrade the BIOS: Follow the instructions in the BIOS ...

Acer Altos R520 User's Guide EN
Page 139
...files. Cold boot reset. Resetting the system Before going through in your dealer or local Acer representative for assistance. Turn the system power off and then on. If the problem you... are experiencing is with the application software" on page 136. Clear system memory, restart POST, and reload the OS. For any drivers used for BIOS, the BMC, FRUSDR... own, contact your system, such as video drivers, network drivers and SAS drivers. Firmware upgrades include updates for components you have installed in -depth troubleshooting, attempt first to reset the ...
...files. Cold boot reset. Resetting the system Before going through in your dealer or local Acer representative for assistance. Turn the system power off and then on. If the problem you... are experiencing is with the application software" on page 136. Clear system memory, restart POST, and reload the OS. For any drivers used for BIOS, the BMC, FRUSDR... own, contact your system, such as video drivers, network drivers and SAS drivers. Firmware upgrades include updates for components you have installed in -depth troubleshooting, attempt first to reset the ...
Acer Altos R520 User's Guide EN
Page 182
...installing 55 power cord 33 power distribution board cover installing 49 removing 48 power supply installing 77 removing 78 processor upgrade guidelines 61 R rack installing 155 rack installation 149 mounting pattern 154 precautions 151 RAID activation key installing 82 removing...87 installing 87 removing 88 setting up the system 31 preinstallation requirements 31 specification chipset 3 control panel 5 graphic interface 5 I/O ports 5 media storage 3 memory subsystem 3 networking 5 OS 6 PCI I/O 5 power supply 6 processor 3 SAS models 4 SATA models 4 server management 5 system fan 6 system boards...
...installing 55 power cord 33 power distribution board cover installing 49 removing 48 power supply installing 77 removing 78 processor upgrade guidelines 61 R rack installing 155 rack installation 149 mounting pattern 154 precautions 151 RAID activation key installing 82 removing...87 installing 87 removing 88 setting up the system 31 preinstallation requirements 31 specification chipset 3 control panel 5 graphic interface 5 I/O ports 5 media storage 3 memory subsystem 3 networking 5 OS 6 PCI I/O 5 power supply 6 processor 3 SAS models 4 SATA models 4 server management 5 system fan 6 system boards...

Acer Altos R520 User's Guide EN
Page 183
173 system jumpers 27 system memory reconfiguring 75 system tour 1 system upgrade 37 ESD precautions 39 installation precautions 39 post-installation instructions 40 preinstallation instructions 39 T top cover installing 44 removing 44 troubleshooting 127 confirming loading of ... diagnostic testing 131 POST error codes 140 problems 132 adapter stopped working 136 cannot connect to a network 135 cannot detect bootable drive 134 cannot detect memory 134 cannot eject DVD/CD tray 134 cannot read DVD/CD 134 controller stopped working 136 CPUs not recognized 133 DVD/CD drive no light...
173 system jumpers 27 system memory reconfiguring 75 system tour 1 system upgrade 37 ESD precautions 39 installation precautions 39 post-installation instructions 40 preinstallation instructions 39 T top cover installing 44 removing 44 troubleshooting 127 confirming loading of ... diagnostic testing 131 POST error codes 140 problems 132 adapter stopped working 136 cannot connect to a network 135 cannot detect bootable drive 134 cannot detect memory 134 cannot eject DVD/CD tray 134 cannot read DVD/CD 134 controller stopped working 136 CPUs not recognized 133 DVD/CD drive no light...
