
User Manual
Page 8
... To install an expansion card 45 Installing and removing a hard disk 47 To remove a hard disk 47 To install a hard disk 47 5 BIOS setup 49 BIOS setup 51 Entering BIOS setup 52 Main 54 Advanced 55 PCI Configuration 56 Boot Configuration 57 Peripheral Configuration 58 Drive Configuration 59 Floppy Configuration 61 Event Log...
... To install an expansion card 45 Installing and removing a hard disk 47 To remove a hard disk 47 To install a hard disk 47 5 BIOS setup 49 BIOS setup 51 Entering BIOS setup 52 Main 54 Advanced 55 PCI Configuration 56 Boot Configuration 57 Peripheral Configuration 58 Drive Configuration 59 Floppy Configuration 61 Event Log...

User Manual
Page 9
... not recognized under device manager (Windows Operating System) 91 Hard drive(s) are not recognized 91 Bootable CD-ROM is not detected 92 LED information 93 BIOS POST Beep Codes 95
... not recognized under device manager (Windows Operating System) 91 Hard drive(s) are not recognized 91 Bootable CD-ROM is not detected 92 LED information 93 BIOS POST Beep Codes 95
User Manual
Page 10
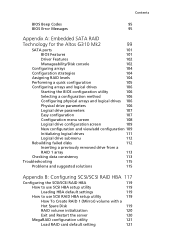
... 95 Appendix A: Embedded SATA RAID Technology for the Altos G310 Mk2 99 SATA ports 101 BIOS Features 101 Driver Features 102 Manageability/Disk console 102 Configuring arrays 104 Configuration strategies 104 Assigning RAID levels 104 Performing a quick configuration 105 Configuring arrays and logical drives 106 Starting the BIOS configuration utility 106 Selecting a configuration method 106...
... 95 Appendix A: Embedded SATA RAID Technology for the Altos G310 Mk2 99 SATA ports 101 BIOS Features 101 Driver Features 102 Manageability/Disk console 102 Configuring arrays 104 Configuration strategies 104 Assigning RAID levels 104 Performing a quick configuration 105 Configuring arrays and logical drives 106 Starting the BIOS configuration utility 106 Selecting a configuration method 106...

User Manual
Page 25
... Recovery 2-3 1 None 1 Function/Mode Normal Jumper Setting 1-2 1 Clear CMOS 2-3 1 No Jumper None 1 Configuration OM16682 The BIOS uses current configuration information and passwords for booting. The maintenance menu is reset to recover the BIOS 3 configuration. Configuration The BIOS uses current configuration 3 information. A recovery floppy disk is required. After the POST runs, Setup runs 3 automatically...
... Recovery 2-3 1 None 1 Function/Mode Normal Jumper Setting 1-2 1 Clear CMOS 2-3 1 No Jumper None 1 Configuration OM16682 The BIOS uses current configuration information and passwords for booting. The maintenance menu is reset to recover the BIOS 3 configuration. Configuration The BIOS uses current configuration 3 information. A recovery floppy disk is required. After the POST runs, Setup runs 3 automatically...

User Manual
Page 56
..., DM3 and DM4 Note: The DIMM socket is slotted to view the new value for total system memory and make a note of it. Run the BIOS setup to ensure proper installation. Reconfiguring the system memory The system automatically detects the amount of the DIMM and insert it again. 6 Observe the "Post...
..., DM3 and DM4 Note: The DIMM socket is slotted to view the new value for total system memory and make a note of it. Run the BIOS setup to ensure proper installation. Reconfiguring the system memory The system automatically detects the amount of the DIMM and insert it again. 6 Observe the "Post...
User Manual
Page 57
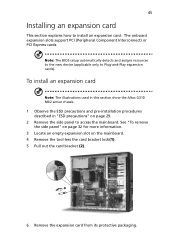
Note: The BIOS setup automatically detects and assigns resources to the new device (applicable only to access the mainboard. To install an expansion card Note: The illustrations used in this section show the Altos G310 Mk2 server chassis. 1 Observe the ESD precautions and pre-installation procedures described in "ESD precautions" on the mainboard. 4 Remove the...
Note: The BIOS setup automatically detects and assigns resources to the new device (applicable only to access the mainboard. To install an expansion card Note: The illustrations used in this section show the Altos G310 Mk2 server chassis. 1 Observe the ESD precautions and pre-installation procedures described in "ESD precautions" on the mainboard. 4 Remove the...

User Manual
Page 62
This chapter gives information about the system BIOS and discusses how to configure the system by changing the settings of the BIOS parameters.
This chapter gives information about the system BIOS and discusses how to configure the system by changing the settings of the BIOS parameters.

User Manual
Page 63
...have saved all open files. This memory area is not part of the system RAM which allows configuration data to the security setup BIOS setup loads the configuration values in CMOS. Before you repeatedly receive Run Setup messages, the battery may be retained when power is... a hardware configuration program built into your system's Basic Input/Output System (BIOS). Ask a qualified technician for assistance. • When redefining the communication ports to prevent any conflicts • When making changes to the ...
...have saved all open files. This memory area is not part of the system RAM which allows configuration data to the security setup BIOS setup loads the configuration values in CMOS. Before you repeatedly receive Run Setup messages, the battery may be retained when power is... a hardware configuration program built into your system's Basic Input/Output System (BIOS). Ask a qualified technician for assistance. • When redefining the communication ports to prevent any conflicts • When making changes to the ...

User Manual
Page 64
... square brackets. keys to select a field. Grayed-out items have fixed settings and are several tabs on the setup screen corresponding to the six major BIOS menus: • Main • Advanced • Security • Power • Boot • Exit The parameters on the server to start the system POST (... to the next page or to return to the previous screen. • Use the Up and Down arrow keys to enter the BIOS setup screen. 52 5 BIOS setup Entering BIOS setup Power on the screens shown in this User's Guide display default system values. During bootup, press F2 to select an item...
... square brackets. keys to select a field. Grayed-out items have fixed settings and are several tabs on the setup screen corresponding to the six major BIOS menus: • Main • Advanced • Security • Power • Boot • Exit The parameters on the server to start the system POST (... to the next page or to return to the previous screen. • Use the Up and Down arrow keys to enter the BIOS setup screen. 52 5 BIOS setup Entering BIOS setup Power on the screens shown in this User's Guide display default system values. During bootup, press F2 to select an item...

User Manual
Page 65
In the descriptive table following each of the screen illustrations, settings in boldface are the default and suggested parameter settings. 53 • Use the Enter key to close the BIOS setup. Note: When a parameter is preceded by a (>), it means that a submenu screen is available. • Press F1 for General Help on using the BIOS setup. • Press F9 to set up defaults • Press F10 to save changes and close the BIOS setup. • Press Esc to display a submenu screen.
In the descriptive table following each of the screen illustrations, settings in boldface are the default and suggested parameter settings. 53 • Use the Enter key to close the BIOS setup. Note: When a parameter is preceded by a (>), it means that a submenu screen is available. • Press F1 for General Help on using the BIOS setup. • Press F9 to set up defaults • Press F10 to save changes and close the BIOS setup. • Press Esc to display a submenu screen.

User Manual
Page 66
... the date and time, you do not need to keep the date and time accurately even when the power is off. 54 5 BIOS setup Main The Main menu displays basic and important information about the system. Sub-Menu ? The real-time clock keeps the system date... and time. Default is necessary for troubleshooting and may be required when asking for technical support. BIOS SETUP UTILITY Main Advanced Security Power Boot Exit BIOS Version : BA92510A.86B.0149 ▲ Processor Type : Genuine Intel(R) CPU Hyper-Threading Technology : [Enabled] Processor Speed 3.6...
... the date and time, you do not need to keep the date and time accurately even when the power is off. 54 5 BIOS setup Main The Main menu displays basic and important information about the system. Sub-Menu ? The real-time clock keeps the system date... and time. Default is necessary for troubleshooting and may be required when asking for technical support. BIOS SETUP UTILITY Main Advanced Security Power Boot Exit BIOS Version : BA92510A.86B.0149 ▲ Processor Type : Genuine Intel(R) CPU Hyper-Threading Technology : [Enabled] Processor Speed 3.6...

User Manual
Page 67
... ? Drive Configuration ? Event Log Configuration ? USB Configuration ? Fan Control Configuration ? Video Configuration ? Important! Hardware Monitoring ? Be cautious in setting parameter values in the screen below BIOS SETUP UTILITY Main Advanced Security Power Boot Exit Setup Warning: Setting items on startup. Boot Configuration ? Remote Access Configuration PCI Configuration ←→ Select Screen...
... ? Drive Configuration ? Event Log Configuration ? USB Configuration ? Fan Control Configuration ? Video Configuration ? Important! Hardware Monitoring ? Be cautious in setting parameter values in the screen below BIOS SETUP UTILITY Main Advanced Security Power Boot Exit Setup Warning: Setting items on startup. Boot Configuration ? Remote Access Configuration PCI Configuration ←→ Select Screen...

User Manual
Page 68
... Exit Parameter Description PCI Slot N Configuration Sets a parameter for the PCI buses Option Auto 56 PCI Configuration 5 BIOS setup Advanced PCI Configuration PCI Slot1 IRQ Priority PCI Slot2 IRQ Priority PCI Slot3 IRQ Priority BIOS SETUP UTILITY [Auto] [Auto] [Auto] Manual IRQ selection does not guarantee PCI slot device will be configured...
... Exit Parameter Description PCI Slot N Configuration Sets a parameter for the PCI buses Option Auto 56 PCI Configuration 5 BIOS setup Advanced PCI Configuration PCI Slot1 IRQ Priority PCI Slot2 IRQ Priority PCI Slot3 IRQ Priority BIOS SETUP UTILITY [Auto] [Auto] [Auto] Manual IRQ selection does not guarantee PCI slot device will be configured...

User Manual
Page 69
... Limit This should be enabled in the system. 57 Boot Configuration Advanced Boot Configuration Plug & Play O/S Numlock Max CPUID Value Limit: BIOS SETUP UTILITY [No] [On] [Disabled] No, lets the BIOS configure all the devices in order to boot legacy OSes that cannot support CPUs with extended CPUID functions Option No Yes...
... Limit This should be enabled in the system. 57 Boot Configuration Advanced Boot Configuration Plug & Play O/S Numlock Max CPUID Value Limit: BIOS SETUP UTILITY [No] [On] [Disabled] No, lets the BIOS configure all the devices in order to boot legacy OSes that cannot support CPUs with extended CPUID functions Option No Yes...

User Manual
Page 70
... of serial port B Parallel port Indicates the configuration of the parallel port Option Enabled Disabled Auto Enabled Disabled Auto Enabled Disabled Auto 58 Peripheral Configuration 5 BIOS setup Advanced Peripheral Configuration Serial Port A Serial Port B Parallel Port Mode Onboard Gb LAN Onboard 10/100 LAN ASF Support...
... of serial port B Parallel port Indicates the configuration of the parallel port Option Enabled Disabled Auto Enabled Disabled Auto Enabled Disabled Auto 58 Peripheral Configuration 5 BIOS setup Advanced Peripheral Configuration Serial Port A Serial Port B Parallel Port Mode Onboard Gb LAN Onboard 10/100 LAN ASF Support...

User Manual
Page 71
...(R) RAID Technology SATA AHCI Mode PCI IDE Bus Master Hard Disk Pre-Delay ? [SATA Port-0 : ? [SATA Port-2 : ? [SATA Port-1 : ? [SATA Port-3 : ? [PATA Master : ? [PATA Slave : BIOS SETUP UTILITY Disabled: All IDE resources disabled [Enhanced] LEGACY: Up to operate in a two way mode. ECP (Extended Capabilities Port) allows the parallel port to...
...(R) RAID Technology SATA AHCI Mode PCI IDE Bus Master Hard Disk Pre-Delay ? [SATA Port-0 : ? [SATA Port-2 : ? [SATA Port-1 : ? [SATA Port-3 : ? [PATA Master : ? [PATA Slave : BIOS SETUP UTILITY Disabled: All IDE resources disabled [Enhanced] LEGACY: Up to operate in a two way mode. ECP (Extended Capabilities Port) allows the parallel port to...

User Manual
Page 72
60 5 BIOS setup Parameter Description Option ATA/IDE Configuration Disabled: All IDE resources disabled. LEGACY: Up to 2 IDE channels enabled for OS requiring legacy IDE operation. ENHANCED: ...
60 5 BIOS setup Parameter Description Option ATA/IDE Configuration Disabled: All IDE resources disabled. LEGACY: Up to 2 IDE channels enabled for OS requiring legacy IDE operation. ENHANCED: ...

User Manual
Page 73
61 Floppy Configuration Advanced Floppy Configuration Diskette Controller Floppy A Diskette Write Protect BIOS SETUP UTILITY [Enabled] [1.44 MB 31/2"] [Disabled] Configures the integrated diskette controller ←→ Select Screen ↑↓ Select Item Enter Select ? Sub-Menu Tab ...
61 Floppy Configuration Advanced Floppy Configuration Diskette Controller Floppy A Diskette Write Protect BIOS SETUP UTILITY [Enabled] [1.44 MB 31/2"] [Disabled] Configures the integrated diskette controller ←→ Select Screen ↑↓ Select Item Enter Select ? Sub-Menu Tab ...

User Manual
Page 74
... Enabled to allow logging of the DMI event log. [Enabled] [Enabled] ←→ Select Screen ↑↓ Select Item Enter Select ? 62 Event Log Configuration 5 BIOS setup Advanced Event Log Configuration Event Log View Event Log Clear Event Log Event Logging ECC Event Logging Mark Events As Read... BIOS SETUP UTILITY [Space Available] Views the contents of ECC events Press Enter to mark all events in the event log as read Option Enabled Disabled ...
... Enabled to allow logging of the DMI event log. [Enabled] [Enabled] ←→ Select Screen ↑↓ Select Item Enter Select ? 62 Event Log Configuration 5 BIOS setup Advanced Event Log Configuration Event Log View Event Log Clear Event Log Event Logging ECC Event Logging Mark Events As Read... BIOS SETUP UTILITY [Space Available] Views the contents of ECC events Press Enter to mark all events in the event log as read Option Enabled Disabled ...

User Manual
Page 75
DVMT MODE Selects IGD OS/Driver memory allocation method IGD DVMT/ FIXED MEMORY Selects IGD OS/Driver memory size used by BIOS & OS for Boot Display Frame Buffer Size Selects how much system RAM is allocated in PCI Memory space for Boot Display ←→ Select... Configuration Primary Video Adapter Frame Buffer Size IGD Aperture Size DVMT MODE IGD DVMT/FIXED MEMORY BIOS SETUP UTILITY [Auto] [ 8MB] [256MB] [DVMT] [128MB] Allows selecting the Primary Video Adapter init'd & used by BIOS & OS for use by the internal graphics device IGD Aperature Size Selects how much memory ...
DVMT MODE Selects IGD OS/Driver memory allocation method IGD DVMT/ FIXED MEMORY Selects IGD OS/Driver memory size used by BIOS & OS for Boot Display Frame Buffer Size Selects how much system RAM is allocated in PCI Memory space for Boot Display ←→ Select... Configuration Primary Video Adapter Frame Buffer Size IGD Aperture Size DVMT MODE IGD DVMT/FIXED MEMORY BIOS SETUP UTILITY [Auto] [ 8MB] [256MB] [DVMT] [128MB] Allows selecting the Primary Video Adapter init'd & used by BIOS & OS for use by the internal graphics device IGD Aperature Size Selects how much memory ...


