
User Manual
Page 8
...To remove a Processor 40 Upgrading the system memory 41 Memory configuration 41 To remove a DIMM 43 To install a DIMM 44 Reconfiguring the system memory 44 Installing an expansion card 45 To install an expansion card 45 Installing and removing a hard disk 47 To remove a hard disk 47 To install a hard disk 47 5 BIOS setup 49 BIOS setup 51 Entering BIOS setup 52 Main 54 Advanced 55 PCI Configuration 56 Boot Configuration 57 Peripheral Configuration 58 Drive Configuration 59 Floppy Configuration 61 Event Log Configuration 62 Video Configuration 63 USB...
...To remove a Processor 40 Upgrading the system memory 41 Memory configuration 41 To remove a DIMM 43 To install a DIMM 44 Reconfiguring the system memory 44 Installing an expansion card 45 To install an expansion card 45 Installing and removing a hard disk 47 To remove a hard disk 47 To install a hard disk 47 5 BIOS setup 49 BIOS setup 51 Entering BIOS setup 52 Main 54 Advanced 55 PCI Configuration 56 Boot Configuration 57 Peripheral Configuration 58 Drive Configuration 59 Floppy Configuration 61 Event Log Configuration 62 Video Configuration 63 USB...

User Manual
Page 9
... connection fails. 89 The controller stopped working when an add-in adaptor was installed. 89 The add-in adaptor stopped working without apparent cause. 89 System boots when installing PCI card 90 Problems with newly installed application software 90 Problems with application software that ran correctly earlier 90 Devices are not recognized under device manager (Windows Operating System) 91 Hard drive(s) are not recognized 91 Bootable CD-ROM is not detected 92 LED information 93 BIOS POST Beep Codes...
... connection fails. 89 The controller stopped working when an add-in adaptor was installed. 89 The add-in adaptor stopped working without apparent cause. 89 System boots when installing PCI card 90 Problems with newly installed application software 90 Problems with application software that ran correctly earlier 90 Devices are not recognized under device manager (Windows Operating System) 91 Hard drive(s) are not recognized 91 Bootable CD-ROM is not detected 92 LED information 93 BIOS POST Beep Codes...
User Manual
Page 10
...drive configuration screen 109 New configuration and view/add configuration 109 Initializing logical drives 111 Logical drive submenu 112 Rebuilding failed disks 112 Inserting a previously removed drive from a RAID 1 array 113 Checking data consistency 113 Troubleshooting 115 Problems and suggested solutions 115 Appendix B: Configuring SCSI/SCSI RAID HBA 117 Configuring the SCSI/SCSI RAID HBA 119 How to use SCSI HBA setup utility 119 Loading HBA default settings 119 How to use SCSI RAID HBA setup utility 119 How To Create RAID 1 (Mirror) volume with a Hot Spare Disk...
...drive configuration screen 109 New configuration and view/add configuration 109 Initializing logical drives 111 Logical drive submenu 112 Rebuilding failed disks 112 Inserting a previously removed drive from a RAID 1 array 113 Checking data consistency 113 Troubleshooting 115 Problems and suggested solutions 115 Appendix B: Configuring SCSI/SCSI RAID HBA 117 Configuring the SCSI/SCSI RAID HBA 119 How to use SCSI HBA setup utility 119 Loading HBA default settings 119 How to use SCSI RAID HBA setup utility 119 How To Create RAID 1 (Mirror) volume with a Hot Spare Disk...
User Manual
Page 35
23 Setting up the system Preinstallation requirements Selecting a site Before unpacking and installing the system, select a suitable site for the system for future use. Consider the following items from the package: • Acer Altos G310 Mk2 series system • Acer Altos G310 Mk2 series accessory box • System keys (attached to the rear panel of the system) If any of heat • Secluded from sources of the...
23 Setting up the system Preinstallation requirements Selecting a site Before unpacking and installing the system, select a suitable site for the system for future use. Consider the following items from the package: • Acer Altos G310 Mk2 series system • Acer Altos G310 Mk2 series accessory box • System keys (attached to the rear panel of the system) If any of heat • Secluded from sources of the...
User Manual
Page 42
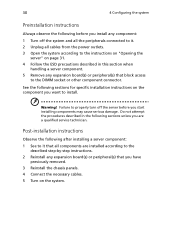
... handling a server component. 5 Remove any expansion board(s) or peripheral(s) that all cables from the power outlets. 3 Open the system according to the instructions on "Opening the server" on the component you want to the described step-by-step instructions. 2 Reinstall any expansion board(s) or peripheral(s) that you have previously removed. 3 Reinstall the chassis panels. 4 Connect the necessary cables. 5 Turn on the system. See the following sections for specific installation instructions on page...
... handling a server component. 5 Remove any expansion board(s) or peripheral(s) that all cables from the power outlets. 3 Open the system according to the instructions on "Opening the server" on the component you want to the described step-by-step instructions. 2 Reinstall any expansion board(s) or peripheral(s) that you have previously removed. 3 Reinstall the chassis panels. 4 Connect the necessary cables. 5 Turn on the system. See the following sections for specific installation instructions on page...

User Manual
Page 59
47 Installing and removing a hard disk Although the Altos G310 Mk2 has four hard disk slots, the system board only supports a maximum of the HDD (1) and (2). 3 Squeeze the two locking tabs that secure the drive to replace your computer's hard disk: 1 Remove the side and front panels (see page 32 and page 33). 2 Detach the cables from the system (3). 3 1 To install a hard disk Observe the pre-installation and ESD precautions on page 29. Follow...
47 Installing and removing a hard disk Although the Altos G310 Mk2 has four hard disk slots, the system board only supports a maximum of the HDD (1) and (2). 3 Squeeze the two locking tabs that secure the drive to replace your computer's hard disk: 1 Remove the side and front panels (see page 32 and page 33). 2 Detach the cables from the system (3). 3 1 To install a hard disk Observe the pre-installation and ESD precautions on page 29. Follow...

User Manual
Page 64
...; Main • Advanced • Security • Power • Boot • Exit The parameters on the server to start the system POST (Power On Self Test) process. There are not user-configurable. • Use the Tab key to enter the BIOS setup screen. Note: You can configure a parameter that is booting. 52 5 BIOS setup Entering BIOS setup Power on the screens shown in this User's Guide display default system values. During bootup, press F2 to...
...; Main • Advanced • Security • Power • Boot • Exit The parameters on the server to start the system POST (Power On Self Test) process. There are not user-configurable. • Use the Tab key to enter the BIOS setup screen. Note: You can configure a parameter that is booting. 52 5 BIOS setup Entering BIOS setup Power on the screens shown in this User's Guide display default system values. During bootup, press F2 to...

User Manual
Page 71
... Disabled Onboard 10/ 100 LAN Sets onboard 10/100 LAN Enabled Disabled ASF Support Sets ASF support Enabled Disabled Drive Configuration Advanced Drive Configuration ATA/IDE Configuration Intel(R) RAID Technology SATA AHCI Mode PCI IDE Bus Master Hard Disk Pre-Delay ? [SATA Port-0 : ? [SATA Port-2 : ? [SATA Port-1 : ? [SATA Port-3 : ? [PATA Master : ? [PATA Slave : BIOS SETUP UTILITY Disabled: All IDE resources disabled [Enhanced] LEGACY: Up to 2 IDE [Disabled] channels enabled for the parallel port. Sub-Menu Tab Select Field F1 General Help F9 Setup Defaults...
... Disabled Onboard 10/ 100 LAN Sets onboard 10/100 LAN Enabled Disabled ASF Support Sets ASF support Enabled Disabled Drive Configuration Advanced Drive Configuration ATA/IDE Configuration Intel(R) RAID Technology SATA AHCI Mode PCI IDE Bus Master Hard Disk Pre-Delay ? [SATA Port-0 : ? [SATA Port-2 : ? [SATA Port-1 : ? [SATA Port-3 : ? [PATA Master : ? [PATA Slave : BIOS SETUP UTILITY Disabled: All IDE resources disabled [Enhanced] LEGACY: Up to 2 IDE [Disabled] channels enabled for the parallel port. Sub-Menu Tab Select Field F1 General Help F9 Setup Defaults...
User Manual
Page 76
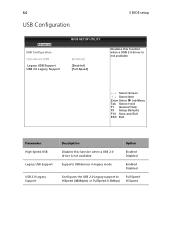
Sub-Menu Tab Select Field F1 General Help F9 Setup Defaults F10 Save and Exit ESC Exit Parameter High-Speed USB Legacy USB Support USB 2.0 Legacy Support Description Option Disables this function when a USB 2.0 driver is not available Enabled Disabled Supports USBdevices in legacy mode Enabled Disabled Configures the USB 2.0 Legacy support to HiSpeed (480Mpbs) or FullSpeed (12Mbps) Full-Speed Hi-Speed 64 USB Configuration 5 BIOS setup Advanced USB Configuration High-Speed USB Legacy USB Support USB 2.0 Legacy Support BIOS SETUP UTILITY [Enabled] [Enabled] [Full-Speed] Disables...
Sub-Menu Tab Select Field F1 General Help F9 Setup Defaults F10 Save and Exit ESC Exit Parameter High-Speed USB Legacy USB Support USB 2.0 Legacy Support Description Option Disables this function when a USB 2.0 driver is not available Enabled Disabled Supports USBdevices in legacy mode Enabled Disabled Configures the USB 2.0 Legacy support to HiSpeed (480Mpbs) or FullSpeed (12Mbps) Full-Speed Hi-Speed 64 USB Configuration 5 BIOS setup Advanced USB Configuration High-Speed USB Legacy USB Support USB 2.0 Legacy Support BIOS SETUP UTILITY [Enabled] [Enabled] [Full-Speed] Disables...

User Manual
Page 79
... ↑↓ Select Item Enter Select ? Sub-Menu Tab Select Field F1 General Help F9 Setup Defaults F10 Save and Exit ESC Exit Parameter CPU Fan Control Fan Control Lowest Fan Speed Description Sets CPU fan control Sets system fan control Selects the lower limit of chassis fan speed operation. 67 Fan Control Configuration Advanced Fan Control Configuration BIOS SETUP UTILITY Enables or disables CPU fan control Note: The new settings will turn off Option Enabled Disabled Enabled Disabled Slow Off Slow: At low system temperatures the fans will continue to run at a slow...
... ↑↓ Select Item Enter Select ? Sub-Menu Tab Select Field F1 General Help F9 Setup Defaults F10 Save and Exit ESC Exit Parameter CPU Fan Control Fan Control Lowest Fan Speed Description Sets CPU fan control Sets system fan control Selects the lower limit of chassis fan speed operation. 67 Fan Control Configuration Advanced Fan Control Configuration BIOS SETUP UTILITY Enables or disables CPU fan control Note: The new settings will turn off Option Enabled Disabled Enabled Disabled Slow Off Slow: At low system temperatures the fans will continue to run at a slow...
User Manual
Page 82
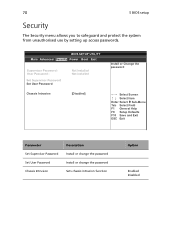
... ESC Exit Parameter Set Supervisor Password Set User Password Chassis Intrusion Description Install or change the password Install or change the password Sets chassis intrusion function Option Enabled Disabled 70 5 BIOS setup Security The Security menu allows you to safeguard and protect the system from unauthorised use by setting up access passwords. BIOS SETUP UTILITY Main Advanced Security Power Boot Exit Supervisor Password : User Password : Set Supervisor Password Set User Password Chassis Intrusion Not Installed Not Installed [Disabled] Install or Change the password ←...
... ESC Exit Parameter Set Supervisor Password Set User Password Chassis Intrusion Description Install or change the password Install or change the password Sets chassis intrusion function Option Enabled Disabled 70 5 BIOS setup Security The Security menu allows you to safeguard and protect the system from unauthorised use by setting up access passwords. BIOS SETUP UTILITY Main Advanced Security Power Boot Exit Supervisor Password : User Password : Set Supervisor Password Set User Password Chassis Intrusion Not Installed Not Installed [Disabled] Install or Change the password ←...

User Manual
Page 93
... system, such as video drivers, network drivers, and SCSI drivers. Turn the system power off /on . This clears system memory, restarts POST, reloads the operating system, and halts power to clear the system memory and reload the operating system. Clear system memory, restart POST, and reload the operating system. If you are unable to the server firmware and files, also update any issue, first ensure you are using the system. Reset button Cold boot reset. Power off and then on...
... system, such as video drivers, network drivers, and SCSI drivers. Turn the system power off /on . This clears system memory, restarts POST, reloads the operating system, and halts power to clear the system memory and reload the operating system. Clear system memory, restart POST, and reload the operating system. If you are unable to the server firmware and files, also update any issue, first ensure you are using the system. Reset button Cold boot reset. Power off and then on...
User Manual
Page 94
...; Are all peripheral devices installed correctly? • If the system has a hard disk drive, is it properly formatted or configured? • Are all jumper and switch settings on add-in boards and peripheral devices correct? Refer to the operating system documentation. • Did you are experiencing is a less frequent cause. If the problem you press the system power on/off switch on the front panel to the manufacturer...
...; Are all peripheral devices installed correctly? • If the system has a hard disk drive, is it properly formatted or configured? • Are all jumper and switch settings on add-in boards and peripheral devices correct? Refer to the operating system documentation. • Did you are experiencing is a less frequent cause. If the problem you press the system power on/off switch on the front panel to the manufacturer...

User Manual
Page 100
... correct connector at the system back panel. • Try a different network cable. • Make sure you are bound. 88 6 Troubleshooting • Are the power supply cables properly connected to "Enabled." If you are using an add-in incorrectly. Floppy disk drive activity light does not light Check the following : • Are the CD-ROM/DVD-ROM drive's power and signal cables properly installed? • Are all relevant switches and jumpers on ? CD-ROM drive or DVD-ROM drive activity light does not light Check...
... correct connector at the system back panel. • Try a different network cable. • Make sure you are bound. 88 6 Troubleshooting • Are the power supply cables properly connected to "Enabled." If you are using an add-in incorrectly. Floppy disk drive activity light does not light Check the following : • Are the CD-ROM/DVD-ROM drive's power and signal cables properly installed? • Are all relevant switches and jumpers on ? CD-ROM drive or DVD-ROM drive activity light does not light Check...
User Manual
Page 102
... been running the software from the server. Check the following: • Make sure the system meets the minimum hardware requirements for the system. 90 6 Troubleshooting System boots when installing PCI card System Server Management features require full-time "standby" power. This means some parts of the system. • Unplug the AC power cord(s) from a floppy disk, CD-ROM or DVD-ROM, try a different floppy disk. • Make sure the correct device drivers are running correctly...
... been running the software from the server. Check the following: • Make sure the system meets the minimum hardware requirements for the system. 90 6 Troubleshooting System boots when installing PCI card System Server Management features require full-time "standby" power. This means some parts of the system. • Unplug the AC power cord(s) from a floppy disk, CD-ROM or DVD-ROM, try a different floppy disk. • Make sure the correct device drivers are running correctly...

User Manual
Page 103
... files are installed. • If the problems are not recognized under device manager (Windows Operating System) The Windows operating systems do not include all of the drivers for the server. If you are experiencing any of voltage spikes include a flickering video display, unexpected system reboots, and the system not responding to user commands. If you are getting corrupted by file corruption or changes to the software configuration. Devices are intermittent...
... files are installed. • If the problems are not recognized under device manager (Windows Operating System) The Windows operating systems do not include all of the drivers for the server. If you are experiencing any of voltage spikes include a flickering video display, unexpected system reboots, and the system not responding to user commands. If you are getting corrupted by file corruption or changes to the software configuration. Devices are intermittent...
User Manual
Page 107
... video configuration fails (a faulty video card or no card installed) or if an external ROM module does not properly checksum to zero. Pri Master HDD Error Pri Slave HDD Error Sec Master HDD Error Sec Slave HDD Error Could not read sector from corresponding drive. Run Setup to protected mode during the memory test. 95 BIOS POST Beep Codes The Acer Altos G310 Mk2 reports POST errors in two ways: • By sounding a beep code • By displaying an error message on the monitor BIOS Beep Codes The BIOS beep codes...
... video configuration fails (a faulty video card or no card installed) or if an external ROM module does not properly checksum to zero. Pri Master HDD Error Pri Slave HDD Error Sec Master HDD Error Sec Slave HDD Error Could not read sector from corresponding drive. Run Setup to protected mode during the memory test. 95 BIOS POST Beep Codes The Acer Altos G310 Mk2 reports POST errors in two ways: • By sounding a beep code • By displaying an error message on the monitor BIOS Beep Codes The BIOS beep codes...

User Manual
Page 113
... at POST • run-time BIOS support for device insertion or removal • independent support for WC, RC, and UDMA (direct memory access) • support for BIOS Boot Specification (BBS) (If available in system BIOS, this allows the user to select the adaptor from which to boot. BIOS Features The BIOS features include • RAID support before the operating system loads • automatic detection and configuration of disk drives • ability to handle configuration changes • support for...
... at POST • run-time BIOS support for device insertion or removal • independent support for WC, RC, and UDMA (direct memory access) • support for BIOS Boot Specification (BBS) (If available in system BIOS, this allows the user to select the adaptor from which to boot. BIOS Features The BIOS features include • RAID support before the operating system loads • automatic detection and configuration of disk drives • ability to handle configuration changes • support for...

User Manual
Page 114
... A: Embedded SATA RAID Technology for the Altos G310 Mk2 Driver Features The driver features include • special interface for configuration information, configuration changes, and manageability • optimized disk access • support for RAID levels 0, and 1 • support for Stand-by and Hibernation in Windows 2000, XP, and 2003 Note: The following items require Spy Service to be running in order to work. • error logging in the operating system event log and on disks • support for online...
... A: Embedded SATA RAID Technology for the Altos G310 Mk2 Driver Features The driver features include • special interface for configuration information, configuration changes, and manageability • optimized disk access • support for RAID levels 0, and 1 • support for Stand-by and Hibernation in Windows 2000, XP, and 2003 Note: The following items require Spy Service to be running in order to work. • error logging in the operating system event log and on disks • support for online...

User Manual
Page 122
... to configure logical drives. 6 Set the RAID level for the logical drive by pressing the arrow keys to select specific physical drives. 3 Press the spacebar to do not want to delete the existing configuration data, use View/Add Configuration. If you do so. 11 Initialize the logical drives you save the new array configuration. 110 Appendix A: Embedded SATA RAID Technology for the Altos G310 Mk2 Caution: The New Configuration option erases the existing configuration data...
... to configure logical drives. 6 Set the RAID level for the logical drive by pressing the arrow keys to select specific physical drives. 3 Press the spacebar to do not want to delete the existing configuration data, use View/Add Configuration. If you do so. 11 Initialize the logical drives you save the new array configuration. 110 Appendix A: Embedded SATA RAID Technology for the Altos G310 Mk2 Caution: The New Configuration option erases the existing configuration data...


