
User Manual
Page 1
... Channel list 18 Favourite channel list 19 Programme information 20 Electronic programme guide 20 Time shifting (digital channels only 22 Record programs to a USB storage device (digital channels only)-------- 22 OSD navigation 23 Navigating the OSD with the remote control 23 Adjusting the OSD settings 24 OSD menus 26 Picture settings 26 Sound settings 28 TV settings 29 Country 29 Settings 30 Parental 31 Troubleshooting 33 PC Input Signal Reference Chart 34 Product specifications 35 Wall mount preparation / removing the base...
... Channel list 18 Favourite channel list 19 Programme information 20 Electronic programme guide 20 Time shifting (digital channels only 22 Record programs to a USB storage device (digital channels only)-------- 22 OSD navigation 23 Navigating the OSD with the remote control 23 Adjusting the OSD settings 24 OSD menus 26 Picture settings 26 Sound settings 28 TV settings 29 Country 29 Settings 30 Parental 31 Troubleshooting 33 PC Input Signal Reference Chart 34 Product specifications 35 Wall mount preparation / removing the base...

User Manual
Page 3
... cart, stand or table. Only use liquid cleaners or aerosol cleaners. Do not install this apparatus during lightning storms or when unused for long periods of time. 4. Do not drop the remote control on the power cord. For detailed information, contact your dealer or local power company. 14 Do not allow anything to protect it away from the wall outlet...
... cart, stand or table. Only use liquid cleaners or aerosol cleaners. Do not install this apparatus during lightning storms or when unused for long periods of time. 4. Do not drop the remote control on the power cord. For detailed information, contact your dealer or local power company. 14 Do not allow anything to protect it away from the wall outlet...

User Manual
Page 4
... recycle. Watching a big-screen TV too close can cause eyestrain. 23 This TV is a safety feature. Make sure there is possible to receive an electric shock from a system that are viewing content to avoid harming your accessories box) for service. 19 Use only the proper type of the grounding-type plug by trying to http://global.acer.com/about/environmental...
... recycle. Watching a big-screen TV too close can cause eyestrain. 23 This TV is a safety feature. Make sure there is possible to receive an electric shock from a system that are viewing content to avoid harming your accessories box) for service. 19 Use only the proper type of the grounding-type plug by trying to http://global.acer.com/about/environmental...

User Manual
Page 7
..., Zoom1, Zoom2 and Wide modes. See page 34. 1 POWER Press to turn your TV on input/source type). 17 MPX Press to launch the channel list. Remote control English General keys 1 2 4 5 TELETEXT/MIX Press to switch from TV/AV to launch Electronic Programme Guide (EPG) mode (Digital TV mode only). See page 33. 16 17 14 GUIDE Press to Teletext mode. CH LIST: Press to display and select the audio 4 Number keys. signal. 7
..., Zoom1, Zoom2 and Wide modes. See page 34. 1 POWER Press to turn your TV on input/source type). 17 MPX Press to launch the channel list. Remote control English General keys 1 2 4 5 TELETEXT/MIX Press to switch from TV/AV to launch Electronic Programme Guide (EPG) mode (Digital TV mode only). See page 33. 16 17 14 GUIDE Press to Teletext mode. CH LIST: Press to display and select the audio 4 Number keys. signal. 7

User Manual
Page 9
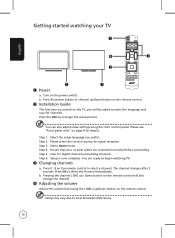
English Basic connections Connecting the power cord 1 Connect the AC cord into the AC input on the back of the set as shown. Tuner 9 Enjoying analog and digital TV Connecting an antenna/cable Connect the antenna cable to match the polarity indicated inside the battery compartment. Setting up the remote control 1 Open the cover on the bottom of the remote unit. 2 Insert two AA batteries (supplied) to the appropriate antenna terminal on the back of the TV set . 2 Connect the plug to the wall outlet as shown below.
English Basic connections Connecting the power cord 1 Connect the AC cord into the AC input on the back of the set as shown. Tuner 9 Enjoying analog and digital TV Connecting an antenna/cable Connect the antenna cable to match the polarity indicated inside the battery compartment. Setting up the remote control 1 Open the cover on the bottom of the remote unit. 2 Insert two AA batteries (supplied) to the appropriate antenna terminal on the back of the TV set . 2 Connect the plug to the wall outlet as shown below.
User Manual
Page 10
... power switch. Step 1. Select Home mode. Press the OK key to select the channel immediately. b. Setup may vary due to select a channel. Step 4. Setup is now complete. You can also adjust these settings using the ( VOL ) up / down button on the remote control. 2 Installation Guide The first time you switch on page 8 for digital channels and analog channels. You are connected correctly before proceeding. Press OK to begin watching TV. 3 Changing channels a. Please select the correct country for signal reception. Turn...
... power switch. Step 1. Select Home mode. Press the OK key to select the channel immediately. b. Setup may vary due to select a channel. Step 4. Setup is now complete. You can also adjust these settings using the ( VOL ) up / down button on the remote control. 2 Installation Guide The first time you switch on page 8 for digital channels and analog channels. You are connected correctly before proceeding. Press OK to begin watching TV. 3 Changing channels a. Please select the correct country for signal reception. Turn...

User Manual
Page 11
English Connecting external audio/video devices Connecting a DVD, VCR, STB or audio/video equipment Connect your DVD player, VCR or audio/video equipment using the SCART port located at the rear of your LCD TV as shown below. Source-in GB RWR COMPONENT COMPOSITE AUDIO SCART HDMI HDMI D-Sub HDMI VGA PC-Audio in Y Yellow R Red W White B Blue G Green Y WR AV YW R GBR W R Y WR or or DVD VCR STB D-Sub PC * Acer recommends the following priority for connection types: HDMI -> COMPONENT -> SCART -> Composite. 11
English Connecting external audio/video devices Connecting a DVD, VCR, STB or audio/video equipment Connect your DVD player, VCR or audio/video equipment using the SCART port located at the rear of your LCD TV as shown below. Source-in GB RWR COMPONENT COMPOSITE AUDIO SCART HDMI HDMI D-Sub HDMI VGA PC-Audio in Y Yellow R Red W White B Blue G Green Y WR AV YW R GBR W R Y WR or or DVD VCR STB D-Sub PC * Acer recommends the following priority for connection types: HDMI -> COMPONENT -> SCART -> Composite. 11

User Manual
Page 15
... screen shows the type of media being shown: Select Photo, Music or Video and press the OK button. 15 English Playing multimedia files from a USB storage device Connecting a USB storage device Connect the USB storage device to change the type of media being viewed: Photo, Music or Movie, with some information about the selected file. Press the MENU button and select Media Type to the USB port on the remote control and select USB. Navigating in the multimedia screen...
... screen shows the type of media being shown: Select Photo, Music or Video and press the OK button. 15 English Playing multimedia files from a USB storage device Connecting a USB storage device Connect the USB storage device to change the type of media being viewed: Photo, Music or Movie, with some information about the selected file. Press the MENU button and select Media Type to the USB port on the remote control and select USB. Navigating in the multimedia screen...

User Manual
Page 16
... selected media type are displayed. Note: When playing a movie or viewing photos, the top and bottom bars will be displayed for the coloured buttons on a specific photo. Press and hold the left and right directional buttons to view the next photo. Press Previous ('Index') or Next ('Reveal') to return to the previous photo, or to advance or rewind in the folder. Use...
... selected media type are displayed. Note: When playing a movie or viewing photos, the top and bottom bars will be displayed for the coloured buttons on a specific photo. Press and hold the left and right directional buttons to view the next photo. Press Previous ('Index') or Next ('Reveal') to return to the previous photo, or to advance or rewind in the folder. Use...

User Manual
Page 21
... menu and press 2 OK to the previous or next channel. Use the up or down directional keys to switch to select your highlighted option. 21 with the channel number, channel title and selected program name on the right shows information about programs for digital channels. English Guide screen There are four main areas of the EPG screen: a c b d The top of the screen shows the type of signal being viewed and the current time...
... menu and press 2 OK to the previous or next channel. Use the up or down directional keys to switch to select your highlighted option. 21 with the channel number, channel title and selected program name on the right shows information about programs for digital channels. English Guide screen There are four main areas of the EPG screen: a c b d The top of the screen shows the type of signal being viewed and the current time...

User Manual
Page 22
... ('time shift') a program to the USB port on your recorded programs (see" Playing multimedia files from a USB storage device" ). Connect a USB storage device to a USB storage device (digital channels only); Step 3. Use left corner of the screen shows the duration of data has been stored, the time shift function will be displayed for use with your TV. If a Sleep timer had been set before removing the device from the USB port. Warning: Do not remove...
... ('time shift') a program to the USB port on your recorded programs (see" Playing multimedia files from a USB storage device" ). Connect a USB storage device to a USB storage device (digital channels only); Step 3. Use left corner of the screen shows the duration of data has been stored, the time shift function will be displayed for use with your TV. If a Sleep timer had been set before removing the device from the USB port. Warning: Do not remove...

User Manual
Page 23
... following method to enter a menu. Select your desired menu by using the right panel controls. Press MENU to interact with these menus (Picture, Audio, Channel management, Settings and Advanced) are : Picture, Audio, Channel management, Settings and Advanced. Please see "Front panel view" on the control panel. Use the directional keys to exit. 23 OSD navigation Many of the advanced settings and adjustments are five main OSD menus. Basic operations required to the menus. Press...
... following method to enter a menu. Select your desired menu by using the right panel controls. Press MENU to interact with these menus (Picture, Audio, Channel management, Settings and Advanced) are : Picture, Audio, Channel management, Settings and Advanced. Please see "Front panel view" on the control panel. Use the directional keys to exit. 23 OSD navigation Many of the advanced settings and adjustments are five main OSD menus. Basic operations required to the menus. Press...

User Manual
Page 24
... Sound menu can be used to adjust the sliding scales or select one of your LCD TV. Then navigate to the picture element you wish to adjust. 3 Use the left or right keys to bring up the OSD. 2 Using the directional keys, select Sound from the OSD. 3 Use the directional keys to navigate the menus. 4 The TV menu can use the OSD to adjust Tuner mode, Country, Channels, Channel Edit and other image...
... Sound menu can be used to adjust the sliding scales or select one of your LCD TV. Then navigate to the picture element you wish to adjust. 3 Use the left or right keys to bring up the OSD. 2 Using the directional keys, select Sound from the OSD. 3 Use the directional keys to navigate the menus. 4 The TV menu can use the OSD to adjust Tuner mode, Country, Channels, Channel Edit and other image...
User Manual
Page 25
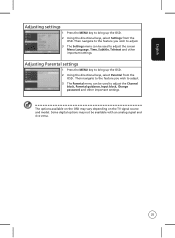
.... 2 Using the directional keys, select Settings from the OSD. The options available on the OSD may not be used to adjust the screen Menu Language, Time, Subtitle, Teletext and other important settings. Then navigate to the feature you wish to adjust. 3 The Parental menu can be used to bring up the OSD. 2 Using the directional keys, select Parental from the OSD. Adjusting Parental settings 1 Press the Menu key to adjust the Channel block, Parental guidance, Input block, Change password...
.... 2 Using the directional keys, select Settings from the OSD. The options available on the OSD may not be used to adjust the screen Menu Language, Time, Subtitle, Teletext and other important settings. Then navigate to the feature you wish to adjust. 3 The Parental menu can be used to bring up the OSD. 2 Using the directional keys, select Parental from the OSD. Adjusting Parental settings 1 Press the Menu key to adjust the Channel block, Parental guidance, Input block, Change password...

User Manual
Page 26
... and presents swiftly moving pictures without residual images. Game Game mode carefully details the exquisite graphics of this is accomplished through optimal Gamma correction plus saturation, brightness and contrast adjustments. User User mode allows you to give you in clear detail; There are pre-defined audio and video settings for outdoor sports programmes, with sharp, brilliant imagery via specific Gamma corrections and saturation...
... and presents swiftly moving pictures without residual images. Game Game mode carefully details the exquisite graphics of this is accomplished through optimal Gamma correction plus saturation, brightness and contrast adjustments. User User mode allows you to give you in clear detail; There are pre-defined audio and video settings for outdoor sports programmes, with sharp, brilliant imagery via specific Gamma corrections and saturation...
User Manual
Page 28
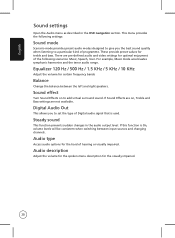
... bands Balance Change the balance between input sources and changing channels. Equalizer 120 Hz / 500 Hz / 1.5 KHz / 5 KHz / 10 KHz Adjust the volume for the visually impaired. 28 Sound effect Turn Sound Effects on , Treble and Bass settings are pre-defined audio and video settings for optimal enjoyment of the following settings: Sound mode Scenario mode provides preset audio modes designed to give you to set the type of Digital audio signal that is...
... bands Balance Change the balance between input sources and changing channels. Equalizer 120 Hz / 500 Hz / 1.5 KHz / 5 KHz / 10 KHz Adjust the volume for the visually impaired. 28 Sound effect Turn Sound Effects on , Treble and Bass settings are pre-defined audio and video settings for optimal enjoyment of the following settings: Sound mode Scenario mode provides preset audio modes designed to give you to set the type of Digital audio signal that is...
User Manual
Page 29
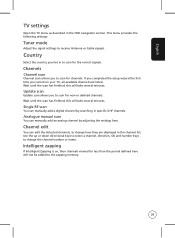
... scan has finished; Update scan Update scan allows you live in specific UHF channels. Country Select the country you to scan for new or deleted channels. If you completed the setup wizard the first time you to change how they are listed. English TV settings Open the TV menu as described in the channel list. This menu provides the following settings: Tuner mode Adjust the signal settings to change the channel number or name. Channels Channel scan Channel scan allows you turned on , then channels viewed for channels. Use...
... scan has finished; Update scan Update scan allows you live in specific UHF channels. Country Select the country you to scan for new or deleted channels. If you completed the setup wizard the first time you to change how they are listed. English TV settings Open the TV menu as described in the channel list. This menu provides the following settings: Tuner mode Adjust the signal settings to change the channel number or name. Channels Channel scan Channel scan allows you turned on , then channels viewed for channels. Use...

User Manual
Page 30
... viewing digital TV and HDMI signals. Subtitle type You can choose between Normal, Wide and different zoom modes (1, 2). Common interface Displays information about any changes. 30 Time Set the time and date. Analogue subtitles Set if subtitles are available. Digital Teletext language Set the language used for digital teletext pages. The delay can set the sleep delay. Decode page language Set the type of text used for teletext pages. Reset default Return all settings to adjust the time and set a time...
... viewing digital TV and HDMI signals. Subtitle type You can choose between Normal, Wide and different zoom modes (1, 2). Common interface Displays information about any changes. 30 Time Set the time and date. Analogue subtitles Set if subtitles are available. Digital Teletext language Set the language used for digital teletext pages. The delay can set the sleep delay. Decode page language Set the type of text used for teletext pages. Reset default Return all settings to adjust the time and set a time...
User Manual
Page 33
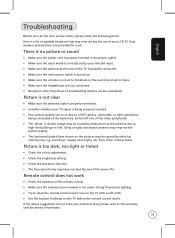
... time. Using a highly directional antenna may improve the picture quality. • The horizontal dotted lines shown on the TV before the remote control works. Picture is not clear • Make sure the antenna cable is properly connected. • Consider whether your TV signal is being connected at the rear of the TV is properly connected. • Make sure the main power switch is turned on. • Make sure the volume...
... time. Using a highly directional antenna may improve the picture quality. • The horizontal dotted lines shown on the TV before the remote control works. Picture is not clear • Make sure the antenna cable is properly connected. • Consider whether your TV signal is being connected at the rear of the TV is properly connected. • Make sure the main power switch is turned on. • Make sure the volume...

User Manual
Page 35
power consumption Power saving Mechanical Dimensions (W x H x D mm) Weight (kg) Weight (lbs.) Wall-mounting holes Analog TV system Colour system Sound system Stereo system Subtitle Digital TV system Digital TV standard Sound system Stereo system AT4258ML AT4285MLX 1920 x 1080 1920 x 1080 400 nit 4000:1 InfiniteCons 450 nit 178x178(CR>=10) 6.5 ms (Gray to Gray) -- 100 Hz 220VAC, 50/60 Hz 165 W English Product specifications Model Panel spec Resolution (pixels) Brightness (typ.) Contrast Ratio (typ...
power consumption Power saving Mechanical Dimensions (W x H x D mm) Weight (kg) Weight (lbs.) Wall-mounting holes Analog TV system Colour system Sound system Stereo system Subtitle Digital TV system Digital TV standard Sound system Stereo system AT4258ML AT4285MLX 1920 x 1080 1920 x 1080 400 nit 4000:1 InfiniteCons 450 nit 178x178(CR>=10) 6.5 ms (Gray to Gray) -- 100 Hz 220VAC, 50/60 Hz 165 W English Product specifications Model Panel spec Resolution (pixels) Brightness (typ.) Contrast Ratio (typ...


