
Acer AT350 F2 Server Service Guide
Page 34
To ensure proper operation, plug the power cord into a properly grounded AC outlet only. 20 Rear connections 2 System setup Note: Consult the operating system manual for information on or pinched by items placed against it. Caution: Do not route the power cord where it will be walked on how to be electrically grounded (earthed). The server is designed to configure the network setup.
To ensure proper operation, plug the power cord into a properly grounded AC outlet only. 20 Rear connections 2 System setup Note: Consult the operating system manual for information on or pinched by items placed against it. Caution: Do not route the power cord where it will be walked on how to be electrically grounded (earthed). The server is designed to configure the network setup.

Acer AT350 F2 Server Service Guide
Page 108
... form. however it may be assigned an IP address. DHCP Static The BIOS will automatically enter the Mac address of this machine; Mac addresses are manually entered (such as by a network administrator). This should not exceed 255. Upon timeout (or lease expiration), the IP address assigned to the client can be...
... form. however it may be assigned an IP address. DHCP Static The BIOS will automatically enter the Mac address of this machine; Mac addresses are manually entered (such as by a network administrator). This should not exceed 255. Upon timeout (or lease expiration), the IP address assigned to the client can be...

Acer AT350 F2 Server Service Guide
Page 133
... other key to launch the configuration menu. Creating a RAID Volume 1 Launch the configuration menu. 2 Select Configuration Wizard 3 Select Add Configuration and click on Next. 4 Select Manual Configuration and click on Next. 5 Press and hold the key and select the drives that you just created, click on submit. 3 Press Home button. 4 Please...
... other key to launch the configuration menu. Creating a RAID Volume 1 Launch the configuration menu. 2 Select Configuration Wizard 3 Select Add Configuration and click on Next. 4 Select Manual Configuration and click on Next. 5 Press and hold the key and select the drives that you just created, click on submit. 3 Press Home button. 4 Please...
Acer AT350 F2 Server Service Guide
Page 168
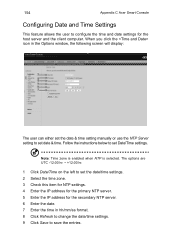
... server. 6 Enter the date. 7 Enter the time in the Options window, the following screen will display: The user can either set the date & time setting manually or use the NTP Server setting to save the entries. When you click the icon in hh/mm/ss format. 8 Click Refresh to change the... date/time settings. 9 Click Save to set date & time. Note: Time zone is enabled when NTP is selected. 154 Appendix C Acer Smart Console Configuring Date and Time Settings This feature allows the user to set Date/Time settings. The options are UTC -12:00 hr. ~ +12...
... server. 6 Enter the date. 7 Enter the time in the Options window, the following screen will display: The user can either set the date & time setting manually or use the NTP Server setting to save the entries. When you click the icon in hh/mm/ss format. 8 Click Refresh to change the... date/time settings. 9 Click Save to set date & time. Note: Time zone is enabled when NTP is selected. 154 Appendix C Acer Smart Console Configuring Date and Time Settings This feature allows the user to set Date/Time settings. The options are UTC -12:00 hr. ~ +12...

Acer AT350 F2 Server Service Guide
Page 174
160 Appendix C Acer Smart Console Configuring Network Settings This feature allows you click the icon in the field. When you to setup the IP address by using the ... will display. To configure Network settings, follow the instructions below . You can also check the first radio button to obtain an IP address automatically by manually entering the information in the fields below. (Note: DHCP is the default setting.) 2 To set the IP address using the IPv4 format, enter proper information...
160 Appendix C Acer Smart Console Configuring Network Settings This feature allows you click the icon in the field. When you to setup the IP address by using the ... will display. To configure Network settings, follow the instructions below . You can also check the first radio button to obtain an IP address automatically by manually entering the information in the fields below. (Note: DHCP is the default setting.) 2 To set the IP address using the IPv4 format, enter proper information...
