Acer AT310 F2 Server Service Guide
Page 4
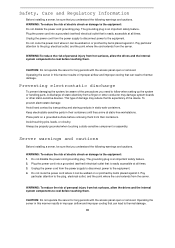
...power cord into a grounded (earthed) electrical outlet that is easily accessible at static-free workstations. Unplug the power cord from the server. Pay particular attention to the plug, electrical outlet, and the point where the cord extends from the power supply to disconnect power ...electrostatic-sensitive parts in improper airflow and improper cooling that can lead to the equipment: 1. Safety, Care and Regulatory Information Before installing a server, be sure that you understand the following warnings and cautions. Do not route the power cord where it can be walked on a ...
...power cord into a grounded (earthed) electrical outlet that is easily accessible at static-free workstations. Unplug the power cord from the server. Pay particular attention to the plug, electrical outlet, and the point where the cord extends from the power supply to disconnect power ...electrostatic-sensitive parts in improper airflow and improper cooling that can lead to the equipment: 1. Safety, Care and Regulatory Information Before installing a server, be sure that you understand the following warnings and cautions. Do not route the power cord where it can be walked on a ...
Acer AT310 F2 Server Service Guide
Page 5
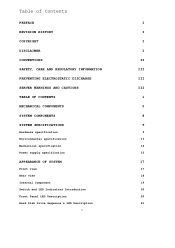
Table of Contents PREFACE I REVISION HISTORY I COPYRIGHT I DISCLAIMER I CONVENTIONS II SAFETY, CARE AND REGULATORY INFORMATION III PREVENTING ELECTROSTATIC DISCHARGE III SERVER WARNINGS AND CAUTIONS III TABLE OF CONTENTS 1 MECHANICAL COMPONENTS 5 SYSTEM COMPONENTS 8 SYSTEM SPECIFICATIONS 9 Hardware specification 9 Environmental specification 13 Mechanical specification 14 Power supply specification 15 ...
Table of Contents PREFACE I REVISION HISTORY I COPYRIGHT I DISCLAIMER I CONVENTIONS II SAFETY, CARE AND REGULATORY INFORMATION III PREVENTING ELECTROSTATIC DISCHARGE III SERVER WARNINGS AND CAUTIONS III TABLE OF CONTENTS 1 MECHANICAL COMPONENTS 5 SYSTEM COMPONENTS 8 SYSTEM SPECIFICATIONS 9 Hardware specification 9 Environmental specification 13 Mechanical specification 14 Power supply specification 15 ...

Acer AT310 F2 Server Service Guide
Page 7
Server Management Menu 56 System Information 57 Event Log Configuration 58 Boot Options Menu 60 Boot Manager Menu 61 Exit Menu 62 RAID CONFIGURATION UTILITIES 63 ...
Server Management Menu 56 System Information 57 Event Log Configuration 58 Boot Options Menu 60 Boot Manager Menu 61 Exit Menu 62 RAID CONFIGURATION UTILITIES 63 ...

Acer AT310 F2 Server Service Guide
Page 18
Mechanical specification Item System board platform System board dimensions Length Width Description ATX (Advanced Technology Extended) 304.8mm 243.84mm System Dimensions Height 420 mm Depth 485mm Width Server weight (maximum configuration, approximate) 190mm Basic configuration (excluding the 12.22KG keyboard and mouse) Fully loaded configuration (including the keyboard, mouse, and kits) 13.52KG 14
Mechanical specification Item System board platform System board dimensions Length Width Description ATX (Advanced Technology Extended) 304.8mm 243.84mm System Dimensions Height 420 mm Depth 485mm Width Server weight (maximum configuration, approximate) 190mm Basic configuration (excluding the 12.22KG keyboard and mouse) Fully loaded configuration (including the keyboard, mouse, and kits) 13.52KG 14
Acer AT310 F2 Server Service Guide
Page 22
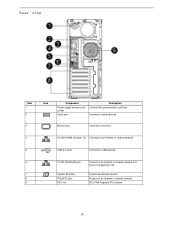
Rear view Item 1 2 3 4 5 6 7 8 9 Icon Component Power supply module cord socket Serial port Description Connect the system power cord here. Monitor port Connects to monitors. 10/100/1000M LAN port 1/2 Connects to an Internet or intranet network. USB 2.0 ports Connects to USB devices. 10/100 iKVM LAN port System ID button PCIe/PCI slots PSU fan Connect to an Internet or intranet network. PSU FAN Regulate PSU airflow. 18 For server management use. Connects to an Internet or intranet network. Protects to serial devices. System identification button.
Rear view Item 1 2 3 4 5 6 7 8 9 Icon Component Power supply module cord socket Serial port Description Connect the system power cord here. Monitor port Connects to monitors. 10/100/1000M LAN port 1/2 Connects to an Internet or intranet network. USB 2.0 ports Connects to USB devices. 10/100 iKVM LAN port System ID button PCIe/PCI slots PSU fan Connect to an Internet or intranet network. PSU FAN Regulate PSU airflow. 18 For server management use. Connects to an Internet or intranet network. Protects to serial devices. System identification button.

Acer AT310 F2 Server Service Guide
Page 30
During the disassembly process, group the screws with the corresponding components to disassemble the server system for the different components vary in size. Installing/Removing system Hardware This chapter contains step-by-step procedures on how to avoid mismatch when putting back the components. 26 To disassemble the Acer AT310 F2 Server, please pay attention to each section's instruction and tools needed. NOTE: The screws for maintenance and troubleshooting.
During the disassembly process, group the screws with the corresponding components to disassemble the server system for the different components vary in size. Installing/Removing system Hardware This chapter contains step-by-step procedures on how to avoid mismatch when putting back the components. 26 To disassemble the Acer AT310 F2 Server, please pay attention to each section's instruction and tools needed. NOTE: The screws for maintenance and troubleshooting.
Acer AT310 F2 Server Service Guide
Page 31
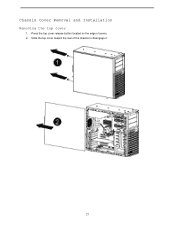
Chassis Cover Removal and Installation Removing the top cover 1. Press the top cover release button located on the edge of the chassis to disengage it. 27 Slide the top cover toward the rear of server. 2.
Chassis Cover Removal and Installation Removing the top cover 1. Press the top cover release button located on the edge of the chassis to disengage it. 27 Slide the top cover toward the rear of server. 2.

Acer AT310 F2 Server Service Guide
Page 35
... x8 slot PCI8X_2- PCI Expansion Card Installation / Removal Acer AT310 F2 has six bus slots with screw. Lift the riser bracket slightly, then pull it by the edges. 3. NOTE: Remove the expansion card from its protective packaging, handling it out from the server chassis. 2. Make sure that the card is removed in the...
... x8 slot PCI8X_2- PCI Expansion Card Installation / Removal Acer AT310 F2 has six bus slots with screw. Lift the riser bracket slightly, then pull it by the edges. 3. NOTE: Remove the expansion card from its protective packaging, handling it out from the server chassis. 2. Make sure that the card is removed in the...

Acer AT310 F2 Server Service Guide
Page 41
...; F10 - Move between selections on , close the utility. 37 Move the cursor to press F2 before POST is user-configuration). Press these keys repeatedly to move between selections on the server and the monitor. BIOS Setup Primary Menus The tabs on the Setup menu bar correspond to the... six primary BIOS Setup menu, namely: Main Advanced Security Server Management Boot Options Boot Manager Save & Exit In the descriptive table following keys to display each of submenu screen is...
...; F10 - Move between selections on , close the utility. 37 Move the cursor to press F2 before POST is user-configuration). Press these keys repeatedly to move between selections on the server and the monitor. BIOS Setup Primary Menus The tabs on the Setup menu bar correspond to the... six primary BIOS Setup menu, namely: Main Advanced Security Server Management Boot Options Boot Manager Save & Exit In the descriptive table following keys to display each of submenu screen is...
Acer AT310 F2 Server Service Guide
Page 53
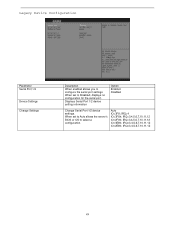
When set to Auto allows the server's BIOS or OS to select a configuration. Auto IO=3F8; IRQ=3,4,5,6,7,10,11,12 IO=3E8h; IRQ=3,4,5,6,7,10,11,12 IO=2F8h; IRQ=3,4,5,6,7,10,11,12 49 Legacy Device Configuration Parameter Serial Port 1/2 Device Settings Change Settings Description When enabled allows you to Disabled, displays no configuration for the serial port. Displays Serial Port 1/2 device setting information Option Enabled Disabled Change Serial Port 1/2 device settings. When set to configure the serial port settings. IRQ=3,4,5,6,7,10,11,12 IO=2E8h; IRQ=4 IO=3F8h;
When set to Auto allows the server's BIOS or OS to select a configuration. Auto IO=3F8; IRQ=3,4,5,6,7,10,11,12 IO=3E8h; IRQ=3,4,5,6,7,10,11,12 IO=2F8h; IRQ=3,4,5,6,7,10,11,12 49 Legacy Device Configuration Parameter Serial Port 1/2 Device Settings Change Settings Description When enabled allows you to Disabled, displays no configuration for the serial port. Displays Serial Port 1/2 device setting information Option Enabled Disabled Change Serial Port 1/2 device settings. When set to configure the serial port settings. IRQ=3,4,5,6,7,10,11,12 IO=2E8h; IRQ=4 IO=3F8h;

Acer AT310 F2 Server Service Guide
Page 57
... configure the user password. To enable or disable this password will restrict a user's access to prevent unauthorized users from unauthorized use by setting up the server. Security Option This feature allows you can only access and modify the System Time, System Date, and Set User Password fields. • Power-on boot...
... configure the user password. To enable or disable this password will restrict a user's access to prevent unauthorized users from unauthorized use by setting up the server. Security Option This feature allows you can only access and modify the System Time, System Date, and Set User Password fields. • Power-on boot...

Acer AT310 F2 Server Service Guide
Page 60
Option 56 Displays Event Log advanced settings. Press Enter to access the related submenu. Press Enter to access the related submenu. Server Management Menu Parameter System Information Event Log Configuration Description Displays basic system ID information, as well as BIOS version.
Option 56 Displays Event Log advanced settings. Press Enter to access the related submenu. Press Enter to access the related submenu. Server Management Menu Parameter System Information Event Log Configuration Description Displays basic system ID information, as well as BIOS version.

Acer AT310 F2 Server Service Guide
Page 64
... Device Priority Hard Disk Drive Priority Description Press Enter to configure the boot priority. Select whether to pause POST when a boot-up . By default, the server searches for Option ROM. Enable or Disable Bootup NumLock function. Removable device 4. Enabled Disabled 60 Hard drive 2. Press Enter to configure the boot priority. Optical...
... Device Priority Hard Disk Drive Priority Description Press Enter to configure the boot priority. Select whether to pause POST when a boot-up . By default, the server searches for Option ROM. Enable or Disable Bootup NumLock function. Removable device 4. Enabled Disabled 60 Hard drive 2. Press Enter to configure the boot priority. Optical...

Acer AT310 F2 Server Service Guide
Page 67
... Y to access the BIOS Setup Utility. 3. Currently, Intel onboard SATA RAID only supports Legacy mode. If the server is Intel RAID 8. During POST, press F2 to reset RAID data on Next to change PCI ROM Priority setting from EFI Compatible ROM to RAID Mode SATA Mode... Please press CTRL-I when you see below information: SATA Controller SATA Mode [Enabled] [AHCI Mode] 6. Option ROM will display on the server and the display monitor. Please select SATA Configuration. 5. Loading Factory Default Setting 1. RAID Configuration Utilities Note: RAID supports various by models,...
... Y to access the BIOS Setup Utility. 3. Currently, Intel onboard SATA RAID only supports Legacy mode. If the server is Intel RAID 8. During POST, press F2 to reset RAID data on Next to change PCI ROM Priority setting from EFI Compatible ROM to RAID Mode SATA Mode... Please press CTRL-I when you see below information: SATA Controller SATA Mode [Enabled] [AHCI Mode] 6. Option ROM will display on the server and the display monitor. Please select SATA Configuration. 5. Loading Factory Default Setting 1. RAID Configuration Utilities Note: RAID supports various by models,...

Acer AT310 F2 Server Service Guide
Page 68
... LSI onboard SATA RAID only supports Legacy mode. PCI ROM Priority [Legacy ROM] Set RAID Controller in the name of RAID volume. 4. If the server is created, you want to create the volume? (Y/N):" displayed. 8. Please select SATA Configuration. 5. The CREATE VOLUME MENU displayed. 3. Assigning a Hot...setting from EFI Compatible ROM to create hot spare drive. Currently, LSI onboard SATA RAID only supports Legacy mode. During POST, press F2 to Legacy ROM in BIOS Setup. You might see below information: SATA Controller [Enabled] 64 Please change PCI ROM Priority setting ...
... LSI onboard SATA RAID only supports Legacy mode. PCI ROM Priority [Legacy ROM] Set RAID Controller in the name of RAID volume. 4. If the server is created, you want to create the volume? (Y/N):" displayed. 8. Please select SATA Configuration. 5. The CREATE VOLUME MENU displayed. 3. Assigning a Hot...setting from EFI Compatible ROM to create hot spare drive. Currently, LSI onboard SATA RAID only supports Legacy mode. During POST, press F2 to Legacy ROM in BIOS Setup. You might see below information: SATA Controller [Enabled] 64 Please change PCI ROM Priority setting ...

Acer AT310 F2 Server Service Guide
Page 69
... press + + to associate the selected drive with the current array. Press the arrow keys to choose specific physical drives and press spacebar to reboot the server. The indicator for 2 disk drives is RAID1. Initializing a RAID Volume 1. Press to return to finish creating current array. 5. Loading Factory default setting 1. After adding 2 drives...
... press + + to associate the selected drive with the current array. Press the arrow keys to choose specific physical drives and press spacebar to reboot the server. The indicator for 2 disk drives is RAID1. Initializing a RAID Volume 1. Press to return to finish creating current array. 5. Loading Factory default setting 1. After adding 2 drives...

Acer AT310 F2 Server Service Guide
Page 70
... + + to EFI Compatible ROM. 6. PCI ROM Priority [Legacy ROM] NOTE. To enable Legacy mode of RAID card, please change PCI ROM Priority to reboot the server. 3. To enable EFI mode of RAID card, please keep PCI ROM Priority as READY and press Enter. 4. Entering RAID BIOS Utility (Legacy Mode) Please press...
... + + to EFI Compatible ROM. 6. PCI ROM Priority [Legacy ROM] NOTE. To enable Legacy mode of RAID card, please change PCI ROM Priority to reboot the server. 3. To enable EFI mode of RAID card, please keep PCI ROM Priority as READY and press Enter. 4. Entering RAID BIOS Utility (Legacy Mode) Please press...

Acer AT310 F2 Server Service Guide
Page 71
... configuration. The current adapter settings appear. Please click on Accept to change . 67 Click on Accept DG and then click on Start to reboot the server. In the left panel 3. Press Ctrl+Alt+Del to launch the configuration menu. Please click on Next. 7. Adapter Selection page will see below options. Press...
... configuration. The current adapter settings appear. Please click on Accept to change . 67 Click on Accept DG and then click on Start to reboot the server. In the left panel 3. Press Ctrl+Alt+Del to launch the configuration menu. Please click on Next. 7. Adapter Selection page will see below options. Press...


