
User Manual
Page 15
...OS 22 Turning off the system 23 3 System upgrades 25 Installation precautions 26 ESD precautions 26 Pre-installation instructions 26 Post-installation instructions 27 Opening the server 28 Configuring the storage devices 30 Accessing the drive bays 30 Hard disk drive configuration guidelines 30 Determining drive status 31 Removing and installing a 3.5" hard disk drive 32 Removing and installing a 2.5" hard disk drive 34 Removing and installing an optical drive 37 Installing and removing the power supply 41 Power supply failure 42 Replacing the power supply 42...
...OS 22 Turning off the system 23 3 System upgrades 25 Installation precautions 26 ESD precautions 26 Pre-installation instructions 26 Post-installation instructions 27 Opening the server 28 Configuring the storage devices 30 Accessing the drive bays 30 Hard disk drive configuration guidelines 30 Determining drive status 31 Removing and installing a 3.5" hard disk drive 32 Removing and installing a 2.5" hard disk drive 34 Removing and installing an optical drive 37 Installing and removing the power supply 41 Power supply failure 42 Replacing the power supply 42...

User Manual
Page 16
... module: Removing a memory module: Installing an expansion card Installing a SAS card Installing the rear SAS card Installing the right riser card 4 System Bios Introduction The BIOS setup utility Changing configuration data Main setup Advanced Settings Boot Features Processor & Clock Options Advanced Chipset Control IDE/SATA configuration PCI/PnP configuration Super IO Configuration Hardware Health Configuration ACPI configuration Security Settings System Management Settings Product Information Remote Access Configuration DMI Event Logging Boot Settings Boot Device Priority Hard Disk Drives...
... module: Removing a memory module: Installing an expansion card Installing a SAS card Installing the rear SAS card Installing the right riser card 4 System Bios Introduction The BIOS setup utility Changing configuration data Main setup Advanced Settings Boot Features Processor & Clock Options Advanced Chipset Control IDE/SATA configuration PCI/PnP configuration Super IO Configuration Hardware Health Configuration ACPI configuration Security Settings System Management Settings Product Information Remote Access Configuration DMI Event Logging Boot Settings Boot Device Priority Hard Disk Drives...

User Manual
Page 17
... onboard SATA RAID Creation Adaptec onboard SATA RAID Creation Configuring LSI MegaRAID SAS 8204ELP MEGARAID SAS 8708EM2 RAID CREATION FLEX IO LSI 1078 SAS RAID CREATION 121 122 123 123 125 127 129 131 Appendix B: Rack installation information System rack installation Vertical mounting hole pattern Installing the system into the rack 133 135 137 138 139 Appendix C: Acer Smart Console Using Acer Smart Console Software requirements Accessing Acer Smart Console Acer Smart Console user interface System Information Server Health Configuration Remote Control Launch SOL Virtual Media Maintenance...
... onboard SATA RAID Creation Adaptec onboard SATA RAID Creation Configuring LSI MegaRAID SAS 8204ELP MEGARAID SAS 8708EM2 RAID CREATION FLEX IO LSI 1078 SAS RAID CREATION 121 122 123 123 125 127 129 131 Appendix B: Rack installation information System rack installation Vertical mounting hole pattern Installing the system into the rack 133 135 137 138 139 Appendix C: Acer Smart Console Using Acer Smart Console Software requirements Accessing Acer Smart Console Acer Smart Console user interface System Information Server Health Configuration Remote Control Launch SOL Virtual Media Maintenance...

User Manual
Page 48
... upgrades Configuring the storage devices The system supports up all eight drive carriers must be added to the server. Note: The operating system you do not touch the backplane with any metal objects and make sure to back up to four 3.5-inch hot-plug SAS/SATA hard disk drives. Proceed to install or replace SAS/SATA drives. Also, regardless of the SATA drives. Hard disk drive configuration guidelines Observe these guidelines when replacing or installing a hard disk drive. • Use only qualified SAS...
... upgrades Configuring the storage devices The system supports up all eight drive carriers must be added to the server. Note: The operating system you do not touch the backplane with any metal objects and make sure to back up to four 3.5-inch hot-plug SAS/SATA hard disk drives. Proceed to install or replace SAS/SATA drives. Also, regardless of the SATA drives. Hard disk drive configuration guidelines Observe these guidelines when replacing or installing a hard disk drive. • Use only qualified SAS...
User Manual
Page 55
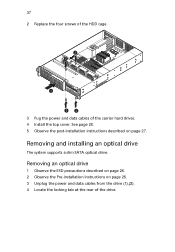
Removing and installing an optical drive The system supports a slim SATA optical drive. 37 2 Replace the four screws of the HDD cage. 3 Pug the power and data cables of the drive. See page 28. 5 Observe the post-installation instructions described on page 26. 3 Unplug the power and data cables from the drive (1),(2). 4 Locate the locking tab at the rear of the carrier hard drives. 4 Install the top cover. Removing an optical drive 1 Observe the ESD precautions described on page 26. 2 Observe the Pre-installation instructions on page 27.
Removing and installing an optical drive The system supports a slim SATA optical drive. 37 2 Replace the four screws of the HDD cage. 3 Pug the power and data cables of the drive. See page 28. 5 Observe the post-installation instructions described on page 26. 3 Unplug the power and data cables from the drive (1),(2). 4 Locate the locking tab at the rear of the carrier hard drives. 4 Install the top cover. Removing an optical drive 1 Observe the ESD precautions described on page 26. 2 Observe the Pre-installation instructions on page 27.
User Manual
Page 59
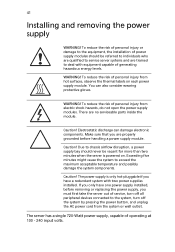
There are properly grounded before removing or replacing the power supply, you are no serviceable parts inside the module. Make sure that you must first take the server out of service, turn off all peripheral devices connected to chassis airflow disruption, a power supply bay should be vacant for more than two minutes when the server is only hot-pluggable if you have one power supply installed, before handling a power supply module. Caution! Caution! Due...
There are properly grounded before removing or replacing the power supply, you are no serviceable parts inside the module. Make sure that you must first take the server out of service, turn off all peripheral devices connected to chassis airflow disruption, a power supply bay should be vacant for more than two minutes when the server is only hot-pluggable if you have one power supply installed, before handling a power supply module. Caution! Caution! Due...

User Manual
Page 62
... air duct. 3 Observe the post-installation instructions described on . Fan speed may be controlled by a setting in BIOS (see Chapter 4). Warning! To replace a fan module: 1 Perform the pre-installation instructions described on the chassis. Allow it to cool off first before handling. 2 Remove the top chassis cover while the system is on page 27. The system fan becomes very hot when the system is still running to provide the cooling for...
... air duct. 3 Observe the post-installation instructions described on . Fan speed may be controlled by a setting in BIOS (see Chapter 4). Warning! To replace a fan module: 1 Perform the pre-installation instructions described on the chassis. Allow it to cool off first before handling. 2 Remove the top chassis cover while the system is on page 27. The system fan becomes very hot when the system is still running to provide the cooling for...

User Manual
Page 98
...: Only available when USB Functions is installed on card user guide for signal transactions between the PCI Express L0 and L1 Links. Others perform better with the coalesce feature, which inhibits the coalesce feature. Select Enabled to use Legacy USB devices. SouthBridge configuration This feature allows you to decide how many onboard USB ports to 128 MB. 80 4 System Bios Active State Power-Management: Uses power management for the desired setting.
...: Only available when USB Functions is installed on card user guide for signal transactions between the PCI Express L0 and L1 Links. Others perform better with the coalesce feature, which inhibits the coalesce feature. Select Enabled to use Legacy USB devices. SouthBridge configuration This feature allows you to decide how many onboard USB ports to 128 MB. 80 4 System Bios Active State Power-Management: Uses power management for the desired setting.

User Manual
Page 99
..., the BIOS automatically detects the presence of the IDE devices and displays the following items: SATA#1 configuration: If Compatible is set to select the USB 2.0 Controller mode. USB 2.0 Controller Mode: This setting allows you to Disabled. This feature allows you to Enabled by the BIOS. When enabled, the EHCI Interface will be changed from BIOS-controlled to native SATA mode. • Configure SATA#1 as - IDE/SATA configuration When this item will be set to select the drive type for an operating system...
..., the BIOS automatically detects the presence of the IDE devices and displays the following items: SATA#1 configuration: If Compatible is set to select the USB 2.0 Controller mode. USB 2.0 Controller Mode: This setting allows you to Disabled. This feature allows you to Enabled by the BIOS. When enabled, the EHCI Interface will be changed from BIOS-controlled to native SATA mode. • Configure SATA#1 as - IDE/SATA configuration When this item will be set to select the drive type for an operating system...

User Manual
Page 100
... included in Configure SATA#1 as . SATA#2 configuration: Selecting Enhanced will set the parameters of device connected to activate the submenu screen for detailed options of data transferred. Select Auto to allow you to set SATA#2 to configure SATA RAID. Use this value if the IDE disk drive support cannot be equipped with a 48-bit LBA mode addressing. If not, contact your system must be determined. 82 4 System Bios • ICH RAID Code Base...
... included in Configure SATA#1 as . SATA#2 configuration: Selecting Enhanced will set the parameters of device connected to activate the submenu screen for detailed options of data transferred. Select Auto to allow you to set SATA#2 to configure SATA RAID. Use this value if the IDE disk drive support cannot be equipped with a 48-bit LBA mode addressing. If not, contact your system must be determined. 82 4 System Bios • ICH RAID Code Base...

User Manual
Page 109
... x86 RDTSC Instruction embedded in order to reduce system crashes due to hardware errors and to improve system recovery and health monitoring. NUMA Support: Uses Non-Uniform Memory Access to improve CPU performance. The high-performance event timer is enabled on Windows platforms in the CPU. WHEA Support: Select Enabled to enable Windows Hardware Error Architecture (WHEA) support, which will provide a common infrastructure for handling hardware errors on an ACPI-aware operating system. 91...
... x86 RDTSC Instruction embedded in order to reduce system crashes due to hardware errors and to improve system recovery and health monitoring. NUMA Support: Uses Non-Uniform Memory Access to improve CPU performance. The high-performance event timer is enabled on Windows platforms in the CPU. WHEA Support: Select Enabled to enable Windows Hardware Error Architecture (WHEA) support, which will provide a common infrastructure for handling hardware errors on an ACPI-aware operating system. 91...
User Manual
Page 130
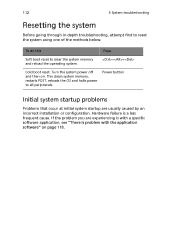
... an incorrect installation or configuration. Power button Initial system startup problems Problems that occur at initial system startup are experiencing is with the application software" on . This clears system memory, restarts POST, reloads the OS and halts power to clear the system memory and reload the operating system. ++ Cold boot reset. 112 5 System troubleshooting Resetting the system Before going through in-depth troubleshooting, attempt first to reset the system using one...
... an incorrect installation or configuration. Power button Initial system startup problems Problems that occur at initial system startup are experiencing is with the application software" on . This clears system memory, restarts POST, reloads the OS and halts power to clear the system memory and reload the operating system. ++ Cold boot reset. 112 5 System troubleshooting Resetting the system Before going through in-depth troubleshooting, attempt first to reset the system using one...

User Manual
Page 136
... sure the correct network drivers are in the BIOS setup utility is properly configured for instructions on the system. • Network might be the first bootable device. Peripheral device connected to the system guidelines. • Make sure the memory modules are not detected. There is not detected. 118 5 System troubleshooting Bootable DVD drive is problem with the system requirements. • Make sure the memory modules have been populated according to a USB connector does not...
... sure the correct network drivers are in the BIOS setup utility is properly configured for instructions on the system. • Network might be the first bootable device. Peripheral device connected to the system guidelines. • Make sure the memory modules are not detected. There is not detected. 118 5 System troubleshooting Bootable DVD drive is problem with the system requirements. • Make sure the memory modules have been populated according to a USB connector does not...
User Manual
Page 141
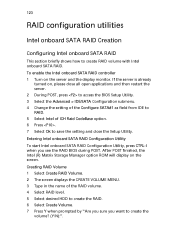
... (R) Matrix Storage Manager option ROM will display on , please close all open applications and then restart the server. 2 During POST, press to access the BIOS Setup Utility. 3 Select the Advanced > IDE/SATA Configuration submenu. 4 Change the setting of the Configure SATA#1 as field from IDE to RAID. 5 Select Intel of the RAID volume. 4 Select RAID level. 5 Select desired HDD to save the setting and close the Setup Utility. If the server is already turned on...
... (R) Matrix Storage Manager option ROM will display on , please close all open applications and then restart the server. 2 During POST, press to access the BIOS Setup Utility. 3 Select the Advanced > IDE/SATA Configuration submenu. 4 Change the setting of the Configure SATA#1 as field from IDE to RAID. 5 Select Intel of the RAID volume. 4 Select RAID level. 5 Select desired HDD to save the setting and close the Setup Utility. If the server is already turned on...
User Manual
Page 143
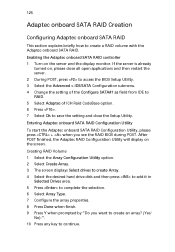
... Adaptec onboard SATA RAID. Creating RAID Volume 1 Select the Array Configuration Utility option. 2 Select Create Array. 3 The screen displays Select drives to create Array. 4 Select the desired hard drive disk and then press to add it in Selected Drives area. 5 Press to complete the selection. 6 Select Array Type. 7 Configure the array properties. 8 Press Done when finish. 9 Press Y when prompted by "Do you see the RAID BIOS during POST. Enabling the Adaptec onboard SATA RAID controller 1 Turn on...
... Adaptec onboard SATA RAID. Creating RAID Volume 1 Select the Array Configuration Utility option. 2 Select Create Array. 3 The screen displays Select drives to create Array. 4 Select the desired hard drive disk and then press to add it in Selected Drives area. 5 Press to complete the selection. 6 Select Array Type. 7 Configure the array properties. 8 Press Done when finish. 9 Press Y when prompted by "Do you see the RAID BIOS during POST. Enabling the Adaptec onboard SATA RAID controller 1 Turn on...

User Manual
Page 145
... listed. 3 Press Enter on the adapter and the adapter setting will show on Start to associate the selected drive with LSI MegaRAID SAS 8204ELP. Please click on the screen. You can change from this menu. 4 Select Factory Default and Yes to load the default settings. 5 Exit the configuration utility and press + + to reboot the server. An array selection window displays the devices connected to the current controller. 3 Press the arrow keys to choose specific...
... listed. 3 Press Enter on the adapter and the adapter setting will show on Start to associate the selected drive with LSI MegaRAID SAS 8204ELP. Please click on the screen. You can change from this menu. 4 Select Factory Default and Yes to load the default settings. 5 Exit the configuration utility and press + + to reboot the server. An array selection window displays the devices connected to the current controller. 3 Press the arrow keys to choose specific...

User Manual
Page 147
... setting. 2 Change the setting of the RAID volume, click on Start to save the configuration. Creating a RAID Volume 1 Launch the configuration menu. 2 Select Configuration Wizard. 3 Select Add Configuration (default) and click on Next. 4 Select Custom Configuration (default) and click on Next. 5 Hold the Ctrl key and select the drives that you creating the logical volume. 10 Click on the screen. Initialing a RAID Volume 1 After you see the RAID BIOS during POST...
... setting. 2 Change the setting of the RAID volume, click on Start to save the configuration. Creating a RAID Volume 1 Launch the configuration menu. 2 Select Configuration Wizard. 3 Select Add Configuration (default) and click on Next. 4 Select Custom Configuration (default) and click on Next. 5 Hold the Ctrl key and select the drives that you creating the logical volume. 10 Click on the screen. Initialing a RAID Volume 1 After you see the RAID BIOS during POST...

User Manual
Page 149
... setting. 2 Change the setting of the RAID volume, click on Next after you want to save the configuration. Entering Flex IO SAS RAID Configuration Utility To start Flex IO SAS RAID Configuration Utility for Flex IO SAS RAID card, press CTRL-H when you create the logical volumes on all of Set Factory Defaults from No to Yes then click on the screen. Initialing a RAID Volume 1 After you see the RAID BIOS during POST...
... setting. 2 Change the setting of the RAID volume, click on Next after you want to save the configuration. Entering Flex IO SAS RAID Configuration Utility To start Flex IO SAS RAID Configuration Utility for Flex IO SAS RAID card, press CTRL-H when you create the logical volumes on all of Set Factory Defaults from No to Yes then click on the screen. Initialing a RAID Volume 1 After you see the RAID BIOS during POST...

User Manual
Page 179
Remote Control The Remote Control menu allows you to all BMC commands, including configuration commands for disabling a communication channel. 161 interfaces. This menu include two options: KVM Remote Console Redirection and Server Power Control. Operator privilege can not disable individual channels or change user access privileges. • Administrator: The administrator privilege has full access and can configure the software and add users. Modifying a user account 1 On the Users page click Modify User. 2 Enter the username. 3 Enter the password. 4 Re-enter the password. 5 Select...
Remote Control The Remote Control menu allows you to all BMC commands, including configuration commands for disabling a communication channel. 161 interfaces. This menu include two options: KVM Remote Console Redirection and Server Power Control. Operator privilege can not disable individual channels or change user access privileges. • Administrator: The administrator privilege has full access and can configure the software and add users. Modifying a user account 1 On the Users page click Modify User. 2 Enter the username. 3 Enter the password. 4 Re-enter the password. 5 Select...
User Manual
Page 184
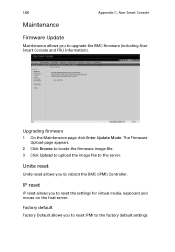
... Browse to locate the firmware image file. 3 Click Upload to upload the image file to the server. Unite reset Unite reset allows you to reset IPMI to the factory default settings. Factory default Factory Default allows you to reboot the BMC (IPMI) Controller. IP reset IP reset allows you to upgrade the BMC firmware (including Acer Smart Console and FRU information). 166 Appendix C: Acer Smart Console Maintenance Firmware Update Maintenance allows you to reset the settings for virtual media, keyboard and...
... Browse to locate the firmware image file. 3 Click Upload to upload the image file to the server. Unite reset Unite reset allows you to reset IPMI to the factory default settings. Factory default Factory Default allows you to reboot the BMC (IPMI) Controller. IP reset IP reset allows you to upgrade the BMC firmware (including Acer Smart Console and FRU information). 166 Appendix C: Acer Smart Console Maintenance Firmware Update Maintenance allows you to reset the settings for virtual media, keyboard and...


