
User Manual
Page 2
Model Number Serial Number Purchase Date Place of Purchase Acer and the Acer Logo are used herein for a particular purpose. All correspondense concerning your computer. This company makes no representations or warranties, either expressed or implied, with respect to your unit should include the serial number, model number, and purchase information. Record the model number, serial number, purchase date, and place of purchase information in new editions of...
Model Number Serial Number Purchase Date Place of Purchase Acer and the Acer Logo are used herein for a particular purpose. All correspondense concerning your computer. This company makes no representations or warranties, either expressed or implied, with respect to your unit should include the serial number, model number, and purchase information. Record the model number, serial number, purchase date, and place of purchase information in new editions of...

User Manual
Page 3
... Tour 1 Front panel 1 Rear panel 2 System Features 3 Performance 3 Multimedia 3 Connectivity 3 System peripherals 4 Mouse(PS/2 or USB, manufacturing option) 4 Keyboard(PS/2 or USB, manufacturing option) 4 Speakers 5 System upgrade 5 Open the computer 6 Set up new components 6 Setting up your computer 7 Necessary to know before Setup 7 Select location 7 Open package 7 Connecting the peripherals 8 Starting your computer 9 Shutting down your computer 9 Troubleshooting 11 Taking Care of your computer 15 Important tips 15 Cleaning and servicing 15 To...
... Tour 1 Front panel 1 Rear panel 2 System Features 3 Performance 3 Multimedia 3 Connectivity 3 System peripherals 4 Mouse(PS/2 or USB, manufacturing option) 4 Keyboard(PS/2 or USB, manufacturing option) 4 Speakers 5 System upgrade 5 Open the computer 6 Set up new components 6 Setting up your computer 7 Necessary to know before Setup 7 Select location 7 Open package 7 Connecting the peripherals 8 Starting your computer 9 Shutting down your computer 9 Troubleshooting 11 Taking Care of your computer 15 Important tips 15 Cleaning and servicing 15 To...

User Manual
Page 5
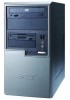
Description No. Description 1 Optical Drive 2 Floppy Drive 3 USB Ports 4 Microphone Jack 5 Speaker or Headphone Jack 6 Power Button English 1 System Tour Your computer's front panel consists of the following: Front panel 1 2 3 4 5 6 No.
Description No. Description 1 Optical Drive 2 Floppy Drive 3 USB Ports 4 Microphone Jack 5 Speaker or Headphone Jack 6 Power Button English 1 System Tour Your computer's front panel consists of the following: Front panel 1 2 3 4 5 6 No.

User Manual
Page 6
English 2 Rear panel Icon Description Power cord socket Voltage Selector Switch PS/2 Mouse Port System Tour PS/2 Keyboard Port Serial Port Monitor Connector Parallel Port Microphone-in jack Audio-out Jack Audio-in Jack Joystick/MIDI port(Manufacturing option) USB Ports LAN Port
English 2 Rear panel Icon Description Power cord socket Voltage Selector Switch PS/2 Mouse Port System Tour PS/2 Keyboard Port Serial Port Monitor Connector Parallel Port Microphone-in jack Audio-out Jack Audio-in Jack Joystick/MIDI port(Manufacturing option) USB Ports LAN Port

User Manual
Page 7
... Jacks (front and rear) However, you system enables your microphone-in jack in front and disables the one at the same time. Connectivity • Two PS/2 ports for keyboard and mouse • One serial port • One Parallel port • One VGA port • USB 2.0 ports • High speed V.92, 56K fax/Data modem (optional) • 10Base-T/100Base-TX Ethernet Network By default, you can not use both of them...
... Jacks (front and rear) However, you system enables your microphone-in jack in front and disables the one at the same time. Connectivity • Two PS/2 ports for keyboard and mouse • One serial port • One Parallel port • One VGA port • USB 2.0 ports • High speed V.92, 56K fax/Data modem (optional) • 10Base-T/100Base-TX Ethernet Network By default, you can not use both of them...

User Manual
Page 8
Mouse(PS/2 or USB, manufacturing option) The included mouse is a standard two-button wheel mouse. English 4 System Tour System peripherals The AcerPower S Series computer consists the system itself, and system peripherals, like a mouse, a keyboard and a set of basic system peripherals. Keyboard(PS/2 or USB, manufacturing option) Connect the keyboard to the PS/2 mouse port or USB port on the back panel of the system. This section provides a brief description of speakers (optional). Connect the mouse to the PS/2 keyboard port or USB port on the back panel of the system.
Mouse(PS/2 or USB, manufacturing option) The included mouse is a standard two-button wheel mouse. English 4 System Tour System peripherals The AcerPower S Series computer consists the system itself, and system peripherals, like a mouse, a keyboard and a set of basic system peripherals. Keyboard(PS/2 or USB, manufacturing option) Connect the keyboard to the PS/2 mouse port or USB port on the back panel of the system. This section provides a brief description of speakers (optional). Connect the mouse to the PS/2 keyboard port or USB port on the back panel of the system.

User Manual
Page 9
System upgrade You can also upgrade the components of the system. Note: speakers are optional and the appearance might be different depending on the back panel of your AcerPower S Series system quickly and easily by adding components. English 5 Speakers For systems bundled with speakers, before powering on the system, connect the speaker cable to the included operating instructions. You can expand your AcerPower S Series system. For more detailed information about the speakers, please refer to the audio out (external speaker) port on the actual product.
System upgrade You can also upgrade the components of the system. Note: speakers are optional and the appearance might be different depending on the back panel of your AcerPower S Series system quickly and easily by adding components. English 5 Speakers For systems bundled with speakers, before powering on the system, connect the speaker cable to the included operating instructions. You can expand your AcerPower S Series system. For more detailed information about the speakers, please refer to the audio out (external speaker) port on the actual product.

User Manual
Page 10
... Acer dealer whether the part will operate within your new components. 6 System Tour English Open the computer Before removing any panels or covers, please make sure to shut off the computer and unplug the power cord from a CD-ROM drive to CD-RW, DVD-ROM, DVD/CDRW combo, or DVD writer - In order to High Capacity HDD - Set up new components You can only use components compatible with your AcerPower S Series...
... Acer dealer whether the part will operate within your new components. 6 System Tour English Open the computer Before removing any panels or covers, please make sure to shut off the computer and unplug the power cord from a CD-ROM drive to CD-RW, DVD-ROM, DVD/CDRW combo, or DVD writer - In order to High Capacity HDD - Set up new components You can only use components compatible with your AcerPower S Series...

User Manual
Page 11
... a serial port, parallel port, PS/2 keyboard and mouse ports, the system includes USB ports, two microphone ports and stereo line-out jacks(one at front and one at rear panel) and a stereo line-in any location that is excessively dusty or damp. The system can also support an optional high-speed fax/data modem or an additional LAN (local area network) card. Your AcerPower S Series has standard I / O ports. Open package Open the...
... a serial port, parallel port, PS/2 keyboard and mouse ports, the system includes USB ports, two microphone ports and stereo line-out jacks(one at front and one at rear panel) and a stereo line-in any location that is excessively dusty or damp. The system can also support an optional high-speed fax/data modem or an additional LAN (local area network) card. Your AcerPower S Series has standard I / O ports. Open package Open the...

User Manual
Page 12
English 8 Setting up your dealer immediately. • AcerPower S Series Series • PS/2 or USB keyboard (manufacturing option) • PS/2 or USB mouse (manufacturing option) • Spearkers (for selected models only) • User's Guide and Starter poster Other user documentation and third party software. Connecting the peripherals Note: Don't connect system power cord before connecting all items are missing or appear damaged, contact your computer Ensure that all peripherals to...
English 8 Setting up your dealer immediately. • AcerPower S Series Series • PS/2 or USB keyboard (manufacturing option) • PS/2 or USB mouse (manufacturing option) • Spearkers (for selected models only) • User's Guide and Starter poster Other user documentation and third party software. Connecting the peripherals Note: Don't connect system power cord before connecting all items are missing or appear damaged, contact your computer Ensure that all peripherals to...

User Manual
Page 13
Once the start your computer according to use the computer. After the system has shut down your computer From the "Start" Menu, select "Shut Down" and click OK. Shutting down , turn off all peripheral equipment, such as monitor, printer, fax, speakers etc. 2 Turn on the front of a system crash, press and hold the power button on the system. English 9 Starting your computer After connecting all the peripheral equipment, start -up process is complete, you can begin to the below steps: 1 Power on all peripheral devices. In the event of the system for four seconds.
Once the start your computer according to use the computer. After the system has shut down your computer From the "Start" Menu, select "Shut Down" and click OK. Shutting down , turn off all peripheral equipment, such as monitor, printer, fax, speakers etc. 2 Turn on the front of a system crash, press and hold the power button on the system. English 9 Starting your computer After connecting all the peripheral equipment, start -up process is complete, you can begin to the below steps: 1 Power on all peripheral devices. In the event of the system for four seconds.

User Manual
Page 15
... selector switch located on the screen. If yes, remove or replace it is plugged in the floppy drive? A: Your computer's power management function automatically blanks the screen to restart your computer. English 11 Troubleshooting The following questions are using a power strip or AVR, make sure that may arise during the use of the computer is set to the correct voltage. • Check if you properly plugged the power cable...
... selector switch located on the screen. If yes, remove or replace it is plugged in the floppy drive? A: Your computer's power management function automatically blanks the screen to restart your computer. English 11 Troubleshooting The following questions are using a power strip or AVR, make sure that may arise during the use of the computer is set to the correct voltage. • Check if you properly plugged the power cable...

User Manual
Page 16
... are using a good (i.e., undamaged) diskette or a good disc. Contact your dealer or technical support center for the Volume icon on your USB keyboard to the printer's documentation. If it . A: Check the following : • Make sure that the printer is connected to the system's parallel port and the corresponding port on the good diskette, CD or DVD there may be a problem with the drive. Make sure...
... are using a good (i.e., undamaged) diskette or a good disc. Contact your dealer or technical support center for the Volume icon on your USB keyboard to the printer's documentation. If it . A: Check the following : • Make sure that the printer is connected to the system's parallel port and the corresponding port on the good diskette, CD or DVD there may be a problem with the drive. Make sure...

User Manual
Page 19
...instructions listed in should not exceed the fuse rating. • Check the documentation that came with water and gently wipe the exterior of the computer and the keyboard. These adjustments could make viewing the screen more comfortable. Cleaning and servicing To clean your computer and keyboard 1 Turn off the computer and unplug the power cord. 2 Use... a soft cloth moistened with your software ...
...instructions listed in should not exceed the fuse rating. • Check the documentation that came with water and gently wipe the exterior of the computer and the keyboard. These adjustments could make viewing the screen more comfortable. Cleaning and servicing To clean your computer and keyboard 1 Turn off the computer and unplug the power cord. 2 Use... a soft cloth moistened with your software ...

User Manual
Page 20
You may also access the Acer Web site (www.acersupport.com) for maintenance instructions. 16 Taking Care of an optical mouse, refer to the documentation that came with a soft, damp cloth. 3 Put the ball back and replace the cover. When to contact a service technician • If you keep your area. To clean your monitor Make sure that came with your local dealer...
You may also access the Acer Web site (www.acersupport.com) for maintenance instructions. 16 Taking Care of an optical mouse, refer to the documentation that came with a soft, damp cloth. 3 Put the ball back and replace the cover. When to contact a service technician • If you keep your area. To clean your monitor Make sure that came with your local dealer...

User Manual
Page 21
... harmful interference to Part 15 of the following measures: • Reorient or relocate the receiving antenna. • Increase the separation between the device and receiver. • Connect the device into an outlet on a circuit different from that to which can radiate radio frequency energy and, if not installed and used in interference to operate this product meets...
... harmful interference to Part 15 of the following measures: • Reorient or relocate the receiving antenna. • Increase the separation between the device and receiver. • Connect the device into an outlet on a circuit different from that to which can radiate radio frequency energy and, if not installed and used in interference to operate this product meets...

User Manual
Page 22
... information, the FCC Registration Number and Ringer Equivalence Number (REN) for this information to maintain uninterrupted telephone service. If they will be notified in its facilities, equipment, operations, or procedures that could affect the proper functioning of the Canadian Interference-Causing Equipment Regulations. English 18 Use conditions This part complies with Part 15 of the FCC rules...
... information, the FCC Registration Number and Ringer Equivalence Number (REN) for this information to maintain uninterrupted telephone service. If they will be notified in its facilities, equipment, operations, or procedures that could affect the proper functioning of the Canadian Interference-Causing Equipment Regulations. English 18 Use conditions This part complies with Part 15 of the FCC rules...

User Manual
Page 23
... instructions marked on the power cord. If you should be operated from the type of fire, use liquid cleaners or aerosol cleaners. The product may fall, causing serious damage to the product. 5 Slots and openings are not sure of the type of the product and to the Public Switched Telephone Network (PSTN). "TBR 21"] for Australia For safety reasons, only connect...
... instructions marked on the power cord. If you should be operated from the type of fire, use liquid cleaners or aerosol cleaners. The product may fall, causing serious damage to the product. 5 Slots and openings are not sure of the type of the product and to the Public Switched Telephone Network (PSTN). "TBR 21"] for Australia For safety reasons, only connect...

User Manual
Page 24
.... Adjust only those controls that could result in a fire or electric shock. f If the product exhibits a distinct change in performance, indicating a need for service. 12 Use only the proper type of power supply cord set (provided in damage and will often require extensive work by a qualified technician to restore the product to rain or water. It should be a remote risk of electric...
.... Adjust only those controls that could result in a fire or electric shock. f If the product exhibits a distinct change in performance, indicating a need for service. 12 Use only the proper type of power supply cord set (provided in damage and will often require extensive work by a qualified technician to restore the product to rain or water. It should be a remote risk of electric...

User Manual
Page 27
... terminal connection to Council Decision 98/482/EC (CTR21) for pan- We, Acer Inc., hereby declare that the equipment bearing the trade name and model number specified above was tested conforming to the applicable Rules under the most accurate measurement standards possible, and that all the necessary steps have been taken and are in lowvoltage supply... of the same equipment will continue to comply with the requirements. 2003/11/19 Easy Lai Date This equipment has been approved to the Public Switched Telephone Network (PSTN).
... terminal connection to Council Decision 98/482/EC (CTR21) for pan- We, Acer Inc., hereby declare that the equipment bearing the trade name and model number specified above was tested conforming to the applicable Rules under the most accurate measurement standards possible, and that all the necessary steps have been taken and are in lowvoltage supply... of the same equipment will continue to comply with the requirements. 2003/11/19 Easy Lai Date This equipment has been approved to the Public Switched Telephone Network (PSTN).


