
Power 1000 User's Guide EN
Page 2
... the prior written permission of purchase information in new editions of such revisions or changes. The serial number and model number are used herein for a particular purpose. AcerPower Series User's Guide Original Issue: 06/2006 Changes may be reproduced, stored in a retrieval system... and specifically disclaims any person of this publication may be incorporated in the space provided below. All correspondence concerning your convenience, we suggest that you enter the model number, serial number, purchase date, and place of Acer Incorporated. Acer Incorporated makes no...
... the prior written permission of purchase information in new editions of such revisions or changes. The serial number and model number are used herein for a particular purpose. AcerPower Series User's Guide Original Issue: 06/2006 Changes may be reproduced, stored in a retrieval system... and specifically disclaims any person of this publication may be incorporated in the space provided below. All correspondence concerning your convenience, we suggest that you enter the model number, serial number, purchase date, and place of Acer Incorporated. Acer Incorporated makes no...

Power 1000 User's Guide EN
Page 3
... openings should be operated from the type of internal components and to prevent battery leakage, do not place the product on the product. Also, make sure that the total ampere rating of the equipment plugged into the product. • To avoid damage of power indicated on the marking label. Turning the...not be blocked by plugging in installation unless proper ventilation is used with this product, make sure that could be placed near water. • Do not place this product through cabinet slots as they may touch dangerous voltage points or short-out parts that the total ...
... openings should be operated from the type of internal components and to prevent battery leakage, do not place the product on the product. Also, make sure that the total ampere rating of the equipment plugged into the product. • To avoid damage of power indicated on the marking label. Turning the...not be blocked by plugging in installation unless proper ventilation is used with this product, make sure that could be placed near water. • Do not place this product through cabinet slots as they may touch dangerous voltage points or short-out parts that the total ...
Power 1000 User's Guide EN
Page 4
... often require extensive work by the operating instructions, since improper adjustment of this product from unexpected noise produced by other nearby electrical devices that are covered by a qualified technician to restore the product to replace the power cord set . Contact your electrician for service • the product does not operate normally after following requirements: detachable type, UL listed/CSA certified, type SPT-2, rated 7 A 125...
... often require extensive work by the operating instructions, since improper adjustment of this product from unexpected noise produced by other nearby electrical devices that are covered by a qualified technician to restore the product to replace the power cord set . Contact your electrician for service • the product does not operate normally after following requirements: detachable type, UL listed/CSA certified, type SPT-2, rated 7 A 125...
Power 1000 User's Guide EN
Page 5
.../CRT monitor or display: Lamp(s) inside this electronic device into the trash when discarding. v Replacing the battery pack The notebook uses lithium batteries. Use of another battery may explode if not handled properly. Do not disassemble or dispose of used batteries. Keep them in use and/or before servicing. • To avoid the remote risk of the global environment, please recycle. Replace the battery with the same type as...
.../CRT monitor or display: Lamp(s) inside this electronic device into the trash when discarding. v Replacing the battery pack The notebook uses lithium batteries. Use of another battery may explode if not handled properly. Do not disassemble or dispose of used batteries. Keep them in use and/or before servicing. • To avoid the remote risk of the global environment, please recycle. Replace the battery with the same type as...

Power 1000 User's Guide EN
Page 6
...Users are also at the center of your desk to minimize neck strain Taking care of a computer. Long work periods, bad posture, poor work habits, stress, inadequate working in front of your vision Long viewing hours, wearing incorrect glasses or contact lenses, glare, excessive room lighting, poorly focused screens, very small typefaces and low-contrast displays...or shrugging your shoulders • install the external display, keyboard and mouse properly and within comfortable reach •... angle of the monitor, using a footrest, or raising your documents, place the display at risk of ...
...Users are also at the center of your desk to minimize neck strain Taking care of a computer. Long work periods, bad posture, poor work habits, stress, inadequate working in front of your vision Long viewing hours, wearing incorrect glasses or contact lenses, glare, excessive room lighting, poorly focused screens, very small typefaces and low-contrast displays...or shrugging your shoulders • install the external display, keyboard and mouse properly and within comfortable reach •... angle of the monitor, using a footrest, or raising your documents, place the display at risk of ...
Power 1000 User's Guide EN
Page 9
... 3 Accessing the User's Guide 4 Front and rear panels 5 Keyboard 6 Optical drive (for selected models) 7 Taking care of your CDs and DVDs 7 2 Setting up your computer 9 Arranging a comfortable work area 11 Adjusting your chair 11 Positioning your PC 11 Positioning your monitor 13 Positioning your keyboard 13 Positioning your mouse 13 Connecting peripherals 14 Connecting your mouse and keyboard 14 Connecting a monitor 15 Connecting the power cable 16 Taking care of your AC adapter 16 Turning on...
... 3 Accessing the User's Guide 4 Front and rear panels 5 Keyboard 6 Optical drive (for selected models) 7 Taking care of your CDs and DVDs 7 2 Setting up your computer 9 Arranging a comfortable work area 11 Adjusting your chair 11 Positioning your PC 11 Positioning your monitor 13 Positioning your keyboard 13 Positioning your mouse 13 Connecting peripherals 14 Connecting your mouse and keyboard 14 Connecting a monitor 15 Connecting the power cable 16 Taking care of your AC adapter 16 Turning on...
Power 1000 User's Guide EN
Page 13
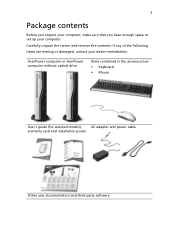
Carefully unpack the carton and remove the contents. If any of the following items are missing or damaged, contact your computer. 3 Package contents Before you unpack your computer, make sure that you have enough space to set up your dealer immediately: AcerPower computer or AcerPower computer without optical drive Items contained in the accessory box • Keyboard • Mouse User's guide (for selected models), AC adapter and power cable warranty card and installation poster Other user documentation and third-party software
Carefully unpack the carton and remove the contents. If any of the following items are missing or damaged, contact your computer. 3 Package contents Before you unpack your computer, make sure that you have enough space to set up your dealer immediately: AcerPower computer or AcerPower computer without optical drive Items contained in the accessory box • Keyboard • Mouse User's guide (for selected models), AC adapter and power cable warranty card and installation poster Other user documentation and third-party software

Power 1000 User's Guide EN
Page 15
5 Front and rear panels Your computer's front and rear panels consist of the following: Icon Component Eject button Icon Component DVI port Power button CRT/LCD monitor port Hard disk drive indicator Optical disk drive indicator OBR (One Button Recovery) button Line-out jack LAN indicator / Network port Microphone-in jack USB ports Kensington lock DC-in jack Headphone/Speaker-out/lineout port Line-in jack Note: See "Connecting peripherals" on page 14 and "Connecting options" on page 19 for more information.
5 Front and rear panels Your computer's front and rear panels consist of the following: Icon Component Eject button Icon Component DVI port Power button CRT/LCD monitor port Hard disk drive indicator Optical disk drive indicator OBR (One Button Recovery) button Line-out jack LAN indicator / Network port Microphone-in jack USB ports Kensington lock DC-in jack Headphone/Speaker-out/lineout port Line-in jack Note: See "Connecting peripherals" on page 14 and "Connecting options" on page 19 for more information.

Power 1000 User's Guide EN
Page 17
... optical disk when the computer is located on , press the drive eject button. The DVD-Dual and DVD-Super multi drive allow you to carry around. However, they are also compact, lightweight and easy to play not only old CD-ROMs, CD-I disks, and video CDs, but digital video disks (DVDs) as well. 7 Optical drive (for instructions. Cleaning kits can affect the data on the disk, impair the disk lens reader...
... optical disk when the computer is located on , press the drive eject button. The DVD-Dual and DVD-Super multi drive allow you to carry around. However, they are also compact, lightweight and easy to play not only old CD-ROMs, CD-I disks, and video CDs, but digital video disks (DVDs) as well. 7 Optical drive (for instructions. Cleaning kits can affect the data on the disk, impair the disk lens reader...
Power 1000 User's Guide EN
Page 24
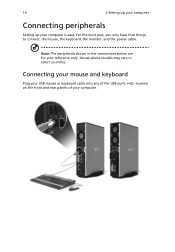
Note: The peripherals shown in select countries. Connecting your mouse and keyboard Plug your USB mouse or keyboard cable into any of the USB ports on the front and rear panels of your computer is easy. 14 2 Setting up your computer Connecting peripherals Setting up your computer. For the most part, you only have four things to connect: the mouse, the keyboard, the monitor, and the power cable. Actual device models may vary in the connections below are for your reference only. located
Note: The peripherals shown in select countries. Connecting your mouse and keyboard Plug your USB mouse or keyboard cable into any of the USB ports on the front and rear panels of your computer is easy. 14 2 Setting up your computer Connecting peripherals Setting up your computer. For the most part, you only have four things to connect: the mouse, the keyboard, the monitor, and the power cable. Actual device models may vary in the connections below are for your reference only. located

Power 1000 User's Guide EN
Page 27
To turn the computer on and get to your computer, such as the monitor, printer, speakers, etc. 2 On the front panel of your computer After connecting the necessary peripherals and plugging in and turned on. Important: Make sure that it is properly plugged into an electrical outlet. 17 Turning on your computer, press the Power button. If you are using a power strip or an AVR (Auto-Voltage Regulator), make sure that the power cable is plugged in the power cable, you are now ready to turn on your computer: 1 Turn on all peripherals connected to work.
To turn the computer on and get to your computer, such as the monitor, printer, speakers, etc. 2 On the front panel of your computer After connecting the necessary peripherals and plugging in and turned on. Important: Make sure that it is properly plugged into an electrical outlet. 17 Turning on your computer, press the Power button. If you are using a power strip or an AVR (Auto-Voltage Regulator), make sure that the power cable is plugged in the power cable, you are now ready to turn on your computer: 1 Turn on all peripherals connected to work.
Power 1000 User's Guide EN
Page 29
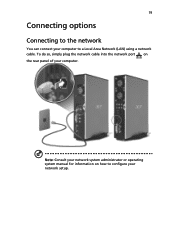
Note: Consult your network system administrator or operating system manual for information on the rear panel of your computer. To do so, simply plug the network cable into the network port on how to configure your computer to the network You can connect your network setup. 19 Connecting options Connecting to a Local Area Network (LAN) using a network cable.
Note: Consult your network system administrator or operating system manual for information on the rear panel of your computer. To do so, simply plug the network cable into the network port on how to configure your computer to the network You can connect your network setup. 19 Connecting options Connecting to a Local Area Network (LAN) using a network cable.
Power 1000 User's Guide EN
Page 30
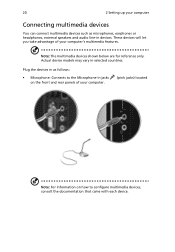
... device models may vary in devices. 20 2 Setting up your computer. (pink jacks) located Note: For information on how to the Microphone-in jacks on the front and rear panels of your computer's multimedia features. Plug the devices in as microphones, earphones or headphones, external speakers and audio line-in selected countries. These devices will let you take advantage of your computer Connecting multimedia devices...
... device models may vary in devices. 20 2 Setting up your computer. (pink jacks) located Note: For information on how to the Microphone-in jacks on the front and rear panels of your computer's multimedia features. Plug the devices in as microphones, earphones or headphones, external speakers and audio line-in selected countries. These devices will let you take advantage of your computer Connecting multimedia devices...

Power 1000 User's Guide EN
Page 31
You can also adjust the volume by using the volume icon on the taskbar at the bottom of your screen. • External speakers: Connect to the headphone jack the front panel of your computer. located on Note: To adjust the headphone volume, use the volume control buttons on the rear panel of your computer. (lime-green 21 • Earphones, headphones: Connect to the audio-out/line-out jack jack) located on the keyboard.
You can also adjust the volume by using the volume icon on the taskbar at the bottom of your screen. • External speakers: Connect to the headphone jack the front panel of your computer. located on Note: To adjust the headphone volume, use the volume control buttons on the rear panel of your computer. (lime-green 21 • Earphones, headphones: Connect to the audio-out/line-out jack jack) located on the keyboard.

Power 1000 User's Guide EN
Page 32
22 2 Setting up your computer • Audio line-in device: Connects to the audio-in/line-in jack jack) located on the rear panel of your computer (light blue
22 2 Setting up your computer • Audio line-in device: Connects to the audio-in/line-in jack jack) located on the rear panel of your computer (light blue

Power 1000 User's Guide EN
Page 36
... partition on the C drive so make sure to enter hidden partition. 3 This utility has same password protection with Acer eRecovery. Follow all files previously saved on your hard drive to restore your system using the One Button Recovery feature, and the system DOES NOT respond, contact your important files before starting the recovery process. If you attempt to store the default settings. Caution! Running the Recovery operation will restore your system's original factory default settings...
... partition on the C drive so make sure to enter hidden partition. 3 This utility has same password protection with Acer eRecovery. Follow all files previously saved on your hard drive to restore your system using the One Button Recovery feature, and the system DOES NOT respond, contact your important files before starting the recovery process. If you attempt to store the default settings. Caution! Running the Recovery operation will restore your system's original factory default settings...

Power 1000 User's Guide EN
Page 39
... arise during the use of your USB keyboard to toggle from the computer. Nothing appears on the taskbar. Check the LED located above the power switch. If pressing a key does not work . You can restart your dealer or technical support center for the Volume icon on the screen. If the LED is not lit, no power is being applied to save power. Your computer's power management function automatically...
... arise during the use of your USB keyboard to toggle from the computer. Nothing appears on the taskbar. Check the LED located above the power switch. If pressing a key does not work . You can restart your dealer or technical support center for the Volume icon on the screen. If the LED is not lit, no power is being applied to save power. Your computer's power management function automatically...
Power 1000 User's Guide EN
Page 40
... are using a good (undamaged) disk. If your drive can not read hard disk, CD or DVD information. Check the following : • Make sure you are using the correct type of disk. Check the following : • Make sure the hard disk is clean and unscratched. • Check your dealer or technical support center for assistance. 30 4 Frequently asked questions System cannot read the information on the hard disk, DVD-Dual or DVD...
... are using a good (undamaged) disk. If your drive can not read hard disk, CD or DVD information. Check the following : • Make sure you are using the correct type of disk. Check the following : • Make sure the hard disk is clean and unscratched. • Check your dealer or technical support center for assistance. 30 4 Frequently asked questions System cannot read the information on the hard disk, DVD-Dual or DVD...

Power 1000 User's Guide EN
Page 45
... the same number within any 30 minute period for any single manual call initiation, and b The equipment shall go on the equipment (PC) associated with this appliance may not operate. The associated equipment shall be set up to make or model, nor does it imply that any product is compatible with all of Telecom's network services. 2 This equipment...
... the same number within any 30 minute period for any single manual call initiation, and b The equipment shall go on the equipment (PC) associated with this appliance may not operate. The associated equipment shall be set up to make or model, nor does it imply that any product is compatible with all of Telecom's network services. 2 This equipment...
Power 1000 User's Guide EN
Page 51
41 Index A accessing the online User's Guide 4 C connecting options multimedia devices 20 audio line-in device 22 earphones/headphones 21 external speakers 20 microphone 20 network 19 serial mouse 19 D disk drives CD-ROM/DVD-ROM/CD-RW drive inserting CDs/DVDs 7 taking care CDs/DVDs 7 F Frequently-asked questions 29 blank screen 29 no audio 29 no sound 29 printer not working 29 system cannot read disk 30 system cannot write to disk 30 system did not boot up...
41 Index A accessing the online User's Guide 4 C connecting options multimedia devices 20 audio line-in device 22 earphones/headphones 21 external speakers 20 microphone 20 network 19 serial mouse 19 D disk drives CD-ROM/DVD-ROM/CD-RW drive inserting CDs/DVDs 7 taking care CDs/DVDs 7 F Frequently-asked questions 29 blank screen 29 no audio 29 no sound 29 printer not working 29 system cannot read disk 30 system cannot write to disk 30 system did not boot up...


