

AL715/716 User's Guide
Page 1
...from Its Stand 3 Interface for Arm Applications...3 Connecting the Display ...3 Connecting the AC Power...4 Connecting the Audio Cable ...4 Setting Up the LCD Monitor...4 Power Management System ...4 Chapter 2 Display Controls 4 User Controls ...4 Adjusting the Monitor's Display...5 Function Description ...6 Chapter 3 Technical Information 7 Specifications ...7 Standard Timing Table...9 Troubleshooting ...9 Preface This manual is designed to assist users in accordance with the limits for a Class B digital device, pursuant to Part 15 of the contents. NOTE A shielded-type signal cord is...
...from Its Stand 3 Interface for Arm Applications...3 Connecting the Display ...3 Connecting the AC Power...4 Connecting the Audio Cable ...4 Setting Up the LCD Monitor...4 Power Management System ...4 Chapter 2 Display Controls 4 User Controls ...4 Adjusting the Monitor's Display...5 Function Description ...6 Chapter 3 Technical Information 7 Specifications ...7 Standard Timing Table...9 Troubleshooting ...9 Preface This manual is designed to assist users in accordance with the limits for a Class B digital device, pursuant to Part 15 of the contents. NOTE A shielded-type signal cord is...

AL715/716 User's Guide
Page 2
... damage to the LCD screen. Though the LCD Monitor uses very little power, some ventilation is required to connect this range could result in the box: * LCD Monitor * User's Manual * Base * 1.8M Monitor-to-PC VGA Cable * 1.8M Power Cord If you have a DVI-D interface your box will also include * 1.5M Stereo Jack Audio Cable If you find that the following items were included in permanent damage. 6. Important Safety Instructions Please read...
... damage to the LCD screen. Though the LCD Monitor uses very little power, some ventilation is required to connect this range could result in the box: * LCD Monitor * User's Manual * Base * 1.8M Monitor-to-PC VGA Cable * 1.8M Power Cord If you have a DVI-D interface your box will also include * 1.5M Stereo Jack Audio Cable If you find that the following items were included in permanent damage. 6. Important Safety Instructions Please read...

AL715/716 User's Guide
Page 3
... settings as illustrated in order to the VGA port or DVI port on the desk first. Power off -the-shelf video cable in Figure 1-4. This device will result in the plastic covering as stated above. Attempting this LCD display has four integrated 4 mm, 0.7 pitches threaded nuts, as well as four 5 mm access holes in damaging the Monitor and Monitor stand. These specifications meet the VESA Flat Panel Monitor Physical Mounting...
... settings as illustrated in order to the VGA port or DVI port on the desk first. Power off -the-shelf video cable in Figure 1-4. This device will result in the plastic covering as stated above. Attempting this LCD display has four integrated 4 mm, 0.7 pitches threaded nuts, as well as four 5 mm access holes in damaging the Monitor and Monitor stand. These specifications meet the VESA Flat Panel Monitor Physical Mounting...

AL715/716 User's Guide
Page 4
... of the audio cable to the LCD Monitor's " LINE IN " jack. Power is OFF. When the LCD Monitor is in "Power Saving Mode". Decrease Volume - Press either left or right control button for OSD (On Screen Display) menu selection. 4 Connect the power cord to the front panel's "AUDIO OUT" jack of your PC's audio card or to an AC power source. Power is ON. The VESA DPMS provides four power saving modes through detecting a horizontal or vertical sync. LED lights Yellow --- LED is in power saving mode, the monitor screen will be...
... of the audio cable to the LCD Monitor's " LINE IN " jack. Power is OFF. When the LCD Monitor is in "Power Saving Mode". Decrease Volume - Press either left or right control button for OSD (On Screen Display) menu selection. 4 Connect the power cord to the front panel's "AUDIO OUT" jack of your PC's audio card or to an AC power source. Power is ON. The VESA DPMS provides four power saving modes through detecting a horizontal or vertical sync. LED lights Yellow --- LED is in power saving mode, the monitor screen will be...
AL715/716 User's Guide
Page 5
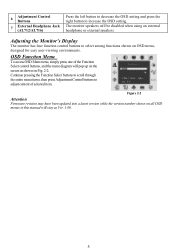
... version number shown on all OSD menus in this manual will stay as shown on Fig. 2-2: Continue pressing the Function Select buttons to scroll through the entire menu items ,then press Adjustment Control buttons to adjust content of the Function Select control buttons, and the menu diagram will be disabled when using an external headphone or external speakers. Adjusting the Monitor's Display The monitor has four function control buttons to increase the OSD setting. 6 Adjustment Control Buttons...
... version number shown on all OSD menus in this manual will stay as shown on Fig. 2-2: Continue pressing the Function Select buttons to scroll through the entire menu items ,then press Adjustment Control buttons to adjust content of the Function Select control buttons, and the menu diagram will be disabled when using an external headphone or external speakers. Adjusting the Monitor's Display The monitor has four function control buttons to increase the OSD setting. 6 Adjustment Control Buttons...

AL715/716 User's Guide
Page 6
...'s you adjust the display's horizontal position V. A smoother setting is more suitable for function and description. The adjustable range can be variable in different modes. This function moves the OSD menu window horizontally. Contrast 101 scales of contrast are available: English, German, French, Spanish, and Italian. This function records the deviated number of the OSD menu. Press the left or right adjustment control button to activate the selected function, Auto Adjustment, Use Analog Input or Use Digital Input. Auto and Input Select...
...'s you adjust the display's horizontal position V. A smoother setting is more suitable for function and description. The adjustable range can be variable in different modes. This function moves the OSD menu window horizontally. Contrast 101 scales of contrast are available: English, German, French, Spanish, and Italian. This function records the deviated number of the OSD menu. Press the left or right adjustment control button to activate the selected function, Auto Adjustment, Use Analog Input or Use Digital Input. Auto and Input Select...

AL715/716 User's Guide
Page 7
Chapter 3 Technical Information Specifications LCD Panel Size Display Type Resolution Display Dot Display Area (mm) Display Color Brightness Contrast Ratio Response Time Lamp Voltage Lamp Current Viewing Angle Video Input Signal Input Impedance Polarity Amplitude Multi-mode Supported Control Power switch (hard and soft types) OSD Brightness Contrast Horizontal Position Vertical Position Phase Clock Display Mode Setup OSD Format 17" (43 cm) Active matrix color TFT LCD 1280 x 1024 1280 x (RGB) x 1024 337.92 x 270.336 (H x V) 262K 250 cd/m2 (typical) 500:1 (typical) Ta=25°C Tr+Tf...
Chapter 3 Technical Information Specifications LCD Panel Size Display Type Resolution Display Dot Display Area (mm) Display Color Brightness Contrast Ratio Response Time Lamp Voltage Lamp Current Viewing Angle Video Input Signal Input Impedance Polarity Amplitude Multi-mode Supported Control Power switch (hard and soft types) OSD Brightness Contrast Horizontal Position Vertical Position Phase Clock Display Mode Setup OSD Format 17" (43 cm) Active matrix color TFT LCD 1280 x 1024 1280 x (RGB) x 1024 337.92 x 270.336 (H x V) 262K 250 cd/m2 (typical) 500:1 (typical) Ta=25°C Tr+Tf...

AL715/716 User's Guide
Page 8
Sync Input Signal Polarity Separate TTL compatible horizontal and vertical synchronization Digital TMDS Positive and negative Plug & Play Supports VESA DDC1 and DDC2B functions External Connection Power Input (AC input) Video Cable Audio Cable AC socket 1.8M with 15-pin D-sub connector, 1.8M with 24-pin DVI-D(For AL712/AL713) 1.5M with Stereo Jack(For AL712/AL716) Environment Operating Condition: Temperature 5°C to 40°C/41°F to 104°F Relative Humidity...
Sync Input Signal Polarity Separate TTL compatible horizontal and vertical synchronization Digital TMDS Positive and negative Plug & Play Supports VESA DDC1 and DDC2B functions External Connection Power Input (AC input) Video Cable Audio Cable AC socket 1.8M with 15-pin D-sub connector, 1.8M with 24-pin DVI-D(For AL712/AL713) 1.5M with Stereo Jack(For AL712/AL716) Environment Operating Condition: Temperature 5°C to 40°C/41°F to 104°F Relative Humidity...

AL715/716 User's Guide
Page 9
... -/- APPLE MAC-768 +/+ SXGA +/+ SXGA Note: 1.When the in put display mode is not 1280 x 1024, the image is smoothly expanded to see if there's any black vertical stripes appear. Refer to another external CRT. Check the screen to 1280 x 1024 dots with the LCD Monitor, the output timing of Range" message. VGA-350 640 x 400 24.830 56.420 21.050 -/- PROBLEM Picture is...
... -/- APPLE MAC-768 +/+ SXGA +/+ SXGA Note: 1.When the in put display mode is not 1280 x 1024, the image is smoothly expanded to see if there's any black vertical stripes appear. Refer to another external CRT. Check the screen to 1280 x 1024 dots with the LCD Monitor, the output timing of Range" message. VGA-350 640 x 400 24.830 56.420 21.050 -/- PROBLEM Picture is...

