
User Manual
Page 1
TABLE OF CONTENTS Special notes on LCD monitors 1 Introduction 2 Features ...2 Unpacking 3 Attaching/Removing the base 4 Screen position adjustment 4 Connecting the power cord 5 Safety precaution 5 Cleaning your monitor 5 Preset modes 6 Power saving 7 DDC ...7 Installation 8 User controls 9 Troubleshooting 13 Specification 15 For more information and help in recycling, please visit the following websites: Worldwide: http://global.acer.com/about/sustainability.htm
TABLE OF CONTENTS Special notes on LCD monitors 1 Introduction 2 Features ...2 Unpacking 3 Attaching/Removing the base 4 Screen position adjustment 4 Connecting the power cord 5 Safety precaution 5 Cleaning your monitor 5 Preset modes 6 Power saving 7 DDC ...7 Installation 8 User controls 9 Troubleshooting 13 Specification 15 For more information and help in recycling, please visit the following websites: Worldwide: http://global.acer.com/about/sustainability.htm
User Manual
Page 2
... make sure the flicker disappears. · You may find slightly uneven brightness on the screen depending on the desktop pattern you use . Visit http://global.acer.com/about/sustainability.htm E-1 In this product. Turn off the Power Switch for sale after switching the image, when the same image is recovered slowly...
... make sure the flicker disappears. · You may find slightly uneven brightness on the screen depending on the desktop pattern you use . Visit http://global.acer.com/about/sustainability.htm E-1 In this product. Turn off the Power Switch for sale after switching the image, when the same image is recovered slowly...
User Manual
Page 3
... resolutions. For horizontal scan frequencies between 30 KHz and 81 KHz, and vertical scan frequencies between 56 Hz and 76 Hz. The AL2202W monitor provides flicker-free and color images at the precision-of a fixed frequency. · The resident memory allows for Apple Macintosh Centris,...applications · The compact and sleek cabinet design saves lot of the LCD monitor. The LCD monitor is WSXGA(1680 x 1050), best suited for purchasing model AL2202W , a high performance 22-inch color TFT LCD monitor. In this user guide, we will introduce you will have a refreshing experience...
... resolutions. For horizontal scan frequencies between 30 KHz and 81 KHz, and vertical scan frequencies between 56 Hz and 76 Hz. The AL2202W monitor provides flicker-free and color images at the precision-of a fixed frequency. · The resident memory allows for Apple Macintosh Centris,...applications · The compact and sleek cabinet design saves lot of the LCD monitor. The LCD monitor is WSXGA(1680 x 1050), best suited for purchasing model AL2202W , a high performance 22-inch color TFT LCD monitor. In this user guide, we will introduce you will have a refreshing experience...
User Manual
Page 4
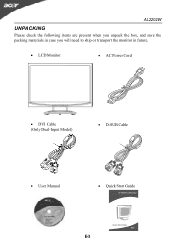
AL2202W UNPACKING Please check the following items are present when you unpack the box, and save the packing materials in case you will need to ship or transport the monitor in future. · LCD Monitor · AC Power Cord · DVI Cable (Only Dual-Input Model) · D-SUB Cable · User Manual · Quick Start Guide E-3 Quick Start Guide
AL2202W UNPACKING Please check the following items are present when you unpack the box, and save the packing materials in case you will need to ship or transport the monitor in future. · LCD Monitor · AC Power Cord · DVI Cable (Only Dual-Input Model) · D-SUB Cable · User Manual · Quick Start Guide E-3 Quick Start Guide
User Manual
Page 5
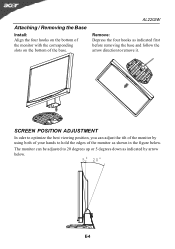
AL2202W Remove: Depress the four hooks as indicated first before removing the base and follow the arrow direction to hold the edges of the monitor as indicated by using both of your hands to remove it. Attaching / Removing the Base Install: Align the four hooks on the bottom of the monitor ...with the corresponding slots on the bottom of the monitor by arrow below . SCREEN POSITION ADJUSTMENT In oder to optimize the best viewing position, you can be adjusted to ...
AL2202W Remove: Depress the four hooks as indicated first before removing the base and follow the arrow direction to hold the edges of the monitor as indicated by using both of your hands to remove it. Attaching / Removing the Base Install: Align the four hooks on the bottom of the monitor ...with the corresponding slots on the bottom of the monitor by arrow below . SCREEN POSITION ADJUSTMENT In oder to optimize the best viewing position, you can be adjusted to ...
User Manual
Page 6
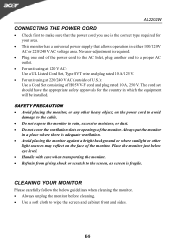
...soft cloth to wipe the screen and cabinet front and sides. The cord set should have the appropriate safety approvals for your area. · This monitor has a universal power supply that the power cord you use is required. · Plug one end of the power cord to the AC Inlet...giving shock or scratch to the screen, as screen is adequate ventilation. · Avoid placing the monitor against a bright background or where sunlight or other heavy object, on the face of the monitor. AL2202W CONNECTING THE POWER CORD · Check first to make sure that allows operation in either 100/120V...
...soft cloth to wipe the screen and cabinet front and sides. The cord set should have the appropriate safety approvals for your area. · This monitor has a universal power supply that the power cord you use is required. · Plug one end of the power cord to the AC Inlet...giving shock or scratch to the screen, as screen is adequate ventilation. · Avoid placing the monitor against a bright background or where sunlight or other heavy object, on the face of the monitor. AL2202W CONNECTING THE POWER CORD · Check first to make sure that allows operation in either 100/120V...
User Manual
Page 7
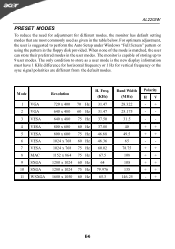
...Hz 1680 x 1050 60 Hz H. For optimum adjustment, the user is matched, the user can store their preferred modes in the floppy disk provided. AL2202W PRESET MODES To reduce the need for adjustment for vertical frequency or the sync signal polarities are most commonly used as a user mode is the... new display information must have 1 KHz difference for horizontal frequency or 1 Hz for different modes, the monitor has default setting modes that are different from the default modes. The monitor is capable of the mode is suggested to 9 user modes. Freq. (KHz) 31.47 31.47 37.50...
...Hz 1680 x 1050 60 Hz H. For optimum adjustment, the user is matched, the user can store their preferred modes in the floppy disk provided. AL2202W PRESET MODES To reduce the need for adjustment for vertical frequency or the sync signal polarities are most commonly used as a user mode is the... new display information must have 1 KHz difference for horizontal frequency or 1 Hz for different modes, the monitor has default setting modes that are different from the default modes. The monitor is capable of the mode is suggested to 9 user modes. Freq. (KHz) 31.47 31.47 37.50...
User Manual
Page 8
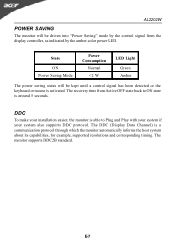
State ON Power Saving Mode Power Consumption Normal AL2202W POWER SAVING The monitor will be driven into "Power Saving" mode by the control signal from the display controller, as indicated by the amber-color power LED.
State ON Power Saving Mode Power Consumption Normal AL2202W POWER SAVING The monitor will be driven into "Power Saving" mode by the control signal from the display controller, as indicated by the amber-color power LED.
User Manual
Page 9
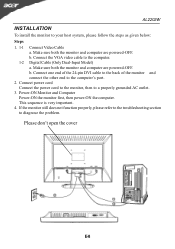
... computer. 1-2 Digital Cable (Only Dual-Input Model) a. Connect power cord Connect the power cord to the monitor, then to the computer's port. 2. Power-ON Monitor and Computer Power-ON the monitor first, then power-ON the computer. This sequence is very important. 4. b. Connect one end of the ...24-pin DVI cable to the back of the monitor and connect the other end to a properly grounded AC outlet. 3. b. AL2202W INSTALLATION To install the monitor to your host system, please follow the steps as given below: Steps 1. 1-1 Connect Video Cable a....
... computer. 1-2 Digital Cable (Only Dual-Input Model) a. Connect power cord Connect the power cord to the monitor, then to the computer's port. 2. Power-ON Monitor and Computer Power-ON the monitor first, then power-ON the computer. This sequence is very important. 4. b. Connect one end of the ...24-pin DVI cable to the back of the monitor and connect the other end to a properly grounded AC outlet. 3. b. AL2202W INSTALLATION To install the monitor to your host system, please follow the steps as given below: Steps 1. 1-1 Connect Video Cable a....
User Manual
Page 14
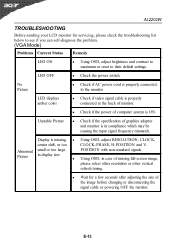
... Current Status Remedy LED ON · Using OSD, adjust brightness and contrast to maximum or reset to the monitor. E-13 AL2202W TROUBLESHOOTING Before sending your LCD monitor for a few seconds after adjusting the size of the image before changing or disconnecting the signal cable or powering... OFF the monitor. LED OFF · Check the power switch. No Picture · Check if AC power cord is missing, ...
... Current Status Remedy LED ON · Using OSD, adjust brightness and contrast to maximum or reset to the monitor. E-13 AL2202W TROUBLESHOOTING Before sending your LCD monitor for a few seconds after adjusting the size of the image before changing or disconnecting the signal cable or powering... OFF the monitor. LED OFF · Check the power switch. No Picture · Check if AC power cord is missing, ...
User Manual
Page 15
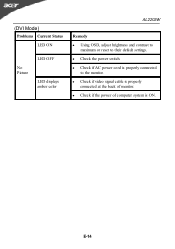
E-14 (DVI Mode) Problems Current Status LED ON No Picture LED OFF LED displays amber color AL2202W Remedy · Using OSD, adjust brightness and contrast to maximum or reset to their default settings. · Check the power switch. · Check if AC power cord is properly connected to the monitor. · Check if video signal cable is properly connected at the back of monitor. · Check if the power of computer system is ON.
E-14 (DVI Mode) Problems Current Status LED ON No Picture LED OFF LED displays amber color AL2202W Remedy · Using OSD, adjust brightness and contrast to maximum or reset to their default settings. · Check the power switch. · Check if AC power cord is properly connected to the monitor. · Check if video signal cable is properly connected at the back of monitor. · Check if the power of computer system is ON.


