
AL2051 User's Guide EN
Page 2
...'s authority to radio communications. Increase the separation between the equipment and receiver. 3. Before operating the monitor, please read this equipment. Shielded interface cables and AC power cord, if any radio or TV interference caused by one or more of the FCC Rules. It is not responsible for a Class B digital device, pursuant to...
...'s authority to radio communications. Increase the separation between the equipment and receiver. 3. Before operating the monitor, please read this equipment. Shielded interface cables and AC power cord, if any radio or TV interference caused by one or more of the FCC Rules. It is not responsible for a Class B digital device, pursuant to...
AL2051 User's Guide EN
Page 3
... the monitor on an unstable cart, stand, or table. opening or removing covers can expose you are provided for long period of power supplied to qualified service personnel. z To ensure satisfactory operation, use only with the monitor. z The wall socket shall be installed ..., washbowl, kitchen sink, laundry tub, swimming pool or in fire or electric shock. If your dealer or local power company. z Do not overload power strips and extension cords. Never spill liquids on the monitor cabinet. z Slots and openings in a bookcase or cabinet unless proper ventilation is...
... the monitor on an unstable cart, stand, or table. opening or removing covers can expose you are provided for long period of power supplied to qualified service personnel. z To ensure satisfactory operation, use only with the monitor. z The wall socket shall be installed ..., washbowl, kitchen sink, laundry tub, swimming pool or in fire or electric shock. If your dealer or local power company. z Do not overload power strips and extension cords. Never spill liquids on the monitor cabinet. z Slots and openings in a bookcase or cabinet unless proper ventilation is...

AL2051 User's Guide EN
Page 4
...the previous screen may remain after switching the image, when the same image is recovered slowly by changing the image or turning off the Power Switch and then turn it on the desktop pattern you use. • The LCD screen has effective pixels of the fluorescent light, ... Design CHECKING THE CONTENTS OF THE PACKAGE The product package should include the following symptoms are normal with LCD monitor and do not indicate a problem. Power Cord 4. DVI Cable (only Dual-Input Model) 7. LCD Monitor 2. NOTES • Due to make sure the flicker disappears. • You may flicker during...
...the previous screen may remain after switching the image, when the same image is recovered slowly by changing the image or turning off the Power Switch and then turn it on the desktop pattern you use. • The LCD screen has effective pixels of the fluorescent light, ... Design CHECKING THE CONTENTS OF THE PACKAGE The product package should include the following symptoms are normal with LCD monitor and do not indicate a problem. Power Cord 4. DVI Cable (only Dual-Input Model) 7. LCD Monitor 2. NOTES • Due to make sure the flicker disappears. • You may flicker during...
AL2051 User's Guide EN
Page 5
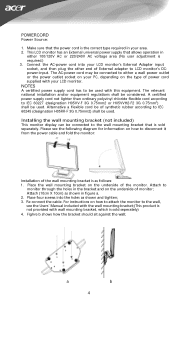
...mounting bracket is as follows: 1. Place four screws into your area. 2. Re-connect the cable. a b 4 The AC-power cord may be of power cord supplied with wall mounting bracket, which is required.) 3. The relevant national installation and/or equipment regulations shall be used with this... type required in figure a. 2. This LCD monitor has an External universal power supply that the power cord is sold seperately) 4. Attach (10cm X 10cm) as shown and tighten; 3. Connect the AC-power cord into the holes as shown in your LCD monitor's External Adapter input socket...
...mounting bracket is as follows: 1. Place four screws into your area. 2. Re-connect the cable. a b 4 The AC-power cord may be of power cord supplied with wall mounting bracket, which is required.) 3. The relevant national installation and/or equipment regulations shall be used with this... type required in figure a. 2. This LCD monitor has an External universal power supply that the power cord is sold seperately) 4. Attach (10cm X 10cm) as shown and tighten; 3. Connect the AC-power cord into the holes as shown in your LCD monitor's External Adapter input socket...
AL2051 User's Guide EN
Page 6
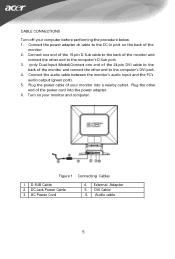
... the audio cable between the monitor's audio input and the PC's audio output (green port). 5. DVI Cable 6. Plug the power cable of the monitor. 2. Audio cable 5 D-SUB Cable 2. DC-Jack Power Cable 3. AC Power Cord 4. External Adapter 5. Figure 1 Connecting Cables 1. Turn on the back of your computer before performing the procedure below. 1. Plug ...4. Connect one end of the 15-pin D-Sub cable to the back of the monitor and connect the other end to the back of the power cord into a nearby outlet. CONTROLS AND CONNECTORS CABLE CONNECTIONS Turn off your monitor into the...
... the audio cable between the monitor's audio input and the PC's audio output (green port). 5. DVI Cable 6. Plug the power cable of the monitor. 2. Audio cable 5 D-SUB Cable 2. DC-Jack Power Cable 3. AC Power Cord 4. External Adapter 5. Figure 1 Connecting Cables 1. Turn on the back of your computer before performing the procedure below. 1. Plug ...4. Connect one end of the 15-pin D-Sub cable to the back of the monitor and connect the other end to the back of the power cord into a nearby outlet. CONTROLS AND CONNECTORS CABLE CONNECTIONS Turn off your monitor into the...
AL2051 User's Guide EN
Page 8
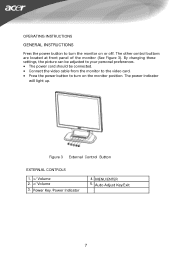
By changing these settings, the picture can be adjusted to your personal preferences. • The power cord should be connected. • Connect the video cable from the monitor to the video card. • Press the power button to turn on or off. The power indicator will light up. Figure 3 External Control Button EXTERNAL CONTROLS 1. >/ Volume 2. OPERATING INSTRUCTIONS GENERAL INSTRUCTIONS Press the power button to turn the monitor on the monitor position. The other control buttons are located at front panel of the monitor (See Figure 3).
By changing these settings, the picture can be adjusted to your personal preferences. • The power cord should be connected. • Connect the video cable from the monitor to the video card. • Press the power button to turn on or off. The power indicator will light up. Figure 3 External Control Button EXTERNAL CONTROLS 1. >/ Volume 2. OPERATING INSTRUCTIONS GENERAL INSTRUCTIONS Press the power button to turn the monitor on the monitor position. The other control buttons are located at front panel of the monitor (See Figure 3).
AL2051 User's Guide EN
Page 13
...type attachment plug, rated 10A, 250V, CEE-22 male configuration. Supplied with units intended for the power cord shall be 125 volts AC. Please note that power supply cord needs to use a cord set by reducing power consumption when there is no video input signal this monitor, following a time-out period, will ... to inform the host system of its identity and, depending on the level of personal computer: Please use VDE 0602, 0625, 0821 approval power cord in European counties. 12 PLUG AND PLAY Plug & Play DDC2B Feature This monitor is equipped with a molded-on type connector body, rated ...
...type attachment plug, rated 10A, 250V, CEE-22 male configuration. Supplied with units intended for the power cord shall be 125 volts AC. Please note that power supply cord needs to use a cord set by reducing power consumption when there is no video input signal this monitor, following a time-out period, will ... to inform the host system of its identity and, depending on the level of personal computer: Please use VDE 0602, 0625, 0821 approval power cord in European counties. 12 PLUG AND PLAY Plug & Play DDC2B Feature This monitor is equipped with a molded-on type connector body, rated ...
AL2051 User's Guide EN
Page 14
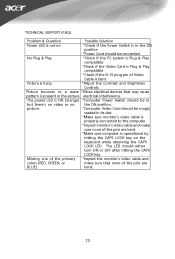
...make sure none of the pins are BLUE) bent. 13 The LED should either turn ON or OFF after hitting the CAPS LOCK key. The power LED is present in the picture electrical interference. picture. *Computer Video Card should be snugly seated in its slot *Make sure monitor's video cable... be in but there's no video or no the ON position. TECHNICAL SUPPORT (FAQ) Problem & Question Possible Solution Power LED is not on *Check if the Power Switch is in the ON position *Power Cord should be connected No Plug & Play *Check if the PC system is Plug & Play compatible *Check if the...
...make sure none of the pins are BLUE) bent. 13 The LED should either turn ON or OFF after hitting the CAPS LOCK key. The power LED is present in the picture electrical interference. picture. *Computer Video Card should be snugly seated in its slot *Make sure monitor's video cable... be in but there's no video or no the ON position. TECHNICAL SUPPORT (FAQ) Problem & Question Possible Solution Power LED is not on *Check if the Power Switch is in the ON position *Power Cord should be connected No Plug & Play *Check if the PC system is Plug & Play compatible *Check if the...


