AL1914 LCD Monitor User's Guide
Page 1
Table of Contents Precautions ...2 Package contents ...3 Installation instructions 3 Assembling the Monitor...3 Detaching the Monitor ...4 Adjusting the Viewing Angle...4 Connecting the Devices...5 Switching the Power ...5 Adjusting display settings 6 External Controls ...6 OSD options ...7 OSD Menu ...7 Troubleshooting ...9 General specifications 10 1
Table of Contents Precautions ...2 Package contents ...3 Installation instructions 3 Assembling the Monitor...3 Detaching the Monitor ...4 Adjusting the Viewing Angle...4 Connecting the Devices...5 Switching the Power ...5 Adjusting display settings 6 External Controls ...6 OSD options ...7 OSD Menu ...7 Troubleshooting ...9 General specifications 10 1
AL1914 LCD Monitor User's Guide
Page 2
... objects touch the screen, the LCD panel will clean stubborn stains. Please contact a qualified engineer if you encounter a problem, please check the "Troubleshooting" section first. In this does not resolve the problem do not indicate a problem. A cloth very slightly moistened with LCD monitor and do not attempt to repair the monitor by changing the image or turning off the Power Switch and then turn it can lead to make sure the flicker...
... objects touch the screen, the LCD panel will clean stubborn stains. Please contact a qualified engineer if you encounter a problem, please check the "Troubleshooting" section first. In this does not resolve the problem do not indicate a problem. A cloth very slightly moistened with LCD monitor and do not attempt to repair the monitor by changing the image or turning off the Power Switch and then turn it can lead to make sure the flicker...
AL1914 LCD Monitor User's Guide
Page 4
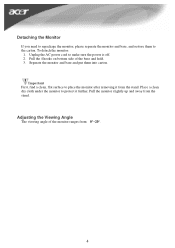
... power cord to the carton. Place a clean dry cloth under the monitor to place the monitor after removing it further. Adjusting the Viewing Angle The viewing angle of the base and hold. 3. Detaching the Monitor If you need to repackage the monitor, please separate the monitor and base, and restore them into carton. Pull the 4 hooks on bottom side of the monitor ranges from the stand. Separate the monitor and base...
... power cord to the carton. Place a clean dry cloth under the monitor to place the monitor after removing it further. Adjusting the Viewing Angle The viewing angle of the base and hold. 3. Detaching the Monitor If you need to repackage the monitor, please separate the monitor and base, and restore them into carton. Pull the 4 hooks on bottom side of the monitor ranges from the stand. Separate the monitor and base...
AL1914 LCD Monitor User's Guide
Page 5
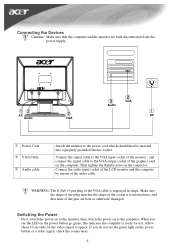
... a video signal, check the connections. 5 Make sure the shape of the plug matches the shape of the graphics card on the computer. If you see the green light on the power button go green, this indicates the computer is ready for the video signal to the VGA output socket of the socket it is trapezoid in shape. Connect the signal cable to the VGA input socket of the monitor , and connect the signal cable...
... a video signal, check the connections. 5 Make sure the shape of the plug matches the shape of the graphics card on the computer. If you see the green light on the power button go green, this indicates the computer is ready for the video signal to the VGA output socket of the socket it is trapezoid in shape. Connect the signal cable to the VGA input socket of the monitor , and connect the signal cable...
AL1914 LCD Monitor User's Guide
Page 6
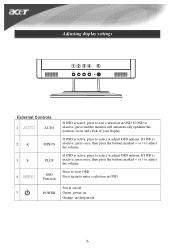
... volume. If OSD is active, press to exit a selection in OSD. Press to enter a selection in sleep mode 6 Press again to view OSD. Adjusting display settings 1234 5 AUTO < > MENU External Controls 1 AUTO 2 < MINUS 3 > 4 PLUS OSD Function If OSD is active, press to select or adjust OSD options. Power on/off 5 POWER Green: power on Orange: in OSD. If OSD is active, press to select or adjust OSD options. If OSD is inactive, press and the monitor will automatically optimize...
... volume. If OSD is active, press to exit a selection in OSD. Press to enter a selection in sleep mode 6 Press again to view OSD. Adjusting display settings 1234 5 AUTO < > MENU External Controls 1 AUTO 2 < MINUS 3 > 4 PLUS OSD Function If OSD is active, press to select or adjust OSD options. Power on/off 5 POWER Green: power on Orange: in OSD. If OSD is active, press to select or adjust OSD options. If OSD is inactive, press and the monitor will automatically optimize...
AL1914 LCD Monitor User's Guide
Page 7
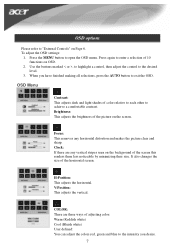
... OSD. 2. V-Position: This adjusts the vertical. COLOR: There are any horizontal distortion and makes the picture clear and sharp. Press the MENU button to enter a selection of 10 functions on the background of the screen this renders them less noticeable by minimizing their size. Use the buttons marked < or >, to highlight a control, then adjust the control to achieve a comfortable contrast. OSD Menu Contrast: This adjusts dark and light shades of the picture on Page 6. Brightness...
... OSD. 2. V-Position: This adjusts the vertical. COLOR: There are any horizontal distortion and makes the picture clear and sharp. Press the MENU button to enter a selection of 10 functions on the background of the screen this renders them less noticeable by minimizing their size. Use the buttons marked < or >, to highlight a control, then adjust the control to achieve a comfortable contrast. OSD Menu Contrast: This adjusts dark and light shades of the picture on Page 6. Brightness...
AL1914 LCD Monitor User's Guide
Page 9
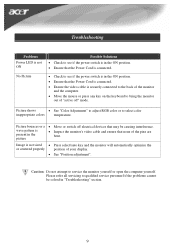
... picture • Inspect the monitor's video cable and ensure that may be causing interference. Picture shows • See "Color Adjustment" to adjust RGB color or to service the monitor yourself or open the computer yourself. Caution: Do not attempt to select color inappropriate colors temperature. Image is present in "Troubleshooting" section. 9 wave pattern is not sized • Press select/auto key and the monitor will automatically optimize the or centered properly position...
... picture • Inspect the monitor's video cable and ensure that may be causing interference. Picture shows • See "Color Adjustment" to adjust RGB color or to service the monitor yourself or open the computer yourself. Caution: Do not attempt to select color inappropriate colors temperature. Image is present in "Troubleshooting" section. 9 wave pattern is not sized • Press select/auto key and the monitor will automatically optimize the or centered properly position...
AL1914 LCD Monitor User's Guide
Page 10
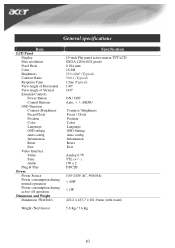
...specifications Item LCD Panel Display Max resolution Pixel Pitch Color Brightness Contrast Ratio Response Time View Angle of Horizontal View Angle of Vertical External Controls Power Button Control Buttons OSD Function Contrast /Brightness Focus/Clock Position Color Language OSD setting Auto config Information Reset Exit Video Interface Video Sync Audio Plug & Play Power Power Source Power consumption during normal operation Power consumption during active off operation Dimension and Weight Dimension (W×H×D) Weight (Net/ Gross) Specification 19-inch Flat panel active-matrix TFT LCD...
...specifications Item LCD Panel Display Max resolution Pixel Pitch Color Brightness Contrast Ratio Response Time View Angle of Horizontal View Angle of Vertical External Controls Power Button Control Buttons OSD Function Contrast /Brightness Focus/Clock Position Color Language OSD setting Auto config Information Reset Exit Video Interface Video Sync Audio Plug & Play Power Power Source Power consumption during normal operation Power consumption during active off operation Dimension and Weight Dimension (W×H×D) Weight (Net/ Gross) Specification 19-inch Flat panel active-matrix TFT LCD...

AL1914 Service Guide
Page 4
... present inside the monitor. Warning Use only shielded signal cables to connect I/O devices to qualified personnel only. - 4 - Consult the dealer or an experienced radio/TV technician for a Class B digital device, pursuant to Part 15 of the following measures: 1. WARNING: (FOR FCC CERTIFIED MODELS) NOTE: this equipment has been tested and found to comply with the instructions, may cause harmful...
... present inside the monitor. Warning Use only shielded signal cables to connect I/O devices to qualified personnel only. - 4 - Consult the dealer or an experienced radio/TV technician for a Class B digital device, pursuant to Part 15 of the following measures: 1. WARNING: (FOR FCC CERTIFIED MODELS) NOTE: this equipment has been tested and found to comply with the instructions, may cause harmful...
AL1914 Service Guide
Page 5
... is equipped with a three-pronged grounded plug, a plug with the monitor. z Do not attempt to qualified service personnel. opening or removing covers can injure a person and cause serious damage to the appliance. Use only a trolley or stand recommended by the manufacture and follow the kit instructions. Do not place the monitor on a wall or shelf, use a mounting kit approved by the manufacture or sold...
... is equipped with a three-pronged grounded plug, a plug with the monitor. z Do not attempt to qualified service personnel. opening or removing covers can injure a person and cause serious damage to the appliance. Use only a trolley or stand recommended by the manufacture and follow the kit instructions. Do not place the monitor on a wall or shelf, use a mounting kit approved by the manufacture or sold...
AL1914 Service Guide
Page 7
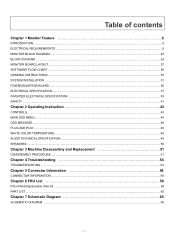
...MONITOR BLOCK DIAGRAM ...23 BLOCK DIAGRAM ...24 MONITOR BOARD LAYOUT ...27 SOFTWARE FLOW CHART ...29 GENERAL INSTRUCTIONS ...30 SYSTEM INSTALLATION ...31 POWER/INVERTOR BOARD ...36 ELECTRICAL SPECIFICATION...37 INVERTER ELECTRICAL SPECIFICATION ...39 SAFETY ...41 Chapter 2 Operating Instruction 43 CONTROLS ...43 MAIN OSD MENU...44 OSD MESSAGE...46 PLUG AND PLAY ...48 WHITE COLOR TEMPERATURE...49 AUDIO TECHNICAL SPECIFICATION ...49 SPEAKERS ...50 Chapter 3 Machine Disassembly and Replacement 51 DISASSEMBLY PROCEDURE ...51 Chapter 4 Troubleshooting 54 TROUBLESHOOTING ...54 Chapter 5 Connector...
...MONITOR BLOCK DIAGRAM ...23 BLOCK DIAGRAM ...24 MONITOR BOARD LAYOUT ...27 SOFTWARE FLOW CHART ...29 GENERAL INSTRUCTIONS ...30 SYSTEM INSTALLATION ...31 POWER/INVERTOR BOARD ...36 ELECTRICAL SPECIFICATION...37 INVERTER ELECTRICAL SPECIFICATION ...39 SAFETY ...41 Chapter 2 Operating Instruction 43 CONTROLS ...43 MAIN OSD MENU...44 OSD MESSAGE...46 PLUG AND PLAY ...48 WHITE COLOR TEMPERATURE...49 AUDIO TECHNICAL SPECIFICATION ...49 SPEAKERS ...50 Chapter 3 Machine Disassembly and Replacement 51 DISASSEMBLY PROCEDURE ...51 Chapter 4 Troubleshooting 54 TROUBLESHOOTING ...54 Chapter 5 Connector...
AL1914 Service Guide
Page 8
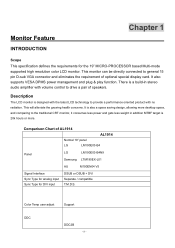
... D-sub VGA connector and eliminates the requirement of AL1914 AL1914 Normal 19" panel LG LM190E03-B4 Panel LG LM190E03-B4N9 Samsung LTM190EX-L01 AU M190EN04 V5 Signal Interface Sync Type for analog input Sync Type for the 19" MICRO-PROCESSOR based Multi-mode supported high resolution color LCD monitor. Monitor Feature INTRODUCTION Chapter 1 Scope This specification defines the requirements for DVI input DSUB or DSUB + DVI Separate / compatible T.M.D.S. This monitor can be directly connected to drive...
... D-sub VGA connector and eliminates the requirement of AL1914 AL1914 Normal 19" panel LG LM190E03-B4 Panel LG LM190E03-B4N9 Samsung LTM190EX-L01 AU M190EN04 V5 Signal Interface Sync Type for analog input Sync Type for the 19" MICRO-PROCESSOR based Multi-mode supported high resolution color LCD monitor. Monitor Feature INTRODUCTION Chapter 1 Scope This specification defines the requirements for DVI input DSUB or DSUB + DVI Separate / compatible T.M.D.S. This monitor can be directly connected to drive...
AL1914 Service Guide
Page 9
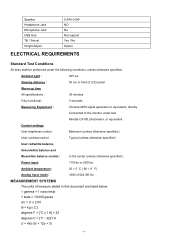
Minolta CA100 photometer, or equivalent Control settings User brightness control : Maximum (unless otherwise specified ) User contrast control: Typical (unless otherwise specified ) User red/white balance, Green/white balance and Blue/white balance control : In the center (unless otherwise specified ) Power input: 110Vac or 230Vac Ambient temperature: 20 ± 5 ˚C ( 68 ± 9 ˚ F) Analog input mode: 1280 x1024 /60 Hz MEASUREMENT SYSTEMS The units of measure stated in this document are listed below...
Minolta CA100 photometer, or equivalent Control settings User brightness control : Maximum (unless otherwise specified ) User contrast control: Typical (unless otherwise specified ) User red/white balance, Green/white balance and Blue/white balance control : In the center (unless otherwise specified ) Power input: 110Vac or 230Vac Ambient temperature: 20 ± 5 ˚C ( 68 ± 9 ˚ F) Analog input mode: 1280 x1024 /60 Hz MEASUREMENT SYSTEMS The units of measure stated in this document are listed below...
AL1914 Service Guide
Page 18
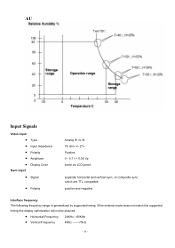
... timing the display optimization will not be assured. • Horizontal Frequency • Vertical Frequency 24KHz --80KHz 49Hz -------75Hz - 18 - Interface frequency The following frequency range is generalized by supported timing. AU Input Signals Video input • • Type Input Impedance • Polarity • Amplitude • Display Color Sync input • Signal • Polarity Analog R, G, B. 75 ohm +/- 2% Positive 0 - 0.7 +/- 0.05 Vp same as LCD panel separate horizontal and vertical sync, or composite sync which are TTL compatible positive and negative...
... timing the display optimization will not be assured. • Horizontal Frequency • Vertical Frequency 24KHz --80KHz 49Hz -------75Hz - 18 - Interface frequency The following frequency range is generalized by supported timing. AU Input Signals Video input • • Type Input Impedance • Polarity • Amplitude • Display Color Sync input • Signal • Polarity Analog R, G, B. 75 ohm +/- 2% Positive 0 - 0.7 +/- 0.05 Vp same as LCD panel separate horizontal and vertical sync, or composite sync which are TTL compatible positive and negative...
AL1914 Service Guide
Page 30
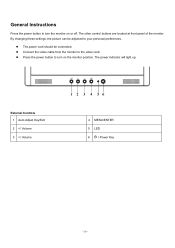
The other control buttons are located at front panel of the monitor. z Connect the video cable from the monitor to the video card. z Press the power button to turn the monitor on the monitor position. By changing these settings, the picture can be connected. The power indicator will light up. z The power cord should be adjusted to your personal preferences. External Controls 1 Auto Adjust Key/Exit 2 / Volume 4 MENU/ENTER 5 LED 6 / Power Key - 30 - General Instructions Press the power button to turn on or off.
The other control buttons are located at front panel of the monitor. z Connect the video cable from the monitor to the video card. z Press the power button to turn the monitor on the monitor position. By changing these settings, the picture can be connected. The power indicator will light up. z The power cord should be adjusted to your personal preferences. External Controls 1 Auto Adjust Key/Exit 2 / Volume 4 MENU/ENTER 5 LED 6 / Power Key - 30 - General Instructions Press the power button to turn on or off.
AL1914 Service Guide
Page 39
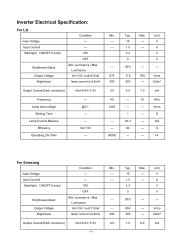
... Specification: For LG Condition Min. A V V --- --- 790 Vrms --- mA --- 80 --- % 50000 --- --- A V V --- --- --- Input Voltage --- --- Luminance / Max. --- Unit --- Vrms 1 --- Backlight ON/OFF Control ON OFF Brightness Adjust Min. Input Current --- --- Luminance Output Voltage Vin=15V, Iout=6.5mA 675 Brightness lamp current in 6.5mA 250 Output Current(Each connector) Vbri=0.4V~3.3V 4.0 - 39 - Unit --- Cd/m² Output Current(Each connector) Vbri=0.4V~3.3V 3.0 6.5 7.0 mA Frequency...
... Specification: For LG Condition Min. A V V --- --- 790 Vrms --- mA --- 80 --- % 50000 --- --- A V V --- --- --- Input Voltage --- --- Luminance / Max. --- Unit --- Vrms 1 --- Backlight ON/OFF Control ON OFF Brightness Adjust Min. Input Current --- --- Luminance Output Voltage Vin=15V, Iout=6.5mA 675 Brightness lamp current in 6.5mA 250 Output Current(Each connector) Vbri=0.4V~3.3V 4.0 - 39 - Unit --- Cd/m² Output Current(Each connector) Vbri=0.4V~3.3V 3.0 6.5 7.0 mA Frequency...
AL1914 Service Guide
Page 42
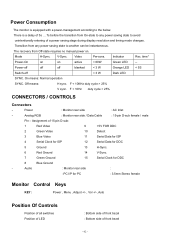
... no manual power on active < 60W Green LED -- Mode H-Sync. Assignment of front bezel - 42 - time* Power-On on on . Video Pw-cons. Indicator Rec. Audio : Monitor rear side : -PC I/P for PC : 3.5mm Stereo female Monitor Control Keys KEY : Power , Menu , Adjust +/- , Vol +/-, Auto Position Of Controls Position of all switches Position of LED : Bottom side of front bezel : Bottom side of 15-pin D-sub: 1 Red Video 9 +5V FOR DDC 2 Green Video 10 Detect 3 Blue Video 11 Serial Data...
... no manual power on active < 60W Green LED -- Mode H-Sync. Assignment of front bezel - 42 - time* Power-On on on . Video Pw-cons. Indicator Rec. Audio : Monitor rear side : -PC I/P for PC : 3.5mm Stereo female Monitor Control Keys KEY : Power , Menu , Adjust +/- , Vol +/-, Auto Position Of Controls Position of all switches Position of LED : Bottom side of front bezel : Bottom side of 15-pin D-sub: 1 Red Video 9 +5V FOR DDC 2 Green Video 10 Detect 3 Blue Video 11 Serial Data...
AL1914 Service Guide
Page 45
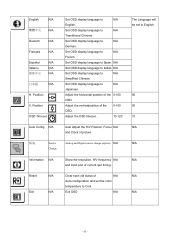
...çais N/A Español N/A Italiano N/A 简体中文 N/A 日本語 N/A H. Adjust the verticalposition of the 0-100 OSD. Adjust the OSD timeout. 10-120 Auto Config N/A Auto Adjust the H/V Position, Focus N/A and Clock of current iput timing. N/A Source Change Analog and Digital source change.(option) N/A The Language will be set the color temperature to English. 50 50 10 N/A N/A Information N/A Show the resolution, H/V frequency N/A N/A and input port of picture. Exit N/A Exit OSD N/A N/A - 45 -
...çais N/A Español N/A Italiano N/A 简体中文 N/A 日本語 N/A H. Adjust the verticalposition of the 0-100 OSD. Adjust the OSD timeout. 10-120 Auto Config N/A Auto Adjust the H/V Position, Focus N/A and Clock of current iput timing. N/A Source Change Analog and Digital source change.(option) N/A The Language will be set the color temperature to English. 50 50 10 N/A N/A Information N/A Show the resolution, H/V frequency N/A N/A and input port of picture. Exit N/A Exit OSD N/A N/A - 45 -
AL1914 Service Guide
Page 46
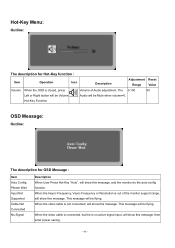
... Menu: Outline: The description for OSD Message : Item Auto Config Please Wait Input Not Supported Cable Not Connected No Signal Description When User Press Hot-Key "Auto", will show this message, and the monitor do the auto config function. The 0-100 50 Left or Right button will be Volume Audio will show this message, then enter power saving. - 46 - When the Hsync Frequency, Vsync Frequency or Resolution is no active signal input...
... Menu: Outline: The description for OSD Message : Item Auto Config Please Wait Input Not Supported Cable Not Connected No Signal Description When User Press Hot-Key "Auto", will show this message, and the monitor do the auto config function. The 0-100 50 Left or Right button will be Volume Audio will show this message, then enter power saving. - 46 - When the Hsync Frequency, Vsync Frequency or Resolution is no active signal input...
AL1914 Service Guide
Page 48
... that power supply card needs to use a cord set by pressing a key on type connector body, rated 10A, 250V, having standard CEE-22 female configuration. It allows the monitor to power outlet of DDC used, communicate additional information about its identity and, depending on the I2C protocol. IN ORDER FOR THIS MONITOR TO OPERATE PROPERLY, THERE MUST BE A VIDEO INPUT SIGNAL. This monitor meets the Green monitor standards as set...
... that power supply card needs to use a cord set by pressing a key on type connector body, rated 10A, 250V, having standard CEE-22 female configuration. It allows the monitor to power outlet of DDC used, communicate additional information about its identity and, depending on the I2C protocol. IN ORDER FOR THIS MONITOR TO OPERATE PROPERLY, THERE MUST BE A VIDEO INPUT SIGNAL. This monitor meets the Green monitor standards as set...


