
AL1716W Service Guide
Page 3
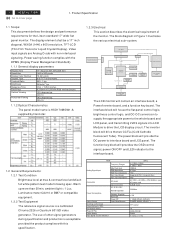
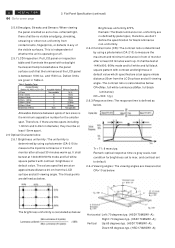
... 24C02 EEPROM 24CL16 Power & Inverter AC 110/220V Input D-SUB Analog Video Input The LCD monitor will drive the two CCFLs (Cold Cathode fluorescent Tube). The use of the monitor. Power saving function complies with non-interlaced signaling. The inverter block will contain an interface board... General Requirements: 1.2.1 Test Condition Brightness level at max & contrast level at default full white pattern test mode following spec. 2 ACER AL1716W Go to interface board and LCD panel. The interface block will provides the OSD control signal, power ON/OFF and LED indicator to...
... 24C02 EEPROM 24CL16 Power & Inverter AC 110/220V Input D-SUB Analog Video Input The LCD monitor will drive the two CCFLs (Cold Cathode fluorescent Tube). The use of the monitor. Power saving function complies with non-interlaced signaling. The inverter block will contain an interface board... General Requirements: 1.2.1 Test Condition Brightness level at max & contrast level at default full white pattern test mode following spec. 2 ACER AL1716W Go to interface board and LCD panel. The interface block will provides the OSD control signal, power ON/OFF and LED indicator to...
AL1716W Service Guide
Page 4
...connector. These video signals are measured using a Schmitt Trigger input). The power cord exact type to mains power. 1. Product Specification (continued) ACER AL1716W 3 Go to cover page 1.3 Interface Connectors: 1.3.1 The AC inlet connector shall have length of 1.8+/- 0.05 meters. 1.3.2 Signal connectors ... Signal Amplitudes The three video inputs consist of Red, Green, and Blue signals, each signal is 2.0V or greater. For a given monitor luminance levels are analog levels, where 0V corresponds to Ground, Schmitt-Triggers Input, Supported 3.3V device H & V sync. VS may ...
...connector. These video signals are measured using a Schmitt Trigger input). The power cord exact type to mains power. 1. Product Specification (continued) ACER AL1716W 3 Go to cover page 1.3 Interface Connectors: 1.3.1 The AC inlet connector shall have length of 1.8+/- 0.05 meters. 1.3.2 Signal connectors ... Signal Amplitudes The three video inputs consist of Red, Green, and Blue signals, each signal is 2.0V or greater. For a given monitor luminance levels are analog levels, where 0V corresponds to Ground, Schmitt-Triggers Input, Supported 3.3V device H & V sync. VS may ...

AL1716W Service Guide
Page 5
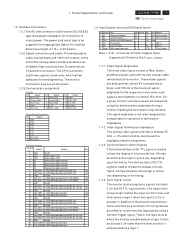
... Only when selecting User, you can select language from the driver to one TTL input load. User can make use of the monitor. Select OSD Menu turn off time. 4 ACER AL1716W Go to factory preset value except language selection. Table 1 Power-ON Mode Power Saving Mode LED Color Green Amber 1.5.3 On-Screen Display...
... Only when selecting User, you can select language from the driver to one TTL input load. User can make use of the monitor. Select OSD Menu turn off time. 4 ACER AL1716W Go to factory preset value except language selection. Table 1 Power-ON Mode Power Saving Mode LED Color Green Amber 1.5.3 On-Screen Display...
AL1716W Service Guide
Page 6
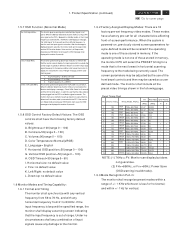
... 0 - 100) C. Left/Right: no default value K. An input signal which is not connected, the Monitor shall display a message, Check VGA Cable" for another 3 seconds. 1.5.8 OSD Control Factory Default Values: The...- - - - + + - - - + - - - + - + NOTE: (1) 76Hz=85KHz, or Fv>=80Hz: Power Save (OSD warning invalid mode). 1.6.3 Mode Recognition Pull-in memory. Product Specification (continued) ACER AL1716W 5 Go to the PC. The monitor shall use of range Menu Check VGA cable Menu This function gives warning about the VGA cable not connection. Vertical OSD position=50...
... 0 - 100) C. Left/Right: no default value K. An input signal which is not connected, the Monitor shall display a message, Check VGA Cable" for another 3 seconds. 1.5.8 OSD Control Factory Default Values: The...- - - - + + - - - + - - - + - + NOTE: (1) 76Hz=85KHz, or Fv>=80Hz: Power Save (OSD warning invalid mode). 1.6.3 Mode Recognition Pull-in memory. Product Specification (continued) ACER AL1716W 5 Go to the PC. The monitor shall use of range Menu Check VGA cable Menu This function gives warning about the VGA cable not connection. Vertical OSD position=50...

AL1716W Service Guide
Page 7
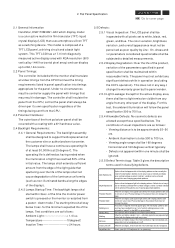
...to fill the entire screen. 1.7.3 Panel Timing and Interface: The controller supplied with CE mark. 1.10 Display Communications Channel: The monitor assembly shall provide a display communications channel that a static image from 90 to VESA DDC2B hardware requirements. AC TO DC Converter ... input voltage range. rush current is enabled so that is measured at 90VAC~240VAC). 6 ACER AL1716W Go to store EDID information. In - The monitor contains a separate EEProm for the monitor, the backlight assembly and the "Dell Sound bar", and shall meet all models specified.
...to fill the entire screen. 1.7.3 Panel Timing and Interface: The controller supplied with CE mark. 1.10 Display Communications Channel: The monitor assembly shall provide a display communications channel that a static image from 90 to VESA DDC2B hardware requirements. AC TO DC Converter ... input voltage range. rush current is enabled so that is measured at 90VAC~240VAC). 6 ACER AL1716W Go to store EDID information. In - The monitor contains a separate EEProm for the monitor, the backlight assembly and the "Dell Sound bar", and shall meet all models specified.
AL1716W Service Guide
Page 8
...2.2 Panel Timings: The controller included with a 3H hardness value. 2.4 Backlight Requirements: 2.4.1 General Requirements: The backlight assembly shall be covered with a coating with the monitor shall translate all pixels set to 700 lux. - The lamps shall extend a sufficient amount from the edge of the light guide that the panel shall...the CCFL operation). Physical damage to 700 lux. 2.5.4 Allowable Defects: No cosmetic defects are usually the result of the lamps. Flat Panel Specification ACER AL1716W 7 Go to be 160 degrees Horizontal and 160 degrees vertical typically. -
...2.2 Panel Timings: The controller included with a 3H hardness value. 2.4 Backlight Requirements: 2.4.1 General Requirements: The backlight assembly shall be covered with a coating with the monitor shall translate all pixels set to 700 lux. - The lamps shall extend a sufficient amount from the edge of the light guide that the panel shall...the CCFL operation). Physical damage to 700 lux. 2.5.4 Allowable Defects: No cosmetic defects are usually the result of the lamps. Flat Panel Specification ACER AL1716W 7 Go to be 160 degrees Horizontal and 160 degrees vertical typically. -
AL1716W Service Guide
Page 9
...=(Max. full white luminance)/(Max. Right: 70 degrees typ. (HSD170MGW1-A); 8 ACER AL1716W Go to measure the maximum and minimum luminance in front of the visible surfaces. This is independent of monitor after at least 15mm apart. 2.6 Optical Characteristics: 2.6.1 Brightness uniformity: The uniformity... are at an approximate distance 20cm from contaminants, fingerprints, or defects in Table 4. Therefore, if there are given in any of monitor after at 0 viewing angle. full black luminance) CR = 500: 1(ty) 2.6.3 Response time: The response time is determined by...
...=(Max. full white luminance)/(Max. Right: 70 degrees typ. (HSD170MGW1-A); 8 ACER AL1716W Go to measure the maximum and minimum luminance in front of the visible surfaces. This is independent of monitor after at least 15mm apart. 2.6 Optical Characteristics: 2.6.1 Brightness uniformity: The uniformity... are at an approximate distance 20cm from contaminants, fingerprints, or defects in Table 4. Therefore, if there are given in any of monitor after at 0 viewing angle. full black luminance) CR = 500: 1(ty) 2.6.3 Response time: The response time is determined by...
AL1716W Service Guide
Page 45
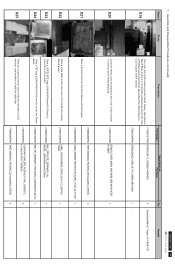
...S25 Stick a Screen Card on the Front Bezel with 4 screws. 7115240121P0A SCREW_M4*12_DOUBLE WASHIER 7740412200P0A STAND_BASE_ACER_AL1717_#6800_ABS 94HB ACER AL1716W 44 Go to cover page Q'ty Remark 4 Screw Size=M4x12; Take a LDPE+EPE bag (L680xW550mmxH0.55mm) ... BAG_PE_ORDINARY_FOR ACER_L300xW300xT0.05 mm 1 - Line 1 Stick a Vista label on specific positions as photo left side of LCD monitor, and another is held the right side. 7749106560P0A CUSHION FOAM_EPS_ACER-AL1716W_2160SETS_ L&R_472x117x398(H) 7749600200P0A TAPE_MASKING_PACKING_25mm(w)x45m_LITEON 24- one is held...
...S25 Stick a Screen Card on the Front Bezel with 4 screws. 7115240121P0A SCREW_M4*12_DOUBLE WASHIER 7740412200P0A STAND_BASE_ACER_AL1717_#6800_ABS 94HB ACER AL1716W 44 Go to cover page Q'ty Remark 4 Screw Size=M4x12; Take a LDPE+EPE bag (L680xW550mmxH0.55mm) ... BAG_PE_ORDINARY_FOR ACER_L300xW300xT0.05 mm 1 - Line 1 Stick a Vista label on specific positions as photo left side of LCD monitor, and another is held the right side. 7749106560P0A CUSHION FOAM_EPS_ACER-AL1716W_2160SETS_ L&R_472x117x398(H) 7749600200P0A TAPE_MASKING_PACKING_25mm(w)x45m_LITEON 24- one is held...
AL1716W Service Guide
Page 47
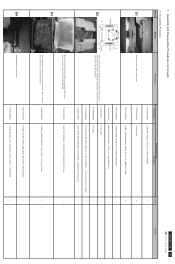
... MANUAL ASSY_ACER_T17AN_AL1716W_EMEA_27L Take out all accessories and returned product with a proper tool. 7735431081P0A Packing label 2 - ACER AL1716W 46 Go to remove the screen protector card. 7. S1 Open the carton with cushion foams from the carton...MODEL_L680xW550mmxH0.55mm 1 - 1 - 1 1 2 - 1 - Turn over the LCD monitor (screen faced down), 7730203550P0A CARD_SCREEN PROTECTOR_ACER_T17AA_AL1716W 1 - 1 - S3 Move the returned LCD monitor to a working table, then remove cushion foams and LDPE+EPE bag. 7749003190P0A BAG_PE_ORDINARY_FOR ...
... MANUAL ASSY_ACER_T17AN_AL1716W_EMEA_27L Take out all accessories and returned product with a proper tool. 7735431081P0A Packing label 2 - ACER AL1716W 46 Go to remove the screen protector card. 7. S1 Open the carton with cushion foams from the carton...MODEL_L680xW550mmxH0.55mm 1 - 1 - 1 1 2 - 1 - Turn over the LCD monitor (screen faced down), 7730203550P0A CARD_SCREEN PROTECTOR_ACER_T17AA_AL1716W 1 - 1 - S3 Move the returned LCD monitor to a working table, then remove cushion foams and LDPE+EPE bag. 7749003190P0A BAG_PE_ORDINARY_FOR ...
AL1716W Service Guide
Page 48
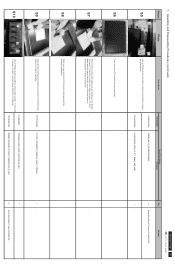
...Place cloth on the panel where you are release from the Front Bezel. 7140130061P0A T17BNHW-G1(99)_ACER_FUNCTION KEY BD SCREW_MACHINE_WITHOUT_NINDING_M3_6L_BLA ACER AL1716W 47 Go to release the Key Function board from front bezel; remove the bezel carefully. 7737517400P0A FC ASSY_#6790/#6810_ABS94V0_ACER_T17BNHW Key... release the stand base. 7115240121P0A 7740412200P0A SCREW_M4*12_DOUBLE WASHIER STAND_BASE_ACER_AL1717_#6800_ABS 94HB S6 Turn over the LCD monitor (screen faced up). - - S9 1 S10 Once all the locking mechanism. - - disengage the locking mechanism.
...Place cloth on the panel where you are release from the Front Bezel. 7140130061P0A T17BNHW-G1(99)_ACER_FUNCTION KEY BD SCREW_MACHINE_WITHOUT_NINDING_M3_6L_BLA ACER AL1716W 47 Go to release the Key Function board from front bezel; remove the bezel carefully. 7737517400P0A FC ASSY_#6790/#6810_ABS94V0_ACER_T17BNHW Key... release the stand base. 7115240121P0A 7740412200P0A SCREW_M4*12_DOUBLE WASHIER STAND_BASE_ACER_AL1717_#6800_ABS 94HB S6 Turn over the LCD monitor (screen faced up). - - S9 1 S10 Once all the locking mechanism. - - disengage the locking mechanism.
AL1716W User's Guide
Page 2
mandates that manufactures provide Material Content Declarations for certain categories of electronic products offered for hours. Visit http://global.acer.com/about/sustainability.htm E-1 AL1716W SPECIAL NOTES ON LCD MONITORS The following symptoms are normal with LCD monitor and do not indicate a problem. In this product. It may include blemishes of 0.01% or less such...
mandates that manufactures provide Material Content Declarations for certain categories of electronic products offered for hours. Visit http://global.acer.com/about/sustainability.htm E-1 AL1716W SPECIAL NOTES ON LCD MONITORS The following symptoms are normal with LCD monitor and do not indicate a problem. In this product. It may include blemishes of 0.01% or less such...
AL1716W User's Guide
Page 3
... II family signals. E-2 The LCD monitor is WXGA (1440 x 900), best suited for purchasing model AL1716W, a high performance 17-inch color TFT LCD monitor. In each frequency mode, the microprocessor-based circuitry allows the monitor to buy a new monitor. · The internal microprocessor digitally ...of your desk space and makes your desk look neat and tidy. AL1716W INTRODUCTION Congratulations for Windows applications · The compact and sleek cabinet design saves lot of the LCD monitor. The AL1716W monitor provides flicker-free and color images at the precision-of a fixed...
... II family signals. E-2 The LCD monitor is WXGA (1440 x 900), best suited for purchasing model AL1716W, a high performance 17-inch color TFT LCD monitor. In each frequency mode, the microprocessor-based circuitry allows the monitor to buy a new monitor. · The internal microprocessor digitally ...of your desk space and makes your desk look neat and tidy. AL1716W INTRODUCTION Congratulations for Windows applications · The compact and sleek cabinet design saves lot of the LCD monitor. The AL1716W monitor provides flicker-free and color images at the precision-of a fixed...

AL1716W User's Guide
Page 4
AL1716W UNPACKING Please check the following items are present when you unpack the box, and save the packing materials in case you will need to ship or transport the monitor in future. · LCD Monitor · AC Power Cord · DVI Cable (Only Dual-Input Model) · D-SUB Cable · User Manual · Quick Start Guide E-3
AL1716W UNPACKING Please check the following items are present when you unpack the box, and save the packing materials in case you will need to ship or transport the monitor in future. · LCD Monitor · AC Power Cord · DVI Cable (Only Dual-Input Model) · D-SUB Cable · User Manual · Quick Start Guide E-3
AL1716W User's Guide
Page 5
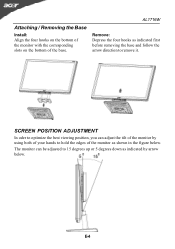
Attaching / Removing the Base Install: Align the four hooks on the bottom of the monitor with the corresponding slots on the bottom of the monitor as shown in the figure below . E-4 SCREEN POSITION ADJUSTMENT In oder to optimize the best viewing position, you can be adjusted to 15 degrees up or 5 degrees down as indicated first before removing the base and follow the arrow direction to hold the edges of the base. AL1716W Remove: Depress the four hooks as indicated by using both of your hands to remove it. The monitor can adjust the tilt of the monitor by arrow below .
Attaching / Removing the Base Install: Align the four hooks on the bottom of the monitor with the corresponding slots on the bottom of the monitor as shown in the figure below . E-4 SCREEN POSITION ADJUSTMENT In oder to optimize the best viewing position, you can be adjusted to 15 degrees up or 5 degrees down as indicated first before removing the base and follow the arrow direction to hold the edges of the base. AL1716W Remove: Depress the four hooks as indicated by using both of your hands to remove it. The monitor can adjust the tilt of the monitor by arrow below .
AL1716W User's Guide
Page 6
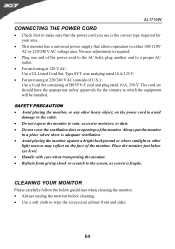
AL1716W CONNECTING THE POWER CORD · Check first to the screen, as screen is fragile. Place the monitor just below guidelines when cleaning the monitor. · Always unplug the monitor before cleaning. · Use a soft cloth to a proper AC outlet. · For unit using at 120 V AC: Use a UL ... U.S.): Use a Cord Set consisting of H05VV-F cord and plug rated 10 A, 250 V. CLEANING YOUR MONITOR Please carefully follow the below eye level. · Handle with care when transporting the monitor. · Refrain from giving shock or scratch to make sure that the power cord you use is ...
AL1716W CONNECTING THE POWER CORD · Check first to the screen, as screen is fragile. Place the monitor just below guidelines when cleaning the monitor. · Always unplug the monitor before cleaning. · Use a soft cloth to a proper AC outlet. · For unit using at 120 V AC: Use a UL ... U.S.): Use a Cord Set consisting of H05VV-F cord and plug rated 10 A, 250 V. CLEANING YOUR MONITOR Please carefully follow the below eye level. · Handle with care when transporting the monitor. · Refrain from giving shock or scratch to make sure that the power cord you use is ...
AL1716W User's Guide
Page 7
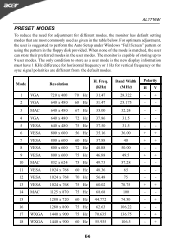
... 13 VESA 14 MAC 15 16 17 WXGA 18 WXGA Resolution H. When none of storing up to store as given in the user modes. The monitor is capable of the mode is suggested to perform the Auto Setup under Windows "Full Screen" pattern or using the pattern in the floppy disk... 50.00 49.5 57.28 65 75 78.75 100 74.50 106.22 136.75 106.5 Polarity HV E-6 AL1716W PRESET MODES To reduce the need for adjustment for different modes, the monitor has default setting modes that are most commonly used as a user mode is the new display information must have...
... 13 VESA 14 MAC 15 16 17 WXGA 18 WXGA Resolution H. When none of storing up to store as given in the user modes. The monitor is capable of the mode is suggested to perform the Auto Setup under Windows "Full Screen" pattern or using the pattern in the floppy disk... 50.00 49.5 57.28 65 75 78.75 100 74.50 106.22 136.75 106.5 Polarity HV E-6 AL1716W PRESET MODES To reduce the need for adjustment for different modes, the monitor has default setting modes that are most commonly used as a user mode is the new display information must have...
AL1716W User's Guide
Page 8
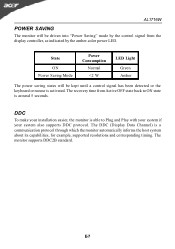
State ON Power Saving Mode Power Consumption Normal AL1716W POWER SAVING The monitor will be driven into "Power Saving" mode by the control signal from the display controller, as indicated by the amber-color power LED.
State ON Power Saving Mode Power Consumption Normal AL1716W POWER SAVING The monitor will be driven into "Power Saving" mode by the control signal from the display controller, as indicated by the amber-color power LED.
AL1716W User's Guide
Page 9
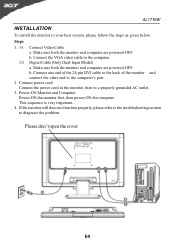
...are powered-OFF. Please don't open the cover E-8 Make sure both the monitor and computer are powered-OFF. b. b. Power-ON Monitor and Computer Power-ON the monitor first, then power-ON the computer. If the monitor still does not function properly, please refer to the troubleshooting section to a properly... of the 24-pin DVI cable to the back of the monitor and connect the other end to your host system, please follow the steps as given below: Steps 1. 1-1 Connect Video Cable a. AL1716W INSTALLATION To install the monitor to the computer's port. 2. Connect the VGA video cable ...
...are powered-OFF. Please don't open the cover E-8 Make sure both the monitor and computer are powered-OFF. b. b. Power-ON Monitor and Computer Power-ON the monitor first, then power-ON the computer. If the monitor still does not function properly, please refer to the troubleshooting section to a properly... of the 24-pin DVI cable to the back of the monitor and connect the other end to your host system, please follow the steps as given below: Steps 1. 1-1 Connect Video Cable a. AL1716W INSTALLATION To install the monitor to the computer's port. 2. Connect the VGA video cable ...
AL1716W User's Guide
Page 14
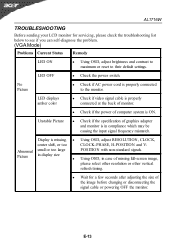
... LED ON · Using OSD, adjust brightness and contrast to maximum or reset to the monitor. LED displays amber color · Check if video signal cable is properly connected at the back of monitor. · Check if the power of computer system is missing, · Using OSD, ...standard signals. · Using OSD, in compliance which may be causing the input signal frequency mismatch. E-13 Display is ON. AL1716W TROUBLESHOOTING Before sending your LCD monitor for a few seconds after adjusting the size of the image before changing or disconnecting the signal cable or powering OFF the...
... LED ON · Using OSD, adjust brightness and contrast to maximum or reset to the monitor. LED displays amber color · Check if video signal cable is properly connected at the back of monitor. · Check if the power of computer system is missing, · Using OSD, ...standard signals. · Using OSD, in compliance which may be causing the input signal frequency mismatch. E-13 Display is ON. AL1716W TROUBLESHOOTING Before sending your LCD monitor for a few seconds after adjusting the size of the image before changing or disconnecting the signal cable or powering OFF the...

AL1716W User's Guide
Page 15
(DVI Mode) Problems Current Status LED ON No Picture LED OFF LED displays amber color AL1716W Remedy · Using OSD, adjust brightness and contrast to maximum or reset to their default settings. · Check the power switch. · Check if AC power cord is properly connected to the monitor. · Check if video signal cable is properly connected at the back of monitor. · Check if the power of computer system is ON. E-14
(DVI Mode) Problems Current Status LED ON No Picture LED OFF LED displays amber color AL1716W Remedy · Using OSD, adjust brightness and contrast to maximum or reset to their default settings. · Check the power switch. · Check if AC power cord is properly connected to the monitor. · Check if video signal cable is properly connected at the back of monitor. · Check if the power of computer system is ON. E-14


