
Service Guide
Page 6
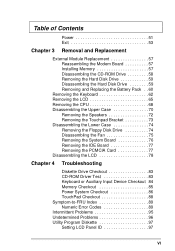
... 74 Removing the Floppy Disk Drive 74 Disassembling the Fan 75 Removing the System Board 76 Removing the IDE Board 77 Removing the PCMCIA Card 77 Disassembling the LCD 78 Chapter 4 Troubleshooting Diskette Drive Checkout 83 CD-ROM Driver Test 83 Keyboard or Auxiliary Input Device Checkout 84 Memory Checkout 85 Power System Checkout 86 TouchPad Checkout 88 Symptom-to-FRU Index 89 Numeric Error Codes 89 Intermittent Problems 95 Undetermined Problems 96 Utility Program Diskette 97 Setting LCD Panel...
... 74 Removing the Floppy Disk Drive 74 Disassembling the Fan 75 Removing the System Board 76 Removing the IDE Board 77 Removing the PCMCIA Card 77 Disassembling the LCD 78 Chapter 4 Troubleshooting Diskette Drive Checkout 83 CD-ROM Driver Test 83 Keyboard or Auxiliary Input Device Checkout 84 Memory Checkout 85 Power System Checkout 86 TouchPad Checkout 88 Symptom-to-FRU Index 89 Numeric Error Codes 89 Intermittent Problems 95 Undetermined Problems 96 Utility Program Diskette 97 Setting LCD Panel...
Service Guide
Page 9
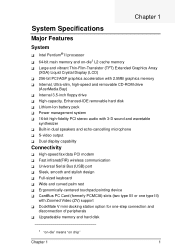
... memory 6 Internal, Ultra-slim, high-speed and removable CD-ROM drive (AcerMedia Bay) 6 Internal 3.5-inch floppy drive 6 High-capacity, Enhanced-IDE removable hard disk 6 Lithium-Ion battery pack 6 Power management system 6 16-bit high-fidelity PCI stereo audio with 3-D sound and wavetable synthesizer 6 Built-in dual speakers and echo-cancelling microphone 6 S-video output 6 Dual display capability Connectivity 6 High-speed fax/data PCI modem 6 Fast infrared(FIR) wireless communication 6 Universal Serial Bus (USB) port...
... memory 6 Internal, Ultra-slim, high-speed and removable CD-ROM drive (AcerMedia Bay) 6 Internal 3.5-inch floppy drive 6 High-capacity, Enhanced-IDE removable hard disk 6 Lithium-Ion battery pack 6 Power management system 6 16-bit high-fidelity PCI stereo audio with 3-D sound and wavetable synthesizer 6 Built-in dual speakers and echo-cancelling microphone 6 S-video output 6 Dual display capability Connectivity 6 High-speed fax/data PCI modem 6 Fast infrared(FIR) wireless communication 6 Universal Serial Bus (USB) port...
Service Guide
Page 16
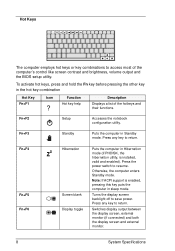
... Setup Accesses the notebook configuration utility. Fn+F3 Standby Puts the computer in the hot key combination Hot Key Fn+F1 Icon Function Hot key help Description Displays a list of the computer's control like screen contrast and brightness, volume output and the BIOS setup utility. To activate hot keys, press and hold the Fn key before pressing the other key in Standby mode. Hot Keys The computer employs hot keys or key combinations to resume. Note: If ACPI support is installed, valid and enabled). Turns the display screen...
... Setup Accesses the notebook configuration utility. Fn+F3 Standby Puts the computer in the hot key combination Hot Key Fn+F1 Icon Function Hot key help Description Displays a list of the computer's control like screen contrast and brightness, volume output and the BIOS setup utility. To activate hot keys, press and hold the Fn key before pressing the other key in Standby mode. Hot Keys The computer employs hot keys or key combinations to resume. Note: If ACPI support is installed, valid and enabled). Turns the display screen...

Service Guide
Page 25
... 128MB Second-Level Cache Slot 2 0 16MB 32MB 64MB 16MB 32MB 64MB 128MB 32MB 64MB 128MB 64MB 128MB 128MB Total Memory 16MB 16MB 32MB 64MB 32MB 48MB 80MB 144MB 64MB 96MB 160MB 128MB 192MB 256MB Item Cache controller Tag RAM location Tag RAM size Tag RAM voltage SRAM type SRAM size SRAM location SRAM configuration SRAM speed Specification MTXC IMM 32K*8x1...
... 128MB Second-Level Cache Slot 2 0 16MB 32MB 64MB 16MB 32MB 64MB 128MB 32MB 64MB 128MB 64MB 128MB 128MB Total Memory 16MB 16MB 32MB 64MB 32MB 48MB 80MB 144MB 64MB 96MB 160MB 128MB 192MB 256MB Item Cache controller Tag RAM location Tag RAM size Tag RAM voltage SRAM type SRAM size SRAM location SRAM configuration SRAM speed Specification MTXC IMM 32K*8x1...

Service Guide
Page 29
... connector type Modem connector location Keyboard Specification V.34 data modem, V.17 fax modem, voice/audio mode, and digital simultaneous voice and data (DSVD) operation over a dial-up telephone line PCI RJ11 & RJ45 combo phone jack Back side Item Keyboard controller Keyboard vendor & model name Total number of keypads Windows 95 keys Internal & external keyboard work simultaneously Disk drives Specification M38867 API 84-/85-/88-key Yes Yes Item Specification Vendor & model name MITSUMI D353F3 Floppy Disk Specifications Media...
... connector type Modem connector location Keyboard Specification V.34 data modem, V.17 fax modem, voice/audio mode, and digital simultaneous voice and data (DSVD) operation over a dial-up telephone line PCI RJ11 & RJ45 combo phone jack Back side Item Keyboard controller Keyboard vendor & model name Total number of keypads Windows 95 keys Internal & external keyboard work simultaneously Disk drives Specification M38867 API 84-/85-/88-key Yes Yes Item Specification Vendor & model name MITSUMI D353F3 Floppy Disk Specifications Media...

Service Guide
Page 35
... a power management scheme that monitors system activity. Note: Power management (APM or ACPI) greatly prolongs your computer. The hard disk returns to the serial and parallel ports, and video memory. If your computer is using AC power and you reconnect AC power to the computer, it automatically adjusts the LCD backlight to a brighter level. When the computer is set for ACPI, Windows 98 handles all of the following devices: keyboard, mouse, drive, hard disk, peripherals connected...
... a power management scheme that monitors system activity. Note: Power management (APM or ACPI) greatly prolongs your computer. The hard disk returns to the serial and parallel ports, and video memory. If your computer is using AC power and you reconnect AC power to the computer, it automatically adjusts the LCD backlight to a brighter level. When the computer is set for ACPI, Windows 98 handles all of the following devices: keyboard, mouse, drive, hard disk, peripherals connected...
Service Guide
Page 37
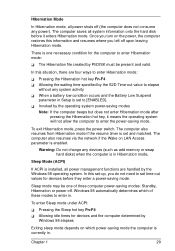
... network if the Wake on the power, the computer restores this set-up, you do not need to set and matched. Sleep Mode (ACPI) If ACPI is installed, all power management functions are four ways to enter Hibernation mode: 6 The Hibernation file created by the Windows 98 operating system. In this information and resumes where you turn on LAN Access parameter is currently in Hibernation mode. To enter Sleep mode under ACPI: 6 Pressing the Sleep hot key...
... network if the Wake on the power, the computer restores this set-up, you do not need to set and matched. Sleep Mode (ACPI) If ACPI is installed, all power management functions are four ways to enter Hibernation mode: 6 The Hibernation file created by the Windows 98 operating system. In this information and resumes where you turn on LAN Access parameter is currently in Hibernation mode. To enter Sleep mode under ACPI: 6 Pressing the Sleep hot key...

Service Guide
Page 47
Note: Make sure an external monitor is connected before External monitor is used to control various settings related to display device(s), such as the display brightness level. You can also click on the item, and use the cursor keys to set the desired level. Display Device Display Device is selected. 6 Brightness for LCD Panel. Sets the default display device on Apply to decrease the setting. Sets the current display device. Click and drag to set the LCD screen brightness levels. Click on the radio button of the...
Note: Make sure an external monitor is connected before External monitor is used to control various settings related to display device(s), such as the display brightness level. You can also click on the item, and use the cursor keys to set the desired level. Display Device Display Device is selected. 6 Brightness for LCD Panel. Sets the default display device on Apply to decrease the setting. Sets the current display device. Click and drag to set the LCD screen brightness levels. Click on the radio button of the...
Service Guide
Page 60
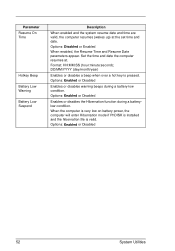
.../YYYY (day/month/year) Enables or disables a beep when over a hot key is valid. Options: Enabled or Disabled 52 System Utilities Format: HH:MM:SS (hour:minute:second); Options: Enabled or Disabled Enables or disables the Hibernation function during a battery-low condition. When the computer is very low on battery power, the computer will enter Hibernation mode if PhDISK is installed and the hibernation file is pressed. Set the time and date...
.../YYYY (day/month/year) Enables or disables a beep when over a hot key is valid. Options: Enabled or Disabled 52 System Utilities Format: HH:MM:SS (hour:minute:second); Options: Enabled or Disabled Enables or disables the Hibernation function during a battery-low condition. When the computer is very low on battery power, the computer will enter Hibernation mode if PhDISK is installed and the hibernation file is pressed. Set the time and date...
Service Guide
Page 67
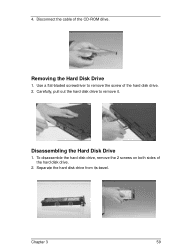
Removing the Hard Disk Drive 1. Disassembling the Hard Disk Drive 1. Carefully, pull out the hard disk drive to remove the screw of the hard disk drive. 2. Disconnect the cable of the hard disk drive. 2. To disassemble the hard disk drive, remove the 2 screws on both sides of the CD-ROM drive. Chapter 3 59 Separate the hard disk drive from its bezel. Use a flat-bladed screwdriver to remove it. 4.
Removing the Hard Disk Drive 1. Disassembling the Hard Disk Drive 1. Carefully, pull out the hard disk drive to remove the screw of the hard disk drive. 2. Disconnect the cable of the hard disk drive. 2. To disassemble the hard disk drive, remove the 2 screws on both sides of the CD-ROM drive. Chapter 3 59 Separate the hard disk drive from its bezel. Use a flat-bladed screwdriver to remove it. 4.

Service Guide
Page 95
... has less than 50% of the total power remaining when installed in the computer. If the charge indicator still does not turn on, remove the battery pack and let it return to 100% of its capacity. If the battery status indicator does not turn on , replace the battery pack. Perform operational charging. Checking Operational Charging: To check operational charging, use a discharged battery pack or a battery pack that less than 95% of...
... has less than 50% of the total power remaining when installed in the computer. If the charge indicator still does not turn on, remove the battery pack and let it return to 100% of its capacity. If the battery status indicator does not turn on , replace the battery pack. Perform operational charging. Checking Operational Charging: To check operational charging, use a discharged battery pack or a battery pack that less than 95% of...
Service Guide
Page 99
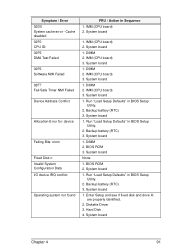
... board 1. Backup battery (RTC) 3. System board 1. Backup battery (RTC) 3. Backup battery (RTC) 3. System board 1. Diskette Driver 3. Cache disabled 02F0 CPU ID: 02F5 DMA Test Failed 02F6 Software NMI Failed 02F7 Fail-Safe Timer NMI Failed Device Address Conflict Allocation Error for: device Failing Bits: nnnn Fixed Disk n Invalid System Configuration Data I/O device IRQ conflict Operating system not found FRU / Action in BIOS Setup Utility. 2. IMM (CPU board) 2. DIMM 2. Run "Load Setup Defaults" in Sequence 1. System board None 1. Run "Load Setup Defaults" in BIOS Setup Utility...
... board 1. Backup battery (RTC) 3. System board 1. Backup battery (RTC) 3. Backup battery (RTC) 3. System board 1. Diskette Driver 3. Cache disabled 02F0 CPU ID: 02F5 DMA Test Failed 02F6 Software NMI Failed 02F7 Fail-Safe Timer NMI Failed Device Address Conflict Allocation Error for: device Failing Bits: nnnn Fixed Disk n Invalid System Configuration Data I/O device IRQ conflict Operating system not found FRU / Action in BIOS Setup Utility. 2. IMM (CPU board) 2. DIMM 2. Run "Load Setup Defaults" in Sequence 1. System board None 1. Run "Load Setup Defaults" in BIOS Setup Utility...
Service Guide
Page 101
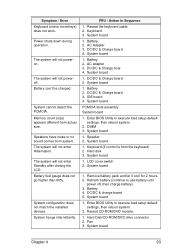
... load setup default settings, then reboot system. 2. Memory count (size) appears different from the keyboard) 2. System board 1. System board 1. Speaker 2. System board 1. System board 1. The system will not enter Hibernation. Battery 2. DC/DC & Charge board 4. Hard Disk/CD-ROM/DVD drive connector 2. System board Chapter 4 93 AC adapter 3. Battery fuel gauge does not go higher than 90%. LCD cover switch 2. Speakers have noise or no sound comes from system. Battery 4. System configuration does not match the installed devices. DIMM 3. Remove battery pack...
... load setup default settings, then reboot system. 2. Memory count (size) appears different from the keyboard) 2. System board 1. System board 1. Speaker 2. System board 1. System board 1. The system will not enter Hibernation. Battery 2. DC/DC & Charge board 4. Hard Disk/CD-ROM/DVD drive connector 2. System board Chapter 4 93 AC adapter 3. Battery fuel gauge does not go higher than 90%. LCD cover switch 2. Speakers have noise or no sound comes from system. Battery 4. System configuration does not match the installed devices. DIMM 3. Remove battery pack...
Service Guide
Page 103
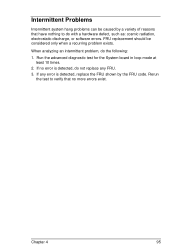
Chapter 4 95 If any error is detected, do not replace any FRU. 3. When analyzing an intermittent problem, do with a hardware defect, such as: cosmic radiation, electrostatic discharge, or software errors. Run the advanced diagnostic test for the System board in loop mode at least 10 times. 2. Rerun the test to verify that no error is detected, replace the FRU shown by...
Chapter 4 95 If any error is detected, do not replace any FRU. 3. When analyzing an intermittent problem, do with a hardware defect, such as: cosmic radiation, electrostatic discharge, or software errors. Run the advanced diagnostic test for the System board in loop mode at least 10 times. 2. Rerun the test to verify that no error is detected, replace the FRU shown by...
Service Guide
Page 105
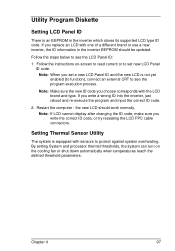
... you replace an LCD with one of a different brand or use a new inverter, the ID information in the inverter which stores its supported LCD type ID code. By setting System and processor thermal thresholds, the system can turn on -screen to read current or to set a new LCD Panel ID and the new LCD is not yet enabled (to function), connect an external CRT to protect against system overheating. Follow the instructions...
... you replace an LCD with one of a different brand or use a new inverter, the ID information in the inverter which stores its supported LCD type ID code. By setting System and processor thermal thresholds, the system can turn on -screen to read current or to set a new LCD Panel ID and the new LCD is not yet enabled (to function), connect an external CRT to protect against system overheating. Follow the instructions...
Service Guide
Page 137
.... book Manager 40 Audio Controller 20 B Battery 22 battery pack charging indicator 4 Boot Device Priority Submenu 46 boot order setting in Notebook Manager 35 setting in Setup Utility 46 Boot Sequence 35 brightness hot keys 9 setting in Notebook Manager 39 C caps lock 5 on indicator 4 CardBus PC Card 1 CCFT 24 CD-ROM Drive Disassembly 58 Charger 23 Checkout Auxiliary Input Device 84 Diskette Drive 83 Keyboard 84 Memory 85 Power System 86 TouchPad 88 computer features 1 information 34 on indicator 4 power management 27 Connectivity 1 Connectors 103 contrast setting in Notebook Manager 39 CPU...
.... book Manager 40 Audio Controller 20 B Battery 22 battery pack charging indicator 4 Boot Device Priority Submenu 46 boot order setting in Notebook Manager 35 setting in Setup Utility 46 Boot Sequence 35 brightness hot keys 9 setting in Notebook Manager 39 C caps lock 5 on indicator 4 CardBus PC Card 1 CCFT 24 CD-ROM Drive Disassembly 58 Charger 23 Checkout Auxiliary Input Device 84 Diskette Drive 83 Keyboard 84 Memory 85 Power System 86 TouchPad 88 computer features 1 information 34 on indicator 4 power management 27 Connectivity 1 Connectors 103 contrast setting in Notebook Manager 39 CPU...
Service Guide
Page 138
book Manager 39 setting boot device in Setup Utility 48 setting in Notebook Manager 39 simultaneous 2 switching device in Note- book Manager 39 Display Device 39 Driver Test CD-ROM 83 DSVD 21 Dual Display 2 E EEPROM 97 Extended Graphics Array (XGA) 1 External CRT Resolutions and Modes 18 External Module Replacement 57 Disassembling the CD-ROM Drive 58 Disassembling the Hard Disk Drive 59 Installing Memory 57 Reassembling the Modem Board 57 Removing and Replacing the Battery Pack 60 Removing the Hard Disk Drive 59 External monitor port 10 F Fast infrared(FIR) 1 Fax/Data Modem 11...
book Manager 39 setting boot device in Setup Utility 48 setting in Notebook Manager 39 simultaneous 2 switching device in Note- book Manager 39 Display Device 39 Driver Test CD-ROM 83 DSVD 21 Dual Display 2 E EEPROM 97 Extended Graphics Array (XGA) 1 External CRT Resolutions and Modes 18 External Module Replacement 57 Disassembling the CD-ROM Drive 58 Disassembling the Hard Disk Drive 59 Installing Memory 57 Reassembling the Modem Board 57 Removing and Replacing the Battery Pack 60 Removing the Hard Disk Drive 59 External monitor port 10 F Fast infrared(FIR) 1 Fax/Data Modem 11...
Service Guide
Page 139
... K Keyboard 5, 21 Keyboard controller 21 Removing the keyboard 62 Special Keys 5 keyboard 5 embedded numeric keypad 6 hot keys 8 Index lock keys 5 Windows keys 7 L LCD 24 Removing the LCD 65 Resolution 24 LCD Panel ID Setting 97 LEDs 4 Line-in Jack 10 Line-in/Microphone 40 Lithium-Ion battery 1 Lock Keys 5 Long Run 126 Lower Case Disassembly 74 Lower Case Disassembly Fan 75 Floppy Disk Drive 74 IDE Board 77 LCD 78 PCMCIA Card 77 System Board 76 M Main screen 42 Major 1 Major Features 1 System 1 media access on indicator 4 Microphone-in jack...
... K Keyboard 5, 21 Keyboard controller 21 Removing the keyboard 62 Special Keys 5 keyboard 5 embedded numeric keypad 6 hot keys 8 Index lock keys 5 Windows keys 7 L LCD 24 Removing the LCD 65 Resolution 24 LCD Panel ID Setting 97 LEDs 4 Line-in Jack 10 Line-in/Microphone 40 Lithium-Ion battery 1 Lock Keys 5 Long Run 126 Lower Case Disassembly 74 Lower Case Disassembly Fan 75 Floppy Disk Drive 74 IDE Board 77 LCD 78 PCMCIA Card 77 System Board 76 M Main screen 42 Major 1 Major Features 1 System 1 media access on indicator 4 Microphone-in jack...
Service Guide
Page 140
Boot Sequence 35 Display Device 39 Hot key 8 Information Viewer 34 Password 36 Power Management 38 starting 33 Num lock 5 on indicator 4 Numeric Error Codes 89 numeric keypad embedded 6 O On-die L2 cache 1 Online Support Information 127 Operational Chargin 87 P Parallel Port 18 Parallel port 10 parallel port setting in Setup Utility 47 Password 36 password changing in Setup Utility 50 checking during boot 49 checking during resume 49 removing in Setup Utility 50 setting in Notebook Manager 36-37 setting in Setup Utility 50 PC Card slots 12...
Boot Sequence 35 Display Device 39 Hot key 8 Information Viewer 34 Password 36 Power Management 38 starting 33 Num lock 5 on indicator 4 Numeric Error Codes 89 numeric keypad embedded 6 O On-die L2 cache 1 Online Support Information 127 Operational Chargin 87 P Parallel Port 18 Parallel port 10 parallel port setting in Setup Utility 47 Password 36 password changing in Setup Utility 50 checking during boot 49 checking during resume 49 removing in Setup Utility 50 setting in Notebook Manager 36-37 setting in Setup Utility 50 PC Card slots 12...
Service Guide
Page 141
... status indicator 4 status indicators 4 Stereo 20 Supervisor Password 36 S-video output 1 Symptom-to-FRU Index 89 System Specification 1 System Utilities 31 T Tag RAM 17 Test Compatible Components List 123 PCMCIA 124 Thermal Sensor Utility Setting 97 Thin-Film-Transistor (TFT) 1 time setting in Setup Utility 43 touchpad Index hot key 9 Touchpad Bracket Removal 73 TPM 127 Troubleshooting 81 U Undetermined Problems 96 Universal Serial Bus (USB) 1 Upper Case Disassembly 70 User Password 37 utility BIOS Setup 41-53 Notebook Manager 33...
... status indicator 4 status indicators 4 Stereo 20 Supervisor Password 36 S-video output 1 Symptom-to-FRU Index 89 System Specification 1 System Utilities 31 T Tag RAM 17 Test Compatible Components List 123 PCMCIA 124 Thermal Sensor Utility Setting 97 Thin-Film-Transistor (TFT) 1 time setting in Setup Utility 43 touchpad Index hot key 9 Touchpad Bracket Removal 73 TPM 127 Troubleshooting 81 U Undetermined Problems 96 Universal Serial Bus (USB) 1 Upper Case Disassembly 70 User Password 37 utility BIOS Setup 41-53 Notebook Manager 33...


