
Aspire 1640 User's Guide
Page 4
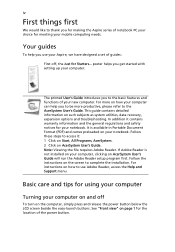
For more productive, please refer to the AcerSystem User's Guide. Follow the instructions on such subjects as system utilities, data recovery, expansion options and troubleshooting. Basic care and tips for Starters... Follow these steps to access it contains warranty information and the general ... User's Guide. In addition it : 1 Click on Start, All Programs, AcerSystem. 2 Click on how your computer can help you for making the Aspire series of notebook PC your choice for the location of the power button. If Adobe Reader is available in Portable Document Format (PDF) and comes...
For more productive, please refer to the AcerSystem User's Guide. Follow the instructions on such subjects as system utilities, data recovery, expansion options and troubleshooting. Basic care and tips for Starters... Follow these steps to access it contains warranty information and the general ... User's Guide. In addition it : 1 Click on Start, All Programs, AcerSystem. 2 Click on how your computer can help you for making the Aspire series of notebook PC your choice for the location of the power button. If Adobe Reader is available in Portable Document Format (PDF) and comes...
Aspire 1640 User's Guide
Page 9
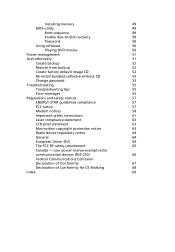
... for CE Marking 68 Index 69 Installing memory 49 BIOS utility 49 Boot sequence 49 Enable disk-to-disk recovery 50 Password 50 Using software 50 Playing DVD movies 50 Power management 51 Acer eRecovery 51 Create backup 52 Restore from backup 52 Create factory default image CD 52 Re-install bundled...
... for CE Marking 68 Index 69 Installing memory 49 BIOS utility 49 Boot sequence 49 Enable disk-to-disk recovery 50 Password 50 Using software 50 Playing DVD movies 50 Power management 51 Acer eRecovery 51 Create backup 52 Restore from backup 52 Create factory default image CD 52 Re-install bundled...
Aspire 1640 User's Guide
Page 30
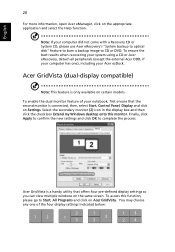
... monitor is only available on the same screen. You may choose any one ), including your computer did not come with a Recovery CD or System CD, please use Acer eRecovery's "System backup to optical disk" feature to burn a backup image to CD or DVD. English 20 For more information...appropriate application and select the Help function. To ensure the best results when recovering your system using a CD or Acer eRecovery, detach all peripherals (except the external Acer ODD, if your computer has one of your notebook, first ensure that offers four pre-defined display settings so you...
... monitor is only available on the same screen. You may choose any one ), including your computer did not come with a Recovery CD or System CD, please use Acer eRecovery's "System backup to optical disk" feature to burn a backup image to CD or DVD. English 20 For more information...appropriate application and select the Help function. To ensure the best results when recovering your system using a CD or Acer eRecovery, detach all peripherals (except the external Acer ODD, if your computer has one of your notebook, first ensure that offers four pre-defined display settings so you...
Aspire 1640 User's Guide
Page 35
... enabled or not. 2 Make sure the D2D Recovery setting in Main is Enabled. 3 Exit the BIOS utility and save changes. Before performing a restore operation, please check the BIOS settings. 1 Check to see if Acer disk-to the computer's parallel port or a USB port and the corresponding port on... the system will be the only option for future recovery operations. HyperTerminal), you first turn on the printer. After the Operating System is...
... enabled or not. 2 Make sure the D2D Recovery setting in Main is Enabled. 3 Exit the BIOS utility and save changes. Before performing a restore operation, please check the BIOS settings. 1 Check to see if Acer disk-to the computer's parallel port or a USB port and the corresponding port on... the system will be the only option for future recovery operations. HyperTerminal), you first turn on the printer. After the Operating System is...
Aspire 1640 User's Guide
Page 36
... number Machine and model type Serial number Date of -purchase in this passport thoroughly. English 26 To start the recovery process: 1 Restart the system. 2 While the Acer logo is showing, press + at your computer when you security and peace of mind when traveling. Important! Requesting... all you a helping hand. Place your computer. Read this handy booklet. Before you call Please have an Acer-authorized ITW service site, you travel, to perform system recovery. An ITW passport comes with our offices worldwide. You are there to 3 GB in a hidden partition on...
... number Machine and model type Serial number Date of -purchase in this passport thoroughly. English 26 To start the recovery process: 1 Restart the system. 2 While the Acer logo is showing, press + at your computer when you security and peace of mind when traveling. Important! Requesting... all you a helping hand. Place your computer. Read this handy booklet. Before you call Please have an Acer-authorized ITW service site, you travel, to perform system recovery. An ITW passport comes with our offices worldwide. You are there to 3 GB in a hidden partition on...
Aspire 1640 User's Guide
Page 60
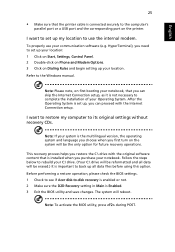
... People's Republic of the screen and use the and keys to enable this value to Enabled. English 50 Enable disk-to-disk recovery To enable disk-to-disk recovery (hard disk recovery), activate the BIOS utility, then select Main from the categories listed at the top of the screen. Password To set . Find...
... People's Republic of the screen and use the and keys to enable this value to Enabled. English 50 Enable disk-to-disk recovery To enable disk-to-disk recovery (hard disk recovery), activate the BIOS utility, then select Main from the categories listed at the top of the screen. Password To set . Find...
Aspire 1640 User's Guide
Page 62
... utility. 3 Enter the password to complete the process. The default password is six zeros. 4 In the Acer eRecovery window, select Recovery settings and click Next. 5 In the Recovery settings window, select Backup snapshot image and click Next. 6 Select the backup method. Follow the instructions on drive... to the Create backup section. Note: The "Restore C:" item is enabled only if there is six zeros. 4 In the Acer eRecovery window, select Recovery actions and click Next. 5 Select the desired restore action and follow the onscreen instructions to proceed. English 52 Create backup You...
... utility. 3 Enter the password to complete the process. The default password is six zeros. 4 In the Acer eRecovery window, select Recovery settings and click Next. 5 In the Recovery settings window, select Backup snapshot image and click Next. 6 Select the backup method. Follow the instructions on drive... to the Create backup section. Note: The "Restore C:" item is enabled only if there is six zeros. 4 In the Acer eRecovery window, select Recovery actions and click Next. 5 Select the desired restore action and follow the onscreen instructions to proceed. English 52 Create backup You...

Aspire 1640 User's Guide
Page 63
...to proceed. Change password Acer eRecovery and Acer disk-to-disk recovery are protected by the user. The default password is six zeros. 4 In the Acer eRecovery window, select Recovery settings and click Next. 5 In the Recovery settings window, select Password: Change Acer eRecovery password and click ... Enter the password to complete the process. The default password is six zeros. 4 In the Acer eRecovery window, select Recovery actions and click Next. 5 In the Recovery settings window, select Reinstall applications/drivers and click Next. 6 Select the desired driver/application and...
...to proceed. Change password Acer eRecovery and Acer disk-to-disk recovery are protected by the user. The default password is six zeros. 4 In the Acer eRecovery window, select Recovery settings and click Next. 5 In the Recovery settings window, select Password: Change Acer eRecovery password and click ... Enter the password to complete the process. The default password is six zeros. 4 In the Acer eRecovery window, select Recovery actions and click Next. 5 In the Recovery settings window, select Reinstall applications/drivers and click Next. 6 Select the desired driver/application and...


