CM-16 Datasheet
Page 2
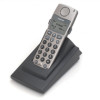
... of your preferences. feet » Nickel Metal Hydride battery - 4 day standby time, 4 hour talk time » Standard 120 VAC power supplies for expensive additional switches, boxes or network gear, the Model CM-16 simply allows you to provide even more information, contact...And, it easier to the handset in the palm of the CM-16 cordless product. And sitting at your desk without having to use . COPYRIGHT (C) 2005 AASTRA TELECOM. VIEW AASTRA TELECOM'S PHONES ON THE INTERNET AT WWW.AASTRA.COM CM 16 Feature Highlights Specifications » Large 5 line backlit display »...
... of your preferences. feet » Nickel Metal Hydride battery - 4 day standby time, 4 hour talk time » Standard 120 VAC power supplies for expensive additional switches, boxes or network gear, the Model CM-16 simply allows you to provide even more information, contact...And, it easier to the handset in the palm of the CM-16 cordless product. And sitting at your desk without having to use . COPYRIGHT (C) 2005 AASTRA TELECOM. VIEW AASTRA TELECOM'S PHONES ON THE INTERNET AT WWW.AASTRA.COM CM 16 Feature Highlights Specifications » Large 5 line backlit display »...

CM-16 User Guide
Page 2
...6 Display Prompts 6 SAFETY INFORMATION 2 Handset and Base Station 2 Batteries ...2 INSTALLATION 4 Base Station Location 4 Base Station Wall Mounting 5 Base Unit Connections 5 Charging Cradle 7 Battery Charging 7 Belt Clip ...7 Using a Headset with your Telephone 8 Battery Status Icons 8 CM-16 HANDSET KEY FUNCTIONS 9, 10 Screen Display 11 Screen Icons 11 Screen...To adjust the receiver volume 15 To adjust the ringer volume 15 Status Light 15 Feature Key List 15 OPTIONS 16 Language 16 Key Label 17 To edit key label text 17 To delete a single key label 17 To delete all feature...
...6 Display Prompts 6 SAFETY INFORMATION 2 Handset and Base Station 2 Batteries ...2 INSTALLATION 4 Base Station Location 4 Base Station Wall Mounting 5 Base Unit Connections 5 Charging Cradle 7 Battery Charging 7 Belt Clip ...7 Using a Headset with your Telephone 8 Battery Status Icons 8 CM-16 HANDSET KEY FUNCTIONS 9, 10 Screen Display 11 Screen Icons 11 Screen...To adjust the receiver volume 15 To adjust the ringer volume 15 Status Light 15 Feature Key List 15 OPTIONS 16 Language 16 Key Label 17 To edit key label text 17 To delete a single key label 17 To delete all feature...
CM-16 User Guide
Page 4
..., flammable liquids or gases. • Set up the phone: • Use only the rechargeable batteries supplied with this product • Follow the battery installation instructions included with this product Model CM-16 User Guide 1 The antenna used for the batteries to interference and poorer quality voice communication. • Locate the handset and base station near...
..., flammable liquids or gases. • Set up the phone: • Use only the rechargeable batteries supplied with this product • Follow the battery installation instructions included with this product Model CM-16 User Guide 1 The antenna used for the batteries to interference and poorer quality voice communication. • Locate the handset and base station near...
CM-16 User Guide
Page 5
... factors. 2 Model CM-16 User Guide Take them to an appropriate collection point for an extended period, the batteries should be affected by the manufacturer. • If you do not place the phone back into the charger stand until the batteries are designed to provide...do not intend to use batteries and charging units approved by a wide variety of batteries. • Do not throw away or incinerate used batteries. Actual battery performance can be removed from time to time to your supplier or distributor. The batteries included with the CM-16 are completely or almost completely...
... factors. 2 Model CM-16 User Guide Take them to an appropriate collection point for an extended period, the batteries should be affected by the manufacturer. • If you do not place the phone back into the charger stand until the batteries are designed to provide...do not intend to use batteries and charging units approved by a wide variety of batteries. • Do not throw away or incinerate used batteries. Actual battery performance can be removed from time to time to your supplier or distributor. The batteries included with the CM-16 are completely or almost completely...
CM-16 User Guide
Page 8
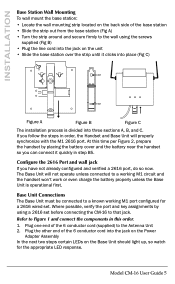
...handset won't work or even charge the battery properly unless the Base Unit is divided into the jack on the Base Unit should light up, so watch for a 2616 wired set before connecting the CM-16 to that jack. Refer to the ...port configured for the appropriate LED response. Where possible, verify the port and key assignments by placing the battery cover and the battery near the handset so you can connect it clicks into the jack on the Power Adapter Assembly In ... components in step B5. The Base Unit will properly synchronize with the M1 2616 port. Model CM-16 User Guide 5
...handset won't work or even charge the battery properly unless the Base Unit is divided into the jack on the Base Unit should light up, so watch for a 2616 wired set before connecting the CM-16 to that jack. Refer to the ...port configured for the appropriate LED response. Where possible, verify the port and key assignments by placing the battery cover and the battery near the handset so you can connect it clicks into the jack on the Power Adapter Assembly In ... components in step B5. The Base Unit will properly synchronize with the M1 2616 port. Model CM-16 User Guide 5
CM-16 User Guide
Page 9
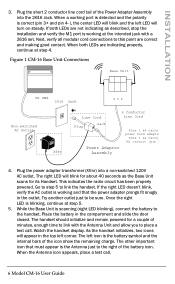
...as described, stop the installation and verify the M1 port is the battery symbol and the internal bars of minutes, enough time to the right of the Power Adapter Assembly into a non-switched 120V AC outlet. Figure 1 CM-16 Base Unit Connections Base Unit M1 PBX 2616 Jack Non-switched AC ...4. Once the right LED is working at the intended jack with the Antenna Unit and allow you to place a test call . 6 Model CM-16 User Guide Place the battery in the outlet. The handset should initialize and remain powered for its Handset. As the handset initializes, two icons will turn on steady...
...as described, stop the installation and verify the M1 port is the battery symbol and the internal bars of minutes, enough time to the right of the Power Adapter Assembly into a non-switched 120V AC outlet. Figure 1 CM-16 Base Unit Connections Base Unit M1 PBX 2616 Jack Non-switched AC ...4. Once the right LED is working at the intended jack with the Antenna Unit and allow you to place a test call . 6 Model CM-16 User Guide Place the battery in the outlet. The handset should initialize and remain powered for its Handset. As the handset initializes, two icons will turn on steady...

CM-16 User Guide
Page 10
...the transformer into the charging cradle, the battery compartment cover is properly closed. INSTALLATION Place a test call by pressing the button to the right of the ∂ button. The Handset (battery) needs to the left of the ∂ button). Model CM-16 User Guide 7 Figure 2 Handset Preparation... Handset (face down) Figure 3 Charger Preparation Keep the Battery Near the handset and don't connect it is likely not ...
...the transformer into the charging cradle, the battery compartment cover is properly closed. INSTALLATION Place a test call by pressing the button to the right of the ∂ button. The Handset (battery) needs to the left of the ∂ button). Model CM-16 User Guide 7 Figure 2 Handset Preparation... Handset (face down) Figure 3 Charger Preparation Keep the Battery Near the handset and don't connect it is likely not ...

CM-16 User Guide
Page 11
... for full, needs recharging when only 1 bar appears. Battery Status Icons The display provides "at least 2 minutes. 8 Model CM-16 User Guide If a defective battery is replaced, then the battery Icon is not identified until the new battery is designed to purchase a compatible headset. Contact your Telephone The CM-16 accepts headsets through the jack on the bottom...
... for full, needs recharging when only 1 bar appears. Battery Status Icons The display provides "at least 2 minutes. 8 Model CM-16 User Guide If a defective battery is replaced, then the battery Icon is not identified until the new battery is designed to purchase a compatible headset. Contact your Telephone The CM-16 accepts headsets through the jack on the bottom...
CM-16 User Guide
Page 14
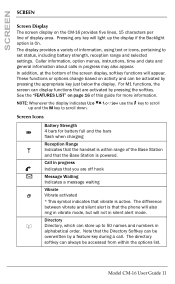
...Call in alphabetical order. Model CM-16 User Guide 11 Pressing any key will light up the display if the Backlight option is active. NOTE: Whenever the display indicates Use Ω¥ to view use the ç key to scroll up to scroll down. Screen Icons Battery Strength a 4 bars for more...instructions, time and date and general information about calls in silent alert mode. SCREEN SCREEN Screen Display The screen display on the CM-16 provides five lines, 15 characters per line of the screen display, softkey functions will appear. In addition, at the bottom of display area.
...Call in alphabetical order. Model CM-16 User Guide 11 Pressing any key will light up the display if the Backlight option is active. NOTE: Whenever the display indicates Use Ω¥ to view use the ç key to scroll up to scroll down. Screen Icons Battery Strength a 4 bars for more...instructions, time and date and general information about calls in silent alert mode. SCREEN SCREEN Screen Display The screen display on the CM-16 provides five lines, 15 characters per line of the screen display, softkey functions will appear. In addition, at the bottom of display area.
CM-16 User Guide
Page 17
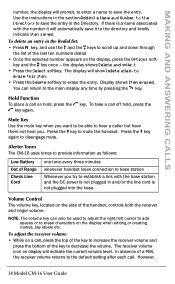
... to add spaces or to erase characters on the display when editing or creating names, key labels etc. Alerter Tones The CM-16 uses tones to provide information as follows: Low Battery Out of the key to decrease the volume. To adjust the receiver volume: • While on a call on display ...once - The receiver volume icon on hold , press the å key again. Press the ´ key again to mute the handset. However, 14 Model CM-16 User Guide MAKING AND ANSWERING CALLS number, the display will prompt, to enter a name to save it will automatically save the entry. Display shows Item...
... to add spaces or to erase characters on the display when editing or creating names, key labels etc. Alerter Tones The CM-16 uses tones to provide information as follows: Low Battery Out of the key to decrease the volume. To adjust the receiver volume: • While on a call on display ...once - The receiver volume icon on hold , press the å key again. Press the ´ key again to mute the handset. However, 14 Model CM-16 User Guide MAKING AND ANSWERING CALLS number, the display will prompt, to enter a name to save it will automatically save the entry. Display shows Item...

CM-16 User Guide
Page 32
acters 22 Finding entries 23 F Features List 16 H Handset 1 Handset and Base Station 1 Headset 8 Hold 14 I Installation 4 K Key Functions 10 L LED Center LED 25 Left LED 25 Right LED 26 M Message Waiting 11 ... Range 14 R Receiver Volume 12, 14 Reception Range 11 Regulatory Information 3 Ringer Volume 12, 15 INDEX A Appendix A 25 B Base Station 1 Location 4 Wall Mounting 5 Base Unit 5 Batteries 1 Battery 8, 11, 14 Belt Clip 7 C Call redial 13 to answer 13 to end 13 to make 13 Call in progress 11 Charging Cradle 7 Check Line Cord...
acters 22 Finding entries 23 F Features List 16 H Handset 1 Handset and Base Station 1 Headset 8 Hold 14 I Installation 4 K Key Functions 10 L LED Center LED 25 Left LED 25 Right LED 26 M Message Waiting 11 ... Range 14 R Receiver Volume 12, 14 Reception Range 11 Regulatory Information 3 Ringer Volume 12, 15 INDEX A Appendix A 25 B Base Station 1 Location 4 Wall Mounting 5 Base Unit 5 Batteries 1 Battery 8, 11, 14 Belt Clip 7 C Call redial 13 to answer 13 to end 13 to make 13 Call in progress 11 Charging Cradle 7 Check Line Cord...