CM-16 Datasheet
Page 1
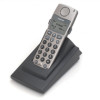
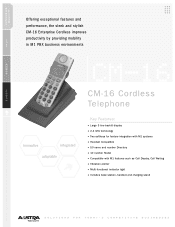
... and stylish CM-16 Enterprise Cordless improves productivity by providing mobility in M1 PBX business environments innovative integrated adaptable CM-16 CM-16 Cordless Telephone Key Features: • Large 5 line backlit display • 2.4 GHz technology • Two softkeys for feature integration with M1 systems • Headset Compatible • 50 name and number Directory • 10 number Redial • Compatible with M1 features such as Call Display, Call Waiting • Vibration alerter • Multi-functional indicator light • Includes base station, handset and charging...
... and stylish CM-16 Enterprise Cordless improves productivity by providing mobility in M1 PBX business environments innovative integrated adaptable CM-16 CM-16 Cordless Telephone Key Features: • Large 5 line backlit display • 2.4 GHz technology • Two softkeys for feature integration with M1 systems • Headset Compatible • 50 name and number Directory • 10 number Redial • Compatible with M1 features such as Call Display, Call Waiting • Vibration alerter • Multi-functional indicator light • Includes base station, handset and charging...
CM-16 Datasheet
Page 2
... of use the Nortel Networks TCM Interface in a business environment. The Model CM-16 employs 2.4 GHz technology and a wall mountable base station (included) to transmit a clear signal to the handset in the Wireline Base Station of range » Four ring tones » Multi-language display option » Illuminated keypad » Key Label option » Custom Name option » Handset Pairing option » Call Timer » Silent alert » Receiver/Ringer volume control »...
... of use the Nortel Networks TCM Interface in a business environment. The Model CM-16 employs 2.4 GHz technology and a wall mountable base station (included) to transmit a clear signal to the handset in the Wireline Base Station of range » Four ring tones » Multi-language display option » Illuminated keypad » Key Label option » Custom Name option » Handset Pairing option » Call Timer » Silent alert » Receiver/Ringer volume control »...

CM-16 User Guide
Page 2
...2 Handset and Base Station 2 Batteries ...2 INSTALLATION 4 Base Station Location 4 Base Station Wall Mounting 5 Base Unit Connections 5 Charging Cradle 7 Battery Charging 7 Belt Clip ...7 Using a Headset with your Telephone 8 Battery Status Icons 8 CM-16 HANDSET KEY FUNCTIONS 9, 10 Screen Display 11 Screen Icons 11 Screen Prompts 12 Making and Answering Calls 13 Redial ...13 Hold function 14 Mute Key 14 Ringer/Alerter tones 14 Volume Control 14 To adjust the receiver volume 15 To adjust the ringer volume 15 Status Light 15 Feature Key List 15 OPTIONS 16 Language 16 Key...
...2 Handset and Base Station 2 Batteries ...2 INSTALLATION 4 Base Station Location 4 Base Station Wall Mounting 5 Base Unit Connections 5 Charging Cradle 7 Battery Charging 7 Belt Clip ...7 Using a Headset with your Telephone 8 Battery Status Icons 8 CM-16 HANDSET KEY FUNCTIONS 9, 10 Screen Display 11 Screen Icons 11 Screen Prompts 12 Making and Answering Calls 13 Redial ...13 Hold function 14 Mute Key 14 Ringer/Alerter tones 14 Volume Control 14 To adjust the receiver volume 15 To adjust the ringer volume 15 Status Light 15 Feature Key List 15 OPTIONS 16 Language 16 Key...
CM-16 User Guide
Page 4
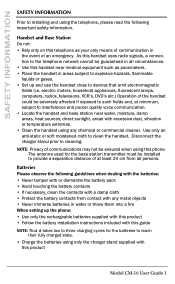
...; Never tamper with or dismantle the battery pack • Avoid touching the battery contacts • If necessary, clean the contacts with a damp cloth • Protect the battery contacts from all circumstances. • Use this product Model CM-16 User Guide 1 Use only an anti-static or soft moistened cloth to cleaning. NOTE: Privacy of an emergency. Handset and Base Station Do not: • Rely only...
...; Never tamper with or dismantle the battery pack • Avoid touching the battery contacts • If necessary, clean the contacts with a damp cloth • Protect the battery contacts from all circumstances. • Use this product Model CM-16 User Guide 1 Use only an anti-static or soft moistened cloth to cleaning. NOTE: Privacy of an emergency. Handset and Base Station Do not: • Rely only...
CM-16 User Guide
Page 5
... to reduce the service life of environmental and user factors. 2 Model CM-16 User Guide Take them to an appropriate collection point for recycling or send them back to use batteries and charging units approved by a wide variety of batteries. • Do not throw away or incinerate used batteries. The battery icon on the display will indicate when the batteries are low and an alert tone is normal...
... to reduce the service life of environmental and user factors. 2 Model CM-16 User Guide Take them to an appropriate collection point for recycling or send them back to use batteries and charging units approved by a wide variety of batteries. • Do not throw away or incinerate used batteries. The battery icon on the display will indicate when the batteries are low and an alert tone is normal...
CM-16 User Guide
Page 7
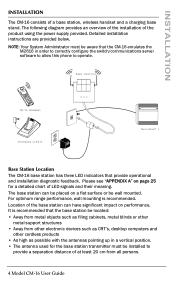
.... 4 Model CM-16 User Guide Detailed installation instructions are provided below. It is recommended. Location of the base station can be placed on a flat surface or be installed to operate. The base station can have significant impact on page 25 for the base station transmitter must be aware that provide operational and installation diagnostic feedback. INSTALLATION INSTALLATION The CM-16 consists of the product using the power supply provided. Base Station CM-16 Handset Charging...
.... 4 Model CM-16 User Guide Detailed installation instructions are provided below. It is recommended. Location of the base station can be placed on a flat surface or be installed to operate. The base station can have significant impact on page 25 for the base station transmitter must be aware that provide operational and installation diagnostic feedback. INSTALLATION INSTALLATION The CM-16 consists of the product using the power supply provided. Base Station CM-16 Handset Charging...
CM-16 User Guide
Page 8
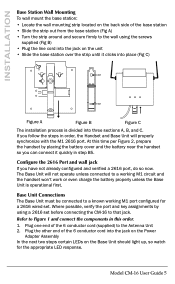
... 2616 port. INSTALLATION Base Station Wall Mounting To wall mount the base station: • Locate the wall mounting strip located on the back side of the base station • Slide the strip out from the base station (Fig A) • Turn the strip around and secure firmly to the wall using a 2616 set . Model CM-16 User Guide 5 Where possible, verify the port and key assignments by placing the battery cover and the battery near the handset...
... 2616 port. INSTALLATION Base Station Wall Mounting To wall mount the base station: • Locate the wall mounting strip located on the back side of the base station • Slide the strip out from the base station (Fig A) • Turn the strip around and secure firmly to the wall using a 2616 set . Model CM-16 User Guide 5 Where possible, verify the port and key assignments by placing the battery cover and the battery near the handset...
CM-16 User Guide
Page 9
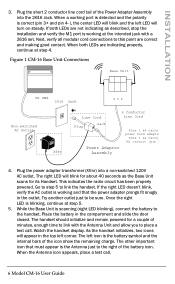
... to link the handset. As the handset initializes, two icons will turn on steady. This indicates the radio circuit has been properly powered. Once the right LED is scanning (right LED blinking), connect the battery to place a test call . 6 Model CM-16 User Guide Watch the handset display. Figure 1 CM-16 Base Unit Connections Base Unit M1 PBX 2616 Jack Non-switched AC Outlet Xfer Line Cord 6 Conductor Line Cord Plug Jack Pins 1 &6 carry power form adapter Pins 3 &4 carry M1 circuit (pin 3 Power Adapter...
... to link the handset. As the handset initializes, two icons will turn on steady. This indicates the radio circuit has been properly powered. Once the right LED is scanning (right LED blinking), connect the battery to place a test call . 6 Model CM-16 User Guide Watch the handset display. Figure 1 CM-16 Base Unit Connections Base Unit M1 PBX 2616 Jack Non-switched AC Outlet Xfer Line Cord 6 Conductor Line Cord Plug Jack Pins 1 &6 carry power form adapter Pins 3 &4 carry M1 circuit (pin 3 Power Adapter...

CM-16 User Guide
Page 10
.... 2. However, once the handset is placed in the charging cradle. Figure 2 Handset Preparation Handset (face down) Figure 3 Charger Preparation Keep the Battery Near the handset and don't connect it is being charged. Verify two way transmission and hang up in the cradle, the battery icon will blink indicating the battery is properly closed. Model CM-16 User Guide 7 From another M1 station, call this DN and answer the call ...
.... 2. However, once the handset is placed in the charging cradle. Figure 2 Handset Preparation Handset (face down) Figure 3 Charger Preparation Keep the Battery Near the handset and don't connect it is being charged. Verify two way transmission and hang up in the cradle, the battery icon will blink indicating the battery is properly closed. Model CM-16 User Guide 7 From another M1 station, call this DN and answer the call ...

CM-16 User Guide
Page 13
... 8 Headset jack 9 Status Light 10 Release ∫ key • To end calls and go on hook • Exits Menu and the various lists. 11 Menu µ key • Access key to the different Options • Scrolls down when in the various lists. • Used as Backspace during editing 12 Redial ® key • Displays the last 10 numbers dialed 13 Charging jack 14 Charging contacts 15 Microphone 10 Model CM-16 User Guide
... 8 Headset jack 9 Status Light 10 Release ∫ key • To end calls and go on hook • Exits Menu and the various lists. 11 Menu µ key • Access key to the different Options • Scrolls down when in the various lists. • Used as Backspace during editing 12 Redial ® key • Displays the last 10 numbers dialed 13 Charging jack 14 Charging contacts 15 Microphone 10 Model CM-16 User Guide
CM-16 User Guide
Page 14
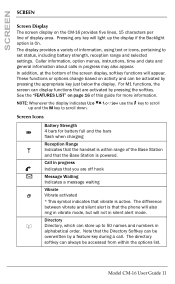
.... SCREEN SCREEN Screen Display The screen display on the CM-16 provides five lines, 15 characters per line of this guide for battery full and the bars flash when charging Reception Range m Indicates that the handset is powered. In addition, at the bottom of the screen display, softkey functions will light up the display if the Backlight option is active. See the "FEATURES LIST" on activity and can always be accessed from within range of information, using...
.... SCREEN SCREEN Screen Display The screen display on the CM-16 provides five lines, 15 characters per line of this guide for battery full and the bars flash when charging Reception Range m Indicates that the handset is powered. In addition, at the bottom of the screen display, softkey functions will light up the display if the Backlight option is active. See the "FEATURES LIST" on activity and can always be accessed from within range of information, using...

CM-16 User Guide
Page 15
... Description Indicates when the Mute button has been Activated Appears briefly when pressing a key if out of range of the base station Will appear if the line cord is not in use to indicate the ringer volume level. If just the bell is displayed, then the phone is activated. SCREEN ¬b lb Ringer Volume This Icon appears when the phone is not properly connected to the base station. 12 Model CM-16 User Guide...
... Description Indicates when the Mute button has been Activated Appears briefly when pressing a key if out of range of the base station Will appear if the line cord is not in use to indicate the ringer volume level. If just the bell is displayed, then the phone is activated. SCREEN ¬b lb Ringer Volume This Icon appears when the phone is not properly connected to the base station. 12 Model CM-16 User Guide...

CM-16 User Guide
Page 16
... ANSWERING CALLS MAKING AND ANSWERING CALLS To make a call : Press ∫ key OR Return the handset to the charging cradle. The number, as entered, will automatically be made directly from the redial list or saved to dial the number. If you need to add a pause to a number (for further information. If the number is no name associated with the Model CM-16 User Guide 13 In addition to redialing the last 10 numbers, the CM-16...
... ANSWERING CALLS MAKING AND ANSWERING CALLS To make a call : Press ∫ key OR Return the handset to the charging cradle. The number, as entered, will automatically be made directly from the redial list or saved to dial the number. If you need to add a pause to a number (for further information. If the number is no name associated with the Model CM-16 User Guide 13 In addition to redialing the last 10 numbers, the CM-16...
CM-16 User Guide
Page 17
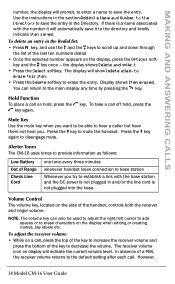
... and/or the line cord is not plugged in the Directory. NOTE: The volume key can return to the main display any time by pressing the ∫ key. The receiver volume icon on the side of Range Check Line Cord one tone every three minutes whenever handset loses connection to base station Whenever you . MAKING AND ANSWERING CALLS number, the display will prompt, to enter a name to erase the entry. If...
... and/or the line cord is not plugged in the Directory. NOTE: The volume key can return to the main display any time by pressing the ∫ key. The receiver volume icon on the side of Range Check Line Cord one tone every three minutes whenever handset loses connection to base station Whenever you . MAKING AND ANSWERING CALLS number, the display will prompt, to enter a name to erase the entry. If...

CM-16 User Guide
Page 18
... the new setting and the ringer volume icon on the handset indicates the following conditions: Incoming call , press the top of the key to increase the ringer volume and press the bottom of the key to the volume. To adjust the ringer volume: • When the handset is not being used for a call flashes rapidly Call on hold solid green Handset muted flashes rapidly Features activated solid green (only while on hook) / message waiting Model CM-16 User Guide 15 MAKING AND ANSWERING CALLS the PBX directive can direct the handset default...
... the new setting and the ringer volume icon on the handset indicates the following conditions: Incoming call , press the top of the key to increase the ringer volume and press the bottom of the key to the volume. To adjust the ringer volume: • When the handset is not being used for a call flashes rapidly Call on hold solid green Handset muted flashes rapidly Features activated solid green (only while on hook) / message waiting Model CM-16 User Guide 15 MAKING AND ANSWERING CALLS the PBX directive can direct the handset default...
CM-16 User Guide
Page 20
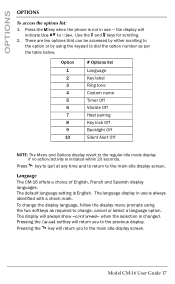
... -confirmed- Model CM-16 User Guide 17 Press the µ key when the phone is changed. Option 1 2 3 4 5 6 7 8 9 10 # Options list Language Key label Ring tone Custom name Timer Off Vibrate Off Hset pairing Key lock Off Backlight Off Silent Alert Off NOTE: The Menu and Options display revert to change the display language, follow the display menu prompts using the keypad to dial the option number as required to the regular idle mode display if...
... -confirmed- Model CM-16 User Guide 17 Press the µ key when the phone is changed. Option 1 2 3 4 5 6 7 8 9 10 # Options list Language Key label Ring tone Custom name Timer Off Vibrate Off Hset pairing Key lock Off Backlight Off Silent Alert Off NOTE: The Menu and Options display revert to change the display language, follow the display menu prompts using the keypad to dial the option number as required to the regular idle mode display if...

CM-16 User Guide
Page 22
...; key will quickly return to the main idle display screen. The display will indicate Vibrate On and-confirmed- Pressing the ∫ key returns you to the previous menu display. By default, the Call Timer option is an ideal option to personalize each handset to signal an incoming call by using the two softkeys as ringing. Vibrate The Vibrate option allows the CM-16 handset to its user or extension number. OPTIONS Ring Tone The CM-16...
...; key will quickly return to the main idle display screen. The display will indicate Vibrate On and-confirmed- Pressing the ∫ key returns you to the previous menu display. By default, the Call Timer option is an ideal option to personalize each handset to signal an incoming call by using the two softkeys as ringing. Vibrate The Vibrate option allows the CM-16 handset to its user or extension number. OPTIONS Ring Tone The CM-16...
CM-16 User Guide
Page 30
... consequential damages, including, but not limited to, loss, damage or expense directly or indirectly arising from the customers use of or inability to use primarily for warranty repairs. Model CM-16 User Guide 27 Exclusions Aastra Telecom does not warrant its option, and as storms or floods, after the telephone is in your possession. This paragraph, however, shall not apply to...
... consequential damages, including, but not limited to, loss, damage or expense directly or indirectly arising from the customers use of or inability to use primarily for warranty repairs. Model CM-16 User Guide 27 Exclusions Aastra Telecom does not warrant its option, and as storms or floods, after the telephone is in your possession. This paragraph, however, shall not apply to...
CM-16 User Guide
Page 31
After Warranty Service Aastra Telecom offers ongoing repair and support for this product may be responsible for further information. In North America, contact our service information number: 1-800-574-1611. This restriction applies during the warranty period; LIMITED WARRANTY Warranty Repair Services Should the set fail during and after the warranty period. You will void the warranty. 28 Model CM-16 User Guide NOTE: Repairs to this...
After Warranty Service Aastra Telecom offers ongoing repair and support for this product may be responsible for further information. In North America, contact our service information number: 1-800-574-1611. This restriction applies during the warranty period; LIMITED WARRANTY Warranty Repair Services Should the set fail during and after the warranty period. You will void the warranty. 28 Model CM-16 User Guide NOTE: Repairs to this...

CM-16 User Guide
Page 32
... 17 Ring Tone 19 Silent Alert 21 Vibrate 19 Out of Range 14 R Receiver Volume 12, 14 Reception Range 11 Regulatory Information 3 Ringer Volume 12, 15 INDEX A Appendix A 25 B Base Station 1 Location 4 Wall Mounting 5 Base Unit 5 Batteries 1 Battery 8, 11, 14 Belt Clip 7 C Call redial 13 to answer 13 to end 13 to make 13 Call in progress 11 Charging Cradle 7 Check Line Cord 14 D Directory 22 Adding a Name and Number 22 Changing entries 23 Deleting...
... 17 Ring Tone 19 Silent Alert 21 Vibrate 19 Out of Range 14 R Receiver Volume 12, 14 Reception Range 11 Regulatory Information 3 Ringer Volume 12, 15 INDEX A Appendix A 25 B Base Station 1 Location 4 Wall Mounting 5 Base Unit 5 Batteries 1 Battery 8, 11, 14 Belt Clip 7 C Call redial 13 to answer 13 to end 13 to make 13 Call in progress 11 Charging Cradle 7 Check Line Cord 14 D Directory 22 Adding a Name and Number 22 Changing entries 23 Deleting...

