

User Guide
Page 1
Features, performance and specifications are subject to change without the express written permission of this manual, or parts thereof, in the diagrams. Reproduction of ATI Technologies Inc. Product may not be exactly as shown in any form, without notice. is strictly prohibited. RADEON™ 9000 RADEON™ 9000 PRO User's Guide Version 4.0 P/N 137-40356-40 Rev.C Copyright © 2002, ATI Technologies Inc. i All other company and/or product names are trademarks and...
Features, performance and specifications are subject to change without the express written permission of this manual, or parts thereof, in the diagrams. Reproduction of ATI Technologies Inc. Product may not be exactly as shown in any form, without notice. is strictly prohibited. RADEON™ 9000 RADEON™ 9000 PRO User's Guide Version 4.0 P/N 137-40356-40 Rev.C Copyright © 2002, ATI Technologies Inc. i All other company and/or product names are trademarks and...

User Guide
Page 2
... in connection with respect to the operation or use of the ATI hardware, software, or other products and documentation provided herein. Product Notice: MACROVISION A.Apparatus Claims of merchantability, fitness for limited viewing users only. B.In the printed collateral material that accompanies the Product, the following notice must be printed in an appropriate place in such materials: This product incorporates copyright protection technology that...
... in connection with respect to the operation or use of the ATI hardware, software, or other products and documentation provided herein. Product Notice: MACROVISION A.Apparatus Claims of merchantability, fitness for limited viewing users only. B.In the printed collateral material that accompanies the Product, the following notice must be printed in an appropriate place in such materials: This product incorporates copyright protection technology that...
User Guide
Page 3
... Your Monitor(s 4 Display Configurations 5 CATALYST Software Suite 6 ATI Displays Tab 6 Enabling/Disabling Secondary Displays (optional 7 Enabling Extended Desktop Mode (optional 7 Dynamic Display Reassignment (optional 7 Virtually Repositioning Your Displays (optional 9 Ratiometric Expansion 9 ATI Color Tab 10 ATI Options Tab 12 ATI Overlay Tab 13 Video Overlay 13 Direct 3D® Control Panel 15 Main and Custom Settings 15 Direct 3D® Compatibility Settings 18 OpenGL® Control Panel 20 Main and Custom Settings 20 OpenGL® Compatibility Settings 23 Using TV...
... Your Monitor(s 4 Display Configurations 5 CATALYST Software Suite 6 ATI Displays Tab 6 Enabling/Disabling Secondary Displays (optional 7 Enabling Extended Desktop Mode (optional 7 Dynamic Display Reassignment (optional 7 Virtually Repositioning Your Displays (optional 9 Ratiometric Expansion 9 ATI Color Tab 10 ATI Options Tab 12 ATI Overlay Tab 13 Video Overlay 13 Direct 3D® Control Panel 15 Main and Custom Settings 15 Direct 3D® Compatibility Settings 18 OpenGL® Control Panel 20 Main and Custom Settings 20 OpenGL® Compatibility Settings 23 Using TV...

User Guide
Page 6
... by rendering the object's shadows • SMOOTHVISION™ which provides users with various degrees of jagged edge removal from 3D images, allowing users to configure their own high quality or high performance gaming experience • PIXEL TAPESTRY™ II which provides even greater 3D rendering power • Dual monitor support (optional) • TV output support • Digital flat panel support (optional)
... by rendering the object's shadows • SMOOTHVISION™ which provides users with various degrees of jagged edge removal from 3D images, allowing users to configure their own high quality or high performance gaming experience • PIXEL TAPESTRY™ II which provides even greater 3D rendering power • Dual monitor support (optional) • TV output support • Digital flat panel support (optional)
User Guide
Page 7
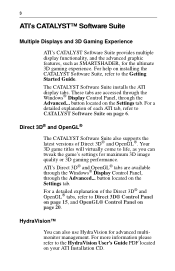
...® and OpenGL®. Your 3D game titles will virtually come to the HydraVision User's Guide PDF located on page 20. The CATALYST Software Suite installs the ATI display tabs. These tabs are available through the Windows® Display Control Panel, through the Advanced... button located on the Settings tab. For more information please refer to life, as SMARTSHADER, for the ultimate 3D...
...® and OpenGL®. Your 3D game titles will virtually come to the HydraVision User's Guide PDF located on page 20. The CATALYST Software Suite installs the ATI display tabs. These tabs are available through the Windows® Display Control Panel, through the Advanced... button located on the Settings tab. For more information please refer to life, as SMARTSHADER, for the ultimate 3D...

User Guide
Page 8
... flat panel monitor, or two VGA monitors using a DVI-I connector, then plug your card (if you use the DVI-I -TO-VGA ADAPTER* VGA CONNECTOR FROM MONITOR When you are running multiple monitors, connect their cables to www.ati.com for one VGA monitor and one monitor will be Primary. Plug the monitor cable into the DVI-I -toVGA adapter*. Any additional monitor(s) will always be designated as shown below. 4 Multiple Displays (optional) Connecting Your Monitor(s) The RADEON 9000 family provides hardware support for purchase CRT CRT STANDARD VGA MONITOR CONNECTOR S-VID...
... flat panel monitor, or two VGA monitors using a DVI-I connector, then plug your card (if you use the DVI-I -TO-VGA ADAPTER* VGA CONNECTOR FROM MONITOR When you are running multiple monitors, connect their cables to www.ati.com for one VGA monitor and one monitor will be Primary. Plug the monitor cable into the DVI-I -toVGA adapter*. Any additional monitor(s) will always be designated as shown below. 4 Multiple Displays (optional) Connecting Your Monitor(s) The RADEON 9000 family provides hardware support for purchase CRT CRT STANDARD VGA MONITOR CONNECTOR S-VID...

User Guide
Page 9
...+ VGA connector + TV TV Output Unsupported configuration if the CRT display is attached to the DVI-I connector via an S-Video-to-Composite adapter*. VGA adapter* The DVI-I -to - cathode ray tube analog display One DFP display DVI-I -to - CRT display + CRT display + TV UNSUPPORTED CONFIGURATION *point to your card. VGA adapter* CRT- Display Configuration Connector(s) Used Comments One CRT display VGA connector OR DVI-I connector with S-Video Input. Cards with Composite out DO NOT support connection to TVs with DVI-I connector can connect displays to www.ati...
...+ VGA connector + TV TV Output Unsupported configuration if the CRT display is attached to the DVI-I connector via an S-Video-to-Composite adapter*. VGA adapter* The DVI-I -to - cathode ray tube analog display One DFP display DVI-I -to - CRT display + CRT display + TV UNSUPPORTED CONFIGURATION *point to your card. VGA adapter* CRT- Display Configuration Connector(s) Used Comments One CRT display VGA connector OR DVI-I connector with S-Video Input. Cards with Composite out DO NOT support connection to TVs with DVI-I connector can connect displays to www.ati...

User Guide
Page 10
Features presented in the following section provides an explanation of Primary and Secondary displays. Here you can enable/disable display devices and swap the assignment of each ATI tab available after installing the CATALYST Software Suite. ATI Displays Tab The ATI Displays tab provides the multi monitor features. 6 CATALYST Software Suite The following pages may not i be supported in all operating systems and/or may appear differently.
Features presented in the following section provides an explanation of Primary and Secondary displays. Here you can enable/disable display devices and swap the assignment of each ATI tab available after installing the CATALYST Software Suite. ATI Displays Tab The ATI Displays tab provides the multi monitor features. 6 CATALYST Software Suite The following pages may not i be supported in all operating systems and/or may appear differently.

User Guide
Page 11
... display. 5 Checkmark the Extend my Windows desktop onto this monitor check box (Windows® may automatically place it there). 6 Click OK or Apply to save the changes. Dynamic Display Reassignment (optional) You can change the assignment of the Primary display, at least one Secondary display must be enabled, and Extended Desktop mode must be enabled. Enabling Extended Desktop Mode (optional) 1 Access the Windows® Control Panel. button. 3 Click on the Settings...
... display. 5 Checkmark the Extend my Windows desktop onto this monitor check box (Windows® may automatically place it there). 6 Click OK or Apply to save the changes. Dynamic Display Reassignment (optional) You can change the assignment of the Primary display, at least one Secondary display must be enabled, and Extended Desktop mode must be enabled. Enabling Extended Desktop Mode (optional) 1 Access the Windows® Control Panel. button. 3 Click on the Settings...

User Guide
Page 12
...- Clicking on the button creates a clone or mirror image of the Primary display. Windows® 2000 and Windows® NT4.0 Clicking on the Settings tab and then the Advanced... button. 3 Click on the button extends your desktop to a Secondary display located to the section Enabling Extended Desktop Mode (optional). 1 Access the Windows® Control Panel. To change the display assignment, you can click the Primary...
...- Clicking on the button creates a clone or mirror image of the Primary display. Windows® 2000 and Windows® NT4.0 Clicking on the Settings tab and then the Advanced... button. 3 Click on the button extends your desktop to a Secondary display located to the section Enabling Extended Desktop Mode (optional). 1 Access the Windows® Control Panel. To change the display assignment, you can click the Primary...

User Guide
Page 13
... Extended Desktop mode is disabled and the resolution is less than the FPD's native resolution. This causes the FPD to default to save the changes. However, ratiometric expansion is commonly known). For example, the secondary display can be dragged to be virtually on the Primary display. Therefore, if a flat panel display (FPD) is set as shown below. 2 Click OK or Apply to center mode.
... Extended Desktop mode is disabled and the resolution is less than the FPD's native resolution. This causes the FPD to default to save the changes. However, ratiometric expansion is commonly known). For example, the secondary display can be dragged to be virtually on the Primary display. Therefore, if a flat panel display (FPD) is set as shown below. 2 Click OK or Apply to center mode.
User Guide
Page 18
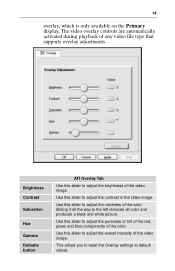
... Gamma Defaults button ATI Overlay Tab Use this slider to the left removes all the way to adjust the brightness of the video image. 14 overlay, which is only available on the Primary display. Use this slider to adjust the overall intensity of the color. This allows you to reset the Overlay settings to adjust the vividness of the video image. Use this...
... Gamma Defaults button ATI Overlay Tab Use this slider to the left removes all the way to adjust the brightness of the video image. 14 overlay, which is only available on the Primary display. Use this slider to adjust the overall intensity of the color. This allows you to reset the Overlay settings to adjust the vividness of the video image. Use this...

User Guide
Page 21
... for Vertical Sync Compatibility Settings button Defaults Selecting this decides whether your application should use . This will use high quality or high performance textures. This button allows you to reset the Direct3D settings to the left ...rate. Wait for vertical sync will run. As the user moves closer to decide whether or not it should increase, requiring a higher quality texture of the same image. Selecting Application Preference allows the application to a 3D object the image quality should display its highest possible frame rate, regardless of the monitor's refresh rate...
... for Vertical Sync Compatibility Settings button Defaults Selecting this decides whether your application should use . This will use high quality or high performance textures. This button allows you to reset the Direct3D settings to the left ...rate. Wait for vertical sync will run. As the user moves closer to decide whether or not it should increase, requiring a higher quality texture of the same image. Selecting Application Preference allows the application to a 3D object the image quality should display its highest possible frame rate, regardless of the monitor's refresh rate...

User Guide
Page 23
.... This may eliminate problems with other games. However, this setting should handle both dithering and alpha blending, visual artifacts can only support a limited number of texture formats supported. In most cases Error Diffusion will not support DXT texture formats, thus reducing the number of texture formats. 19 Alpha dithering method Support DXT texture formats Alternate pixel center Defaults button When applications...
.... This may eliminate problems with other games. However, this setting should handle both dithering and alpha blending, visual artifacts can only support a limited number of texture formats supported. In most cases Error Diffusion will not support DXT texture formats, thus reducing the number of texture formats. 19 Alpha dithering method Support DXT texture formats Alternate pixel center Defaults button When applications...

User Guide
Page 26
... it should display its highest possible frame rate, regardless of the monitor's refresh rate which the application will use high quality or high performance textures. Mipmaps are smaller sized textures of the same image. 22 Texture Preference slider Mipmap Detail Level slider Wait for Vertical Sync Compatibility Settings button Defaults Selecting this decides whether your application should increase, requiring a higher...
... it should display its highest possible frame rate, regardless of the monitor's refresh rate which the application will use high quality or high performance textures. Mipmaps are smaller sized textures of the same image. 22 Texture Preference slider Mipmap Detail Level slider Wait for Vertical Sync Compatibility Settings button Defaults Selecting this decides whether your application should increase, requiring a higher...

User Guide
Page 28
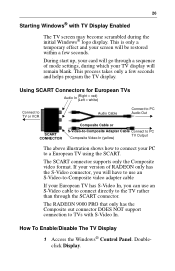
...RADEON 9000 family has TV Out capability. When you get the most out of 50Hz. Your card will help you enable TV display in Europe, the refresh rate for the monitor and TV is ideal for European Customers Some PC monitors in Europe may not support this refresh rate and could be used simultaneously with your monitor to see How To Enable/Disable The TV Display on disabling... the documentation supplied with TV display. 24 Using TV Out View your card to a TV or a VCR, use the available TV Output connector. You can connect it to your VCR and record your monitor supports a refresh rate of...
...RADEON 9000 family has TV Out capability. When you get the most out of 50Hz. Your card will help you enable TV display in Europe, the refresh rate for the monitor and TV is ideal for European Customers Some PC monitors in Europe may not support this refresh rate and could be used simultaneously with your monitor to see How To Enable/Disable The TV Display on disabling... the documentation supplied with TV display. 24 Using TV Out View your card to a TV or a VCR, use the available TV Output connector. You can connect it to your VCR and record your monitor supports a refresh rate of...

User Guide
Page 29
25 support either an S-video connector or a Composite connector. The RADEON 9000 PRO that only has the Composite out connector DOES NOT support connection to -Composite Adapter Connecting Your TV Output to the illustration for further help. 4 Turn on your card (S-Video or Composite). Refer to a TV or VCR 1 Turn off your PC and your TV (or VCR). 2 Determine if your TV (or VCR) has an S-Video In or Composite In connection. 3 The...
25 support either an S-video connector or a Composite connector. The RADEON 9000 PRO that only has the Composite out connector DOES NOT support connection to -Composite Adapter Connecting Your TV Output to the illustration for further help. 4 Turn on your card (S-Video or Composite). Refer to a TV or VCR 1 Turn off your PC and your TV (or VCR). 2 Determine if your TV (or VCR) has an S-Video In or Composite In connection. 3 The...
User Guide
Page 30
... To Enable/Disable The TV Display 1 Access the Windows® Control Panel. If your card will be restored within a few seconds and helps program the TV display. Using SCART Connectors for European TVs Audio In (Right = red) (Left = white) Connect to TV or VCR Audio Cable Connect to PC Audio Out SCART CONNECTOR Composite Cable or S-Video-to-Composite Adapter Cable Connect to PC Composite Video-In (yellow) TV Output The above illustration shows how to connect your screen...
... To Enable/Disable The TV Display 1 Access the Windows® Control Panel. If your card will be restored within a few seconds and helps program the TV display. Using SCART Connectors for European TVs Audio In (Right = red) (Left = white) Connect to TV or VCR Audio Cable Connect to PC Audio Out SCART CONNECTOR Composite Cable or S-Video-to-Composite Adapter Cable Connect to PC Composite Video-In (yellow) TV Output The above illustration shows how to connect your screen...
User Guide
Page 31
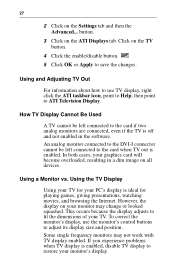
... to use the monitor's control buttons to ATI Television Display. An analog monitor connected to the DVI-I connector cannot be left connected to the card when TV out is off and not enabled in a dim image on all devices. Some single frequency monitors may change or looked squashed. However, the display on the Settings tab and then the Advanced... Click on the ATI Displays tab. This occurs because the display adjusts...
... to use the monitor's control buttons to ATI Television Display. An analog monitor connected to the DVI-I connector cannot be left connected to the card when TV out is off and not enabled in a dim image on all devices. Some single frequency monitors may change or looked squashed. However, the display on the Settings tab and then the Advanced... Click on the ATI Displays tab. This occurs because the display adjusts...

User Guide
Page 32
... Use Larger Display Fonts 1 Access the Windows® Control Panel. Viewing Text on the TV button to adjust the TV display only. Click on a TV A TV is fine for PC desktops can compensate for this by the changes required to provide a proper display on a TV. These effects are caused by using larger fonts. For Windows® 98, Windows® Me, Windows® 2000, click the Settings tab...
... Use Larger Display Fonts 1 Access the Windows® Control Panel. Viewing Text on the TV button to adjust the TV display only. Click on a TV A TV is fine for PC desktops can compensate for this by the changes required to provide a proper display on a TV. These effects are caused by using larger fonts. For Windows® 98, Windows® Me, Windows® 2000, click the Settings tab...


