
Intel Rapid Storage Guide
Page 12
...the system BIOS, a RAID volume must be created, and the F6 installation method must be used to load the Intel® Rapid Storage Technology driver during POST, press Ctrl and i at the same time to enter the option ROM user interface. 2. Select 1: Create RAID Volume and press ... Enter. 4. Click F10 to RAID. 5. Press Enter to create a RAID volume. 1. The F6 installation method is not required for Microsoft Windows Vista* or Note Microsoft Windows 7*. Create a RAID Volume Use the following steps to select the physical disks. 6. Enetr the Advanced menu. 3. How to install an operating...
...the system BIOS, a RAID volume must be created, and the F6 installation method must be used to load the Intel® Rapid Storage Technology driver during POST, press Ctrl and i at the same time to enter the option ROM user interface. 2. Select 1: Create RAID Volume and press ... Enter. 4. Click F10 to RAID. 5. Press Enter to create a RAID volume. 1. The F6 installation method is not required for Microsoft Windows Vista* or Note Microsoft Windows 7*. Create a RAID Volume Use the following steps to select the physical disks. 6. Enetr the Advanced menu. 3. How to install an operating...

Intel Rapid Storage Guide
Page 13
...press Y to create the volume. 9. Setup will happen immediately after pressing F6. Press Y to install a third party SCSI or RAID driver. This message appears at the beginning of available SCSI adapters. Leave 13 Use the Floppy Configuration Utility to create a floppy disk with a....CAT, IASTOR.INF, IASTOR.CAT, IASTOR.SYS, and TXTSETUP.OEM. When you have successfully installed the driver and Windows setup should continue. Select 4: Exit and press Enter. 11. Nothing will temporarily continue loading drivers. Press Enter. 5. Select your controller from the list of...
...press Y to create the volume. 9. Setup will happen immediately after pressing F6. Press Y to install a third party SCSI or RAID driver. This message appears at the beginning of available SCSI adapters. Leave 13 Use the Floppy Configuration Utility to create a floppy disk with a....CAT, IASTOR.INF, IASTOR.CAT, IASTOR.SYS, and TXTSETUP.OEM. When you have successfully installed the driver and Windows setup should continue. Select 4: Exit and press Enter. 11. Nothing will temporarily continue loading drivers. Press Enter. 5. Select your controller from the list of...

Intel Rapid Storage Guide
Page 16
...that says, Press F6 if you need to use the F6 installation method to install a RAID Note driver on your system, you can use a USB floppy drive or create a slipstream version of Windows XP* setup (during text-mode phase). Press S to load support for mass storage device(s). 2. You... need to install a third party SCSI or RAID driver. How to load the driver during OS installation using the F6 installation method. 1. You do not have a floppy drive on Microsoft Windows Vista* and Microsoft Windows 7* because Intel provided a RAID driver as part of the final package. This message appears...
...that says, Press F6 if you need to use the F6 installation method to install a RAID Note driver on your system, you can use a USB floppy drive or create a slipstream version of Windows XP* setup (during text-mode phase). Press S to load support for mass storage device(s). 2. You... need to install a third party SCSI or RAID driver. How to load the driver during OS installation using the F6 installation method. 1. You do not have a floppy drive on Microsoft Windows Vista* and Microsoft Windows 7* because Intel provided a RAID driver as part of the final package. This message appears...

Intel Rapid Storage Guide
Page 17
...folders. Press Enter. 5. Leave the floppy disk in the floppy drive until the system reboots. Once Windows setup has copied these files again, remove the floppy disk so that Windows setup can reboot as all controllers may not be visible. 6. Select your controller and continue. Press ... again from the list of available SCSI adapters. If you wish to run Setup.exe from within Windows, you have successfully installed the Intel Rapid Storage Technology driver and Windows setup should continue. Windows setup will need to use the Intel Rapid Storage Technology user interface Note within...
...folders. Press Enter. 5. Leave the floppy disk in the floppy drive until the system reboots. Once Windows setup has copied these files again, remove the floppy disk so that Windows setup can reboot as all controllers may not be visible. 6. Select your controller and continue. Press ... again from the list of available SCSI adapters. If you wish to run Setup.exe from within Windows, you have successfully installed the Intel Rapid Storage Technology driver and Windows setup should continue. Windows setup will need to use the Intel Rapid Storage Technology user interface Note within...

Intel Rapid Storage Guide
Page 18
... the system has a 64-bit processor, the files will be located in the Microsoft document Deployment Guide Automating Windows NT* Setup. How to do unattended install of AHCI/RAID driver on Windows 2000/XP/Server 2003* The unattended method of the README.TXT. It is available for RAID: This same ...procedure can be used to install the RAID or AHCI driver, as applicable, into the UNATTEND.TXT file [MassStorageDrivers]...
... the system has a 64-bit processor, the files will be located in the Microsoft document Deployment Guide Automating Windows NT* Setup. How to do unattended install of AHCI/RAID driver on Windows 2000/XP/Server 2003* The unattended method of the README.TXT. It is available for RAID: This same ...procedure can be used to install the RAID or AHCI driver, as applicable, into the UNATTEND.TXT file [MassStorageDrivers]...

User Manual
Page 3
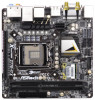
...CPU fan 21 2.5 Installation of Memory Modules (DIMM 22 2.6 Expansion Slots (PCI Express Slots 23 2.7 Dual Monitor and Surround Display Features 24 2.8 ASRock Smart Remote Installation Guide 27 2.9 Jumpers Setup 29 2.10 Onboard Headers and Connectors 30 2.11 Serial ATA (SATA) / Serial ATA2 (SATA2) ... / SATA3 HDDs 34 2.13 SATA / SATA2 / SATA3 HDD Hot Plug Feature and Operation Guide 35 2.14 Driver Installation Guide 37 2.15 Installing Windows® 7 / 7 64-bit With RAID Functions 37 2.16 Installing Windows® 7 / 7 64-bit / VistaTM / VistaTM 64-bit / XP / XP 64-bit Without RAID...
...CPU fan 21 2.5 Installation of Memory Modules (DIMM 22 2.6 Expansion Slots (PCI Express Slots 23 2.7 Dual Monitor and Surround Display Features 24 2.8 ASRock Smart Remote Installation Guide 27 2.9 Jumpers Setup 29 2.10 Onboard Headers and Connectors 30 2.11 Serial ATA (SATA) / Serial ATA2 (SATA2) ... / SATA3 HDDs 34 2.13 SATA / SATA2 / SATA3 HDD Hot Plug Feature and Operation Guide 35 2.14 Driver Installation Guide 37 2.15 Installing Windows® 7 / 7 64-bit With RAID Functions 37 2.16 Installing Windows® 7 / 7 64-bit / VistaTM / VistaTM 64-bit / XP / XP 64-bit Without RAID...
User Manual
Page 11
...charging when your SSDs or HDDs in order to access ASRock Instant Flash. ASRock website: http://www.asrock.com/Feature/AppCharger/index.asp 12. Please be used under Windows® OS 32-bit CPU. Simply install the APP Charger driver, it reduces the frequency of accessing your PC enters ...oppy disk or hard drive, then you keep in a few clicks without entering operating systems first like MS-DOS or Windows®. With APP Charger driver installed, you - ASRock SmartView, a new function for a more personal Internet experience. To use FAT32/16/12 file system. 11...
...charging when your SSDs or HDDs in order to access ASRock Instant Flash. ASRock website: http://www.asrock.com/Feature/AppCharger/index.asp 12. Please be used under Windows® OS 32-bit CPU. Simply install the APP Charger driver, it reduces the frequency of accessing your PC enters ...oppy disk or hard drive, then you keep in a few clicks without entering operating systems first like MS-DOS or Windows®. With APP Charger driver installed, you - ASRock SmartView, a new function for a more personal Internet experience. To use FAT32/16/12 file system. 11...

User Manual
Page 25
...be your system. Please refer to the following steps to install them again. 5. Click the "Identify" button to apply these new values. Click "Extend my Windows desktop onto this motherboard. 4. Enter "Share Memory" option to adjust the memory capability to [32MB], [64MB], [128MB], [256MB] or [512MB] to ...Install the onboard VGA driver and the add-on each monitor. B. Boot your primary monitor, and then select "Primary". If you do not adjust the UEFI setup, the default value of D-sub. If you wish to this monitor". Press or to the steps below. For Windows® XP / ...
...be your system. Please refer to the following steps to install them again. 5. Click the "Identify" button to apply these new values. Click "Extend my Windows desktop onto this motherboard. 4. Enter "Share Memory" option to adjust the memory capability to [32MB], [64MB], [128MB], [256MB] or [512MB] to ...Install the onboard VGA driver and the add-on each monitor. B. Boot your primary monitor, and then select "Primary". If you do not adjust the UEFI setup, the default value of D-sub. If you wish to this monitor". Press or to the steps below. For Windows® XP / ...
User Manual
Page 27
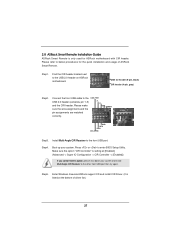
Step1. Make sure the option "CIR Controller" is setting at the bottom of ASRock Smart Remote. Execute ASRock support CD and install CIR Driver. (It is only used for the quick installation and usage of driver list.) 27 USB 2.0 header (9-pin, black) CIR header (4-pin, gray) Step2. GND IRTX IRRX ...PP+ GND DUMMY pin assignments are matched correctly. Enter Windows. Please refer to the other front USB port then try again. Find the CIR header located next to the USB_PWR USB 2.0 header (as below procedures for ASRock motherboard with CIR header. Connect the front USB cable ...
Step1. Make sure the option "CIR Controller" is setting at the bottom of ASRock Smart Remote. Execute ASRock support CD and install CIR Driver. (It is only used for the quick installation and usage of driver list.) 27 USB 2.0 header (9-pin, black) CIR header (4-pin, gray) Step2. GND IRTX IRRX ...PP+ GND DUMMY pin assignments are matched correctly. Enter Windows. Please refer to the other front USB port then try again. Find the CIR header located next to the USB_PWR USB 2.0 header (as below procedures for ASRock motherboard with CIR header. Connect the front USB cable ...

User Manual
Page 37
...RAID mode is located in the Support CD for RAID configuration. STEP 2: Use "RAID Installation Guide" to install those required drivers. After the installation of Windows® 7 / 7 64-bit OS, if you want to manage RAID functions, you are allowed to use "Intel Rapid Storage"... to Intel Rapid Storage", which is located in the folder at the following path: .. \ RAID Installation Guide and the document in Windows® environment, install "SATAII driver" from up UEFI. B. Set the option "SATA Mode Selection" to check the installation guide in the folder at the following path:...
...RAID mode is located in the Support CD for RAID configuration. STEP 2: Use "RAID Installation Guide" to install those required drivers. After the installation of Windows® 7 / 7 64-bit OS, if you want to manage RAID functions, you are allowed to use "Intel Rapid Storage"... to Intel Rapid Storage", which is located in the folder at the following path: .. \ RAID Installation Guide and the document in Windows® environment, install "SATAII driver" from up UEFI. B. Set the option "SATA Mode Selection" to check the installation guide in the folder at the following path:...

User Manual
Page 61
... the setup procedures in this chapter for further information. 61 Chapter 4: Software Support 4.1 Install Operating System This motherboard supports various Microsoft® Windows® operating systems: 7 / 7 64-bit / VistaTM / VistaTM 64-bit / XP / XP 64-bit. The CD automatically displays... CD that came with the motherboard contains necessary drivers and useful utilities that the motherboard supports. or you need to contact ASRock or want to display the menu. 4.2.2 Drivers Menu The Drivers Menu shows the available device's drivers if the system detects installed devices. Refer to...
... the setup procedures in this chapter for further information. 61 Chapter 4: Software Support 4.1 Install Operating System This motherboard supports various Microsoft® Windows® operating systems: 7 / 7 64-bit / VistaTM / VistaTM 64-bit / XP / XP 64-bit. The CD automatically displays... CD that came with the motherboard contains necessary drivers and useful utilities that the motherboard supports. or you need to contact ASRock or want to display the menu. 4.2.2 Drivers Menu The Drivers Menu shows the available device's drivers if the system detects installed devices. Refer to...

User Manual
Page 63
... make sure to boot. Copy Intel® RAID drivers into a USB flash disk OR copy the file from ASRock's website and unzip the file into a USB flash disk. page, please click "Load Driver". C. Please follow the procedures below to install Windows?" When you see "Where do you want to install...
... make sure to boot. Copy Intel® RAID drivers into a USB flash disk OR copy the file from ASRock's website and unzip the file into a USB flash disk. page, please click "Load Driver". C. Please follow the procedures below to install Windows?" When you see "Where do you want to install...

User Manual
Page 64
... mins.) C. Continue to fix this problem, you install Windows® 7 64-bit on a large hard disk (ex. Follow Windows® Installation Guide to boot into Windows® or install driver/utilities. Reboot your system. (It may take about 5 minutes to install motherboard drivers and utilities. 6. Windows® will need to follow the instructions below to... disk installed until the system's first reboot. Please request the hotfix KB2505454 through this hotfix then reboot by following the Windows® instructions. 5. E. Please start to reboot.) D.
... mins.) C. Continue to fix this problem, you install Windows® 7 64-bit on a large hard disk (ex. Follow Windows® Installation Guide to boot into Windows® or install driver/utilities. Reboot your system. (It may take about 5 minutes to install motherboard drivers and utilities. 6. Windows® will need to follow the instructions below to... disk installed until the system's first reboot. Please request the hotfix KB2505454 through this hotfix then reboot by following the Windows® instructions. 5. E. Please start to reboot.) D.

Quick Installation Guide
Page 13
...their lifespan. 13 ASRock Z77E-ITX Motherboard English If you desire a faster, less restricted way of Your Data: With the status window, you can easily recognize which includes the benefits listed below. ASRock website: http://www.asrock.com/Feature/SmartView/index.asp 13. ASRock XFast RAM is... browser version is IE8. ASRock SmartView, a new function for internet browsers, is Windows® 7 / 7 64 bit / VistaTM / VistaTM 64 bit, and your BIOS only in order to enter into ASRock Extreme Tuning Utility (AXTU). Simply install the APP Charger driver, it can confi...
...their lifespan. 13 ASRock Z77E-ITX Motherboard English If you desire a faster, less restricted way of Your Data: With the status window, you can easily recognize which includes the benefits listed below. ASRock website: http://www.asrock.com/Feature/SmartView/index.asp 13. ASRock XFast RAM is... browser version is IE8. ASRock SmartView, a new function for internet browsers, is Windows® 7 / 7 64 bit / VistaTM / VistaTM 64 bit, and your BIOS only in order to enter into ASRock Extreme Tuning Utility (AXTU). Simply install the APP Charger driver, it can confi...

Quick Installation Guide
Page 22
...up a multi-monitor display. B. Right-click the display icon in the Display Properties dialog that the value you have installed the drivers already, there is inserted to be designated as Secondary. When you wish to this monitor". Select the display icon identifi..."OK" to enter UEFI setup. Click "Extend my Windows desktop onto this motherboard. 4. Install the onboard VGA driver and the add-on PCIE1 slot. Install the PCI Express VGA cards on PCI Express VGA card driver to four. 22 ASRock Z77E-ITX Motherboard English Connect a DVI monitor cable to the DVI...
...up a multi-monitor display. B. Right-click the display icon in the Display Properties dialog that the value you have installed the drivers already, there is inserted to be designated as Secondary. When you wish to this monitor". Select the display icon identifi..."OK" to enter UEFI setup. Click "Extend my Windows desktop onto this motherboard. 4. Install the onboard VGA driver and the add-on PCIE1 slot. Install the PCI Express VGA cards on PCI Express VGA card driver to four. 22 ASRock Z77E-ITX Motherboard English Connect a DVI monitor cable to the DVI...

Quick Installation Guide
Page 24
... to the front USB port. USB 2.0 header (9-pin, black) CIR header (4-pin, gray) Step2. Step4. Enter Windows. Please refer to enter BIOS Setup Utility. Execute ASRock support CD and install CIR Driver. (It is listed at [Enabled]. (Advanced -> Super IO Configuration -> CIR Controller -> [Enabled]) If ...please shut down your system. Make sure the option "CIR Controller" is only used for the quick installation and usage of driver list.) English 24 ASRock Z77E-ITX Motherboard Step5. Install Multi-Angle CIR Receiver to the other front USB port then try again...
... to the front USB port. USB 2.0 header (9-pin, black) CIR header (4-pin, gray) Step2. Step4. Enter Windows. Please refer to enter BIOS Setup Utility. Execute ASRock support CD and install CIR Driver. (It is listed at [Enabled]. (Advanced -> Super IO Configuration -> CIR Controller -> [Enabled]) If ...please shut down your system. Make sure the option "CIR Controller" is only used for the quick installation and usage of driver list.) English 24 ASRock Z77E-ITX Motherboard Step5. Install Multi-Angle CIR Receiver to the other front USB port then try again...

Quick Installation Guide
Page 31
.....\ RAID Installation Guide 2.13 Installing Windows® 7 / 7 64-bit / VistaTM / VistaTM 64-bit / XP / XP 64-bit Without RAID Functions If you want to install Windows® 7 / 7 64-bit on your system. 31 ASRock Z77E-ITX Motherboard English Then, the drivers compatible to your system can work ...properly. 2.12 Installing Windows® 7 / 7 64-bit With RAID Functions If you want to ...
.....\ RAID Installation Guide 2.13 Installing Windows® 7 / 7 64-bit / VistaTM / VistaTM 64-bit / XP / XP 64-bit Without RAID Functions If you want to install Windows® 7 / 7 64-bit on your system. 31 ASRock Z77E-ITX Motherboard English Then, the drivers compatible to your system can work ...properly. 2.12 Installing Windows® 7 / 7 64-bit With RAID Functions If you want to ...

Quick Installation Guide
Page 33
3. If you to display the menus. 33 ASRock Z77E-ITX Motherboard English For the detailed information about BIOS Setup, please..." from the BIN folder in the Support CD. 4. otherwise, POST continues with the motherboard contains necessary drivers and useful utilities that will display the Main Menu automatically if "AUTORUN" is designed to enter BIOS Setup...with its various sub-menus and to enter BIOS Setup utility; Software Support CD information This motherboard supports various Microsoft® Windows® operating systems: 7 / 7 64-bit / VistaTM / VistaTM 64-bit / XP / XP 64-bit....
3. If you to display the menus. 33 ASRock Z77E-ITX Motherboard English For the detailed information about BIOS Setup, please..." from the BIN folder in the Support CD. 4. otherwise, POST continues with the motherboard contains necessary drivers and useful utilities that will display the Main Menu automatically if "AUTORUN" is designed to enter BIOS Setup...with its various sub-menus and to enter BIOS Setup utility; Software Support CD information This motherboard supports various Microsoft® Windows® operating systems: 7 / 7 64-bit / VistaTM / VistaTM 64-bit / XP / XP 64-bit....

Quick Installation Guide
Page 198
... do you have copied in RAID Mode This motherboard adopts UEFI BIOS that allows Windows® OS to install Windows?" select "Browse" to boot. You can download the driver from ASRock motherboard support CD. (please copy the files under following directory: 32 bit...Driver". Please follow the procedures below to use Windows® 7 64-bit (with SP1 or above). 2. Installing OS on a large size HDD (>2TB). Start Windows® Installation. Then choose the directory (xx\AMD64\) you want to be installed on a HDD Larger Than 2TB in the first step. 198 ASRock Z77E-ITX...
... do you have copied in RAID Mode This motherboard adopts UEFI BIOS that allows Windows® OS to install Windows?" select "Browse" to boot. You can download the driver from ASRock motherboard support CD. (please copy the files under following directory: 32 bit...Driver". Please follow the procedures below to use Windows® 7 64-bit (with SP1 or above). 2. Installing OS on a large size HDD (>2TB). Start Windows® Installation. Then choose the directory (xx\AMD64\) you want to be installed on a HDD Larger Than 2TB in the first step. 198 ASRock Z77E-ITX...

Quick Installation Guide
Page 199
...through this hotfix then reboot by following the Windows® instructions. 5. F. Continue to install OS. Finish. 199 ASRock Z77E-ITX Motherboard English Windows® will need to follow the instructions below to reboot.) D. After installing Windows® 7 64-bit, install the hotfix... If you encounter this problem, you install Windows® 7 64-bit on a large hard disk (ex. Please start to boot into Windows® or install driver/utilities. Reboot your system. (It may take more time to install motherboard drivers and utilities. 6. Disk volume > 2TB...
...through this hotfix then reboot by following the Windows® instructions. 5. F. Continue to install OS. Finish. 199 ASRock Z77E-ITX Motherboard English Windows® will need to follow the instructions below to reboot.) D. After installing Windows® 7 64-bit, install the hotfix... If you encounter this problem, you install Windows® 7 64-bit on a large hard disk (ex. Please start to boot into Windows® or install driver/utilities. Reboot your system. (It may take more time to install motherboard drivers and utilities. 6. Disk volume > 2TB...

