
Intel Rapid Storage Guide
Page 1
... new levels of protection, performance, and expandability for any hard drive can fail without data loss or system downtime. Combined with Intel® Rapid Recover Technology, setting up response time on data-intensive applications. When the failed drive is removed and a replacement... makes creating and managing your storage simple and intuitive. By seamlessly storing copies of a single drive as editing home video. Intel Rapid Storage Technology provides benefits to users of data on each drive simultaneously, speeding up data protection can reduce the power consumption...
... new levels of protection, performance, and expandability for any hard drive can fail without data loss or system downtime. Combined with Intel® Rapid Recover Technology, setting up response time on data-intensive applications. When the failed drive is removed and a replacement... makes creating and managing your storage simple and intuitive. By seamlessly storing copies of a single drive as editing home video. Intel Rapid Storage Technology provides benefits to users of data on each drive simultaneously, speeding up data protection can reduce the power consumption...

Intel Rapid Storage Guide
Page 2
Click Continue (if needed) to a known location on your computer's hard drive. 2. Installation Instructions 1. Click Next. 2 Download the Intel Rapid Storage Technology software from Intel website. Save the file to launch the installation program. 4. Locate the file on your hard drive and double-click it. 3. Click Next at the Welcome screen. 5.
Click Continue (if needed) to a known location on your computer's hard drive. 2. Installation Instructions 1. Click Next. 2 Download the Intel Rapid Storage Technology software from Intel website. Save the file to launch the installation program. 4. Locate the file on your hard drive and double-click it. 3. Click Next at the Welcome screen. 5.

Intel Rapid Storage Guide
Page 5
You will find the "Intel Rapid Storage Technology" icon on the Windows task bar. 5 Restart your system. 10.
You will find the "Intel Rapid Storage Technology" icon on the Windows task bar. 5 Restart your system. 10.
Intel Rapid Storage Guide
Page 6
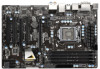
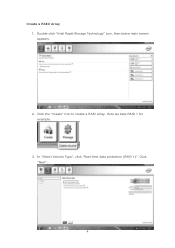
In "Select Volume Type", click "Real-time data protection (RAID 1)". Here we take RAID 1 for example. 3. Click the "Create" icon to create a RAID array. Click "Next". 6 Double-click "Intel Rapid Storage Technology" icon, then below main screen appears. 2. Create a RAID Array 1.
In "Select Volume Type", click "Real-time data protection (RAID 1)". Here we take RAID 1 for example. 3. Click the "Create" icon to create a RAID array. Click "Next". 6 Double-click "Intel Rapid Storage Technology" icon, then below main screen appears. 2. Create a RAID Array 1.

Intel Rapid Storage Guide
Page 12
...of hard drives and press Space to enter the BIOS Setup program after the Power-On-Self-Test (POST) memory test begins. 2. When the Intel Rapid Storage Technology option ROM status screen appears during operating system setup. Click F10 to select the physical disks. 6. Press Enter to save the BIOS...RAID option must be enabled in the system BIOS, a RAID volume must be created, and the F6 installation method must be used to load the Intel® Rapid Storage Technology driver during POST, press Ctrl and i at the same time to enter the option ROM user interface. 2. The F6 installation...
...of hard drives and press Space to enter the BIOS Setup program after the Power-On-Self-Test (POST) memory test begins. 2. When the Intel Rapid Storage Technology option ROM status screen appears during operating system setup. Click F10 to select the physical disks. 6. Press Enter to save the BIOS...RAID option must be enabled in the system BIOS, a RAID volume must be created, and the F6 installation method must be used to load the Intel® Rapid Storage Technology driver during POST, press Ctrl and i at the same time to enter the option ROM user interface. 2. The F6 installation...

Intel Rapid Storage Guide
Page 13
... be prompted Note with the Note necessary files. 4. Setup will happen immediately after pressing F6. Use the up and down arrow keys to install the Intel Rapid Storage Technology driver during text-mode phase). 7. Press Y to create the volume. 9. Press Enter. 5.
... be prompted Note with the Note necessary files. 4. Setup will happen immediately after pressing F6. Use the up and down arrow keys to install the Intel Rapid Storage Technology driver during text-mode phase). 7. Press Y to create the volume. 9. Press Enter. 5.
Intel Rapid Storage Guide
Page 14
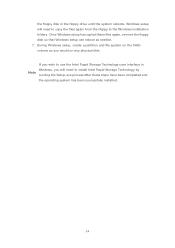
... Windows setup has copied these steps have been completed and the operating system has been successfully installed. 14 If you wish to use the Intel Rapid Storage Technology user interface in the floppy drive until the system reboots. Windows setup will need to copy the files again from the... Windows setup, create a partition and file system on the RAID volume as needed. 7. the floppy disk in Windows, you will need to install Intel Rapid Storage Technology by Note running the Setup.exe process after these files again, remove the floppy disk so that Windows setup can reboot as...
... Windows setup has copied these steps have been completed and the operating system has been successfully installed. 14 If you wish to use the Intel Rapid Storage Technology user interface in the floppy drive until the system reboots. Windows setup will need to copy the files again from the... Windows setup, create a partition and file system on the RAID volume as needed. 7. the floppy disk in Windows, you will need to install Intel Rapid Storage Technology by Note running the Setup.exe process after these files again, remove the floppy disk so that Windows setup can reboot as...
Intel Rapid Storage Guide
Page 15
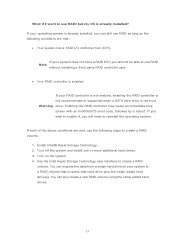
... installing a third-party RAID controller card. • Your RAID controller is already installed, you will need to create a RAID volume. 1. Install Intel® Rapid Storage Technology. 2. You can still use RAID as long as the following conditions are met, use the following steps to reinstall the...has a RAID I want to use RAID but my OS is the boot Warning drive. Turn on your operating system is enabled. Use the Intel Rapid Storage Technology user interface to a RAID volume that includes that hard drive plus the newly added hard drive(s). If your system to create...
... installing a third-party RAID controller card. • Your RAID controller is already installed, you will need to create a RAID volume. 1. Install Intel® Rapid Storage Technology. 2. You can still use RAID as long as the following conditions are met, use the following steps to reinstall the...has a RAID I want to use RAID but my OS is the boot Warning drive. Turn on your operating system is enabled. Use the Intel Rapid Storage Technology user interface to a RAID volume that includes that hard drive plus the newly added hard drive(s). If your system to create...

Intel Rapid Storage Guide
Page 16
This message appears at the beginning of the final package. You will then be used to load the Intel® Rapid Storage Technology driver during operating system installation. Nothing will Note temporarily continue loading drivers. When you to load support for mass ...that says, Please insert the disk labeled Manufacturer-supplied hardware support disk into Drive A:, insert a floppy disk containing the following steps to install the Intel® Rapid Storage Technology driver using F6 when in AHCI/RAID mode In order to install an operating system onto a single Serial ATA hard ...
This message appears at the beginning of the final package. You will then be used to load the Intel® Rapid Storage Technology driver during operating system installation. Nothing will Note temporarily continue loading drivers. When you to load support for mass ...that says, Please insert the disk labeled Manufacturer-supplied hardware support disk into Drive A:, insert a floppy disk containing the following steps to install the Intel® Rapid Storage Technology driver using F6 when in AHCI/RAID mode In order to install an operating system onto a single Serial ATA hard ...

Intel Rapid Storage Guide
Page 17
... can reboot as all controllers may not be visible. 6. 4. Windows setup will need to run Setup.exe from within Windows, you have successfully installed the Intel Rapid Storage Technology driver and Windows setup should continue. Leave the floppy disk in the floppy drive until the system reboots. If you wish to... scroll through the list as needed. Use the up and down arrow keys to use the Intel Rapid Storage Technology user interface Note within Windows. 17 Press Enter. 5.
... can reboot as all controllers may not be visible. 6. 4. Windows setup will need to run Setup.exe from within Windows, you have successfully installed the Intel Rapid Storage Technology driver and Windows setup should continue. Leave the floppy disk in the floppy drive until the system reboots. If you wish to... scroll through the list as needed. Use the up and down arrow keys to use the Intel Rapid Storage Technology user interface Note within Windows. 17 Press Enter. 5.

Intel Rapid Storage Guide
Page 18
It is used for Intel® Matrix Storage Manager version 8.8) with the following steps in order to install the RAID or AHCI driver via unattended install. 1. IATA88ENU.EXE for systems ... procedure can be located in the Drivers64 folder after extraction. Perform the following command line options: -A -A -PC:\, as applicable, into the UNATTEND.TXT file [MassStorageDrivers] "Intel(R) 82801R/DO/DH SATA RAID Controller" = OEM 18
It is used for Intel® Matrix Storage Manager version 8.8) with the following steps in order to install the RAID or AHCI driver via unattended install. 1. IATA88ENU.EXE for systems ... procedure can be located in the Drivers64 folder after extraction. Perform the following command line options: -A -A -PC:\, as applicable, into the UNATTEND.TXT file [MassStorageDrivers] "Intel(R) 82801R/DO/DH SATA RAID Controller" = OEM 18

Intel Rapid Storage Guide
Page 19
Place IAAHCI.CAT, IAAHCI.INF, IASTOR.CAT, IASTOR.INF, IASTOR.SYS, and TXTSETUP.OEM into the UNATTEND.TXT file [MassStorageDrivers] "Intel(R) 82801R/DO/DH SATA AHCI Controller" = OEM [OEMBootFiles] iaAhci.inf iaStor.sys iaAhci.cat Txtsetup.oem 3. [OEMBootFiles] iaStor.inf iaStor.sys iaStor.cat Txtsetup.oem ...
Place IAAHCI.CAT, IAAHCI.INF, IASTOR.CAT, IASTOR.INF, IASTOR.SYS, and TXTSETUP.OEM into the UNATTEND.TXT file [MassStorageDrivers] "Intel(R) 82801R/DO/DH SATA AHCI Controller" = OEM [OEMBootFiles] iaAhci.inf iaStor.sys iaAhci.cat Txtsetup.oem 3. [OEMBootFiles] iaStor.inf iaStor.sys iaStor.cat Txtsetup.oem ...

User Manual
Page 4
... Keys 46 3.2 Main Screen 46 3.3 OC Tweaker Screen 47 3.4 Advanced Screen 52 3.4.1 CPU Configuration 53 3.4.2 North Bridge Configuration 55 3.4.3 South Bridge Configuration 56 3.4.4 Intel(R) Rapid Start Technology 57 3.4.5 Intel(R) Smart Connect Technology 58 3.4.6 Storage Configuration 59 3.4.7 Super IO Configuration 60 3.4.8 ACPI Configuration 61 3.4.9 USB Configuration 62 3.5 Hardware Health Event Monitoring Screen 63...
... Keys 46 3.2 Main Screen 46 3.3 OC Tweaker Screen 47 3.4 Advanced Screen 52 3.4.1 CPU Configuration 53 3.4.2 North Bridge Configuration 55 3.4.3 South Bridge Configuration 56 3.4.4 Intel(R) Rapid Start Technology 57 3.4.5 Intel(R) Smart Connect Technology 58 3.4.6 Storage Configuration 59 3.4.7 Super IO Configuration 60 3.4.8 ACPI Configuration 61 3.4.9 USB Configuration 62 3.5 Hardware Health Event Monitoring Screen 63...

User Manual
Page 6
... PCIE 2.0. - 1 x PCI Express 2.0 x16 slot (PCIE3: x4 mode) - 1 x PCI Express 2.0 x 1 slot - 3 x PCI slots - Pixel Shader 4.1, DirectX 10.1 with Intel® Ivy Bridge CPU. Intel® Z77 - Dual Channel DDR3 Memory Technology (see CAUTION 6) - Supports Intel® Extreme Memory Profile (XMP)1.3/1.2 - 1 x PCI Express 3.0 x16 slot (PCIE2: x16 mode) (see CAUTION 1) - Pixel Shader 5.0, DirectX 11 with...
... PCIE 2.0. - 1 x PCI Express 2.0 x16 slot (PCIE3: x4 mode) - 1 x PCI Express 2.0 x 1 slot - 3 x PCI slots - Pixel Shader 4.1, DirectX 10.1 with Intel® Ivy Bridge CPU. Intel® Z77 - Dual Channel DDR3 Memory Technology (see CAUTION 6) - Supports Intel® Extreme Memory Profile (XMP)1.3/1.2 - 1 x PCI Express 3.0 x16 slot (PCIE2: x16 mode) (see CAUTION 1) - Pixel Shader 5.0, DirectX 11 with...

User Manual
Page 7
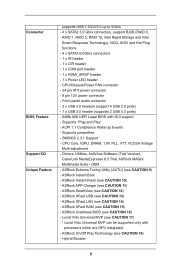
... and HBR (High Bit Rate Audio) with HDMI (Compliant HDMI monitor is required) (see CAUTION 8) - 2 x SATA3 6.0 Gb/s connectors by Intel® Z77, support RAID (RAID 0, RAID 1, RAID 5, RAID 10, Intel Rapid Storage and Intel Smart Response Technology), NCQ, AHCI and Hot Plug functions - 2 x SATA3 6.0 Gb/s connectors by ASMedia ASM1061, support NCQ, AHCI and Hot...
... and HBR (High Bit Rate Audio) with HDMI (Compliant HDMI monitor is required) (see CAUTION 8) - 2 x SATA3 6.0 Gb/s connectors by Intel® Z77, support RAID (RAID 0, RAID 1, RAID 5, RAID 10, Intel Rapid Storage and Intel Smart Response Technology), NCQ, AHCI and Hot Plug functions - 2 x SATA3 6.0 Gb/s connectors by ASMedia ASM1061, support NCQ, AHCI and Hot...
User Manual
Page 8
... Booster: 8 Lucid Virtu Universal MVP (see CAUTION 13) - OEM - CPU Core, IGPU, DRAM, 1.8V PLL, VTT, VCCSA Voltage Multi-adjustment - ASRock Instant Boot - ASRock SmartView (see CAUTION 11) - Front panel audio connector - 2 x USB 2.0 headers (support 4 USB 2.0 ports) - 1 x USB 3.0 header (supports...ASRock On/Off Play Technology (see CAUTION 16) - ASRock Crashless BIOS (see CAUTION 18) - Connector BIOS Feature Support CD Unique Feature supports USB 1.0/2.0/3.0 up to 5Gb/s - 4 x SATA2 3.0 Gb/s connectors, support RAID (RAID 0, RAID 1, RAID 5, RAID 10, Intel Rapid Storage and Intel...
... Booster: 8 Lucid Virtu Universal MVP (see CAUTION 13) - OEM - CPU Core, IGPU, DRAM, 1.8V PLL, VTT, VCCSA Voltage Multi-adjustment - ASRock Instant Boot - ASRock SmartView (see CAUTION 11) - Front panel audio connector - 2 x USB 2.0 headers (support 4 USB 2.0 ports) - 1 x USB 3.0 header (supports...ASRock On/Off Play Technology (see CAUTION 16) - ASRock Crashless BIOS (see CAUTION 18) - Connector BIOS Feature Support CD Unique Feature supports USB 1.0/2.0/3.0 up to 5Gb/s - 4 x SATA2 3.0 Gb/s connectors, support RAID (RAID 0, RAID 1, RAID 5, RAID 10, Intel Rapid Storage and Intel...
User Manual
Page 10
... run the PCI Express in a user-friendly interface, which includes Hardware Monitor, Fan Control, Overclocking, OC DNA and IES. ASRock website: http://www.asrock.com 10. ASRock Instant Flash is an all-in-one tool to overclock CPU frequency for proper installation. 3. Before you are allowed to ne... the same features as a profile and share it shows the major readings of memory modules on page 14 for the latest information. 6. Please check Intel® website for proper connection. 9. D-Sub, DVI-D and HDMI monitors cannot be enabled at PCI Express Gen 2 speed. 5. For audio output...
... run the PCI Express in a user-friendly interface, which includes Hardware Monitor, Fan Control, Overclocking, OC DNA and IES. ASRock website: http://www.asrock.com 10. ASRock Instant Flash is an all-in-one tool to overclock CPU frequency for proper installation. 3. Before you are allowed to ne... the same features as a profile and share it shows the major readings of memory modules on page 14 for the latest information. 6. Please check Intel® website for proper connection. 9. D-Sub, DVI-D and HDMI monitors cannot be enabled at PCI Express Gen 2 speed. 5. For audio output...
User Manual
Page 12
...it is not supported by intelligently reducing redundant rendering tasks in ACPI S5 mode)! Combo Cooler Option (C.C.O.) provides the flexible option to Intel's suggestion, the EuP ready power supply must meet EuP standards, an EuP ready motherboard and an EuP ready power supply are not ...thermal grease between the CPU, GPU and the display. 18. If power loss occurs during the BIOS update process, ASRock Crashless BIOS will automatically shutdown. ASRock XFast RAM is not recommended to define the power consumption for the completed system. To improve heat dissipation, remember to...
...it is not supported by intelligently reducing redundant rendering tasks in ACPI S5 mode)! Combo Cooler Option (C.C.O.) provides the flexible option to Intel's suggestion, the EuP ready power supply must meet EuP standards, an EuP ready motherboard and an EuP ready power supply are not ...thermal grease between the CPU, GPU and the display. 18. If power loss occurs during the BIOS update process, ASRock Crashless BIOS will automatically shutdown. ASRock XFast RAM is not recommended to define the power consumption for the completed system. To improve heat dissipation, remember to...

User Manual
Page 13
...Ready LAN PHY 35 PCIE2 USB3_0_1 1 10 PCI Express 3.0 CMOS Battery Intel 11 Z77 34 PCI1 Super I/O XFast LAN XFast RAM 33 PCIE3 64Mb BIOS 12 SATA3 6Gb/s Designed in Taipei XFast USB Z77 Pro4 13 SATA2_5 SATA2_4 32 AUDIO PCI2 CODEC 14 RoHS SATA2_3 31 HD_AUDIO1 ...Gray) 29 HDMI_SPDIF Header 9 SATA3 Connectors (SATA3_A2, Gray) (HDMI_SPDIF1, Black) 10 USB 3.0 Header (USB3_0_1, Black) 30 Front Panel Audio Header 11 Intel Z77 Chipset (HD_AUDIO1, Black) 12 SPI Flash Memory (64Mb) 31 PCI Slot (PCI3, Black) 13 SATA2 Connectors (SATA2_4, Black) 32 PCI Slot (...
...Ready LAN PHY 35 PCIE2 USB3_0_1 1 10 PCI Express 3.0 CMOS Battery Intel 11 Z77 34 PCI1 Super I/O XFast LAN XFast RAM 33 PCIE3 64Mb BIOS 12 SATA3 6Gb/s Designed in Taipei XFast USB Z77 Pro4 13 SATA2_5 SATA2_4 32 AUDIO PCI2 CODEC 14 RoHS SATA2_3 31 HD_AUDIO1 ...Gray) 29 HDMI_SPDIF Header 9 SATA3 Connectors (SATA3_A2, Gray) (HDMI_SPDIF1, Black) 10 USB 3.0 Header (USB3_0_1, Black) 30 Front Panel Audio Header 11 Intel Z77 Chipset (HD_AUDIO1, Black) 12 SPI Flash Memory (64Mb) 31 PCI Slot (PCI3, Black) 13 SATA2 Connectors (SATA2_4, Black) 32 PCI Slot (...

User Manual
Page 17
... flip up the load plate. 2.3 CPU Installation For the installation of the hook. Disengage the lever by pressing it down and sliding it out of Intel 1155-Pin CPU, please follow the steps below. 1155-Pin Socket Overview Before you insert the 1155-Pin CPU into the socket if above situation...
... flip up the load plate. 2.3 CPU Installation For the installation of the hook. Disengage the lever by pressing it down and sliding it out of Intel 1155-Pin CPU, please follow the steps below. 1155-Pin Socket Overview Before you insert the 1155-Pin CPU into the socket if above situation...


