
Intel Rapid Storage Guide
Page 12
...to create a RAID volume. 1. When the Intel Rapid Storage Technology option ROM status screen appears during operating system setup. Enable RAID in System BIOS Use the instructions included with your motherboard to enter the option ROM user interface. 2. Use the up or down arrow keys to scroll through ...select the strip size and press Enter. 5. Select 1: Create RAID Volume and press Enter. 3. Switch the SATA Operation Mode option to enter the BIOS Setup program after the Power-On-Self-Test (POST) memory test begins. 2. Click F2 or Delete to RAID. 5. The F6 installation method ...
...to create a RAID volume. 1. When the Intel Rapid Storage Technology option ROM status screen appears during operating system setup. Enable RAID in System BIOS Use the instructions included with your motherboard to enter the option ROM user interface. 2. Use the up or down arrow keys to scroll through ...select the strip size and press Enter. 5. Select 1: Create RAID Volume and press Enter. 3. Switch the SATA Operation Mode option to enter the BIOS Setup program after the Power-On-Self-Test (POST) memory test begins. 2. Click F2 or Delete to RAID. 5. The F6 installation method ...
RAID Installation Guide
Page 1
Guide to SATA Hard Disks Installation 2 1.1 Serial ATA (SATA) Hard Disks Installation 2 2. Guide to RAID Configurations 3 2.1 Introduction of RAID 3 2.2 RAID Configuration Precautions 5 2.3 Installing Windows® 7 / 7 64-bit / VistaTM / VistaTM 64-bit With RAID Functions 6 2.4 Setting the BIOS RAID Items 7 2.5 Configuring the Intel RAID BIOS 7 2.6 Deleting RAID Volumes 11 1 Guide to SATA Hard Disks Installation and RAID Configuration 1.
Guide to SATA Hard Disks Installation 2 1.1 Serial ATA (SATA) Hard Disks Installation 2 2. Guide to RAID Configurations 3 2.1 Introduction of RAID 3 2.2 RAID Configuration Precautions 5 2.3 Installing Windows® 7 / 7 64-bit / VistaTM / VistaTM 64-bit With RAID Functions 6 2.4 Setting the BIOS RAID Items 7 2.5 Configuring the Intel RAID BIOS 7 2.6 Deleting RAID Volumes 11 1 Guide to SATA Hard Disks Installation and RAID Configuration 1.

RAID Installation Guide
Page 6
Enter BIOS SETUP UTILITY Advanced screen Storage Configuration. STEP 2: Use "RAID Installation Guide" to [RAID]. B. Before you start to configure the RAID function, ... the installation guide in the Support CD for RAID configuration. Set "SATA Mode Selection" to set RAID configuration. STEP 1: Set up BIOS. 2.3 Installing Windows® 7 / 7 64-bit / VistaTM / VistaTM 64-bit With RAID Functions RAID mode is located in the folder at the following path: .. \ Intel Rapid...
Enter BIOS SETUP UTILITY Advanced screen Storage Configuration. STEP 2: Use "RAID Installation Guide" to [RAID]. B. Before you start to configure the RAID function, ... the installation guide in the Support CD for RAID configuration. Set "SATA Mode Selection" to set RAID configuration. STEP 1: Set up BIOS. 2.3 Installing Windows® 7 / 7 64-bit / VistaTM / VistaTM 64-bit With RAID Functions RAID mode is located in the folder at the following path: .. \ Intel Rapid...

RAID Installation Guide
Page 7
...then the main interface of BIOS setup utility will appear. Create RAID Volume window appears. Select the option Create RAID Volume and press . 7 Wait until you see the RAID software prompting you exit BIOS setup. 2.5 Configuring the Intel RAID BIOS Reboot your change before setting ...your system, and press key to enter BIOS setup utility. Boot your RAID configuration. 2.4 Setting the BIOS RAID Items After installing the hard disk drives,...
...then the main interface of BIOS setup utility will appear. Create RAID Volume window appears. Select the option Create RAID Volume and press . 7 Wait until you see the RAID software prompting you exit BIOS setup. 2.5 Configuring the Intel RAID BIOS Reboot your change before setting ...your system, and press key to enter BIOS setup utility. Boot your RAID configuration. 2.4 Setting the BIOS RAID Items After installing the hard disk drives,...
RAID Installation Guide
Page 11
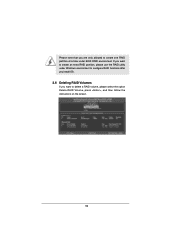
Please note that you want to create one RAID partition at a time under BIOS RAID environment. If you want to create an extra RAID partition, please use the RAID utility under Windows environment to configure RAID functions after you install OS. 2.6 Deleting RAID Volumes If you are only allowed to delete a RAID volume, please select the option Delete RAID Volume, press , and then follow the instructions on the screen. 11
Please note that you want to create one RAID partition at a time under BIOS RAID environment. If you want to create an extra RAID partition, please use the RAID utility under Windows environment to configure RAID functions after you install OS. 2.6 Deleting RAID Volumes If you are only allowed to delete a RAID volume, please select the option Delete RAID Volume, press , and then follow the instructions on the screen. 11
User Manual
Page 5
... manual, chapter 1 and 2 contains introduction of the Support CD. For the BIOS setup, please refer to quality and endurance. It delivers excellent performance with robust design conforming to ASRock's commitment to the "User Manual" in , 30.5 cm x 24.4 cm) ASRock Z77 Extreme9 Quick Installation Guide ASRock Z77 Extreme9 Support CD 6 x Serial ATA (SATA) Data Cables (Optional) 2 x Serial ATA...
... manual, chapter 1 and 2 contains introduction of the Support CD. For the BIOS setup, please refer to quality and endurance. It delivers excellent performance with robust design conforming to ASRock's commitment to the "User Manual" in , 30.5 cm x 24.4 cm) ASRock Z77 Extreme9 Quick Installation Guide ASRock Z77 Extreme9 Support CD 6 x Serial ATA (SATA) Data Cables (Optional) 2 x Serial ATA...
User Manual
Page 8
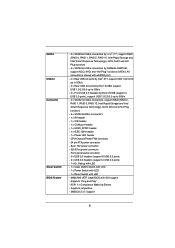
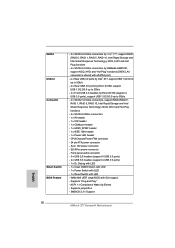
... Switch with LED - 1 x Power Switch with LED - 1 x Reset Switch with LED - 64Mb AMI UEFI Legal BIOS with eSATA3 port) - 4 x Rear USB 3.0 ports by Intel® Z77, support USB 1.0/2.0/3.0 up to 5Gb/s - 4 x Rear USB 3.0 ports by Etron EJ188, support USB 1.0/2.0/3.0 up to...COM port header - 1 x HDMI_SPDIF header - 1 x IEEE 1394 header - 1 x Power LED header - SATA3 USB3.0 Connector Smart Switch BIOS Feature - 2 x SATA3 6.0 Gb/s connectors by Intel® Z77, support RAID (RAID 0, RAID 1, RAID 5, RAID 10, Intel Rapid Storage and Intel Smart Response Technology), NCQ, AHCI and Hot Plug functions ...
... Switch with LED - 1 x Power Switch with LED - 1 x Reset Switch with LED - 64Mb AMI UEFI Legal BIOS with eSATA3 port) - 4 x Rear USB 3.0 ports by Intel® Z77, support USB 1.0/2.0/3.0 up to 5Gb/s - 4 x Rear USB 3.0 ports by Etron EJ188, support USB 1.0/2.0/3.0 up to...COM port header - 1 x HDMI_SPDIF header - 1 x IEEE 1394 header - 1 x Power LED header - SATA3 USB3.0 Connector Smart Switch BIOS Feature - 2 x SATA3 6.0 Gb/s connectors by Intel® Z77, support RAID (RAID 0, RAID 1, RAID 5, RAID 10, Intel Rapid Storage and Intel Smart Response Technology), NCQ, AHCI and Hot Plug functions ...
User Manual
Page 9
... Adjust by CPU Temperature) - Drivers, Utilities, AntiVirus Software (Trial Version), CyberLink MediaEspresso 6.5 Trial, ASRock MAGIX Multimedia Suite - ASRock XFast RAM (see CAUTION 18) - ASRock Dehumidifier Function (see CAUTION 14) - Lucid Virtu Universal MVP (see CAUTION 11) -...Quiet Fan (Allows Chassis Fan Speed Auto- ASRock Instant Boot - CPU Core, IGPU, DRAM, 1.8V PLL, VTT, VCCSA Voltage Multi-adjustment Support CD - ASRock Extreme Tuning Utility (AXTU) (see CAUTION 15) - ASRock Crashless BIOS (see CAUTION 8) - CPU Temperature Sensing ...
... Adjust by CPU Temperature) - Drivers, Utilities, AntiVirus Software (Trial Version), CyberLink MediaEspresso 6.5 Trial, ASRock MAGIX Multimedia Suite - ASRock XFast RAM (see CAUTION 18) - ASRock Dehumidifier Function (see CAUTION 14) - Lucid Virtu Universal MVP (see CAUTION 11) -...Quiet Fan (Allows Chassis Fan Speed Auto- ASRock Instant Boot - CPU Core, IGPU, DRAM, 1.8V PLL, VTT, VCCSA Voltage Multi-adjustment Support CD - ASRock Extreme Tuning Utility (AXTU) (see CAUTION 15) - ASRock Crashless BIOS (see CAUTION 8) - CPU Temperature Sensing ...
User Manual
Page 10
...your own risk and expense. WARNING Please realize that Windows® cannot use ASRock XFast RAM to utilize the memory that there is a certain risk involved with overclocking, including adjusting the setting in the BIOS, applying Untied Overclocking Technology, or using third-party overclocking tools. Only PCIE1,...you can load the OC profile to their own system to page 25 for system usage under Windows® 7 / VistaTM / XP. ASRock Extreme Tuning Utility (AXTU) is supported under Windows® 7 64-bit / 7. It should be enabled only if the display supports 12bpc in ...
...your own risk and expense. WARNING Please realize that Windows® cannot use ASRock XFast RAM to utilize the memory that there is a certain risk involved with overclocking, including adjusting the setting in the BIOS, applying Untied Overclocking Technology, or using third-party overclocking tools. Only PCIE1,...you can load the OC profile to their own system to page 25 for system usage under Windows® 7 / VistaTM / XP. ASRock Extreme Tuning Utility (AXTU) is supported under Windows® 7 64-bit / 7. It should be enabled only if the display supports 12bpc in ...
User Manual
Page 11
... utility that the USB flash drive or hard drive must use ASRock SmartView feature, please make sure your OS version is Windows® 7 / 7 64 bit / VistaTM / VistaTM 64 bit, and your BIOS only in Game: After setting online game's priority higher, it makes your iPhone charge much quickly from your PC...
... utility that the USB flash drive or hard drive must use ASRock SmartView feature, please make sure your OS version is Windows® 7 / 7 64 bit / VistaTM / VistaTM 64 bit, and your BIOS only in Game: After setting online game's priority higher, it makes your iPhone charge much quickly from your PC...

User Manual
Page 12
... accessing your USB disk. Although this motherboard offers stepless control, it back again. ASRock XFast RAM is a new function that cannot be running on automatically to extend their BIOS without fear of HyperFormance technology, VIRTU Universal MVP improves game performance by Microsoft®... to dehumidify the system after regaining power. It fully utilizes the memory space that is detected, the system will automatically shutdown. ASRock Crashless BIOS allows users to dampness by Microsoft® Windows® VistaTM / VistaTM 64-bit / XP / XP 64-bit. 12 ...
... accessing your USB disk. Although this motherboard offers stepless control, it back again. ASRock XFast RAM is a new function that cannot be running on automatically to extend their BIOS without fear of HyperFormance technology, VIRTU Universal MVP improves game performance by Microsoft®... to dehumidify the system after regaining power. It fully utilizes the memory space that is detected, the system will automatically shutdown. ASRock Crashless BIOS allows users to dampness by Microsoft® Windows® VistaTM / VistaTM 64-bit / XP / XP 64-bit. 12 ...
User Manual
Page 14
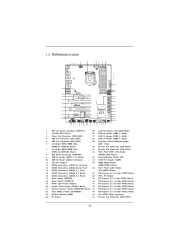
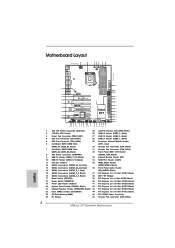
.../EuP Ready PCI Express 3.0 CHA_FAN3 SLI/XFIRE_PWR1 PCIE1 X X Fast USB Fast LAN PCIE2 LAN PHY PCIE3 USB3_11_12 USB3_9_10 Super I/O PCIE4 Z77 Extreme9 XFast RAM PCIE5 MINI_PCIE1 PCIE6 WiFi+BT Module CMOS Battery AUDIO CODEC RoHS HDMI_SPDIF1 1 1 HD_AUDIO1 IR1 COM1 1 1 PCIE7 FRONT_1394 CHA_FAN1 ...CHA_FAN2 1 USB6_7 1 1 CIR1 USB4_5 1 Intel Z77 RSTBTN Front USB 3.0 USB2_3 1 Dr. Debug CLRCMOS1 PLED1 64Mb 1 BIOS 1 SPEAKER1 1 PWRBTN PLED PWRBTN 1 HDLED RESET PANEL1 30.5cm (12.0 in) 8 9 10 11 12 ...
.../EuP Ready PCI Express 3.0 CHA_FAN3 SLI/XFIRE_PWR1 PCIE1 X X Fast USB Fast LAN PCIE2 LAN PHY PCIE3 USB3_11_12 USB3_9_10 Super I/O PCIE4 Z77 Extreme9 XFast RAM PCIE5 MINI_PCIE1 PCIE6 WiFi+BT Module CMOS Battery AUDIO CODEC RoHS HDMI_SPDIF1 1 1 HD_AUDIO1 IR1 COM1 1 1 PCIE7 FRONT_1394 CHA_FAN1 ...CHA_FAN2 1 USB6_7 1 1 CIR1 USB4_5 1 Intel Z77 RSTBTN Front USB 3.0 USB2_3 1 Dr. Debug CLRCMOS1 PLED1 64Mb 1 BIOS 1 SPEAKER1 1 PWRBTN PLED PWRBTN 1 HDLED RESET PANEL1 30.5cm (12.0 in) 8 9 10 11 12 ...
User Manual
Page 45
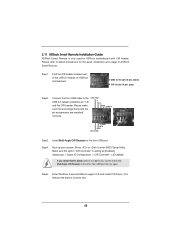
... Multi-Angle CIR Receiver to the USB 2.0 header on ASRock motherboard. 2.11 ASRock Smart Remote Installation Guide ASRock Smart Remote is listed at [Enabled]. (Advanced -> Super...sure the option "CIR Controller" is setting at the bottom of ASRock Smart Remote. USB 2.0 header (9-pin, black) CIR header (4-pin...Angle CIR Receiver to the USB_PWR USB 2.0 header (as below procedures for ASRock motherboard with CIR header. Press or to below , pin 1-5) and ...correctly. 1 23 45 GND IRTX IRRX ATX+5VSB Step3. Execute ASRock support CD and install CIR Driver. (It is only used for...
... Multi-Angle CIR Receiver to the USB 2.0 header on ASRock motherboard. 2.11 ASRock Smart Remote Installation Guide ASRock Smart Remote is listed at [Enabled]. (Advanced -> Super...sure the option "CIR Controller" is setting at the bottom of ASRock Smart Remote. USB 2.0 header (9-pin, black) CIR header (4-pin...Angle CIR Receiver to the USB_PWR USB 2.0 header (as below procedures for ASRock motherboard with CIR header. Press or to below , pin 1-5) and ...correctly. 1 23 45 GND IRTX IRRX ATX+5VSB Step3. Execute ASRock support CD and install CIR Driver. (It is only used for...
User Manual
Page 47
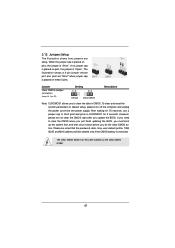
... only if the CMOS battery is placed on CLRCMOS1 for 5 seconds. If you need to clear the CMOS when you just finish updating the BIOS, you must boot up the system first, and then shut it down before you do not clear the CMOS right after you to clear... cord from the power supply. Jumper Clear CMOS Jumper (CLRCMOS1) (see p.14, No. 22) Setting Default Clear CMOS Description Note: CLRCMOS1 allows you update the BIOS. To clear and reset the system parameters to short pin2 and pin3 on these 2 pins. The Clear CMOS Switch has the same function as the...
... only if the CMOS battery is placed on CLRCMOS1 for 5 seconds. If you need to clear the CMOS when you just finish updating the BIOS, you must boot up the system first, and then shut it down before you do not clear the CMOS right after you to clear... cord from the power supply. Jumper Clear CMOS Jumper (CLRCMOS1) (see p.14, No. 22) Setting Default Clear CMOS Description Note: CLRCMOS1 allows you update the BIOS. To clear and reset the system parameters to short pin2 and pin3 on these 2 pins. The Clear CMOS Switch has the same function as the...
User Manual
Page 95
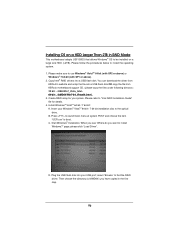
... size HDD (>2TB). Please make sure to install the operating system. 1. Installing OS on a HDD Larger Than 2TB in AHCI Mode This motherboard adopts UEFI BIOS that allows Windows® OS to boot in UEFI Setup Utility > Advanced > Storage Configuration > SATA Mode. 3.
... size HDD (>2TB). Please make sure to install the operating system. 1. Installing OS on a HDD Larger Than 2TB in AHCI Mode This motherboard adopts UEFI BIOS that allows Windows® OS to boot in UEFI Setup Utility > Advanced > Storage Configuration > SATA Mode. 3.
User Manual
Page 96
...Create RAID array for details. 4. D. When you see "Where do you have copied in RAID Mode This motherboard adopts UEFI BIOS that allows Windows® OS to install Windows?" Please refer to the optical drive. B. Start Windows® Installation. page, ...please click "Load Driver". Please follow the procedures below to boot. You can download the driver from ASRock motherboard support CD. (please copy the files under following directory: 32 bit: ..\i386\Win7_Vista_Intel.. 64-bit: ..\AMD64\Win7-64_Vista64_Intel.. 3. Press...
...Create RAID array for details. 4. D. When you see "Where do you have copied in RAID Mode This motherboard adopts UEFI BIOS that allows Windows® OS to install Windows?" Please refer to the optical drive. B. Start Windows® Installation. page, ...please click "Load Driver". Please follow the procedures below to boot. You can download the driver from ASRock motherboard support CD. (please copy the files under following directory: 32 bit: ..\i386\Win7_Vista_Intel.. 64-bit: ..\AMD64\Win7-64_Vista64_Intel.. 3. Press...
Quick Installation Guide
Page 2
... 3.0 CHA_FAN3 SLI/XFIRE_PWR1 PCIE1 X X Fast USB Fast LAN PCIE2 LAN PHY PCIE3 USB3_11_12 USB3_9_10 Super I/O PCIE4 Z77 Extreme9 XFast RAM PCIE5 MINI_PCIE1 PCIE6 WiFi+BT Module CMOS Battery AUDIO CODEC RoHS HDMI_SPDIF1 1 1 HD_AUDIO1 IR1 COM1 1... 1 PCIE7 FRONT_1394 CHA_FAN1 CHA_FAN2 1 USB6_7 1 1 CIR1 USB4_5 1 Intel Z77 RSTBTN Front USB 3.0 USB2_3 1 Dr. Debug CLRCMOS1 PLED1 64Mb 1 BIOS 1 SPEAKER1 1 PWRBTN PLED PWRBTN 1 HDLED RESET PANEL1 30.5cm (12.0 in) 8 ... Dr. Debug 46 Chassis Fan Connector (CHA_FAN3) English 2 ASRock Z77 Extreme9 Motherboard
... 3.0 CHA_FAN3 SLI/XFIRE_PWR1 PCIE1 X X Fast USB Fast LAN PCIE2 LAN PHY PCIE3 USB3_11_12 USB3_9_10 Super I/O PCIE4 Z77 Extreme9 XFast RAM PCIE5 MINI_PCIE1 PCIE6 WiFi+BT Module CMOS Battery AUDIO CODEC RoHS HDMI_SPDIF1 1 1 HD_AUDIO1 IR1 COM1 1... 1 PCIE7 FRONT_1394 CHA_FAN1 CHA_FAN2 1 USB6_7 1 1 CIR1 USB4_5 1 Intel Z77 RSTBTN Front USB 3.0 USB2_3 1 Dr. Debug CLRCMOS1 PLED1 64Mb 1 BIOS 1 SPEAKER1 1 PWRBTN PLED PWRBTN 1 HDLED RESET PANEL1 30.5cm (12.0 in) 8 ... Dr. Debug 46 Chassis Fan Connector (CHA_FAN3) English 2 ASRock Z77 Extreme9 Motherboard
Quick Installation Guide
Page 7
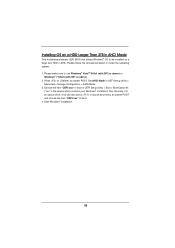
... better performance in Windows® 7 / 7 64-bit / VistaTM / VistaTM 64bit, it is recommended to set the BIOS option in Storage Configuration to the "User Manual" in , 30.5 cm x 24.4 cm) ASRock Z77 Extreme9 Quick Installation Guide ASRock Z77 Extreme9 Support CD 6 x Serial ATA (SATA) Data Cables (Optional) 2 x Serial ATA (SATA) HDD Power Cables (Optional) 1 x I/O Panel...
... better performance in Windows® 7 / 7 64-bit / VistaTM / VistaTM 64bit, it is recommended to set the BIOS option in Storage Configuration to the "User Manual" in , 30.5 cm x 24.4 cm) ASRock Z77 Extreme9 Quick Installation Guide ASRock Z77 Extreme9 Support CD 6 x Serial ATA (SATA) Data Cables (Optional) 2 x Serial ATA (SATA) HDD Power Cables (Optional) 1 x I/O Panel...
Quick Installation Guide
Page 10
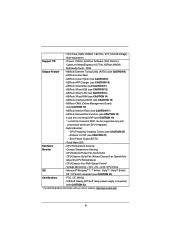
... GUI support - SMBIOS 2.3.1 Support English 10 ASRock Z77 Extreme9 Motherboard CPU/Chassis/Power FAN connector - 24 pin ATX power connector - 8 pin 12V power connector - Supports "Plug and Play" - Supports jumperfree - ACPI 1.1 Compliance Wake Up Events - SATA3 USB3.0 Connector Smart Switch BIOS Feature - 2 x SATA3 6.0 Gb/s connectors by Intel® Z77, support RAID (RAID 0, RAID 1, RAID 5, RAID...
... GUI support - SMBIOS 2.3.1 Support English 10 ASRock Z77 Extreme9 Motherboard CPU/Chassis/Power FAN connector - 24 pin ATX power connector - 8 pin 12V power connector - Supports "Plug and Play" - Supports jumperfree - ACPI 1.1 Compliance Wake Up Events - SATA3 USB3.0 Connector Smart Switch BIOS Feature - 2 x SATA3 6.0 Gb/s connectors by Intel® Z77, support RAID (RAID 0, RAID 1, RAID 5, RAID...
Quick Installation Guide
Page 11
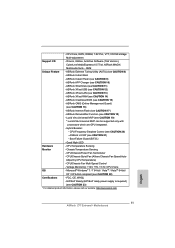
...64-bit compliant (see CAUTION 15) - Drivers, Utilities, AntiVirus Software (Trial Version), CyberLink MediaEspresso 6.5 Trial, ASRock MAGIX Multimedia Suite - ASRock Instant Boot - ASRock Crashless BIOS (see CAUTION 22) Certifications - Lucid Virtu Universal MVP (see CAUTION 20) - CPU Frequency Stepless ...-Speed Control - ASRock Internet Flash (see CAUTION 13) - ASRock XFast LAN (see CAUTION 17) - ASRock XFast RAM (see CAUTION 23) * For detailed product information, please visit our website: http://www.asrock.com English 11 ASRock Z77 Extreme9 Motherboard ErP/EuP...
...64-bit compliant (see CAUTION 15) - Drivers, Utilities, AntiVirus Software (Trial Version), CyberLink MediaEspresso 6.5 Trial, ASRock MAGIX Multimedia Suite - ASRock Instant Boot - ASRock Crashless BIOS (see CAUTION 22) Certifications - Lucid Virtu Universal MVP (see CAUTION 20) - CPU Frequency Stepless ...-Speed Control - ASRock Internet Flash (see CAUTION 13) - ASRock XFast LAN (see CAUTION 17) - ASRock XFast RAM (see CAUTION 23) * For detailed product information, please visit our website: http://www.asrock.com English 11 ASRock Z77 Extreme9 Motherboard ErP/EuP...


