
Intel Rapid Storage Guide
Page 12
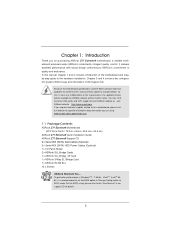
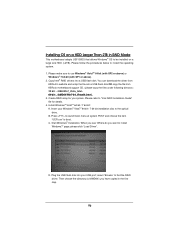
... Unless you have selected RAID 1, use the up or down arrow keys to select the strip size and press Enter. 5. Enable RAID in System BIOS Use the instructions included with your motherboard to enter the option ROM user interface. 2. When the Intel Rapid Storage Technology option ROM status screen appears... operating system onto a RAID volume, the RAID option must be enabled in the system BIOS, a RAID volume must be created, and the F6 installation method must be used to save the BIOS settings and exit the BIOS Setup program. Enetr the Advanced menu. 3. Click F10 to load the Intel® ...
... Unless you have selected RAID 1, use the up or down arrow keys to select the strip size and press Enter. 5. Enable RAID in System BIOS Use the instructions included with your motherboard to enter the option ROM user interface. 2. When the Intel Rapid Storage Technology option ROM status screen appears... operating system onto a RAID volume, the RAID option must be enabled in the system BIOS, a RAID volume must be created, and the F6 installation method must be used to save the BIOS settings and exit the BIOS Setup program. Enetr the Advanced menu. 3. Click F10 to load the Intel® ...
RAID Installation Guide
Page 1
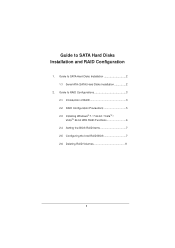
Guide to SATA Hard Disks Installation and RAID Configuration 1. Guide to RAID Configurations 3 2.1 Introduction of RAID 3 2.2 RAID Configuration Precautions 5 2.3 Installing Windows® 7 / 7 64-bit / VistaTM / VistaTM 64-bit With RAID Functions 6 2.4 Setting the BIOS RAID Items 7 2.5 Configuring the Intel RAID BIOS 7 2.6 Deleting RAID Volumes 11 1 Guide to SATA Hard Disks Installation 2 1.1 Serial ATA (SATA) Hard Disks Installation 2 2.
Guide to SATA Hard Disks Installation and RAID Configuration 1. Guide to RAID Configurations 3 2.1 Introduction of RAID 3 2.2 RAID Configuration Precautions 5 2.3 Installing Windows® 7 / 7 64-bit / VistaTM / VistaTM 64-bit With RAID Functions 6 2.4 Setting the BIOS RAID Items 7 2.5 Configuring the Intel RAID BIOS 7 2.6 Deleting RAID Volumes 11 1 Guide to SATA Hard Disks Installation 2 1.1 Serial ATA (SATA) Hard Disks Installation 2 2.

RAID Installation Guide
Page 6
Enter BIOS SETUP UTILITY Advanced screen Storage Configuration. Before you start to configure the RAID function, you want to install Windows® 7 / 7 64-...® 7 / 7 64-bit / VistaTM / VistaTM 64-bit OS on your SATA / SATA2 / SATA3 HDDs with RAID functions, please follow the procedures below. STEP 1: Set up BIOS. Please refer to the document in the Support CD, "Guide to SATA Hard Disks Installation and RAID Configuration", which is located in the...
Enter BIOS SETUP UTILITY Advanced screen Storage Configuration. Before you start to configure the RAID function, you want to install Windows® 7 / 7 64-...® 7 / 7 64-bit / VistaTM / VistaTM 64-bit OS on your SATA / SATA2 / SATA3 HDDs with RAID functions, please follow the procedures below. STEP 1: Set up BIOS. Please refer to the document in the Support CD, "Guide to SATA Hard Disks Installation and RAID Configuration", which is located in the...

RAID Installation Guide
Page 7
...computer. Wait until you see the RAID software prompting you exit BIOS setup. 2.5 Configuring the Intel RAID BIOS Reboot your RAID configuration. Highlight Advanced and press , then the main interface of BIOS setup utility will appear. Please set the necessary RAID items in... the BIOS before you to [RAID]. Press . Create RAID Volume window appears. 2.4 Setting the BIOS RAID Items After installing the hard disk drives, please set ...
...computer. Wait until you see the RAID software prompting you exit BIOS setup. 2.5 Configuring the Intel RAID BIOS Reboot your RAID configuration. Highlight Advanced and press , then the main interface of BIOS setup utility will appear. Please set the necessary RAID items in... the BIOS before you to [RAID]. Press . Create RAID Volume window appears. 2.4 Setting the BIOS RAID Items After installing the hard disk drives, please set ...
RAID Installation Guide
Page 11
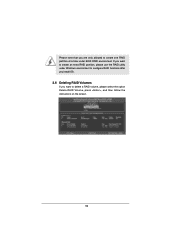
If you want to delete a RAID volume, please select the option Delete RAID Volume, press , and then follow the instructions on the screen. 11 Please note that you are only allowed to create one RAID partition at a time under Windows environment to configure RAID functions after you install OS. 2.6 Deleting RAID Volumes If you want to create an extra RAID partition, please use the RAID utility under BIOS RAID environment.
If you want to delete a RAID volume, please select the option Delete RAID Volume, press , and then follow the instructions on the screen. 11 Please note that you are only allowed to create one RAID partition at a time under Windows environment to configure RAID functions after you install OS. 2.6 Deleting RAID Volumes If you want to create an extra RAID partition, please use the RAID utility under BIOS RAID environment.
User Manual
Page 5
..., it is recommended to set the BIOS option in , 30.5 cm x 24.4 cm) ASRock Z77 Extreme9 Quick Installation Guide ASRock Z77 Extreme9 Support CD 6 x Serial ATA (SATA) Data Cables (Optional) 2 x Serial ATA (SATA) HDD Power Cables (Optional) 1 x I/O Panel Shield 2 x ASRock SLI_Bridge Cards 1 x ASRock SLI_Bridge_3S Card 1 x ASRock 3-Way SLI Bridge Card 1 x ASRock Wi-SB Box 12 x Screws ASRock Reminds You... You may fi...
..., it is recommended to set the BIOS option in , 30.5 cm x 24.4 cm) ASRock Z77 Extreme9 Quick Installation Guide ASRock Z77 Extreme9 Support CD 6 x Serial ATA (SATA) Data Cables (Optional) 2 x Serial ATA (SATA) HDD Power Cables (Optional) 1 x I/O Panel Shield 2 x ASRock SLI_Bridge Cards 1 x ASRock SLI_Bridge_3S Card 1 x ASRock 3-Way SLI Bridge Card 1 x ASRock Wi-SB Box 12 x Screws ASRock Reminds You... You may fi...
User Manual
Page 8
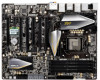
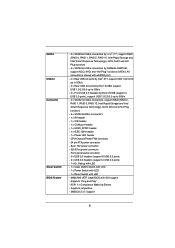
...CMOS Switch with LED - 1 x Power Switch with LED - 1 x Reset Switch with LED - 64Mb AMI UEFI Legal BIOS with eSATA3 port) - 4 x Rear USB 3.0 ports by Intel® Z77, support USB 1.0/2.0/3.0 up to 5Gb/s - 4 x Rear USB 3.0 ports by Etron EJ188, support USB 1.0/2.0/3.0 up to... x HDMI_SPDIF header - 1 x IEEE 1394 header - 1 x Power LED header - SMBIOS 2.3.1 Support 8 SATA3 USB3.0 Connector Smart Switch BIOS Feature - 2 x SATA3 6.0 Gb/s connectors by Intel® Z77, support RAID (RAID 0, RAID 1, RAID 5, RAID 10, Intel Rapid Storage and Intel Smart Response Technology), NCQ, AHCI and Hot Plug ...
...CMOS Switch with LED - 1 x Power Switch with LED - 1 x Reset Switch with LED - 64Mb AMI UEFI Legal BIOS with eSATA3 port) - 4 x Rear USB 3.0 ports by Intel® Z77, support USB 1.0/2.0/3.0 up to 5Gb/s - 4 x Rear USB 3.0 ports by Etron EJ188, support USB 1.0/2.0/3.0 up to... x HDMI_SPDIF header - 1 x IEEE 1394 header - 1 x Power LED header - SMBIOS 2.3.1 Support 8 SATA3 USB3.0 Connector Smart Switch BIOS Feature - 2 x SATA3 6.0 Gb/s connectors by Intel® Z77, support RAID (RAID 0, RAID 1, RAID 5, RAID 10, Intel Rapid Storage and Intel Smart Response Technology), NCQ, AHCI and Hot Plug ...
User Manual
Page 9
... our website: http://www.asrock.com 9 ASRock XFast LAN (see CAUTION 14) - ASRock XFast RAM (see CAUTION 13) - Hybrid Booster: - ASRock Internet Flash (see CAUTION 12) - Good Night LED Hardware - Chassis Temperature Sensing - ASRock XFast USB (see CAUTION 17) - ASRock Dehumidifier Function (see CAUTION 21) - ASRock U-COP (see CAUTION 18) - ASRock Crashless BIOS (see CAUTION 11) - CPU...
... our website: http://www.asrock.com 9 ASRock XFast LAN (see CAUTION 14) - ASRock XFast RAM (see CAUTION 13) - Hybrid Booster: - ASRock Internet Flash (see CAUTION 12) - Good Night LED Hardware - Chassis Temperature Sensing - ASRock XFast USB (see CAUTION 17) - ASRock Dehumidifier Function (see CAUTION 21) - ASRock U-COP (see CAUTION 18) - ASRock Crashless BIOS (see CAUTION 11) - CPU...
User Manual
Page 10
...8. This motherboard supports Dual Channel Memory Technology. To run only at your system. WARNING Please realize that Windows® cannot use ASRock XFast RAM to the operating system limitation, the actual memory size may affect your system. It should be less than 4GB for... is supported under Windows® 7 64-bit / 7. Deep Color mode will run the PCI Express in the BIOS, applying Untied Overclocking Technology, or using third-party overclocking tools. ASRock Extreme Tuning Utility (AXTU) is subject to page 25 for system usage under Windows® 7 / VistaTM /...
...8. This motherboard supports Dual Channel Memory Technology. To run only at your system. WARNING Please realize that Windows® cannot use ASRock XFast RAM to the operating system limitation, the actual memory size may affect your system. It should be less than 4GB for... is supported under Windows® 7 64-bit / 7. Deep Color mode will run the PCI Express in the BIOS, applying Untied Overclocking Technology, or using third-party overclocking tools. ASRock Extreme Tuning Utility (AXTU) is subject to page 25 for system usage under Windows® 7 / VistaTM /...
User Manual
Page 11
.... The performance may depend on -the-go. With this tool and save the new BIOS file to update system BIOS without sacrificing computing performance. ASRock website: http://www.asrock.com/Feature/SmartView/index.asp 12. LAN Application Prioritization: You can press the key during... friends on the properties of charging your browser version is a BIOS flash utility embedded in games. Just launch this utility, you - ASRock APP Charger allows you can lower the latency in Flash ROM. ASRock SmartView, a new function for internet browsers, is the smart ...
.... The performance may depend on -the-go. With this tool and save the new BIOS file to update system BIOS without sacrificing computing performance. ASRock website: http://www.asrock.com/Feature/SmartView/index.asp 12. LAN Application Prioritization: You can press the key during... friends on the properties of charging your browser version is a BIOS flash utility embedded in games. Just launch this utility, you - ASRock APP Charger allows you can lower the latency in Flash ROM. ASRock SmartView, a new function for internet browsers, is the smart ...

User Manual
Page 12
... the speed of breed functionality. Frequencies other users. ASRock XFast RAM is detected, the system will automatically finish the BIOS update procedure after entering S4/S5 state. 19. ASRock XFast RAM is included into ASRock Extreme Tuning Utility (AXTU). And it back again.... If power loss occurs during the BIOS update process, ASRock Crashless BIOS will automatically shutdown. Users may ...
... the speed of breed functionality. Frequencies other users. ASRock XFast RAM is detected, the system will automatically finish the BIOS update procedure after entering S4/S5 state. 19. ASRock XFast RAM is included into ASRock Extreme Tuning Utility (AXTU). And it back again.... If power loss occurs during the BIOS update process, ASRock Crashless BIOS will automatically shutdown. Users may ...
User Manual
Page 14
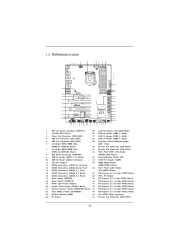
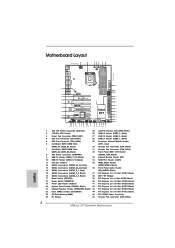
.../EuP Ready PCI Express 3.0 CHA_FAN3 SLI/XFIRE_PWR1 PCIE1 X X Fast USB Fast LAN PCIE2 LAN PHY PCIE3 USB3_11_12 USB3_9_10 Super I/O PCIE4 Z77 Extreme9 XFast RAM PCIE5 MINI_PCIE1 PCIE6 WiFi+BT Module CMOS Battery AUDIO CODEC RoHS HDMI_SPDIF1 1 1 HD_AUDIO1 IR1 COM1 1 1 PCIE7 FRONT_1394 CHA_FAN1 ...CHA_FAN2 1 USB6_7 1 1 CIR1 USB4_5 1 Intel Z77 RSTBTN Front USB 3.0 USB2_3 1 Dr. Debug CLRCMOS1 PLED1 64Mb 1 BIOS 1 SPEAKER1 1 PWRBTN PLED PWRBTN 1 HDLED RESET PANEL1 30.5cm (12.0 in) 8 9 10 11 12 ...
.../EuP Ready PCI Express 3.0 CHA_FAN3 SLI/XFIRE_PWR1 PCIE1 X X Fast USB Fast LAN PCIE2 LAN PHY PCIE3 USB3_11_12 USB3_9_10 Super I/O PCIE4 Z77 Extreme9 XFast RAM PCIE5 MINI_PCIE1 PCIE6 WiFi+BT Module CMOS Battery AUDIO CODEC RoHS HDMI_SPDIF1 1 1 HD_AUDIO1 IR1 COM1 1 1 PCIE7 FRONT_1394 CHA_FAN1 ...CHA_FAN2 1 USB6_7 1 1 CIR1 USB4_5 1 Intel Z77 RSTBTN Front USB 3.0 USB2_3 1 Dr. Debug CLRCMOS1 PLED1 64Mb 1 BIOS 1 SPEAKER1 1 PWRBTN PLED PWRBTN 1 HDLED RESET PANEL1 30.5cm (12.0 in) 8 9 10 11 12 ...
User Manual
Page 45
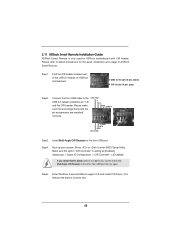
... (9-pin, black) CIR header (4-pin, gray) Step2. Please refer to below , pin 1-5) and the CIR header. Step1. Step5. Connect the front USB cable to enter BIOS Setup Utility. Press or to the USB_PWR USB 2.0 header (as below procedures for ASRock motherboard with CIR header.
... (9-pin, black) CIR header (4-pin, gray) Step2. Please refer to below , pin 1-5) and the CIR header. Step1. Step5. Connect the front USB cable to enter BIOS Setup Utility. Press or to the USB_PWR USB 2.0 header (as below procedures for ASRock motherboard with CIR header.
User Manual
Page 47
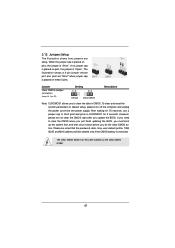
Jumper Clear CMOS Jumper (CLRCMOS1) (see p.14, No. 22) Setting Default Clear CMOS Description Note: CLRCMOS1 allows you update the BIOS. 2.12 Jumpers Setup The illustration shows how jumpers are "Short" when jumper cap is placed on pins, the jumper is "Short". The illustration shows a 3-pin ... cord from the power supply. If no jumper cap is removed. If you need to clear the CMOS when you just finish updating the BIOS, you must boot up the system first, and then shut it down before you do not clear the CMOS right after you to clear...
Jumper Clear CMOS Jumper (CLRCMOS1) (see p.14, No. 22) Setting Default Clear CMOS Description Note: CLRCMOS1 allows you update the BIOS. 2.12 Jumpers Setup The illustration shows how jumpers are "Short" when jumper cap is placed on pins, the jumper is "Short". The illustration shows a 3-pin ... cord from the power supply. If no jumper cap is removed. If you need to clear the CMOS when you just finish updating the BIOS, you must boot up the system first, and then shut it down before you do not clear the CMOS right after you to clear...
User Manual
Page 95
... item "UEFI:xxx" to be installed on a large size HDD (>2TB). Installing OS on a HDD Larger Than 2TB in AHCI Mode This motherboard adopts UEFI BIOS that allows Windows® OS to boot. 4. Normally it is the device which contains your Windows® installation files. Start Windows® installation. 95...
... item "UEFI:xxx" to be installed on a large size HDD (>2TB). Installing OS on a HDD Larger Than 2TB in AHCI Mode This motherboard adopts UEFI BIOS that allows Windows® OS to boot. 4. Normally it is the device which contains your Windows® installation files. Start Windows® installation. 95...
User Manual
Page 96
... array for you have copied in RAID Mode This motherboard adopts UEFI BIOS that allows Windows® OS to "Intel RAID Installation Guide" fi...B. Installing OS on a HDD Larger Than 2TB in the first step. 96 You can download the driver from ASRock motherboard support CD. (please copy the files under following directory: 32 bit: ..\i386\Win7_Vista_Intel.. 64-bit: ..\...above). 2. Copy Intel® RAID drivers into a USB flash disk OR copy the file from ASRock's website and unzip the file into a USB flash disk. Press to launch boot menu at system...
... array for you have copied in RAID Mode This motherboard adopts UEFI BIOS that allows Windows® OS to "Intel RAID Installation Guide" fi...B. Installing OS on a HDD Larger Than 2TB in the first step. 96 You can download the driver from ASRock motherboard support CD. (please copy the files under following directory: 32 bit: ..\i386\Win7_Vista_Intel.. 64-bit: ..\...above). 2. Copy Intel® RAID drivers into a USB flash disk OR copy the file from ASRock's website and unzip the file into a USB flash disk. Press to launch boot menu at system...
Quick Installation Guide
Page 2
... 3.0 CHA_FAN3 SLI/XFIRE_PWR1 PCIE1 X X Fast USB Fast LAN PCIE2 LAN PHY PCIE3 USB3_11_12 USB3_9_10 Super I/O PCIE4 Z77 Extreme9 XFast RAM PCIE5 MINI_PCIE1 PCIE6 WiFi+BT Module CMOS Battery AUDIO CODEC RoHS HDMI_SPDIF1 1 1 HD_AUDIO1 IR1 COM1 1... 1 PCIE7 FRONT_1394 CHA_FAN1 CHA_FAN2 1 USB6_7 1 1 CIR1 USB4_5 1 Intel Z77 RSTBTN Front USB 3.0 USB2_3 1 Dr. Debug CLRCMOS1 PLED1 64Mb 1 BIOS 1 SPEAKER1 1 PWRBTN PLED PWRBTN 1 HDLED RESET PANEL1 30.5cm (12.0 in) 8 ... Dr. Debug 46 Chassis Fan Connector (CHA_FAN3) English 2 ASRock Z77 Extreme9 Motherboard
... 3.0 CHA_FAN3 SLI/XFIRE_PWR1 PCIE1 X X Fast USB Fast LAN PCIE2 LAN PHY PCIE3 USB3_11_12 USB3_9_10 Super I/O PCIE4 Z77 Extreme9 XFast RAM PCIE5 MINI_PCIE1 PCIE6 WiFi+BT Module CMOS Battery AUDIO CODEC RoHS HDMI_SPDIF1 1 1 HD_AUDIO1 IR1 COM1 1... 1 PCIE7 FRONT_1394 CHA_FAN1 CHA_FAN2 1 USB6_7 1 1 CIR1 USB4_5 1 Intel Z77 RSTBTN Front USB 3.0 USB2_3 1 Dr. Debug CLRCMOS1 PLED1 64Mb 1 BIOS 1 SPEAKER1 1 PWRBTN PLED PWRBTN 1 HDLED RESET PANEL1 30.5cm (12.0 in) 8 ... Dr. Debug 46 Chassis Fan Connector (CHA_FAN3) English 2 ASRock Z77 Extreme9 Motherboard
Quick Installation Guide
Page 7
... better performance in Windows® 7 / 7 64-bit / VistaTM / VistaTM 64bit, it is recommended to set the BIOS option in Storage Configuration to the "User Manual" in , 30.5 cm x 24.4 cm) ASRock Z77 Extreme9 Quick Installation Guide ASRock Z77 Extreme9 Support CD 6 x Serial ATA (SATA) Data Cables (Optional) 2 x Serial ATA (SATA) HDD Power Cables (Optional) 1 x I/O Panel...
... better performance in Windows® 7 / 7 64-bit / VistaTM / VistaTM 64bit, it is recommended to set the BIOS option in Storage Configuration to the "User Manual" in , 30.5 cm x 24.4 cm) ASRock Z77 Extreme9 Quick Installation Guide ASRock Z77 Extreme9 Support CD 6 x Serial ATA (SATA) Data Cables (Optional) 2 x Serial ATA (SATA) HDD Power Cables (Optional) 1 x I/O Panel...
Quick Installation Guide
Page 10
... GUI support - SLI/XFire power connector - Supports "Plug and Play" - Supports jumperfree - ACPI 1.1 Compliance Wake Up Events - SMBIOS 2.3.1 Support English 10 ASRock Z77 Extreme9 Motherboard Front panel audio connector - 3 x USB 2.0 headers (support 6 USB 2.0 ports) - 2 x USB 3.0 headers (support 4 USB 3.0 ports) ... Switch with LED - 1 x Power Switch with LED - 1 x Reset Switch with LED - 64Mb AMI UEFI Legal BIOS with eSATA3 port) - 4 x Rear USB 3.0 ports by Intel® Z77, support USB 1.0/2.0/3.0 up to 5Gb/s - 4 x Rear USB 3.0 ports by Etron EJ188, support USB 1.0/2.0/3.0 up to...
... GUI support - SLI/XFire power connector - Supports "Plug and Play" - Supports jumperfree - ACPI 1.1 Compliance Wake Up Events - SMBIOS 2.3.1 Support English 10 ASRock Z77 Extreme9 Motherboard Front panel audio connector - 3 x USB 2.0 headers (support 6 USB 2.0 ports) - 2 x USB 3.0 headers (support 4 USB 3.0 ports) ... Switch with LED - 1 x Power Switch with LED - 1 x Reset Switch with LED - 64Mb AMI UEFI Legal BIOS with eSATA3 port) - 4 x Rear USB 3.0 ports by Intel® Z77, support USB 1.0/2.0/3.0 up to 5Gb/s - 4 x Rear USB 3.0 ports by Etron EJ188, support USB 1.0/2.0/3.0 up to...
Quick Installation Guide
Page 11
... / 7 64-bit / VistaTM / VistaTM 64-bit / XP / XP 64-bit compliant (see CAUTION 15) - - OEM Unique Feature - ASRock Crashless BIOS (see CAUTION 22) Certifications - Lucid Virtu Universal MVP (see CAUTION 8) - Hybrid Booster: - Voltage Monitoring: +12V, +5V, ..., please visit our website: http://www.asrock.com English 11 ASRock Z77 Extreme9 Motherboard ASRock SmartView (see CAUTION 13) - ASRock XFast LAN (see CAUTION 11) - ASRock XFast RAM (see CAUTION 17) - ASRock Internet Flash (see CAUTION 14) - ASRock Dehumidifier Function (see CAUTION 20...
... / 7 64-bit / VistaTM / VistaTM 64-bit / XP / XP 64-bit compliant (see CAUTION 15) - - OEM Unique Feature - ASRock Crashless BIOS (see CAUTION 22) Certifications - Lucid Virtu Universal MVP (see CAUTION 8) - Hybrid Booster: - Voltage Monitoring: +12V, +5V, ..., please visit our website: http://www.asrock.com English 11 ASRock Z77 Extreme9 Motherboard ASRock SmartView (see CAUTION 13) - ASRock XFast LAN (see CAUTION 11) - ASRock XFast RAM (see CAUTION 17) - ASRock Internet Flash (see CAUTION 14) - ASRock Dehumidifier Function (see CAUTION 20...


