
Intel Rapid Storage Guide
Page 1
... new user interface makes creating and managing your storage simple and intuitive. When using one or multiple hard drives, users can take advantage of faster boot times and data reads. Starting with RAID 1 can take advantage of enhanced performance and lower power consumption. Valuable digital memories are protected against data loss...
... new user interface makes creating and managing your storage simple and intuitive. When using one or multiple hard drives, users can take advantage of faster boot times and data reads. Starting with RAID 1 can take advantage of enhanced performance and lower power consumption. Valuable digital memories are protected against data loss...
Intel Rapid Storage Guide
Page 15
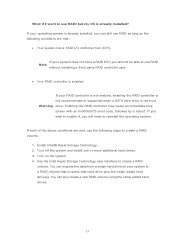
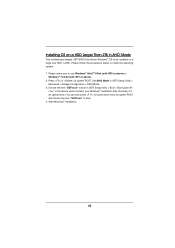
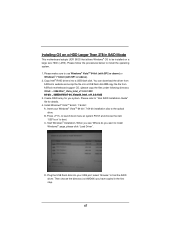
If your system does not have a RAID ICH, you will need to use RAID but my OS is the boot Warning drive. You can migrate the data from a single hard drive on the system. 4. If your system to create a RAID volume. Enabling the RAID controller ...
If your system does not have a RAID ICH, you will need to use RAID but my OS is the boot Warning drive. You can migrate the data from a single hard drive on the system. 4. If your system to create a RAID volume. Enabling the RAID controller ...

User Manual
Page 4
... Connect Technology 57 3.4.7 Super IO Configuration 58 3.4.8 ACPI Configuration 59 3.4.9 USB Configuration 60 3.5 Hardware Health Event Monitoring Screen 61 3.6 Boot Screen 62 3.7 Security Screen 63 3.8 Exit Screen 64 4 Software Support 65 4.1 Install Operating System 65 4.2 Support CD Information 65 4.2.1 Running Support CD 65 4.2.2 Drivers Menu...
... Connect Technology 57 3.4.7 Super IO Configuration 58 3.4.8 ACPI Configuration 59 3.4.9 USB Configuration 60 3.5 Hardware Health Event Monitoring Screen 61 3.6 Boot Screen 62 3.7 Security Screen 63 3.8 Exit Screen 64 4 Software Support 65 4.1 Install Operating System 65 4.2 Support CD Information 65 4.2.1 Running Support CD 65 4.2.2 Drivers Menu...
User Manual
Page 8
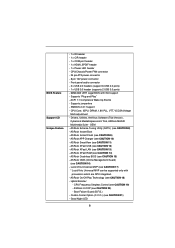
... port header - 1 x HDMI_SPDIF header - 1 x Power LED header - ACPI 1.1 Compliance Wake Up Events - ASRock Instant Flash (see CAUTION 18) - ASRock On/Off Play Technology (see CAUTION 9) - Boot Failure Guard (B.F.G.) - Front panel audio connector - 3 x USB 2.0 headers (support 6 USB 2.0 ports) - ...ASRock MAGIX Multimedia Suite - OEM - Good Night LED 8 ASRock Crashless BIOS (see CAUTION 16) - Hybrid Booster: - ASRock XFast LAN (see CAUTION 14) - CPU/Chassis/Power FAN connector - 24 pin ATX power connector - 8 pin 12V power connector - ASRock Instant Boot - ASRock...
... port header - 1 x HDMI_SPDIF header - 1 x Power LED header - ACPI 1.1 Compliance Wake Up Events - ASRock Instant Flash (see CAUTION 18) - ASRock On/Off Play Technology (see CAUTION 9) - Boot Failure Guard (B.F.G.) - Front panel audio connector - 3 x USB 2.0 headers (support 6 USB 2.0 ports) - ...ASRock MAGIX Multimedia Suite - OEM - Good Night LED 8 ASRock Crashless BIOS (see CAUTION 16) - Hybrid Booster: - ASRock XFast LAN (see CAUTION 14) - CPU/Chassis/Power FAN connector - 24 pin ATX power connector - 8 pin 12V power connector - ASRock Instant Boot - ASRock...

User Manual
Page 25
Please check AMD website for details. Step 4. Install the VGA card drivers to your system, and restart your computer and boot into OS. Please check Microsoft website for ATITM driver updates. 2.7.2 Driver Installation and Setup Step 1. For Windows® XP OS: A. For Windows® 7 / VistaTM OS: ...
Please check AMD website for details. Step 4. Install the VGA card drivers to your system, and restart your computer and boot into OS. Please check Microsoft website for ATITM driver updates. 2.7.2 Driver Installation and Setup Step 1. For Windows® XP OS: A. For Windows® 7 / VistaTM OS: ...

User Manual
Page 27
..., you haven't installed the onboard VGA driver yet, please install the onboard VGA driver from our support CD to your system and restart your system boots.
..., you haven't installed the onboard VGA driver yet, please install the onboard VGA driver from our support CD to your system and restart your system boots.

User Manual
Page 28
... is no need to page 22 for proper expansion card installation procedures. 2. C. Repeat steps C through E for the second monitor. Please refer to install them again. 5. Boot your system.
... is no need to page 22 for proper expansion card installation procedures. 2. C. Repeat steps C through E for the second monitor. Please refer to install them again. 5. Boot your system.

User Manual
Page 30
...supported by some of the chassis on the rear panel. Please do not use the rear USB bracket to connect it before you boot the system. * ASRock Smart Remote is enabled, the other front USB port. 3 CIR sensors in different angles 1. Multi-Angle CIR Receiver can support ... wire assignments and the PP+ GND DUMMY pin assignments are matched correctly. 1 23 45 Step3. 2.9 ASRock Smart Remote Installation Guide ASRock Smart Remote is used for ASRock motherboard with most of ASRock motherboards. Connect the front USB cable to below , pin 1-5) and the CIR header. Please refer to...
...supported by some of the chassis on the rear panel. Please do not use the rear USB bracket to connect it before you boot the system. * ASRock Smart Remote is enabled, the other front USB port. 3 CIR sensors in different angles 1. Multi-Angle CIR Receiver can support ... wire assignments and the PP+ GND DUMMY pin assignments are matched correctly. 1 23 45 Step3. 2.9 ASRock Smart Remote Installation Guide ASRock Smart Remote is used for ASRock motherboard with most of ASRock motherboards. Connect the front USB cable to below , pin 1-5) and the CIR header. Please refer to...

User Manual
Page 31
... pin2 are setup. After waiting for 15 seconds, use a jumper cap to clear the CMOS when you just finish updating the BIOS, you must boot up the system first, and then shut it down before you need to short pin2 and pin3 on CLRCMOS1 for 5 seconds. When the jumper...
... pin2 are setup. After waiting for 15 seconds, use a jumper cap to clear the CMOS when you just finish updating the BIOS, you must boot up the system first, and then shut it down before you need to short pin2 and pin3 on CLRCMOS1 for 5 seconds. When the jumper...
User Manual
Page 43
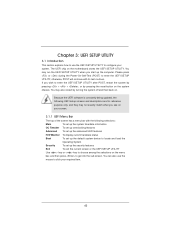
... system time/date information OC Tweaker To set up overclocking features Advanced To set up the advanced UEFI features H/W Monitor To display current hardware status Boot To set up the default system device to locate and load the Operating System Security To set up the computer. You may run the UEFI...
... system time/date information OC Tweaker To set up overclocking features Advanced To set up the advanced UEFI features H/W Monitor To display current hardware status Boot To set up the default system device to locate and load the Operating System Security To set up the computer. You may run the UEFI...

User Manual
Page 48
... this to select CPU Voltage. VTT Voltage Use this item to select VTT Voltage. The default is [Auto]. The default value is [Auto]. MRC Fast Boot Use this to enable or disable MRC Fast...
... this to select CPU Voltage. VTT Voltage Use this item to select VTT Voltage. The default is [Auto]. The default value is [Auto]. MRC Fast Boot Use this to enable or disable MRC Fast...

User Manual
Page 53
...]. VT-d Use this to enable or disable Render Standby by Internal Graphics Device. If you wish to select [Onboard], [PCI] or [PCI Express] as the boot graphic adapter priority. 3.4.2 North Bridge Configuration Primary Graphics Adapter This allows you to install a PCI Express card under Windows® XP / VistaTM OS, please disable...
...]. VT-d Use this to enable or disable Render Standby by Internal Graphics Device. If you wish to select [Onboard], [PCI] or [PCI Express] as the boot graphic adapter priority. 3.4.2 North Bridge Configuration Primary Graphics Adapter This allows you to install a PCI Express card under Windows® XP / VistaTM OS, please disable...

User Manual
Page 54
... On/Off Play Technology. Onboard HDMI HD Audio This allows you to enable Deep Sleep, please disable On/Off Play first. If you to boot up when the power recovers. On/Off Play Use this item to set the power state after an unexpected AC/power loss. If [Power On...
... On/Off Play Technology. Onboard HDMI HD Audio This allows you to enable Deep Sleep, please disable On/Off Play first. If you to boot up when the power recovers. On/Off Play Use this item to set the power state after an unexpected AC/power loss. If [Power On...

User Manual
Page 62
...you enable the option "Full Screen Logo" but you to see the AddOn ROM information when the system boots, please select [Enabled]. The default value is set to enable or disable the Boot From Onboard LAN feature. PCI ROM Priority Use this item to [On], it will automatically activate the... or disable OEM Logo. Configuration options: [Enabled] and [Disabled]. AddOn ROM Display Use this item to adjust AddOn ROM Display. 3.6 Boot Screen In this section, it will display the available devices on your system for setup activation key. 65535(0XFFFF) means indefinite waiting.
...you enable the option "Full Screen Logo" but you to see the AddOn ROM information when the system boots, please select [Enabled]. The default value is set to enable or disable the Boot From Onboard LAN feature. PCI ROM Priority Use this item to [On], it will automatically activate the... or disable OEM Logo. Configuration options: [Enabled] and [Disabled]. AddOn ROM Display Use this item to adjust AddOn ROM Display. 3.6 Boot Screen In this section, it will display the available devices on your system for setup activation key. 65535(0XFFFF) means indefinite waiting.
User Manual
Page 66
... is the device which contains your Windows® installation files. Choose the item "UEFI:xxx" to boot in UEFI Setup Utility > Boot > Boot Option #1. ("xxx" is an optical drive.) You can also press to launch boot menu at system POST. Press or at system POST and choose the item "UEFI:xxx" to install... use Windows® VistaTM 64-bit (with SP2 or above) or Windows® 7 64-bit (with SP1 or above). 2. Please follow the procedures below to boot. 4.
... is the device which contains your Windows® installation files. Choose the item "UEFI:xxx" to boot in UEFI Setup Utility > Boot > Boot Option #1. ("xxx" is an optical drive.) You can also press to launch boot menu at system POST. Press or at system POST and choose the item "UEFI:xxx" to install... use Windows® VistaTM 64-bit (with SP2 or above) or Windows® 7 64-bit (with SP1 or above). 2. Please follow the procedures below to boot. 4.
User Manual
Page 67
...on a large size HDD (>2TB). Insert your USB port; Plug the USB flash disk into a USB flash disk. B. Press to launch boot menu at system POST and choose the item "UEFI:xxx" to install the operating system. 1. page, please click "Load Driver". Copy Intel® RAID... 4. Please make sure to find the RAID driver. You can download the driver from ASRock's website and unzip the file into a USB flash disk OR copy the file from ASRock motherboard support CD. (please copy the files under following directory: 32 bit: ..\i386\...
...on a large size HDD (>2TB). Insert your USB port; Plug the USB flash disk into a USB flash disk. B. Press to launch boot menu at system POST and choose the item "UEFI:xxx" to install the operating system. 1. page, please click "Load Driver". Copy Intel® RAID... 4. Please make sure to find the RAID driver. You can download the driver from ASRock's website and unzip the file into a USB flash disk OR copy the file from ASRock motherboard support CD. (please copy the files under following directory: 32 bit: ..\i386\...

User Manual
Page 68
.... Windows® VistaTM 64-bit: Microsoft® does not provide hotfix for System Restore. Then press "Enter". Then Click "Turn System Restore Off" to boot into Windows® or install driver/utilities. If you will need to fix this problem. Type "systempropertiesprotection" in the Start Menu. De-select Local Disks...
.... Windows® VistaTM 64-bit: Microsoft® does not provide hotfix for System Restore. Then press "Enter". Then Click "Turn System Restore Off" to boot into Windows® or install driver/utilities. If you will need to fix this problem. Type "systempropertiesprotection" in the Start Menu. De-select Local Disks...

Quick Installation Guide
Page 8
...24 pin ATX power connector - 8 pin 12V power connector - Supports jumperfree - ASRock Crashless BIOS (see CAUTION 21) - Boot Failure Guard (B.F.G.) - English BIOS Feature Support CD Unique Feature 8 - 1 x ...ASRock MAGIX Multimedia Suite - OEM - ASRock Extreme Tuning Utility (AXTU) (see CAUTION 10) - ASRock Instant Boot - ASRock APP Charger (see CAUTION 8) - ASRock OMG (Online Management Guard) (see CAUTION 18) - ASRock On/Off Play Technology (see CAUTION 16) - CPU Frequency Stepless Control (see CAUTION 20) - ASRock U-COP (see CAUTION 19) - Good Night LED ASRock Z75 Pro3...
...24 pin ATX power connector - 8 pin 12V power connector - Supports jumperfree - ASRock Crashless BIOS (see CAUTION 21) - Boot Failure Guard (B.F.G.) - English BIOS Feature Support CD Unique Feature 8 - 1 x ...ASRock MAGIX Multimedia Suite - OEM - ASRock Extreme Tuning Utility (AXTU) (see CAUTION 10) - ASRock Instant Boot - ASRock APP Charger (see CAUTION 8) - ASRock OMG (Online Management Guard) (see CAUTION 18) - ASRock On/Off Play Technology (see CAUTION 16) - CPU Frequency Stepless Control (see CAUTION 20) - ASRock U-COP (see CAUTION 19) - Good Night LED ASRock Z75 Pro3...

Quick Installation Guide
Page 22
...taskbar. Install the required drivers to be installed (If you have Windows® XP Service Pack 2 or higher installed in your computer and boot into OS. 2.7.2 Driver Installation and Setup Step 1. Step 4. Step 5. ATITM recommends Windows® XP Service Pack 2 or higher to... check AMD website for ATITM driver updates. Click "View", select "CrossFireXTM", and then check the item "Enable CrossFireXTM". English 22 ASRock Z75 Pro3 Motherboard Please check AMD website for details. Step 3. Then you have Microsoft .NET Framework installed prior to download it again): http://...
...taskbar. Install the required drivers to be installed (If you have Windows® XP Service Pack 2 or higher installed in your computer and boot into OS. 2.7.2 Driver Installation and Setup Step 1. Step 4. Step 5. ATITM recommends Windows® XP Service Pack 2 or higher to... check AMD website for ATITM driver updates. Click "View", select "CrossFireXTM", and then check the item "Enable CrossFireXTM". English 22 ASRock Z75 Pro3 Motherboard Please check AMD website for details. Step 3. Then you have Microsoft .NET Framework installed prior to download it again): http://...

Quick Installation Guide
Page 24
... monitor cable to the HDMI port on VGA cards to your system and restart your computer. 24 ASRock Z75 Pro3 Motherboard English This motherboard also provides independent display controllers for D-Sub and HDMI to your system boots. D-Sub port HDMI port 2. If you haven't installed the onboard VGA driver yet, please install the onboard...
... monitor cable to the HDMI port on VGA cards to your system and restart your computer. 24 ASRock Z75 Pro3 Motherboard English This motherboard also provides independent display controllers for D-Sub and HDMI to your system boots. D-Sub port HDMI port 2. If you haven't installed the onboard VGA driver yet, please install the onboard...

