
User Manual
Page 1
All rights reserved. 1 Z68M-ITX/HT User Manual Version 1.0 Published July 2011 Copyright©2011 ASRock INC.
All rights reserved. 1 Z68M-ITX/HT User Manual Version 1.0 Published July 2011 Copyright©2011 ASRock INC.
User Manual
Page 2
... cause harmful interference, and (2) this device must accept any defect or error in advance. Copyright Notice: No part of this manual may be registered trademarks or copyrights of their respective companies, and are furnished for informational use only and subject to change without notice.... When you discard the Lithium battery in California, USA, please follow the related regulations in the manual or product. With respect to the contents of this manual, ASRock does not provide warranty of any kind, either expressed or implied, including but not limited to the following two ...
... cause harmful interference, and (2) this device must accept any defect or error in advance. Copyright Notice: No part of this manual may be registered trademarks or copyrights of their respective companies, and are furnished for informational use only and subject to change without notice.... When you discard the Lithium battery in California, USA, please follow the related regulations in the manual or product. With respect to the contents of this manual, ASRock does not provide warranty of any kind, either expressed or implied, including but not limited to the following two ...
User Manual
Page 5
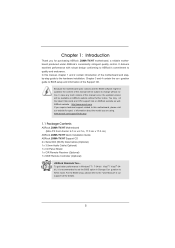
... the BIOS option in , 17.0 cm x 17.0 cm) ASRock Z68M-ITX/HT Quick Installation Guide ASRock Z68M-ITX/HT Support CD 2 x Serial ATA (SATA) Data Cables (Optional) 1 x 3.5mm Audio Cable (Optional) 1 x I/O Panel Shield 1 x CIR Remote Receiver (Optional) 1 x MCE Remote Controller (Optional) ASRock Reminds You... In this manual will be available on ASRock website as well. Chapter 3 and 4 contain the con guration...
... the BIOS option in , 17.0 cm x 17.0 cm) ASRock Z68M-ITX/HT Quick Installation Guide ASRock Z68M-ITX/HT Support CD 2 x Serial ATA (SATA) Data Cables (Optional) 1 x 3.5mm Audio Cable (Optional) 1 x I/O Panel Shield 1 x CIR Remote Receiver (Optional) 1 x MCE Remote Controller (Optional) ASRock Reminds You... In this manual will be available on ASRock website as well. Chapter 3 and 4 contain the con guration...
User Manual
Page 18
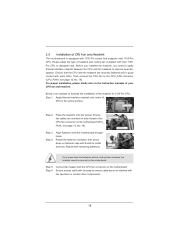
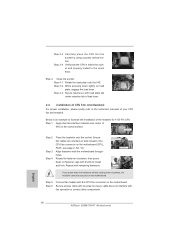
... Fastener slots pointing straight out Press Down (4 Places) If you need to spray thermal interface material between the CPU and the heatsink to the instruction manuals of IHS on fastener caps with fan operation or contact other . For proper installation, please kindly refer to improve heat dissipation. Step 1. Step...
... Fastener slots pointing straight out Press Down (4 Places) If you need to spray thermal interface material between the CPU and the heatsink to the instruction manuals of IHS on fastener caps with fan operation or contact other . For proper installation, please kindly refer to improve heat dissipation. Step 1. Step...
User Manual
Page 27
... the wire assignments and the pin assign-ments are for AC'97 audio panel. The LED is off when the system is in our manual and chassis manual to OUT2_L. If you use AC'97 audio panel, please install it to turn off (S5). Select "Recorder". Press the reset switch to restart...
... the wire assignments and the pin assign-ments are for AC'97 audio panel. The LED is off when the system is in our manual and chassis manual to OUT2_L. If you use AC'97 audio panel, please install it to turn off (S5). Select "Recorder". Press the reset switch to restart...
User Manual
Page 31
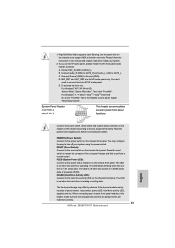
.../ SATAII / SATA3 HDD 1x4-pin conventional power connector (White) connect to reduce the risk of our motherboard is available on our website: www.asrock.com 2. Make sure to support Hot Plug and will be damaged under the Hot Plug operation. 3. Without SATA 15-pin power connector interface, the... conventional power connector interface is de nitely not able to use the SATA power cable & data cable, which are from your dealer or HDD user manual. The SATA / SATAII / SATA3 HDD, which supports SATA / SATAII / SATA3 HDD Hot Plug. * The SATA / SATAII / SATA3 Hot Plug feature might not ...
.../ SATAII / SATA3 HDD 1x4-pin conventional power connector (White) connect to reduce the risk of our motherboard is available on our website: www.asrock.com 2. Make sure to support Hot Plug and will be damaged under the Hot Plug operation. 3. Without SATA 15-pin power connector interface, the... conventional power connector interface is de nitely not able to use the SATA power cable & data cable, which are from your dealer or HDD user manual. The SATA / SATAII / SATA3 HDD, which supports SATA / SATAII / SATA3 HDD Hot Plug. * The SATA / SATAII / SATA3 Hot Plug feature might not ...
User Manual
Page 37
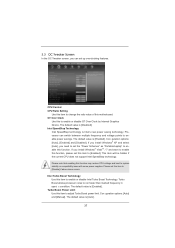
... Power Limit Use this motherboard. This item will be hidden if the current CPU does not support Intel SpeedStep technology. Con guration options: [Auto] and [Manual]. The default value is [Enabled]. CPU Control CPU Ratio Setting Use this item to change the ratio value of this item to run faster than...
... Power Limit Use this motherboard. This item will be hidden if the current CPU does not support Intel SpeedStep technology. Con guration options: [Auto] and [Manual]. The default value is [Enabled]. CPU Control CPU Ratio Setting Use this item to change the ratio value of this item to run faster than...
User Manual
Page 38
... is [Auto]. Row Precharge Time (tRP) Use this item to change Write Recovery Time (tWR) Auto/Manual setting. Write Recovery Time (tWR) Use this item to change Row Precharge Time (tRP) Auto/Manual setting. The default is in Turbo mode. The default value is [Auto]. The default is [Auto]. ... to Read Delay (tWTR) Use this item to change RAS to change Four Activate Window (tFAW) Auto/Manual setting. Four Activate Window (tFAW) Use this item to change Command Rate (CR) Auto/Manual setting. Max: 2N. RAS to RAS Delay (tRRD) Use this item to change Read to load XMP...
... is [Auto]. Row Precharge Time (tRP) Use this item to change Write Recovery Time (tWR) Auto/Manual setting. Write Recovery Time (tWR) Use this item to change Row Precharge Time (tRP) Auto/Manual setting. The default is in Turbo mode. The default value is [Auto]. The default is [Auto]. ... to Read Delay (tWTR) Use this item to change RAS to change Four Activate Window (tFAW) Auto/Manual setting. Four Activate Window (tFAW) Use this item to change Command Rate (CR) Auto/Manual setting. Max: 2N. RAS to RAS Delay (tRRD) Use this item to change Read to load XMP...
Quick Installation Guide
Page 5
... quality control. This Quick Installation Guide contains introduction of the motherboard can be available on ASRock website as well. For the BIOS setup, please refer to the "User Manual" in , 17.0 cm x 17.0 cm) ASRock Z68M-ITX/HT Quick Installation Guide ASRock Z68M-ITX/HT Support CD 2 x Serial ATA (SATA) Data Cables (Optional) 1 x 3.5mm Audio Cable (Optional) 1 x I/O Panel Shield 1 x CIR...
... quality control. This Quick Installation Guide contains introduction of the motherboard can be available on ASRock website as well. For the BIOS setup, please refer to the "User Manual" in , 17.0 cm x 17.0 cm) ASRock Z68M-ITX/HT Quick Installation Guide ASRock Z68M-ITX/HT Support CD 2 x Serial ATA (SATA) Data Cables (Optional) 1 x 3.5mm Audio Cable (Optional) 1 x I/O Panel Shield 1 x CIR...
Quick Installation Guide
Page 9
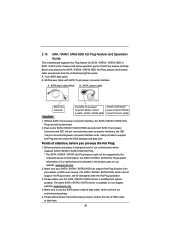
.... 2. In OC DNA, you are idle without sacrificing computing performance. In IES (Intelligent Energy Saver), the voltage regulator can reduce the number of "User Manual" in a user-friendly interface, which is no such limitation. 4. About the setting of "Hyper Threading Technology", please check page 41 of output phases to..., DVI-D and HDMI monitors cannot be less than 4GB for the reservation for proper connection. 8. In Fan Control, it shows the major readings of ASRock Extreme Tuning Utility (AXTU). ASRock website: http://www.asrock.com 9 ASRock Z68M-ITX/HT Motherboard English
.... 2. In OC DNA, you are idle without sacrificing computing performance. In IES (Intelligent Energy Saver), the voltage regulator can reduce the number of "User Manual" in a user-friendly interface, which is no such limitation. 4. About the setting of "Hyper Threading Technology", please check page 41 of output phases to..., DVI-D and HDMI monitors cannot be less than 4GB for the reservation for proper connection. 8. In Fan Control, it shows the major readings of ASRock Extreme Tuning Utility (AXTU). ASRock website: http://www.asrock.com 9 ASRock Z68M-ITX/HT Motherboard English
Quick Installation Guide
Page 14
... CPU is an example to install and lock. Step 4-2. Step 4. Secure excess cable with tie-wrap to the orient keys. Step 4-3. Step 3-3. Step 3-4. English 14 ASRock Z68M-ITX/HT Motherboard Carefully place the CPU into the socket by using a purely vertical motion. Close the socket: Step 4-1. Below is within the socket and properly mated... Press Down (4 Places) If you press down on the motherboard. Secure load lever with the motherboard throughholes. Fan cables on side closest to the instruction manuals of your CPU fan and heatsink.
... CPU is an example to install and lock. Step 4-2. Step 4. Secure excess cable with tie-wrap to the orient keys. Step 4-3. Step 3-3. Step 3-4. English 14 ASRock Z68M-ITX/HT Motherboard Carefully place the CPU into the socket by using a purely vertical motion. Close the socket: Step 4-1. Below is within the socket and properly mated... Press Down (4 Places) If you press down on the motherboard. Secure load lever with the motherboard throughholes. Fan cables on side closest to the instruction manuals of your CPU fan and heatsink.
Quick Installation Guide
Page 23
... the power switch on the chassis front panel. MIC_RET and OUT_RET are matched correctly. 23 ASRock Z68M-ITX/HT Motherboard English For Windows® 7 / 7 64-bit / VistaTM / VistaTM 64-bit OS: Go to the "FrontMic" Tab in our manual and chassis manual to install your system. 2. Adjust "Recording Volume". The LED keeps blinking when the system...
... the power switch on the chassis front panel. MIC_RET and OUT_RET are matched correctly. 23 ASRock Z68M-ITX/HT Motherboard English For Windows® 7 / 7 64-bit / VistaTM / VistaTM 64-bit OS: Go to the "FrontMic" Tab in our manual and chassis manual to install your system. 2. Adjust "Recording Volume". The LED keeps blinking when the system...
Quick Installation Guide
Page 27
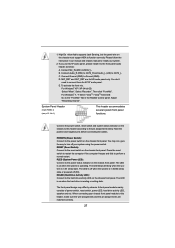
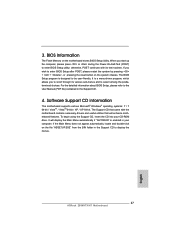
For the detailed information about BIOS Setup, please refer to the User Manual (PDF file) contained in your CD-ROM drive. Software Support CD information This motherboard supports various Microsoft® Windows® operating systems: 7 / 7 64-bit / ... with its various sub-menus and to scroll through its test routines. It will enhance motherboard features. It is designed to display the menus. 27 ASRock Z68M-ITX/HT Motherboard English 3. BIOS Information The Flash Memory on the file "ASSETUP.EXE" from the BIN folder in the Support CD to be user-friendly...
For the detailed information about BIOS Setup, please refer to the User Manual (PDF file) contained in your CD-ROM drive. Software Support CD information This motherboard supports various Microsoft® Windows® operating systems: 7 / 7 64-bit / ... with its various sub-menus and to scroll through its test routines. It will enhance motherboard features. It is designed to display the menus. 27 ASRock Z68M-ITX/HT Motherboard English 3. BIOS Information The Flash Memory on the file "ASSETUP.EXE" from the BIN folder in the Support CD to be user-friendly...

RAID Installation Guide
Page 2
.... Guide to the Intel southbridge chipset that your motherboard adopts. For SATA installation guide, please refer to Serial ATA (SATA) Hard Disks Installation of "User Manual" in this motherboard for internal storage devices. This section will guide you how to create RAID on this guide carefully according to SATA Hard Disks...
.... Guide to the Intel southbridge chipset that your motherboard adopts. For SATA installation guide, please refer to Serial ATA (SATA) Hard Disks Installation of "User Manual" in this motherboard for internal storage devices. This section will guide you how to create RAID on this guide carefully according to SATA Hard Disks...
Lucid Virtu Installation Guide
Page 4
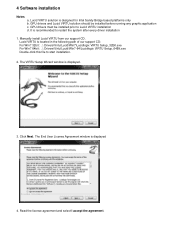
...\Lucid\Win7\Lucidlogix VIRTU Setup_32Bit.exe For Win7 64bit : ..\ Drivers\Virtu\Lucid\Win7-64\Lucidlogix VIRTU Setup_64Bit.exe Double-click this file to start installation. 2. Manually install Lucid VIRTU from our support CD. Lucid VIRTU is designed for Intel Sandy Bridge based platforms only b. Click Next. The End User License Agreement...
...\Lucid\Win7\Lucidlogix VIRTU Setup_32Bit.exe For Win7 64bit : ..\ Drivers\Virtu\Lucid\Win7-64\Lucidlogix VIRTU Setup_64Bit.exe Double-click this file to start installation. 2. Manually install Lucid VIRTU from our support CD. Lucid VIRTU is designed for Intel Sandy Bridge based platforms only b. Click Next. The End User License Agreement...
Lucid Virtu Installation Guide
Page 7
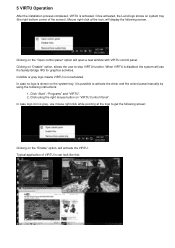
... case no logo is disabled, the system will activate the VIRTU. In case logo icon is possible to activate the driver and the control panel manually by using the right mouse button on the "Open control panel" option will display the following instructions: 1. Once activated, the Lucid logo shows on the...
... case no logo is disabled, the system will activate the VIRTU. In case logo icon is possible to activate the driver and the control panel manually by using the right mouse button on the "Open control panel" option will display the following instructions: 1. Once activated, the Lucid logo shows on the...
Lucid Virtu Installation Guide
Page 9
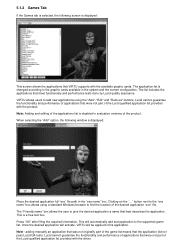
... done by Lucid quality assurance. Lucid cannot guarantee the functionality and performance of applications that were not part of the desired application "exe" file. adding manually an application that was not originally part of the Lucid qualified application list provided with the product. When selecting the "Add" option, the following screen...
... done by Lucid quality assurance. Lucid cannot guarantee the functionality and performance of applications that were not part of the desired application "exe" file. adding manually an application that was not originally part of the Lucid qualified application list provided with the product. When selecting the "Add" option, the following screen...
