
Intel Rapid Storage Guide
Page 12
... list of hard drives by using the up or down arrow keys to select the RAID level and press Enter. 4. Press Enter to enter the BIOS Setup program after the Power-On-Self-Test (POST) memory test begins. 2. When finished press Enter. 12 Click the Storage Configuration menu. 4....RAID volume (F6 install method) In order to install an operating system onto a RAID volume, the RAID option must be enabled in the system BIOS. 1. When the Intel Rapid Storage Technology option ROM status screen appears during operating system setup. The F6 installation method is not required for Microsoft...
... list of hard drives by using the up or down arrow keys to select the RAID level and press Enter. 4. Press Enter to enter the BIOS Setup program after the Power-On-Self-Test (POST) memory test begins. 2. When finished press Enter. 12 Click the Storage Configuration menu. 4....RAID volume (F6 install method) In order to install an operating system onto a RAID volume, the RAID option must be enabled in the system BIOS. 1. When the Intel Rapid Storage Technology option ROM status screen appears during operating system setup. The F6 installation method is not required for Microsoft...

User Manual
Page 5
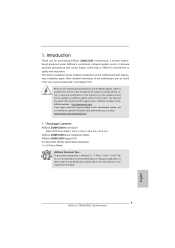
...; 7 / 7 64-bit / VistaTM / VistaTM 64bit, it is recommended to set the BIOS option in , 24.4 cm x 21.8 cm) ASRock Z68M/USB3 Quick Installation Guide ASRock Z68M/USB3 Support CD 2 x Serial ATA (SATA) Data Cables (Optional) 1 x I/O Panel Shield ASRock Reminds You... www.asrock.com/support/index.asp 1.1 Package Contents ASRock Z68M/USB3 Motherboard (Micro ATX Form Factor: 9.6-in x 8.6-in Storage Configuration...
...; 7 / 7 64-bit / VistaTM / VistaTM 64bit, it is recommended to set the BIOS option in , 24.4 cm x 21.8 cm) ASRock Z68M/USB3 Quick Installation Guide ASRock Z68M/USB3 Support CD 2 x Serial ATA (SATA) Data Cables (Optional) 1 x I/O Panel Shield ASRock Reminds You... www.asrock.com/support/index.asp 1.1 Package Contents ASRock Z68M/USB3 Motherboard (Micro ATX Form Factor: 9.6-in x 8.6-in Storage Configuration...
User Manual
Page 9
... involved with 64-bit CPU, there is no such limitation. 4. For Windows® OS with overclocking, including adjusting the setting in the BIOS, applying Untied Overclocking Technology, or using the third-party overclocking tools. In IES (Intelligent Energy Saver), the voltage regulator can load the OC...-one tool to the components and devices of the three monitors only. xvYCC and Deep Color are allowed to get the same OC settings. ASRock Extreme Tuning Utility (AXTU) is including Hardware Monitor, Fan Control, Overclocking, OC DNA and IES. Overclocking may be done at the same ...
... involved with 64-bit CPU, there is no such limitation. 4. For Windows® OS with overclocking, including adjusting the setting in the BIOS, applying Untied Overclocking Technology, or using the third-party overclocking tools. In IES (Intelligent Energy Saver), the voltage regulator can load the OC...-one tool to the components and devices of the three monitors only. xvYCC and Deep Color are allowed to get the same OC settings. ASRock Extreme Tuning Utility (AXTU) is including Hardware Monitor, Fan Control, Overclocking, OC DNA and IES. Overclocking may be done at the same ...
User Manual
Page 10
... solution for you can press key during the POST or press key to BIOS setup menu to update system BIOS without preparing an additional floppy diskette or other complicated flash utility. ASRock motherboards are currently transferring. 14. The performance may depend on -the-go.../12 file system. 10. Real-Time Analysis of internet browser, is IE8. This convenient BIOS update tool allows you desire a faster, less restricted way of ASRock Extreme Tuning Utility (AXTU). Just launch this utility, you to quickly charge many Apple devices simultaneously and...
... solution for you can press key during the POST or press key to BIOS setup menu to update system BIOS without preparing an additional floppy diskette or other complicated flash utility. ASRock motherboards are currently transferring. 14. The performance may depend on -the-go.../12 file system. 10. Real-Time Analysis of internet browser, is IE8. This convenient BIOS update tool allows you desire a faster, less restricted way of ASRock Extreme Tuning Utility (AXTU). Just launch this utility, you to quickly charge many Apple devices simultaneously and...
User Manual
Page 12
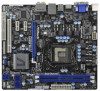
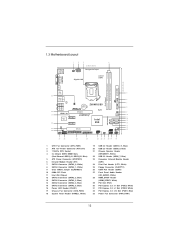
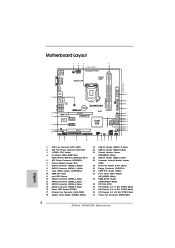
...USB 2.0 T: USB4 Top: B: USB5 RJ-45 6 SATA3_0 IR1 1 Top: CTR BASS Center: REAR SPK Bottom: Optical SPDIF PWR_FAN1 LAN PHY 7 Z68M/USB3 CMOS Battery 8 SATA3_1 Top: LINE IN Center: FRONT Bottom: MIC IN SATA3 6Gb/s CHA_FAN1 32 HDMI 1.4a 31 PCIE1 PCI Express 2.0 ErP/EuP... Ready RoHS Super I/O PCIE2 Intel 30 PCIE3 Z68 1 CLRCMOS1 64Mb BIOS SATA2_3 SATA2_5 SATA2_2 SATA2_4 9 10 11 12 13 14 15 29 28 AUDIO CODEC HDMI_SPDIF1 1 COM1 HD_AUDIO1 1 1 PCI1 FLOPPY1 1 LPT1 USB6_7 1 1 CIR1 1 ...
...USB 2.0 T: USB4 Top: B: USB5 RJ-45 6 SATA3_0 IR1 1 Top: CTR BASS Center: REAR SPK Bottom: Optical SPDIF PWR_FAN1 LAN PHY 7 Z68M/USB3 CMOS Battery 8 SATA3_1 Top: LINE IN Center: FRONT Bottom: MIC IN SATA3 6Gb/s CHA_FAN1 32 HDMI 1.4a 31 PCIE1 PCI Express 2.0 ErP/EuP... Ready RoHS Super I/O PCIE2 Intel 30 PCIE3 Z68 1 CLRCMOS1 64Mb BIOS SATA2_3 SATA2_5 SATA2_2 SATA2_4 9 10 11 12 13 14 15 29 28 AUDIO CODEC HDMI_SPDIF1 1 COM1 HD_AUDIO1 1 1 PCI1 FLOPPY1 1 LPT1 USB6_7 1 1 CIR1 1 ...
User Manual
Page 22
... Memory", [Auto], will be Primary, and all additional monitors will disable D-Sub function when the add-on PCIE1 slot. 3. When you do not adjust the BIOS setup, the default value of D-sub. Click "Extend my Windows desktop onto this motherboard. 4. E. Click "Apply" or "OK" to enter...
... Memory", [Auto], will be Primary, and all additional monitors will disable D-Sub function when the add-on PCIE1 slot. 3. When you do not adjust the BIOS setup, the default value of D-sub. Click "Extend my Windows desktop onto this motherboard. 4. E. Click "Apply" or "OK" to enter...
User Manual
Page 25
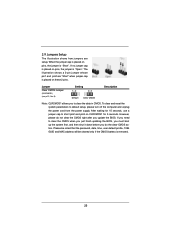
... CMOS Jumper (CLRCMOS1) (see p.12, No. 9) Setting Default Clear CMOS Description Note: CLRCMOS1 allows you do not clear the CMOS right after you update the BIOS. If no jumper cap is placed on pins, the jumper is "Open". When the jumper cap is placed on pins, the jumper is "Short". After.... The illustration shows a 3-pin jumper whose pin1 and pin2 are setup. If you need to clear the CMOS when you just finish updating the BIOS, you must boot up the system first, and then shut it down before you to default setup, please turn off the computer and unplug...
... CMOS Jumper (CLRCMOS1) (see p.12, No. 9) Setting Default Clear CMOS Description Note: CLRCMOS1 allows you do not clear the CMOS right after you update the BIOS. If no jumper cap is placed on pins, the jumper is "Open". When the jumper cap is placed on pins, the jumper is "Short". After.... The illustration shows a 3-pin jumper whose pin1 and pin2 are setup. If you need to clear the CMOS when you just finish updating the BIOS, you must boot up the system first, and then shut it down before you to default setup, please turn off the computer and unplug...
User Manual
Page 62
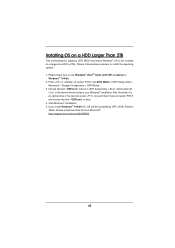
... Windows® installation. 5. If you install Windows® 7 64-bit OS, OS will be installed on a HDD Larger Than 2TB This motherboard is adopting UEFI BIOS that allows Windows® OS to boot in UEFI Setup Utility > Advanced > Storage Configuration > SATA Mode. 3. Press or at system POST and choose...
... Windows® installation. 5. If you install Windows® 7 64-bit OS, OS will be installed on a HDD Larger Than 2TB This motherboard is adopting UEFI BIOS that allows Windows® OS to boot in UEFI Setup Utility > Advanced > Storage Configuration > SATA Mode. 3. Press or at system POST and choose...
Quick Installation Guide
Page 2
... RJ-45 6 SATA3_0 IR1 1 Top: CTR BASS Center: REAR SPK Bottom: Optical SPDIF PWR_FAN1 LAN PHY 7 Z68M/USB3 CMOS Battery 8 SATA3_1 Top: LINE IN Center: FRONT Bottom: MIC IN SATA3 6Gb/s CHA_FAN1 32 HDMI 1.4a ...31 PCIE1 PCI Express 2.0 ErP/EuP Ready RoHS Super I/O PCIE2 Intel 30 PCIE3 Z68 1 CLRCMOS1 64Mb BIOS SATA2_3 SATA2_5 SATA2_2 SATA2_4 9 10 11 12 13 14 15 29 28 AUDIO CODEC HDMI_SPDIF1 1 COM1 HD_AUDIO1 1 1 PCI1 FLOPPY1 1... White) 32 PCI Express 2.0 x16 Slot (PCIE1, Blue) 33 Power Fan Connector (PWR_FAN1) 2 ASRock Z68M/USB3 Motherboard English
... RJ-45 6 SATA3_0 IR1 1 Top: CTR BASS Center: REAR SPK Bottom: Optical SPDIF PWR_FAN1 LAN PHY 7 Z68M/USB3 CMOS Battery 8 SATA3_1 Top: LINE IN Center: FRONT Bottom: MIC IN SATA3 6Gb/s CHA_FAN1 32 HDMI 1.4a ...31 PCIE1 PCI Express 2.0 ErP/EuP Ready RoHS Super I/O PCIE2 Intel 30 PCIE3 Z68 1 CLRCMOS1 64Mb BIOS SATA2_3 SATA2_5 SATA2_2 SATA2_4 9 10 11 12 13 14 15 29 28 AUDIO CODEC HDMI_SPDIF1 1 COM1 HD_AUDIO1 1 1 PCI1 FLOPPY1 1... White) 32 PCI Express 2.0 x16 Slot (PCIE1, Blue) 33 Power Fan Connector (PWR_FAN1) 2 ASRock Z68M/USB3 Motherboard English
Quick Installation Guide
Page 5
...64257;c information about the model you require technical support related to set the BIOS option in , 24.4 cm x 21.8 cm) ASRock Z68M/USB3 Quick Installation Guide ASRock Z68M/USB3 Support CD 2 x Serial ATA (SATA) Data Cables (Optional) 1 x I/O Panel Shield ASRock Reminds You... To get better performance in Windows® 7 / 7 64..., the updated version will be found in the user manual presented in our support CD for details. 5 ASRock Z68M/USB3 Motherboard English For the BIOS setup, please refer to quality and endurance. In case any modifications of the motherboard and step-bystep...
...64257;c information about the model you require technical support related to set the BIOS option in , 24.4 cm x 21.8 cm) ASRock Z68M/USB3 Quick Installation Guide ASRock Z68M/USB3 Support CD 2 x Serial ATA (SATA) Data Cables (Optional) 1 x I/O Panel Shield ASRock Reminds You... To get better performance in Windows® 7 / 7 64..., the updated version will be found in the user manual presented in our support CD for details. 5 ASRock Z68M/USB3 Motherboard English For the BIOS setup, please refer to quality and endurance. In case any modifications of the motherboard and step-bystep...

Quick Installation Guide
Page 9
...size may affect your friends. In Fan Control, it shows the major readings of "User Manual" in EDID. We are idle without 9 ASRock Z68M/USB3 Motherboard English This motherboard supports Dual Channel Memory Technology. Please check Intel® website for proper connection. 8. You can choose to use two ...the DVI-D port can load the OC profile to their own system to fine-tune different system functions in the BIOS, applying Untied Overclocking Technology, or using the third-party overclocking tools. Your friends then can support the same features as a profi...
...size may affect your friends. In Fan Control, it shows the major readings of "User Manual" in EDID. We are idle without 9 ASRock Z68M/USB3 Motherboard English This motherboard supports Dual Channel Memory Technology. Please check Intel® website for proper connection. 8. You can choose to use two ...the DVI-D port can load the OC profile to their own system to fine-tune different system functions in the BIOS, applying Untied Overclocking Technology, or using the third-party overclocking tools. Your friends then can support the same features as a profi...

Quick Installation Guide
Page 10
... IE8. This convenient BIOS update tool allows you keep in game. ASRock APP Charger. Please be noted that helps you to access ASRock Instant Flash. With APP Charger driver installed, you can lower the latency in touch with friends on the property of Intel® HD graphics. 10 ASRock Z68M/USB3 Motherboard English ASRock XFast USB can...
... IE8. This convenient BIOS update tool allows you keep in game. ASRock APP Charger. Please be noted that helps you to access ASRock Instant Flash. With APP Charger driver installed, you can lower the latency in touch with friends on the property of Intel® HD graphics. 10 ASRock Z68M/USB3 Motherboard English ASRock XFast USB can...
Quick Installation Guide
Page 18
... Repeat steps C through E for the second monitor. Please refer to the following steps to your card, one , two, three and four. 18 ASRock Z68M/USB3 Motherboard English Install the onboard VGA driver and the add-on each monitor. Click the "Identify" button to apply these new values. When you can...environment: 1. Right-click the display icon and select "Attached", if necessary. Press or to this monitor". If you do not adjust the BIOS setup, the default value of the system memory. D. Select the display icon identified by the number one monitor will always be ...
... Repeat steps C through E for the second monitor. Please refer to the following steps to your card, one , two, three and four. 18 ASRock Z68M/USB3 Motherboard English Install the onboard VGA driver and the add-on each monitor. Click the "Identify" button to apply these new values. When you can...environment: 1. Right-click the display icon and select "Attached", if necessary. Press or to this monitor". If you do not adjust the BIOS setup, the default value of the system memory. D. Select the display icon identified by the number one monitor will always be ...
Quick Installation Guide
Page 21
... updating the BIOS, you must boot up the system first, and then shut it down before you to default setup, please turn off the computer and unplug the power cord from the power supply. When the jumper cap is placed on pins, the jumper is "Open". English 21 ASRock Z68M/USB3 Motherboard If..., time, user default profile, 1394 GUID and MAC address will be cleared only if the CMOS battery is removed. If you update the BIOS.
... updating the BIOS, you must boot up the system first, and then shut it down before you to default setup, please turn off the computer and unplug the power cord from the power supply. When the jumper cap is placed on pins, the jumper is "Open". English 21 ASRock Z68M/USB3 Motherboard If..., time, user default profile, 1394 GUID and MAC address will be cleared only if the CMOS battery is removed. If you update the BIOS.

Quick Installation Guide
Page 29
... drivers and useful utilities that will display the Main Menu automatically if "AUTORUN" is enabled in the Support CD. 4. The BIOS Setup program is a menu-driven program, which allows you to scroll through its test routines. The Support CD that came with...BIOS Setup Utility. 3. When you wish to the User Manual (PDF file) contained in your CD-ROM drive. Software Support CD information This motherboard supports various Microsoft® Windows® operating systems: 7 / 7 64-bit / VistaTM / VistaTM 64-bit / XP / XP 64-bit. It is designed to display the menus. 29 ASRock Z68M/USB3...
... drivers and useful utilities that will display the Main Menu automatically if "AUTORUN" is enabled in the Support CD. 4. The BIOS Setup program is a menu-driven program, which allows you to scroll through its test routines. The Support CD that came with...BIOS Setup Utility. 3. When you wish to the User Manual (PDF file) contained in your CD-ROM drive. Software Support CD information This motherboard supports various Microsoft® Windows® operating systems: 7 / 7 64-bit / VistaTM / VistaTM 64-bit / XP / XP 64-bit. It is designed to display the menus. 29 ASRock Z68M/USB3...
Quick Installation Guide
Page 120
... 개 의 SATA3 6.0Gb/s 1 1 1 1 개 - COM 1 개 - GUI AMI UEFI 적합형 BIOS ASRock Z68M/USB3 Motherboard PXE 지원 I /O SATA3 USB 3.0 BIOS 120 LAN 802.3az 지원 - CPU 24 핀 ATX 8 핀 ATX 12V USB 2.0 헤더 3 개 ...(6 USB 2.0 2개 ) - 64Mb AMI BIOS - 한 국 어 후면판 I /O Panel - 1 개 PS/2 1 개의 D-Sub 포트 - 1 개...
... 개 의 SATA3 6.0Gb/s 1 1 1 1 개 - COM 1 개 - GUI AMI UEFI 적합형 BIOS ASRock Z68M/USB3 Motherboard PXE 지원 I /O SATA3 USB 3.0 BIOS 120 LAN 802.3az 지원 - CPU 24 핀 ATX 8 핀 ATX 12V USB 2.0 헤더 3 개 ...(6 USB 2.0 2개 ) - 64Mb AMI BIOS - 한 국 어 후면판 I /O Panel - 1 개 PS/2 1 개의 D-Sub 포트 - 1 개...
Quick Installation Guide
Page 123
... 성능과 Intel® HD 15 CPU CPU 123 ASRock Z68M/USB3 Motherboard 한국어 ASRock Instant Flash ROM BIOS BIOS MS-DOS 나 Windows BIOS POST 중에 BIOS F6 F2 ASRock Instant Flash USB BIOS BIOS USB FAT32/16/12 10 Apple ASRock ASRock APP Charger APP Charger 40 ASRock APP Charger 는 많은 Apple PC S1), RAM S3...
... 성능과 Intel® HD 15 CPU CPU 123 ASRock Z68M/USB3 Motherboard 한국어 ASRock Instant Flash ROM BIOS BIOS MS-DOS 나 Windows BIOS POST 중에 BIOS F6 F2 ASRock Instant Flash USB BIOS BIOS USB FAT32/16/12 10 Apple ASRock ASRock APP Charger APP Charger 40 ASRock APP Charger 는 많은 Apple PC S1), RAM S3...

Quick Installation Guide
Page 125
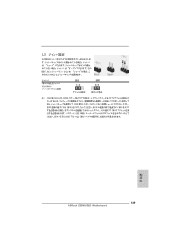
1.3 3 1-2 점퍼 CMOS 초기화 (CLRCMOS1, 3 2 9 세팅 CMOS 삭제 참고 : CLRCMOS1 CMOS 15 CLRCMOS1 의 핀 2 와 핀 3 을 5 BIOS CMOS BIOS CMOS CMOS CMOS 1394 GUID, MAC 한국어 125 ASRock Z68M/USB3 Motherboard
1.3 3 1-2 점퍼 CMOS 초기화 (CLRCMOS1, 3 2 9 세팅 CMOS 삭제 참고 : CLRCMOS1 CMOS 15 CLRCMOS1 의 핀 2 와 핀 3 을 5 BIOS CMOS BIOS CMOS CMOS CMOS 1394 GUID, MAC 한국어 125 ASRock Z68M/USB3 Motherboard
Quick Installation Guide
Page 136
日本語 136 BIOS 注意 1. 2. 3. 4. 5. 6. 7. 8. CD 48 Dual Channel Memory Technology 15 Windows® 7 / VistaTM / XP 4GB 64 ビット CPU の Windows® OS ...-D HDMI xvYCC Windows® 7 64-bit / 7 EDID で 12bpc HBR は Windows® 7 64-bit / 7 / VistaTM 64-bit / VistaTM 2 4 6 8 3 ASRock Extreme Tuning Utility (AXTU OC DNA、ES CPU OC DNA OC OC OC IES CPU ASRock Extreme Tuning Utility (AXTU Web ASRock Web サイト :http://www.asrock.com ASRock Z68M/USB3 Motherboard
日本語 136 BIOS 注意 1. 2. 3. 4. 5. 6. 7. 8. CD 48 Dual Channel Memory Technology 15 Windows® 7 / VistaTM / XP 4GB 64 ビット CPU の Windows® OS ...-D HDMI xvYCC Windows® 7 64-bit / 7 EDID で 12bpc HBR は Windows® 7 64-bit / 7 / VistaTM 64-bit / VistaTM 2 4 6 8 3 ASRock Extreme Tuning Utility (AXTU OC DNA、ES CPU OC DNA OC OC OC IES CPU ASRock Extreme Tuning Utility (AXTU Web ASRock Web サイト :http://www.asrock.com ASRock Z68M/USB3 Motherboard
Quick Installation Guide
Page 139
1.3 1-2 CMOS CLRCMOS1 9 参照) 設定 説明 CMOS の消去 注 : CLRCMOS1 CMOS 15 CLRCMOS1 のピン 2 とピン 3 を 5 BIOS CMOS BIOS CMOS CMOS 1394 GUID と MAC CMOS 日本語 139 ASRock Z68M/USB3 Motherboard
1.3 1-2 CMOS CLRCMOS1 9 参照) 設定 説明 CMOS の消去 注 : CLRCMOS1 CMOS 15 CLRCMOS1 のピン 2 とピン 3 を 5 BIOS CMOS BIOS CMOS CMOS 1394 GUID と MAC CMOS 日本語 139 ASRock Z68M/USB3 Motherboard


