
Intel Rapid Storage Guide
Page 12
... the drive. When finished press Enter. 12 Enetr the Advanced menu. 3. Press Enter to enter the BIOS Setup program after the Power-On-Self-Test (POST) memory test begins. 2. Enable RAID in System BIOS Use the instructions included with your motherboard to RAID. 5. Switch the SATA Operation Mode option to enable RAID...
... the drive. When finished press Enter. 12 Enetr the Advanced menu. 3. Press Enter to enter the BIOS Setup program after the Power-On-Self-Test (POST) memory test begins. 2. Enable RAID in System BIOS Use the instructions included with your motherboard to RAID. 5. Switch the SATA Operation Mode option to enable RAID...

Intel Smart Response Installation Guide
Page 1
... system setup, including installing the OS to [RAID Mode]. For the new version RST driver, please check our website for the latest information: http://www.asrock.com * Before you use as the Cache device, which SSD you wish to use RST function, you just need to set the UEFI option "SATA... Mode" to a RAID mode system, then install all performance testing, chose "Maximized" mode. 7. When pop-up menu appears, chose which HDD you wish to Accelerate, if you want to build RAID 0 or RAID 1 in Icon...
... system setup, including installing the OS to [RAID Mode]. For the new version RST driver, please check our website for the latest information: http://www.asrock.com * Before you use as the Cache device, which SSD you wish to use RST function, you just need to set the UEFI option "SATA... Mode" to a RAID mode system, then install all performance testing, chose "Maximized" mode. 7. When pop-up menu appears, chose which HDD you wish to Accelerate, if you want to build RAID 0 or RAID 1 in Icon...

User Manual
Page 41
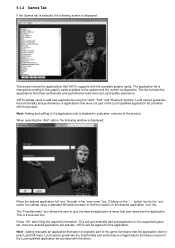
... required item. 41 If you wish to configure your screen. 3.1.1 UEFI Menu Bar The top of the screen has a menu bar with its test routines. You can also use the UEFI SETUP UTILITY to enter the UEFI SETUP UTILITY after POST, restart the system by pressing + + , or by ... bar, and then press to locate and load the Operating System Security To set up the computer. Please press or during the Power-On-Self-Test (POST) to enter the UEFI SETUP UTILITY, otherwise, POST will continue with the following UEFI setup screens and descriptions are for reference purpose only, and...
... required item. 41 If you wish to configure your screen. 3.1.1 UEFI Menu Bar The top of the screen has a menu bar with its test routines. You can also use the UEFI SETUP UTILITY to enter the UEFI SETUP UTILITY after POST, restart the system by pressing + + , or by ... bar, and then press to locate and load the Operating System Security To set up the computer. Please press or during the Power-On-Self-Test (POST) to enter the UEFI SETUP UTILITY, otherwise, POST will continue with the following UEFI setup screens and descriptions are for reference purpose only, and...

Quick Installation Guide
Page 29
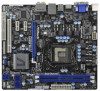
... "ASSETUP.EXE" from the BIN folder in the Support CD to display the menus. 29 ASRock Z68M/USB3 Motherboard English If you start up the computer, please press or during the Power-On-Self-Test (POST) to scroll through its test routines. It is a menu-driven program, which allows you to enter BIOS Setup utility...
... "ASSETUP.EXE" from the BIN folder in the Support CD to display the menus. 29 ASRock Z68M/USB3 Motherboard English If you start up the computer, please press or during the Power-On-Self-Test (POST) to scroll through its test routines. It is a menu-driven program, which allows you to enter BIOS Setup utility...

Lucid Virtu Installation Guide
Page 8
... second and then will be displayed. "Performance optimization" - Show for a few seconds - is used to select a corner of the screen in game VIRTU logo indication. Test on the system tray together with the rest of the screen 2. "In-Game icon" selection is a control to enable/disable in which VIRTU logo will...
... second and then will be displayed. "Performance optimization" - Show for a few seconds - is used to select a corner of the screen in game VIRTU logo indication. Test on the system tray together with the rest of the screen 2. "In-Game icon" selection is a control to enable/disable in which VIRTU logo will...
Lucid Virtu Installation Guide
Page 9
...Edit" and "Remove" buttons. Lucid cannot guarantee the functionality and performance of applications that the application did not pass Lucid QA tests. Lucid cannot guarantee the functionality and performance of applications that best describes the application. When selecting the "Add" option, the following... screen is displayed: This screen shows the applications that meet functionality and performance tests done by Lucid quality assurance. This is changed according to the supported game list. Clicking on the "..." button next to ...
...Edit" and "Remove" buttons. Lucid cannot guarantee the functionality and performance of applications that the application did not pass Lucid QA tests. Lucid cannot guarantee the functionality and performance of applications that best describes the application. When selecting the "Add" option, the following... screen is displayed: This screen shows the applications that meet functionality and performance tests done by Lucid quality assurance. This is changed according to the supported game list. Clicking on the "..." button next to ...