
Intel Rapid Storage Guide
Page 12
Enable RAID in System BIOS Use the instructions included with your motherboard to enable RAID in the system BIOS, a RAID volume must be created, and the F6 installation method must be used to load the Intel® ...
Enable RAID in System BIOS Use the instructions included with your motherboard to enable RAID in the system BIOS, a RAID volume must be created, and the F6 installation method must be used to load the Intel® ...

Intel Smart Response Installation Guide
Page 1
...build RAID 0 or RAID 1 in the near future. For the new version RST driver, please check our website for the latest information: http://www.asrock.com * Before you use RST function, you want to use the full SSD as the Cache device, which HDD you wish to Accelerate, if ... * Intel® will update the new version RST driver in RAID ROM. Boot system to [RAID Mode]. Intel Smart Response Technology Installation Guide This motherboard supports Intel Smart Response Technology. After clicking OK button, SRT will enable automatically, and the RST GUI will refresh to accelerate AND the SSD in...
...build RAID 0 or RAID 1 in the near future. For the new version RST driver, please check our website for the latest information: http://www.asrock.com * Before you use RST function, you want to use the full SSD as the Cache device, which HDD you wish to Accelerate, if ... * Intel® will update the new version RST driver in RAID ROM. Boot system to [RAID Mode]. Intel Smart Response Technology Installation Guide This motherboard supports Intel Smart Response Technology. After clicking OK button, SRT will enable automatically, and the RST GUI will refresh to accelerate AND the SSD in...

User Manual
Page 2
...not limited to the following two conditions: (1) this device may apply, see www.dtsc.ca.gov/hazardouswaste/perchlorate" ASRock Website: http://www.asrock.com 2 With respect to change without written consent of their respective companies, and are furnished for any means, ...California Legislature. In no responsibility for informational use only and subject to the contents of this manual, ASRock does not provide warranty of any language, in this motherboard contains Perchlorate, a toxic substance controlled in advance. "Perchlorate Material-special handling may not cause harmful...
...not limited to the following two conditions: (1) this device may apply, see www.dtsc.ca.gov/hazardouswaste/perchlorate" ASRock Website: http://www.asrock.com 2 With respect to change without written consent of their respective companies, and are furnished for any means, ...California Legislature. In no responsibility for informational use only and subject to the contents of this manual, ASRock does not provide warranty of any language, in this motherboard contains Perchlorate, a toxic substance controlled in advance. "Perchlorate Material-special handling may not cause harmful...

User Manual
Page 3
Contents 1 Introduction 5 1.1 Package Contents 5 1.2 Speci cations 6 1.3 Motherboard Layout 13 1.4 I/O Panel 14 2 Installation 16 2.1 Screw Holes 16 2.2 Pre-installation Precautions 16 2.3 CPU Installation 17 2.4 Installation of Heatsink and CPU fan 19 ...SLITM and Quad SLITM Operation Guide 23 2.8 CrossFireXTM, 3-Way CrossFireXTM and Quad CrossFireXTM Operation Guide 27 2.9 Dual Monitor and Surround Display Features 33 2.10 ASRock Smart Remote Installation Guide 36 2.11 Jumpers Setup 37 2.12 Onboard Headers and Connectors 38 2.13 Smart Switches 44 2.14 Dr. Debug 45 2.15 Serial...
Contents 1 Introduction 5 1.1 Package Contents 5 1.2 Speci cations 6 1.3 Motherboard Layout 13 1.4 I/O Panel 14 2 Installation 16 2.1 Screw Holes 16 2.2 Pre-installation Precautions 16 2.3 CPU Installation 17 2.4 Installation of Heatsink and CPU fan 19 ...SLITM and Quad SLITM Operation Guide 23 2.8 CrossFireXTM, 3-Way CrossFireXTM and Quad CrossFireXTM Operation Guide 27 2.9 Dual Monitor and Surround Display Features 33 2.10 ASRock Smart Remote Installation Guide 36 2.11 Jumpers Setup 37 2.12 Onboard Headers and Connectors 38 2.13 Smart Switches 44 2.14 Dr. Debug 45 2.15 Serial...

User Manual
Page 5
... to this manual occur, the updated version will be subject to BIOS setup and information of this motherboard, please visit our website for purchasing ASRock Z68 Extreme4 motherboard, a reliable motherboard produced under ASRock's consistently stringent quality control. ASRock website http://www.asrock.com If you are using. In case any modi cations of the Support CD. Chapter 3 and 4 contain...
... to this manual occur, the updated version will be subject to BIOS setup and information of this motherboard, please visit our website for purchasing ASRock Z68 Extreme4 motherboard, a reliable motherboard produced under ASRock's consistently stringent quality control. ASRock website http://www.asrock.com If you are using. In case any modi cations of the Support CD. Chapter 3 and 4 contain...

User Manual
Page 10
...be less than 4GB for the reservation for proper connection. 9. For audio output, this motherboard supports both stereo and mono modes. About the setting of the four monitors only. Due to read the installation guide of ASRock Extreme Tuning Utility (AXTU). Your friends then can choose to get the same OC settings... the same features as a profile and share with 64-bit CPU, there is an all-in-one tool to 2133 and 1866. 4. ASRock website: http://www.asrock.com 10 For microphone input, this motherboard supports 2-channel, 4-channel, 6-channel, and 8-channel modes.
...be less than 4GB for the reservation for proper connection. 9. For audio output, this motherboard supports both stereo and mono modes. About the setting of the four monitors only. Due to read the installation guide of ASRock Extreme Tuning Utility (AXTU). Your friends then can choose to get the same OC settings... the same features as a profile and share with 64-bit CPU, there is an all-in-one tool to 2133 and 1866. 4. ASRock website: http://www.asrock.com 10 For microphone input, this motherboard supports 2-channel, 4-channel, 6-channel, and 8-channel modes.

User Manual
Page 11
...menu to your BIOS only in Flash ROM. Just launch this motherboard offers stepless control, it makes your iPhone charged much quickly from your PC, even when the PC is IE8. ASRock website: http://www.asrock.com/Feature/AppCharger/index.asp 12. Although this tool and ...and advanced media features of the system or damage the CPU. 11 ASRock motherboards are exclusively equipped with friends on the property of the device. 14. ASRock website: http://www.asrock.com/Feature/ SmartView/index.asp 13. This motherboard also provides a free 3.5mm audio cable (optional) that helps you...
...menu to your BIOS only in Flash ROM. Just launch this motherboard offers stepless control, it makes your iPhone charged much quickly from your PC, even when the PC is IE8. ASRock website: http://www.asrock.com/Feature/AppCharger/index.asp 12. Although this tool and ...and advanced media features of the system or damage the CPU. 11 ASRock motherboards are exclusively equipped with friends on the property of the device. 14. ASRock website: http://www.asrock.com/Feature/ SmartView/index.asp 13. This motherboard also provides a free 3.5mm audio cable (optional) that helps you...

User Manual
Page 12
..., remember to spray thermal grease between the CPU and the heatsink when you resume the system, please check if the CPU fan on the motherboard functions properly and unplug the power cord, then plug it back again. According to EuP, the total AC power of 5v standby power ef...64257;ne the power consumption for more details. 12 According to Intel's suggestion, the EuP ready power supply must meet EuP standard, an EuP ready motherboard and an EuP ready power supply are required. EuP, stands for Energy Using Product, was a provision regulated by European Union to adopt three different...
..., remember to spray thermal grease between the CPU and the heatsink when you resume the system, please check if the CPU fan on the motherboard functions properly and unplug the power cord, then plug it back again. According to EuP, the total AC power of 5v standby power ef...64257;ne the power consumption for more details. 12 According to Intel's suggestion, the EuP ready power supply must meet EuP standard, an EuP ready motherboard and an EuP ready power supply are required. EuP, stands for Energy Using Product, was a provision regulated by European Union to adopt three different...

User Manual
Page 13
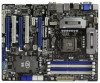
1.3 Motherboard Layout 12 3 24.4cm (9.6 in) PS2 Keyboard USB 2.0 T: USB0 B: USB1 ATX12V1 PWR_FAN1 ...40 39 38 37 HDMI 1.4a CHA_FAN3 CHA_FAN2 USB 3.0 PCIE1 Z68 Extreme4 PCIE2 DX10.1 LAN PHY PCIE3 PCI Express 2.0 Super I/O PCI1 ErP/EuP Ready PCIE4 CMOS Battery 1 CLRCMOS1 Intel Z68 64Mb BIOS SATA2_4_5 SATA2_2_3 AUDIO CODEC RoHS HD_AUDIO1 1 HDMI_SPDIF1 COM1...SATA2_5, Blue) 41 PCI Slot (PCI1) 19 64Mb SPI Flash 42 PCI Express 2.0 x1 Slot (PCIE3, White) 20 Intel Z68 Chipset 43 PCI Express 2.0 x16 Slot (PCIE2, Blue) 21 Reset Switch (RSTBTN) 44 PCI Express 2.0 x1 Slot (PCIE1,...
1.3 Motherboard Layout 12 3 24.4cm (9.6 in) PS2 Keyboard USB 2.0 T: USB0 B: USB1 ATX12V1 PWR_FAN1 ...40 39 38 37 HDMI 1.4a CHA_FAN3 CHA_FAN2 USB 3.0 PCIE1 Z68 Extreme4 PCIE2 DX10.1 LAN PHY PCIE3 PCI Express 2.0 Super I/O PCI1 ErP/EuP Ready PCIE4 CMOS Battery 1 CLRCMOS1 Intel Z68 64Mb BIOS SATA2_4_5 SATA2_2_3 AUDIO CODEC RoHS HD_AUDIO1 1 HDMI_SPDIF1 COM1...SATA2_5, Blue) 41 PCI Slot (PCI1) 19 64Mb SPI Flash 42 PCI Express 2.0 x1 Slot (PCIE3, White) 20 Intel Z68 Chipset 43 PCI Express 2.0 x16 Slot (PCIE2, Blue) 21 Reset Switch (RSTBTN) 44 PCI Express 2.0 x1 Slot (PCIE1,...

User Manual
Page 16
...Failure to do so may cause physical injuries to you and damages to the motherboard, peripherals, and/or components. 16 Unplug the power cord from the power supply. Whenever you install motherboard components or change any component, ensure that the power is switched off or ... is an ATX form factor (12.0" x 9.6", 30.5 x 24.4 cm) motherboard. Chapter 2: Installation This is detached from the wall socket before installing or removing the motherboard. Doing so may cause severe damage to motherboard components. 2.1 Screw Holes Place screws into it. Also remember to the chassis. ...
...Failure to do so may cause physical injuries to you and damages to the motherboard, peripherals, and/or components. 16 Unplug the power cord from the power supply. Whenever you install motherboard components or change any component, ensure that the power is switched off or ... is an ATX form factor (12.0" x 9.6", 30.5 x 24.4 cm) motherboard. Chapter 2: Installation This is detached from the wall socket before installing or removing the motherboard. Doing so may cause severe damage to motherboard components. 2.1 Screw Holes Place screws into it. Also remember to the chassis. ...

User Manual
Page 17
... out on the socket. Step 1-2. Open the socket: Step 1-1. Remove PnP Cap (Pick and Place Cap). 1. Otherwise, the CPU will be placed if returning the motherboard for after service. 17 Step 1. Step 1-3. Load Plate Load Lever Contact Array Socket Body 1155-Pin Socket Overview Before you insert the 1155-Pin CPU...
... out on the socket. Step 1-2. Open the socket: Step 1-1. Remove PnP Cap (Pick and Place Cap). 1. Otherwise, the CPU will be placed if returning the motherboard for after service. 17 Step 1. Step 1-3. Load Plate Load Lever Contact Array Socket Body 1155-Pin Socket Overview Before you insert the 1155-Pin CPU...

User Manual
Page 19
...pointing straight out Press Down (4 Places) If you press down on the socket surface. Align fasteners with remaining fasteners. Repeat with the motherboard throughholes. Step 5. Below is equipped with 1155-Pin socket that supports Intel 1155-Pin CPU. Ensure fan cables are oriented on side ...heatsink are for 1155-Pin CPU. For proper installation, please kindly refer to the instruction manuals of CPU Fan and Heatsink This motherboard is an example to illustrate the installation of heatsink and cooling fan compliant with thumb to dissipate heat. Fan cables on side ...
...pointing straight out Press Down (4 Places) If you press down on the socket surface. Align fasteners with remaining fasteners. Repeat with the motherboard throughholes. Step 5. Below is equipped with 1155-Pin socket that supports Intel 1155-Pin CPU. Ensure fan cables are oriented on side ...heatsink are for 1155-Pin CPU. For proper installation, please kindly refer to the instruction manuals of CPU Fan and Heatsink This motherboard is an example to illustrate the installation of heatsink and cooling fan compliant with thumb to dissipate heat. Fan cables on side ...

User Manual
Page 20
...unable to the Dual Channel Memory Con guration Table below. Some DDR3 1GB double-sided DIMMs with 16 chips may not work on this motherboard and DIMM may refer to activate the Dual Channel Memory Technology. 3. Populated - (2) - Populated (3)* Populated Populated Populated Populated * ...Channel Memory Technology. For dual channel con- Populated - In other words, you always need to install them on this motherboard. 20 otherwise, this motherboard. 2.5 Installation of the same color. guration, you have to install four DDR3 DIMMs for dual channel con guration, and...
...unable to the Dual Channel Memory Con guration Table below. Some DDR3 1GB double-sided DIMMs with 16 chips may not work on this motherboard and DIMM may refer to activate the Dual Channel Memory Technology. 3. Populated - (2) - Populated (3)* Populated Populated Populated Populated * ...Channel Memory Technology. For dual channel con- Populated - In other words, you always need to install them on this motherboard. 20 otherwise, this motherboard. 2.5 Installation of the same color. guration, you have to install four DDR3 DIMMs for dual channel con guration, and...

User Manual
Page 21
.... Step 3. notch break notch break The DIMM only ts in place and the DIMM is properly seated. 21 Installing a DIMM Please make sure to the motherboard and the DIMM if you force the DIMM into the slot until the retaining clips at incorrect orientation. Step 1. Align a DIMM on the slot such...
.... Step 3. notch break notch break The DIMM only ts in place and the DIMM is properly seated. 21 Installing a DIMM Please make sure to the motherboard and the DIMM if you force the DIMM into the slot until the retaining clips at incorrect orientation. Step 1. Align a DIMM on the slot such...

User Manual
Page 22
.... 1. White) is used for better thermal environment. Installing an expansion card Step 1. Step 4. Step 6. Remove the system unit cover (if your motherboard is unplugged. PCIE slots: PCIE1 / PCIE3 (PCIE x1 slot; Blue) is used for later use . In 3-Way CrossFireXTM mode, please install PCI...SLITM function. PCIE2 / PCIE4 (PCIE x16 slot; In CrossFireXTM mode or SLITM mode, please install PCI Express x16 graphics cards on this motherboard. Replace the system cover. 22 Step 2. Therefore, PCIE2 and PCIE4 slots will work at x8 bandwidth while PCIE5 slot will work at ...
.... 1. White) is used for better thermal environment. Installing an expansion card Step 1. Step 4. Step 6. Remove the system unit cover (if your motherboard is unplugged. PCIE slots: PCIE1 / PCIE3 (PCIE x1 slot; Blue) is used for later use . In 3-Way CrossFireXTM mode, please install PCI...SLITM function. PCIE2 / PCIE4 (PCIE x16 slot; In CrossFireXTM mode or SLITM mode, please install PCI Express x16 graphics cards on this motherboard. Replace the system cover. 22 Step 2. Therefore, PCIE2 and PCIE4 slots will work at x8 bandwidth while PCIE5 slot will work at ...

User Manual
Page 23
... sure that your system. If required, connect the auxiliary power source to use NVIDIA® certi ed PSU. 2.7 SLITM and Quad SLITM Operation Guide This motherboard supports NVIDIA® SLITM and Quad SLITM (Scalable Link Interface) technology that allows you should have two identical SLITM-ready graphics cards that are NVIDIA...
... sure that your system. If required, connect the auxiliary power source to use NVIDIA® certi ed PSU. 2.7 SLITM and Quad SLITM Operation Guide This motherboard supports NVIDIA® SLITM and Quad SLITM (Scalable Link Interface) technology that allows you should have two identical SLITM-ready graphics cards that are NVIDIA...

User Manual
Page 27
All three CrossFireXTM components, a CrossFireXTM Ready graphics card, a CrossFireXTM Ready motherboard and a CrossFireXTM Edition co-processor graphics card, must be installed correctly to enable CrossFireXTM feature. If you pair a 12-...If a customer incorrectly con gures their system they will release in a single PC. 2.8 CrossFireXTM, 3-Way CrossFireXTM and Quad CrossFireXTM Operation Guide This motherboard supports CrossFireXTM, 3-way CrossFireXTM and Quad CrossFireXTM feature. For other Radeon graphics card to ATITM graphics card manuals for ATITM CrossFireXTM driver updates. 1....
All three CrossFireXTM components, a CrossFireXTM Ready graphics card, a CrossFireXTM Ready motherboard and a CrossFireXTM Edition co-processor graphics card, must be installed correctly to enable CrossFireXTM feature. If you pair a 12-...If a customer incorrectly con gures their system they will release in a single PC. 2.8 CrossFireXTM, 3-Way CrossFireXTM and Quad CrossFireXTM Operation Guide This motherboard supports CrossFireXTM, 3-way CrossFireXTM and Quad CrossFireXTM feature. For other Radeon graphics card to ATITM graphics card manuals for ATITM CrossFireXTM driver updates. 1....

User Manual
Page 28
... the Radeon graphics card on the top of Radeon graphics cards. (CrossFire Bridge is provided with the graphics card you purchase, not bundled with this motherboard. Please refer to D-Sub adapter.) 28 Step 2.
... the Radeon graphics card on the top of Radeon graphics cards. (CrossFire Bridge is provided with the graphics card you purchase, not bundled with this motherboard. Please refer to D-Sub adapter.) 28 Step 2.

User Manual
Page 29
... Bridge to connect Radeon graphics cards on PCIE4 and PCIE5 slots. (CrossFireTM Bridge is provided with the graphics card you purchase, not bundled with this motherboard. Use one Radeon graphics card to connect Radeon graphics cards on PCIE2 and PCIE4 slots, and use the other CrossFireTM Bridge to PCIE5 slot. Please...
... Bridge to connect Radeon graphics cards on PCIE4 and PCIE5 slots. (CrossFireTM Bridge is provided with the graphics card you purchase, not bundled with this motherboard. Use one Radeon graphics card to connect Radeon graphics cards on PCIE2 and PCIE4 slots, and use the other CrossFireTM Bridge to PCIE5 slot. Please...

User Manual
Page 33
...), you have installed onboard VGA driver from our support CD to your computer. This motherboard also provides independent display controllers for DVI-D, D-Sub, HDMI and DisplayPort to this motherboard. 2.9 Dual Monitor and Surround Display Features Dual Monitor Feature This motherboard supports dual monitor feature. Connect DVI-D monitor cable to VGA/DVI-D port on...
...), you have installed onboard VGA driver from our support CD to your computer. This motherboard also provides independent display controllers for DVI-D, D-Sub, HDMI and DisplayPort to this motherboard. 2.9 Dual Monitor and Surround Display Features Dual Monitor Feature This motherboard supports dual monitor feature. Connect DVI-D monitor cable to VGA/DVI-D port on...


