
Intel Rapid Storage Guide
Page 12
... list of hard drives by using the up or down arrow keys to RAID. 5. Click F2 or Delete to save the BIOS settings and exit the BIOS Setup program. Click the Storage Configuration menu. 4. When the Intel Rapid Storage Technology option ROM status screen appears during operating system... setup. Enable RAID in System BIOS Use the instructions included with your motherboard to enable RAID in the system BIOS, a RAID volume must be created, and the F6 installation method must be enabled in the system...
... list of hard drives by using the up or down arrow keys to RAID. 5. Click F2 or Delete to save the BIOS settings and exit the BIOS Setup program. Click the Storage Configuration menu. 4. When the Intel Rapid Storage Technology option ROM status screen appears during operating system... setup. Enable RAID in System BIOS Use the instructions included with your motherboard to enable RAID in the system BIOS, a RAID volume must be created, and the F6 installation method must be enabled in the system...

RAID Installation Guide
Page 1
... a RAID array 8 2.4.1 Configuring a RAID array Using UEFI Setup Utility....... 9 2.4.2 Configuring a PCIE SSD RAID Array Using UEFI Setup Utility 13 2.4.3 Configuring a RAID array Using Intel RAID BIOS....... 18 3.
... a RAID array 8 2.4.1 Configuring a RAID array Using UEFI Setup Utility....... 9 2.4.2 Configuring a PCIE SSD RAID Array Using UEFI Setup Utility 13 2.4.3 Configuring a RAID array Using Intel RAID BIOS....... 18 3.
RAID Installation Guide
Page 6
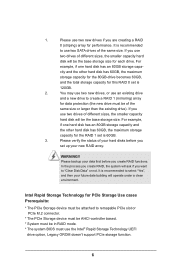
... attached to remapable PCIe slot or PCIe M.2 connector. * The PCIe Storage device must be AHCI-controller based. * System must be in RAID mode. * The system BIOS must be the base storage size. Please backup your future data building will ask if you want to create a RAID 1 (mirroring) array for performance. WARNING...
... attached to remapable PCIe slot or PCIe M.2 connector. * The PCIe Storage device must be AHCI-controller based. * System must be in RAID mode. * The system BIOS must be the base storage size. Please backup your future data building will ask if you want to create a RAID 1 (mirroring) array for performance. WARNING...

RAID Installation Guide
Page 7
...set RAID configuration. Please note that this document for all models A. Follow the onscreen instruction to confirm the selection C. Plug in the BIOS before setting your RAID configuration. STEP 3: Set RAID configuration Please refer to p.8 -17 of this feature is not available for instructions ...to your USB flash drive into a USB port B. STEP 2: Use ASRock Easy RAID Installer Easy RAID Installer can copy the RAID driver from a support CD to enter BIOS setup utility. STEP 1: Setting the BIOS RAID Items After installing the hard disk drives, please set the necessary RAID...
...set RAID configuration. Please note that this document for all models A. Follow the onscreen instruction to confirm the selection C. Plug in the BIOS before setting your RAID configuration. STEP 3: Set RAID configuration Please refer to p.8 -17 of this feature is not available for instructions ...to your USB flash drive into a USB port B. STEP 2: Use ASRock Easy RAID Installer Easy RAID Installer can copy the RAID driver from a support CD to enter BIOS setup utility. STEP 1: Setting the BIOS RAID Items After installing the hard disk drives, please set the necessary RAID...

RAID Installation Guide
Page 8
2.4 Configuring a RAID array You can configure a RAID array using either UEFI Setup Utility or Intel® RAID BIOS setup utility, depending on the HDD capacity and the OS you are installing. OS HDD Capacity Ultra Fast Boot Windows 10 Under 2.2 Over 2.2 TB TB ... ROM Boot\CSM [Launch n/a n/a n/a Setting Storage OpROM policy] = [UEFI only] Required UEFI Setup UEFI Setup UEFI Setup RAID Utility Utility Utility Utility Intel® RAID BIOS setup utility 8 Please refer to the table below to choose the corresponding RAID Utility.
2.4 Configuring a RAID array You can configure a RAID array using either UEFI Setup Utility or Intel® RAID BIOS setup utility, depending on the HDD capacity and the OS you are installing. OS HDD Capacity Ultra Fast Boot Windows 10 Under 2.2 Over 2.2 TB TB ... ROM Boot\CSM [Launch n/a n/a n/a Setting Storage OpROM policy] = [UEFI only] Required UEFI Setup UEFI Setup UEFI Setup RAID Utility Utility Utility Utility Intel® RAID BIOS setup utility 8 Please refer to the table below to choose the corresponding RAID Utility.

RAID Installation Guide
Page 18
Volume0 18 In the Create Volume Menu, under Name item, please key-in a unique name with 1-16 letters for your computer. Press . Create RAID Volume window appears. Then, the Intel RAID Utility - 2.4.3 Configuring a RAID array Using Intel RAID BIOS Reboot your RAID volume then press . Wait until you see the RAID software prompting you to press .
Volume0 18 In the Create Volume Menu, under Name item, please key-in a unique name with 1-16 letters for your computer. Press . Create RAID Volume window appears. Then, the Intel RAID Utility - 2.4.3 Configuring a RAID array Using Intel RAID BIOS Reboot your RAID volume then press . Wait until you see the RAID software prompting you to press .

RAID Installation Guide
Page 21
After the completion, you will see the detailed information about the RAID that you want to delete a RAID volume, please select the option Delete RAID Volume, press , and then follow the instructions on the screen. 21 If you want to create an extra RAID partition, please use the RAID utility under BIOS RAID environment. If you are only allowed to create one RAID partition at a time under Windows environment to complete the setup of RAID. Press to configure RAID functions after you set up. Please note that you install OS.
After the completion, you will see the detailed information about the RAID that you want to delete a RAID volume, please select the option Delete RAID Volume, press , and then follow the instructions on the screen. 21 If you want to create an extra RAID partition, please use the RAID utility under BIOS RAID environment. If you are only allowed to create one RAID partition at a time under Windows environment to complete the setup of RAID. Press to configure RAID functions after you set up. Please note that you install OS.

RAID Installation Guide
Page 22
3. Installing Windows® on a HDD under 2TB in RAID mode After the UEFI and RAID BIOS setup you may start installing Windows® 10 64-bit OS as usual. 22
3. Installing Windows® on a HDD under 2TB in RAID mode After the UEFI and RAID BIOS setup you may start installing Windows® 10 64-bit OS as usual. 22

RAID Installation Guide
Page 23
...UEFI:" to use Windows® 10 64-bit. 4. After the UEFI and RAID BIOS setup, please follow the steps below. STEP 1: Copy Intel® RAID drivers into a USB flash disk You can download the drivers from ASRock's website and unzip the files into a USB flash disk or copy the files from... ASRock's motherboard support CD. (Please copy the files under the following directory: 32 bit: ..\i386\Win7_Intel.. 64-bit...
...UEFI:" to use Windows® 10 64-bit. 4. After the UEFI and RAID BIOS setup, please follow the steps below. STEP 1: Copy Intel® RAID drivers into a USB flash disk You can download the drivers from ASRock's website and unzip the files into a USB flash disk or copy the files from... ASRock's motherboard support CD. (Please copy the files under the following directory: 32 bit: ..\i386\Win7_Intel.. 64-bit...

User Manual
Page 5
... Update & APP Shop 43 3.3.1 UI Overview 43 3.3.2 Apps 44 3.3.3 BIOS & Drivers 47 3.3.4 Setting 48 3.4 Nahimic Audio 49 3.5 ASRock Polychrome SYNC 50 Chapter 4 UEFI SETUP UTILITY 53 4.1 Introduction 53 4.2 EZ Mode 54 4.3 Advanced Mode 55 4.3.1 UEFI Menu Bar 55 4.3.2 Navigation Keys 56 4.4 Main Screen ...
... Update & APP Shop 43 3.3.1 UI Overview 43 3.3.2 Apps 44 3.3.3 BIOS & Drivers 47 3.3.4 Setting 48 3.4 Nahimic Audio 49 3.5 ASRock Polychrome SYNC 50 Chapter 4 UEFI SETUP UTILITY 53 4.1 Introduction 53 4.2 EZ Mode 54 4.3 Advanced Mode 55 4.3.1 UEFI Menu Bar 55 4.3.2 Navigation Keys 56 4.4 Main Screen ...
User Manual
Page 7
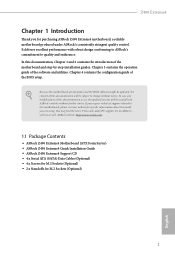
... Thank you are using. Because the motherboard specifications and the BIOS software might be updated, the content of the motherboard and step-by-step installation guides. ASRock website http://www.asrock.com. 1.1 Package Contents • ASRock Z490 Extreme4 Motherboard (ATX Form Factor) • ASRock Z490 Extreme4 Quick Installation Guide • ASRock Z490 Extreme4 Support CD • 4 x Serial ATA (SATA) Data Cables (Optional...
... Thank you are using. Because the motherboard specifications and the BIOS software might be updated, the content of the motherboard and step-by-step installation guides. ASRock website http://www.asrock.com. 1.1 Package Contents • ASRock Z490 Extreme4 Motherboard (ATX Form Factor) • ASRock Z490 Extreme4 Quick Installation Guide • ASRock Z490 Extreme4 Support CD • 4 x Serial ATA (SATA) Data Cables (Optional...
User Manual
Page 12
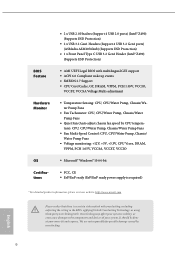
...* For detailed product information, please visit our website: http://www.asrock.com Please realize that there is a certain risk involved with overclocking, including adjusting the setting in the BIOS, applying Untied Overclocking Technology, or using third-party overclocking tools. ...ports) (ASMedia ASM1074 hub) (Supports ESD Protection) • 1 x Front Panel Type C USB 3.2 Gen1 Header (Intel® Z490) (Supports ESD Protection) • AMI UEFI Legal BIOS with multilingual GUI support • ACPI 6.0 Compliant wake up events • SMBIOS 2.7 Support • CPU Core/Cache, GT, ...
...* For detailed product information, please visit our website: http://www.asrock.com Please realize that there is a certain risk involved with overclocking, including adjusting the setting in the BIOS, applying Untied Overclocking Technology, or using third-party overclocking tools. ...ports) (ASMedia ASM1074 hub) (Supports ESD Protection) • 1 x Front Panel Type C USB 3.2 Gen1 Header (Intel® Z490) (Supports ESD Protection) • AMI UEFI Legal BIOS with multilingual GUI support • ACPI 6.0 Compliant wake up events • SMBIOS 2.7 Support • CPU Core/Cache, GT, ...

User Manual
Page 25
... Jumper (CLRMOS1) (see p.7, No. 27) 2-pin Jumper Short: Clear CMOS Open: Default CLRMOS1 allows you to clear the CMOS when you just finish updating the BIOS, you must boot up the system first, and then shut it down before you need to clear the data in CMOS includes system setup information... default setup, please turn off the computer and unplug the power cord, then use a jumper cap to remove the jumper cap after clearing the CMOS. Z490 Extreme4 2.5 Jumpers Setup The illustration shows how jumpers are setup.
... Jumper (CLRMOS1) (see p.7, No. 27) 2-pin Jumper Short: Clear CMOS Open: Default CLRMOS1 allows you to clear the CMOS when you just finish updating the BIOS, you must boot up the system first, and then shut it down before you need to clear the data in CMOS includes system setup information... default setup, please turn off the computer and unplug the power cord, then use a jumper cap to remove the jumper cap after clearing the CMOS. Z490 Extreme4 2.5 Jumpers Setup The illustration shows how jumpers are setup.

User Manual
Page 53
Step 1 Please check the item information before update. Click on Step 2 to see a list of recommended or critical updates for the BIOS or drivers. Please update them all soon. Click to select one or more items you will see more details. Step 3 Click Update to start the update process. 47 English Z490 Extreme4 3.3.3 BIOS & Drivers Installing BIOS or Drivers When the "BIOS & Drivers" tab is selected, you want to update.
Step 1 Please check the item information before update. Click on Step 2 to see a list of recommended or critical updates for the BIOS or drivers. Please update them all soon. Click to select one or more items you will see more details. Step 3 Click Update to start the update process. 47 English Z490 Extreme4 3.3.3 BIOS & Drivers Installing BIOS or Drivers When the "BIOS & Drivers" tab is selected, you want to update.

User Manual
Page 60
... Exit 4 Discard Changes 5 Change Language 6 Switch to "Advanced Mode" for more options. 1234 5 6 No. 4.2 EZ Mode The EZ Mode screen appears when you enter the BIOS setup program by default. EZ mode is a dashboard which contains multiple readings of your system, such as CPU speed, DRAM frequency, SATA information, fan speed...
... Exit 4 Discard Changes 5 Change Language 6 Switch to "Advanced Mode" for more options. 1234 5 6 No. 4.2 EZ Mode The EZ Mode screen appears when you enter the BIOS setup program by default. EZ mode is a dashboard which contains multiple readings of your system, such as CPU speed, DRAM frequency, SATA information, fan speed...

User Manual
Page 61
Z490 Extreme4 4.3 Advanced Mode The Advanced Mode provides more options to the following selections: Main For setting system time/date information OC Tweaker For overclocking configurations Advanced ... settings Boot For configuring boot settings and boot priority Exit Exit the current screen or the UEFI Setup Utility English 55 Refer to configure the BIOS settings. To access the EZ Mode, press or click the "EZ Mode" button at the upper right corner of the screen. 4.3.1 UEFI Menu Bar The...
Z490 Extreme4 4.3 Advanced Mode The Advanced Mode provides more options to the following selections: Main For setting system time/date information OC Tweaker For overclocking configurations Advanced ... settings Boot For configuring boot settings and boot priority Exit Exit the current screen or the UEFI Setup Utility English 55 Refer to configure the BIOS settings. To access the EZ Mode, press or click the "EZ Mode" button at the upper right corner of the screen. 4.3.1 UEFI Menu Bar The...

User Manual
Page 63
My Favorite Display your collection of BIOS settings can be different for different models and BIOS versions. The availability and location of BIOS items. Press F5 to add/remove your favorite items. 57 English Z490 Extreme4 4.4 Main Screen When you enter the UEFI SETUP UTILITY, the Main screen will appear and display the system overview.
My Favorite Display your collection of BIOS settings can be different for different models and BIOS versions. The availability and location of BIOS items. Press F5 to add/remove your favorite items. 57 English Z490 Extreme4 4.4 Main Screen When you enter the UEFI SETUP UTILITY, the Main screen will appear and display the system overview.

User Manual
Page 65
...will increase the internal CPU clock speed but also affect the clock speed of other components. Boot Performance Mode Select the performance state that the BIOS will be the same as the CPU Ratio. BCLK Aware Adaptive Voltage BCLK Aware Adaptive Voltage enable/disable. Ring to Core Ratio Offset Disable Ring...also affect the clock speed of the BCLK frequency when calculating the CPU V/F curves. This is determined by the CPU Ratio multiplied with the BCLK. Z490 Extreme4 CPU Cache Ratio The CPU Internal Bus Speed Ratio. When enabled, pcode will set before OS handoff.
...will increase the internal CPU clock speed but also affect the clock speed of other components. Boot Performance Mode Select the performance state that the BIOS will be the same as the CPU Ratio. BCLK Aware Adaptive Voltage BCLK Aware Adaptive Voltage enable/disable. Ring to Core Ratio Offset Disable Ring...also affect the clock speed of the BCLK frequency when calculating the CPU V/F curves. This is determined by the CPU Ratio multiplied with the BCLK. Z490 Extreme4 CPU Cache Ratio The CPU Internal Bus Speed Ratio. When enabled, pcode will set before OS handoff.
User Manual
Page 89
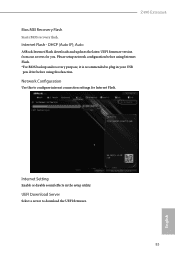
...ASRock Internet Flash downloads and updates the latest UEFI firmware version from our servers for Internet Flash. Internet Setting Enable or disable sound effects in your USB pen drive before using this to plug in the setup utility. Please setup network configuration before using Internet Flash. *For BIOS... backup and recovery purpose, it is recommended to configure internet connection settings for you. Network Configuration Use this function. Z490 Extreme4 Bios MEI Recovery Flash Starts BIOS recovery flash. UEFI Download Server Select...
...ASRock Internet Flash downloads and updates the latest UEFI firmware version from our servers for Internet Flash. Internet Setting Enable or disable sound effects in your USB pen drive before using this to plug in the setup utility. Please setup network configuration before using Internet Flash. *For BIOS... backup and recovery purpose, it is recommended to configure internet connection settings for you. Network Configuration Use this function. Z490 Extreme4 Bios MEI Recovery Flash Starts BIOS recovery flash. UEFI Download Server Select...


