
User Manual
Page 5
3.3.1 UI Overview 36 3.3.2 Apps 37 3.3.3 BIOS & Drivers 40 3.3.4 Setting 41 Chapter 4 UEFI SETUP UTILITY 42 4.1 Introduction 42 4.2 EZ Mode 43 4.3 Advanced Mode 44 4.3.1 UEFI Menu Bar 44 4.3.2 Navigation Keys 45 4.4 Main ...
3.3.1 UI Overview 36 3.3.2 Apps 37 3.3.3 BIOS & Drivers 40 3.3.4 Setting 41 Chapter 4 UEFI SETUP UTILITY 42 4.1 Introduction 42 4.2 EZ Mode 43 4.3 Advanced Mode 44 4.3.1 UEFI Menu Bar 44 4.3.2 Navigation Keys 45 4.4 Main ...
User Manual
Page 7
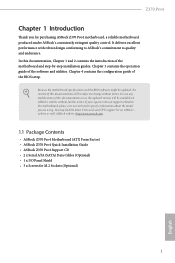
... the BIOS setup. You may find the latest VGA cards and CPU support list on ASRock's website without notice. In this documentation will be subject to change without further notice. Chapter 4 contains the configuration guide of the software and utilities. ASRock website http://www.asrock.com. 1.1 Package Contents • ASRock Z370 Pro4 Motherboard (ATX Form Factor) • ASRock Z370 Pro4...
... the BIOS setup. You may find the latest VGA cards and CPU support list on ASRock's website without notice. In this documentation will be subject to change without further notice. Chapter 4 contains the configuration guide of the software and utilities. ASRock website http://www.asrock.com. 1.1 Package Contents • ASRock Z370 Pro4 Motherboard (ATX Form Factor) • ASRock Z370 Pro4...
User Manual
Page 11
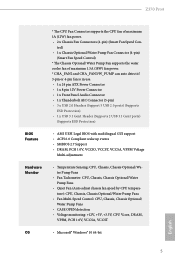
Z370 Pro4 BIOS Feature Hardware Monitor OS * The CPU Fan Connector supports the CPU fan of maximum 1.5A (18W) fan power. * CHA_FAN2 and CHA_FAN3/W_PUMP can auto detect ... (5-pin) • 3 x USB 2.0 Headers (Support 5 USB 2.0 ports) (Supports ESD Protection) • 1 x USB 3.1 Gen1 Header (Supports 2 USB 3.1 Gen1 ports) (Supports ESD Protection) • AMI UEFI Legal BIOS with multilingual GUI support • ACPI 6.0 Compliant wake up events • SMBIOS 2.7 Support • DRAM, PCH 1.0V, VCCIO, VCCST, VCCSA, VPPM Voltage Multi-adjustment •...
Z370 Pro4 BIOS Feature Hardware Monitor OS * The CPU Fan Connector supports the CPU fan of maximum 1.5A (18W) fan power. * CHA_FAN2 and CHA_FAN3/W_PUMP can auto detect ... (5-pin) • 3 x USB 2.0 Headers (Support 5 USB 2.0 ports) (Supports ESD Protection) • 1 x USB 3.1 Gen1 Header (Supports 2 USB 3.1 Gen1 ports) (Supports ESD Protection) • AMI UEFI Legal BIOS with multilingual GUI support • ACPI 6.0 Compliant wake up events • SMBIOS 2.7 Support • DRAM, PCH 1.0V, VCCIO, VCCST, VCCSA, VPPM Voltage Multi-adjustment •...

User Manual
Page 12
.... Certifications • FCC, CE • ErP/EuP ready (ErP/EuP ready power supply is required) * For detailed product information, please visit our website: http://www.asrock.com Please realize that there is a certain risk involved with overclocking, including adjusting the setting in the...
.... Certifications • FCC, CE • ErP/EuP ready (ErP/EuP ready power supply is required) * For detailed product information, please visit our website: http://www.asrock.com Please realize that there is a certain risk involved with overclocking, including adjusting the setting in the...

User Manual
Page 25
...cap to short the pins on the pins, the jumper is "Open". If you need to clear the CMOS when you just finish updating the BIOS, you must boot up the system first, and then shut it down before you to remove the jumper cap after clearing the CMOS. The ... cap is "Short". Please remember to clear the data in CMOS includes system setup information such as system password, date, time, and system setup parameters. Z370 Pro4 2.5 Jumpers Setup The illustration shows how jumpers are setup. Clear CMOS Jumper (CLRCMOS1) (see p.7, No. 21) 2-pin Jumper Short: Clear CMOS Open: Default CLRCMOS1...
...cap to short the pins on the pins, the jumper is "Open". If you need to clear the CMOS when you just finish updating the BIOS, you must boot up the system first, and then shut it down before you to remove the jumper cap after clearing the CMOS. The ... cap is "Short". Please remember to clear the data in CMOS includes system setup information such as system password, date, time, and system setup parameters. Z370 Pro4 2.5 Jumpers Setup The illustration shows how jumpers are setup. Clear CMOS Jumper (CLRCMOS1) (see p.7, No. 21) 2-pin Jumper Short: Clear CMOS Open: Default CLRCMOS1...

User Manual
Page 46
Step 1 Please check the item information before update. Click to select one or more details. Please update them all soon. Click on Step 2 to see a list of recommended or critical updates for the BIOS or drivers. Step 3 Click Update to start the update process. 40 English 3.3.3 BIOS & Drivers Installing BIOS or Drivers When the "BIOS & Drivers" tab is selected, you will see more items you want to update.
Step 1 Please check the item information before update. Click to select one or more details. Please update them all soon. Click on Step 2 to see a list of recommended or critical updates for the BIOS or drivers. Step 3 Click Update to start the update process. 40 English 3.3.3 BIOS & Drivers Installing BIOS or Drivers When the "BIOS & Drivers" tab is selected, you will see more items you want to update.

User Manual
Page 49
Z370 Pro4 4.2 EZ Mode The EZ Mode screen appears when you enter the BIOS setup program by default. No. Press or click the "Advanced Mode" button at the upper right corner of your system, such as CPU speed, DRAM frequency, SATA information, fan speed, etc. Function 1 Help 2 Load UEFI Defaults 3 Save Changes and Exit 4 Discard Changes 5 Change Language 6 Switch to "Advanced Mode" for more options. You can check the most crucial information of the screen to switch to Advanced Mode 43 English EZ mode is a dashboard which contains multiple readings of the system's current status.
Z370 Pro4 4.2 EZ Mode The EZ Mode screen appears when you enter the BIOS setup program by default. No. Press or click the "Advanced Mode" button at the upper right corner of your system, such as CPU speed, DRAM frequency, SATA information, fan speed, etc. Function 1 Help 2 Load UEFI Defaults 3 Save Changes and Exit 4 Discard Changes 5 Change Language 6 Switch to "Advanced Mode" for more options. You can check the most crucial information of the screen to switch to Advanced Mode 43 English EZ mode is a dashboard which contains multiple readings of the system's current status.

User Manual
Page 50
... settings Boot For configuring boot settings and boot priority Exit Exit the current screen or the UEFI Setup Utility English 44 Refer to configure the BIOS settings. To access the EZ Mode, press or click the "EZ Mode" button at the upper right corner of the screen. 4.3.1 UEFI Menu Bar The...
... settings Boot For configuring boot settings and boot priority Exit Exit the current screen or the UEFI Setup Utility English 44 Refer to configure the BIOS settings. To access the EZ Mode, press or click the "EZ Mode" button at the upper right corner of the screen. 4.3.1 UEFI Menu Bar The...

User Manual
Page 52
My Favorite Display your collection of BIOS items. Press F5 to add/remove your favorite items. 46 English 4.4 Main Screen When you enter the UEFI SETUP UTILITY, the Main screen will appear and display the system overview.
My Favorite Display your collection of BIOS items. Press F5 to add/remove your favorite items. 46 English 4.4 Main Screen When you enter the UEFI SETUP UTILITY, the Main screen will appear and display the system overview.
User Manual
Page 78
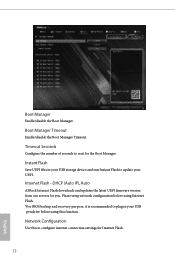
...number of seconds to configure internet connection settings for Internet Flash. 72 English Network Configuration Use this function. DHCP (Auto IP), Auto ASRock Internet Flash downloads and updates the latest UEFI firmware version from our servers for the Boot Manager. Instant Flash Save UEFI files in ...your USB storage device and run Instant Flash to update your USB pen drive before using Internet Flash. *For BIOS backup and recovery purpose, it is recommended to plug in your UEFI. Boot Manager Enable/disable the Boot Manager. Boot Manager Timeout Enable...
...number of seconds to configure internet connection settings for Internet Flash. 72 English Network Configuration Use this function. DHCP (Auto IP), Auto ASRock Internet Flash downloads and updates the latest UEFI firmware version from our servers for the Boot Manager. Instant Flash Save UEFI files in ...your USB storage device and run Instant Flash to update your USB pen drive before using Internet Flash. *For BIOS backup and recovery purpose, it is recommended to plug in your UEFI. Boot Manager Enable/disable the Boot Manager. Boot Manager Timeout Enable...


