User Manual
Page 5
Chapter 3 Software and Utilities Operation 48 3.1 Installing Drivers 48 3.2 A-Tuning 49 3.2.1 Installing A-Tuning 49 3.2.2 Using A-Tuning 49 3.3 ASRock Live Update & APP Shop 52 3.3.1 UI Overview 52 3.3.2 Apps 53 3.3.3 BIOS & Drivers 56 3.3.4 Setting 57 Chapter 4 UEFI SETUP UTILITY 60 4.1 Introduction 60 4.1.1 UEFI Menu Bar 60 4.1.2 Navigation Keys 61 4.2 Main Screen 62 4.3 OC Tweaker Screen 63...
Chapter 3 Software and Utilities Operation 48 3.1 Installing Drivers 48 3.2 A-Tuning 49 3.2.1 Installing A-Tuning 49 3.2.2 Using A-Tuning 49 3.3 ASRock Live Update & APP Shop 52 3.3.1 UI Overview 52 3.3.2 Apps 53 3.3.3 BIOS & Drivers 56 3.3.4 Setting 57 Chapter 4 UEFI SETUP UTILITY 60 4.1 Introduction 60 4.1.1 UEFI Menu Bar 60 4.1.2 Navigation Keys 61 4.2 Main Screen 62 4.3 OC Tweaker Screen 63...
User Manual
Page 7
... the latest VGA cards and CPU support list on ASRock's website without notice. Because the motherboard specifications and the BIOS software might be updated, the content of the motherboard and step-by-step installation guides. Chapter 4 contains the configuration guide of the software and utilities. X370 Taichi Chapter 1 Introduction Thank you are using. In case...
... the latest VGA cards and CPU support list on ASRock's website without notice. Because the motherboard specifications and the BIOS software might be updated, the content of the motherboard and step-by-step installation guides. Chapter 4 contains the configuration guide of the software and utilities. X370 Taichi Chapter 1 Introduction Thank you are using. In case...
User Manual
Page 11
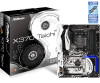
X370 Taichi • 1 x AMD LED Fan USB Header • 2 x USB 2.0 Headers (Support 4 USB 2.0 ports) (Supports ESD Protection) • 2 x USB 3.0 Headers (Support 4 USB 3.0 ports) (Supports ESD Protection) • 1 x Dr. Debug with LED BIOS Feature • AMI UEFI Legal BIOS with multilingual GUI support • Supports "...05V, +1.8V, VDDP OS • Microsoft® Windows® 10 64-bit * For the updated Windows® 10 driver, please visit ASRock's website for details: http://www.asrock.com Certifications • FCC, CE, WHQL • ErP/EuP ready (ErP/EuP ready power supply...
X370 Taichi • 1 x AMD LED Fan USB Header • 2 x USB 2.0 Headers (Support 4 USB 2.0 ports) (Supports ESD Protection) • 2 x USB 3.0 Headers (Support 4 USB 3.0 ports) (Supports ESD Protection) • 1 x Dr. Debug with LED BIOS Feature • AMI UEFI Legal BIOS with multilingual GUI support • Supports "...05V, +1.8V, VDDP OS • Microsoft® Windows® 10 64-bit * For the updated Windows® 10 driver, please visit ASRock's website for details: http://www.asrock.com Certifications • FCC, CE, WHQL • ErP/EuP ready (ErP/EuP ready power supply...
User Manual
Page 32
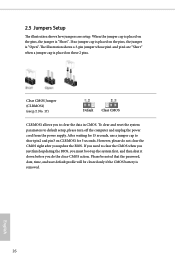
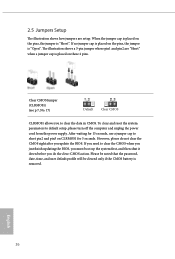
Clear CMOS Jumper (CLRMOS1) (see p.7, No. 17) Default Clear CMOS CLRMOS1 allows you to clear the CMOS when you just finish updating the BIOS, you must boot up the system first, and then shut it down before you do not clear the CMOS right after you need to clear ... do the clear-CMOS action. 2.5 Jumpers Setup The illustration shows how jumpers are "Short" when a jumper cap is placed on these 2 pins. If you update the BIOS. The illustration shows a 3-pin jumper whose pin1 and pin2 are setup. Please be noted that the password, date, time, and user default profile will be...
Clear CMOS Jumper (CLRMOS1) (see p.7, No. 17) Default Clear CMOS CLRMOS1 allows you to clear the CMOS when you just finish updating the BIOS, you must boot up the system first, and then shut it down before you do not clear the CMOS right after you need to clear ... do the clear-CMOS action. 2.5 Jumpers Setup The illustration shows how jumpers are "Short" when a jumper cap is placed on these 2 pins. If you update the BIOS. The illustration shows a 3-pin jumper whose pin1 and pin2 are setup. Please be noted that the password, date, time, and user default profile will be...

User Manual
Page 62
Step 1 Please check the item information before update. Click on Step 2 to see more items you will see a list of recommended or critical updates for the BIOS or drivers. 3.3.3 BIOS & Drivers Installing BIOS or Drivers When the "BIOS & Drivers" tab is selected, you want to update. Click to start the update process. 56 English Step 3 Click Update to select one or more details. Please update them all soon.
Step 1 Please check the item information before update. Click on Step 2 to see more items you will see a list of recommended or critical updates for the BIOS or drivers. 3.3.3 BIOS & Drivers Installing BIOS or Drivers When the "BIOS & Drivers" tab is selected, you want to update. Click to start the update process. 56 English Step 3 Click Update to select one or more details. Please update them all soon.
User Manual
Page 79
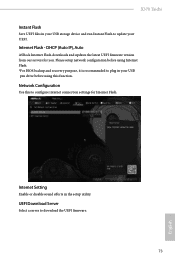
... before using Internet Flash. *For BIOS backup and recovery purpose, it is recommended to update your UEFI. X370 Taichi Instant Flash Save UEFI files in your USB storage device and run Instant Flash to plug in the setup utility. Internet Flash - DHCP (Auto IP), Auto ASRock Internet Flash downloads and updates the latest UEFI firmware version...
... before using Internet Flash. *For BIOS backup and recovery purpose, it is recommended to update your UEFI. X370 Taichi Instant Flash Save UEFI files in your USB storage device and run Instant Flash to plug in the setup utility. Internet Flash - DHCP (Auto IP), Auto ASRock Internet Flash downloads and updates the latest UEFI firmware version...
Quick Installation Guide
Page 7
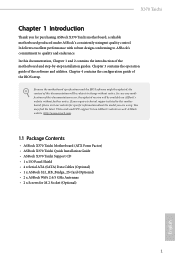
... quality and endurance. Because the motherboard specifications and the BIOS software might be updated, the content of this documentation will be subject to change without further notice. ASRock website http://www.asrock.com. 1.1 Package Contents • ASRock X370 Taichi Motherboard (ATX Form Factor) • ASRock X370 Taichi Quick Installation Guide • ASRock X370 Taichi Support CD • 1 x I/O Panel Shield • 4 x Serial ATA (SATA...
... quality and endurance. Because the motherboard specifications and the BIOS software might be updated, the content of this documentation will be subject to change without further notice. ASRock website http://www.asrock.com. 1.1 Package Contents • ASRock X370 Taichi Motherboard (ATX Form Factor) • ASRock X370 Taichi Quick Installation Guide • ASRock X370 Taichi Support CD • 1 x I/O Panel Shield • 4 x Serial ATA (SATA...
Quick Installation Guide
Page 11
X370 Taichi • 1 x AMD LED Fan USB Header • 2 x USB 2.0 Headers (Support 4 USB 2.0 ports) (Supports ESD Protection) • 2 x USB 3.0 Headers (Support 4 USB 3.0 ports) (Supports ESD Protection) • 1 x Dr. Debug with LED BIOS Feature • AMI UEFI Legal BIOS with multilingual GUI support • Supports "...05V, +1.8V, VDDP OS • Microsoft® Windows® 10 64-bit * For the updated Windows® 10 driver, please visit ASRock's website for details: http://www.asrock.com Certifications • FCC, CE, WHQL • ErP/EuP ready (ErP/EuP ready power supply...
X370 Taichi • 1 x AMD LED Fan USB Header • 2 x USB 2.0 Headers (Support 4 USB 2.0 ports) (Supports ESD Protection) • 2 x USB 3.0 Headers (Support 4 USB 3.0 ports) (Supports ESD Protection) • 1 x Dr. Debug with LED BIOS Feature • AMI UEFI Legal BIOS with multilingual GUI support • Supports "...05V, +1.8V, VDDP OS • Microsoft® Windows® 10 64-bit * For the updated Windows® 10 driver, please visit ASRock's website for details: http://www.asrock.com Certifications • FCC, CE, WHQL • ErP/EuP ready (ErP/EuP ready power supply...
Quick Installation Guide
Page 28
... illustration shows a 3-pin jumper whose pin1 and pin2 are setup. Clear CMOS Jumper (CLRMOS1) (see p.7, No. 17) Default Clear CMOS CLRMOS1 allows you update the BIOS. To clear and reset the system parameters to short pin2 and pin3 on these 2 pins. However, please do the clear-CMOS action. When the jumper... The illustration shows how jumpers are "Short" when a jumper cap is removed. If you need to clear the CMOS when you just finish updating the BIOS, you must boot up the system first, and then shut it down before you do not clear the CMOS right after you to clear the...
... illustration shows a 3-pin jumper whose pin1 and pin2 are setup. Clear CMOS Jumper (CLRMOS1) (see p.7, No. 17) Default Clear CMOS CLRMOS1 allows you update the BIOS. To clear and reset the system parameters to short pin2 and pin3 on these 2 pins. However, please do the clear-CMOS action. When the jumper... The illustration shows how jumpers are "Short" when a jumper cap is removed. If you need to clear the CMOS when you just finish updating the BIOS, you must boot up the system first, and then shut it down before you do not clear the CMOS right after you to clear the...


