RAID Installation Guide
Page 1
AMD Windows RAID Installation Guide 16 1 AMD RAID Installation Guide 1. AMD BIOS RAID Installation Guide ...2 1.1 Introduction to RAID...2 1.2 RAID Configurations Precautions 4 1.3 Legacy RAID ROM Configuration (for AMD X370, B350, and A320 Chipsets 5 1.4 UEFI RAID Configuration (for AMD X399, X370, B350, and A320 Chipsets 11 2.
AMD Windows RAID Installation Guide 16 1 AMD RAID Installation Guide 1. AMD BIOS RAID Installation Guide ...2 1.1 Introduction to RAID...2 1.2 RAID Configurations Precautions 4 1.3 Legacy RAID ROM Configuration (for AMD X370, B350, and A320 Chipsets 5 1.4 UEFI RAID Configuration (for AMD X399, X370, B350, and A320 Chipsets 11 2.
RAID Installation Guide
Page 2
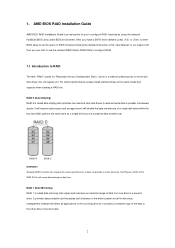
...cause data damage or data loss. It provides data protection and increases fault tolerance to RAID mode by using the onboard FastBuild BIOS utility under BIOS environment. For optimal performance, please install identical drives of the same model and capacity when creating a RAID set the option to...all applications to the surviving drive as a single drive but at a sustained data transfer rate. Hot-Plug any fault tolerance. AMD BIOS RAID Installation Guide AMD BIOS RAID Installation Guide is a method combining two or more hard disk drives into one drive fails. 2 After you make a SATA ...
...cause data damage or data loss. It provides data protection and increases fault tolerance to RAID mode by using the onboard FastBuild BIOS utility under BIOS environment. For optimal performance, please install identical drives of the same model and capacity when creating a RAID set the option to...all applications to the surviving drive as a single drive but at a sustained data transfer rate. Hot-Plug any fault tolerance. AMD BIOS RAID Installation Guide AMD BIOS RAID Installation Guide is a method combining two or more hard disk drives into one drive fails. 2 After you make a SATA ...
RAID Installation Guide
Page 5
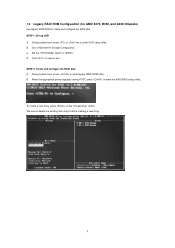
... RAID disk A. When the appropriate prompt appears during POST, press to enter UEFI setup utility. During system boot, press or key to enter the RAID BIOS setup utility. B. B. STEP 1: Set up UEFI A. D. C. During system boot, press to create and configure the RAID disk. 1.3 Legacy RAID ROM Configuration (for AMD...
... RAID disk A. When the appropriate prompt appears during POST, press to enter UEFI setup utility. During system boot, press or key to enter the RAID BIOS setup utility. B. B. STEP 1: Set up UEFI A. D. C. During system boot, press to create and configure the RAID disk. 1.3 Legacy RAID ROM Configuration (for AMD...

RAID Installation Guide
Page 7
Press to proceed. Select a caching mode and press to exit the RAID BIOS utility. 7 Press to confirm and then press to return to the previous screen. When completed, you will see the new array on the main screen.
Press to proceed. Select a caching mode and press to exit the RAID BIOS utility. 7 Press to confirm and then press to return to the previous screen. When completed, you will see the new array on the main screen.
Quick Installation Guide
Page 7
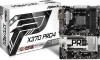
...endurance. You may find the latest VGA cards and CPU support list on ASRock's website without notice. ASRock website http://www.asrock.com. 1.1 Package Contents • ASRock X370 Pro4 Motherboard (ATX Form Factor) • ASRock X370 Pro4 Quick Installation Guide • ASRock X370 Pro4 Support CD • 1 x I/O Panel Shield • 2 x ... case any modifications of this manual occur, the updated version will be available on ASRock's website as well. Because the motherboard specifications and the BIOS software might be updated, the content of this manual will be subject to change...
...endurance. You may find the latest VGA cards and CPU support list on ASRock's website without notice. ASRock website http://www.asrock.com. 1.1 Package Contents • ASRock X370 Pro4 Motherboard (ATX Form Factor) • ASRock X370 Pro4 Quick Installation Guide • ASRock X370 Pro4 Support CD • 1 x I/O Panel Shield • 2 x ... case any modifications of this manual occur, the updated version will be available on ASRock's website as well. Because the motherboard specifications and the BIOS software might be updated, the content of this manual will be subject to change...

Quick Installation Guide
Page 11
..., or even cause damage to the components and devices of your own risk and expense. We are not responsible for possible damage caused by overclocking. X370 Pro4 BIOS Feature Hardware Monitor OS Certifications • 1 x 24 pin ATX Power Connector • 1 x 8 pin 12V Power Connector • 1 x Front Panel Audio Connector • 2...• ErP/EuP ready (ErP/EuP ready power supply is required) * For detailed product information, please visit our website: http://www.asrock.com Please realize that there is a certain risk involved with overclocking, including adjusting the setting in the...
..., or even cause damage to the components and devices of your own risk and expense. We are not responsible for possible damage caused by overclocking. X370 Pro4 BIOS Feature Hardware Monitor OS Certifications • 1 x 24 pin ATX Power Connector • 1 x 8 pin 12V Power Connector • 1 x Front Panel Audio Connector • 2...• ErP/EuP ready (ErP/EuP ready power supply is required) * For detailed product information, please visit our website: http://www.asrock.com Please realize that there is a certain risk involved with overclocking, including adjusting the setting in the...
Quick Installation Guide
Page 27
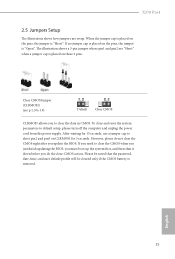
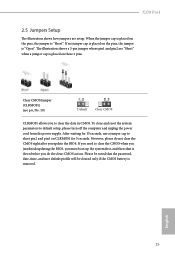
... when you just finish updating the BIOS, you must boot up the system first, and then shut it down before you do not clear the CMOS right after you to default setup, please turn off the computer and unplug the power cord from the power supply. X370 Pro4 2.5 Jumpers Setup The illustration shows... reset the system parameters to clear the data in CMOS. Clear CMOS Jumper (CLRMOS1) (see p.1, No. 19) Default Clear CMOS CLRMOS1 allows you update the BIOS. However, please do the clear-CMOS action. If no jumper cap is placed on the pins, the jumper is removed.
... when you just finish updating the BIOS, you must boot up the system first, and then shut it down before you do not clear the CMOS right after you to default setup, please turn off the computer and unplug the power cord from the power supply. X370 Pro4 2.5 Jumpers Setup The illustration shows... reset the system parameters to clear the data in CMOS. Clear CMOS Jumper (CLRMOS1) (see p.1, No. 19) Default Clear CMOS CLRMOS1 allows you update the BIOS. However, please do the clear-CMOS action. If no jumper cap is placed on the pins, the jumper is removed.
User Manual
Page 4
... Connectors 26 2.7 M.2_SSD (NGFF) Module Installation Guide (M2_1) 31 2.8 M.2_SSD (NGFF) Module Installation Guide (M2_2) 34 Chapter 3 Software and Utilities Operation 37 3.1 Installing Drivers 37 3.2 ASRock Live Update & APP Shop 38 3.2.1 UI Overview 38 3.2.2 Apps 39 3.2.3 BIOS & Drivers 42 3.2.4 Setting 43 3.3 ASRock RGB LED 44
... Connectors 26 2.7 M.2_SSD (NGFF) Module Installation Guide (M2_1) 31 2.8 M.2_SSD (NGFF) Module Installation Guide (M2_2) 34 Chapter 3 Software and Utilities Operation 37 3.1 Installing Drivers 37 3.2 ASRock Live Update & APP Shop 38 3.2.1 UI Overview 38 3.2.2 Apps 39 3.2.3 BIOS & Drivers 42 3.2.4 Setting 43 3.3 ASRock RGB LED 44
User Manual
Page 6
...) 1 English Because the motherboard specifications and the BIOS software might be updated, the content of this manual occur, the updated version will be available on ASRock's website as well. ASRock website http://www.asrock.com. 1.1 Package Contents • ASRock X370 Pro4 Motherboard (ATX Form Factor) • ASRock X370 Pro4 Quick Installation Guide • ASRock X370 Pro4 Support CD • 1 x I/O Panel Shield • 2 x Serial...
...) 1 English Because the motherboard specifications and the BIOS software might be updated, the content of this manual occur, the updated version will be available on ASRock's website as well. ASRock website http://www.asrock.com. 1.1 Package Contents • ASRock X370 Pro4 Motherboard (ATX Form Factor) • ASRock X370 Pro4 Quick Installation Guide • ASRock X370 Pro4 Support CD • 1 x I/O Panel Shield • 2 x Serial...

User Manual
Page 10
... devices of your own risk and expense. It should be done at your system. English 5 We are not responsible for possible damage caused by overclocking. X370 Pro4 BIOS Feature Hardware Monitor OS Certifications • 1 x 24 pin ATX Power Connector • 1 x 8 pin 12V Power Connector • 1 x Front Panel Audio Connector •...; ErP/EuP ready (ErP/EuP ready power supply is required) * For detailed product information, please visit our website: http://www.asrock.com Please realize that there is a certain risk involved with overclocking, including adjusting the setting in the...
... devices of your own risk and expense. It should be done at your system. English 5 We are not responsible for possible damage caused by overclocking. X370 Pro4 BIOS Feature Hardware Monitor OS Certifications • 1 x 24 pin ATX Power Connector • 1 x 8 pin 12V Power Connector • 1 x Front Panel Audio Connector •...; ErP/EuP ready (ErP/EuP ready power supply is required) * For detailed product information, please visit our website: http://www.asrock.com Please realize that there is a certain risk involved with overclocking, including adjusting the setting in the...
User Manual
Page 30
... p.6, No. 19) Default Clear CMOS CLRMOS1 allows you update the BIOS. However, please do the clear-CMOS action. Please be noted that the password, date, time, and user default profile will be cleared only if the CMOS battery is "Open". English 25 X370 Pro4 2.5 Jumpers Setup The illustration shows how jumpers are "Short... no jumper cap is placed on these 2 pins. To clear and reset the system parameters to clear the CMOS when you just finish updating the BIOS, you must boot up the system first, and then shut it down before you do not clear the CMOS right after you to short pin2...
... p.6, No. 19) Default Clear CMOS CLRMOS1 allows you update the BIOS. However, please do the clear-CMOS action. Please be noted that the password, date, time, and user default profile will be cleared only if the CMOS battery is "Open". English 25 X370 Pro4 2.5 Jumpers Setup The illustration shows how jumpers are "Short... no jumper cap is placed on these 2 pins. To clear and reset the system parameters to clear the CMOS when you just finish updating the BIOS, you must boot up the system first, and then shut it down before you do not clear the CMOS right after you to short pin2...
User Manual
Page 47
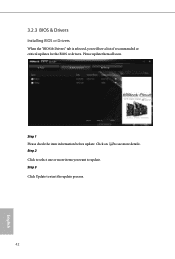
Please update them all soon. 3.2.3 BIOS & Drivers Installing BIOS or Drivers When the "BIOS & Drivers" tab is selected, you want to update. Click on Step 2 to see more items you will see a list of recommended or critical updates for the BIOS or drivers. Step 3 Click Update to select one or more details. Step 1 Please check the item information before update. Click to start the update process. 42 English
Please update them all soon. 3.2.3 BIOS & Drivers Installing BIOS or Drivers When the "BIOS & Drivers" tab is selected, you want to update. Click on Step 2 to see more items you will see a list of recommended or critical updates for the BIOS or drivers. Step 3 Click Update to select one or more details. Step 1 Please check the item information before update. Click to start the update process. 42 English
User Manual
Page 65
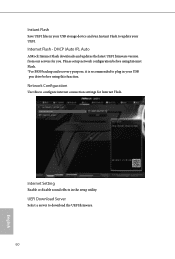
Internet Setting Enable or disable sound effects in the setup utility. Please setup network configuration before using Internet Flash. *For BIOS backup and recovery purpose, it is recommended to download the UEFI firmware. 60 English UEFI Download Server Select a server to plug in your USB pen...configure internet connection settings for you. Network Configuration Use this function. Instant Flash Save UEFI files in your UEFI. Internet Flash - DHCP (Auto IP), Auto ASRock Internet Flash downloads and updates the latest UEFI firmware version from our servers for Internet Flash.
Internet Setting Enable or disable sound effects in the setup utility. Please setup network configuration before using Internet Flash. *For BIOS backup and recovery purpose, it is recommended to download the UEFI firmware. 60 English UEFI Download Server Select a server to plug in your USB pen...configure internet connection settings for you. Network Configuration Use this function. Instant Flash Save UEFI files in your UEFI. Internet Flash - DHCP (Auto IP), Auto ASRock Internet Flash downloads and updates the latest UEFI firmware version from our servers for Internet Flash.


