
User Manual
Page 6
... 41 Chapter 3 Software and Utilities Operation 45 3.1 Installing Drivers 45 3.2 A-Tuning 46 3.2.1 Installing A-Tuning 46 3.2.2 Using A-Tuning 46 3.3 ASRock Live Update & APP Shop 49 3.3.1 UI Overview 49 3.3.2 Apps 50 3.3.3 BIOS & Drivers 53 3.3.4 Setting 54 3.4 ASRock RGB LED 55 Chapter 4 UEFI SETUP UTILITY 57 4.1 Introduction 57 4.2 EZ Mode 58 4.3 Advanced Mode 59 4.3.1 UEFI Menu...
... 41 Chapter 3 Software and Utilities Operation 45 3.1 Installing Drivers 45 3.2 A-Tuning 46 3.2.1 Installing A-Tuning 46 3.2.2 Using A-Tuning 46 3.3 ASRock Live Update & APP Shop 49 3.3.1 UI Overview 49 3.3.2 Apps 50 3.3.3 BIOS & Drivers 53 3.3.4 Setting 54 3.4 ASRock RGB LED 55 Chapter 4 UEFI SETUP UTILITY 57 4.1 Introduction 57 4.2 EZ Mode 58 4.3 Advanced Mode 59 4.3.1 UEFI Menu...
User Manual
Page 8
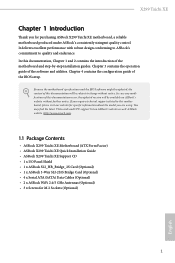
... and the BIOS software might be updated, the content of the motherboard and step-by-step installation guides. You may find the latest VGA cards and CPU support list on ASRock's website without... M.2 Sockets (Optional) 1 English ASRock website http://www.asrock.com. 1.1 Package Contents • ASRock X299 Taichi XE Motherboard (ATX Form Factor) • ASRock X299 Taichi XE Quick Installation Guide • ASRock X299 Taichi XE Support CD • 1 x I/O Panel Shield • 1 x ASRock SLI_HB_Bridge_2S Card (Optional) • 1 x ASRock 3-Way SLI-2S1S Bridge Card (Optional...
... and the BIOS software might be updated, the content of the motherboard and step-by-step installation guides. You may find the latest VGA cards and CPU support list on ASRock's website without... M.2 Sockets (Optional) 1 English ASRock website http://www.asrock.com. 1.1 Package Contents • ASRock X299 Taichi XE Motherboard (ATX Form Factor) • ASRock X299 Taichi XE Quick Installation Guide • ASRock X299 Taichi XE Support CD • 1 x I/O Panel Shield • 1 x ASRock SLI_HB_Bridge_2S Card (Optional) • 1 x ASRock 3-Way SLI-2S1S Bridge Card (Optional...

User Manual
Page 11
... supported on USB3_12 ports. • 4 x USB 3.1 Gen1 Ports (Supports ESD Protection (ASRock Full Spike Protection)) • 2 x RJ-45 LAN Ports with LED (ACT/LINK LED and SPEED LED) • 1 x BIOS Flashback Button • 1 x Clear CMOS Button • HD Audio Jacks: Rear Speaker ...8226; 1 x USB 3.1 Gen2 Type-A Port (10 Gb/s) (ASMedia ASM3142) (Supports ESD Protection (ASRock Full Spike Protection)) • 1 x USB 3.1 Gen2 Type-C Port (10 Gb/s) (ASMedia ASM3142) (Supports ESD Protection (ASRock Full Spike Protection)) * Ultra USB Power is supported on USB3_12 ports. * ACPI wake-up to Gen3 ...
... supported on USB3_12 ports. • 4 x USB 3.1 Gen1 Ports (Supports ESD Protection (ASRock Full Spike Protection)) • 2 x RJ-45 LAN Ports with LED (ACT/LINK LED and SPEED LED) • 1 x BIOS Flashback Button • 1 x Clear CMOS Button • HD Audio Jacks: Rear Speaker ...8226; 1 x USB 3.1 Gen2 Type-A Port (10 Gb/s) (ASMedia ASM3142) (Supports ESD Protection (ASRock Full Spike Protection)) • 1 x USB 3.1 Gen2 Type-C Port (10 Gb/s) (ASMedia ASM3142) (Supports ESD Protection (ASRock Full Spike Protection)) * Ultra USB Power is supported on USB3_12 ports. * ACPI wake-up to Gen3 ...
User Manual
Page 13
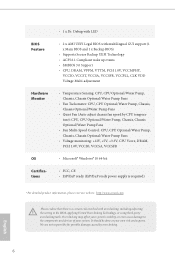
... Hardware Monitor OS Certifications • 1 x Dr. Debug with LED • 2 x AMI UEFI Legal BIOS with multilingual GUI support (1 x Main BIOS and 1 x Backup BIOS) • Supports Secure Backup UEFI Technology • ACPI 6.1 Compliant wake up events • SMBIOS 3.0 Support • CPU, DRAM, VPPM, VTTM, PCH 1.0V, VCCMPHY, ... FCC, CE • ErP/EuP ready (ErP/EuP ready power supply is required) * For detailed product information, please visit our website: http://www.asrock.com Please realize that there is a certain risk involved with overclocking, including adjusting the setting in the...
... Hardware Monitor OS Certifications • 1 x Dr. Debug with LED • 2 x AMI UEFI Legal BIOS with multilingual GUI support (1 x Main BIOS and 1 x Backup BIOS) • Supports Secure Backup UEFI Technology • ACPI 6.1 Compliant wake up events • SMBIOS 3.0 Support • CPU, DRAM, VPPM, VTTM, PCH 1.0V, VCCMPHY, ... FCC, CE • ErP/EuP ready (ErP/EuP ready power supply is required) * For detailed product information, please visit our website: http://www.asrock.com Please realize that there is a certain risk involved with overclocking, including adjusting the setting in the...
User Manual
Page 14
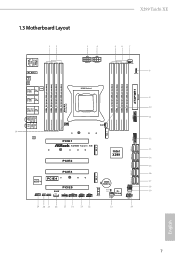
1.3 Motherboard Layout X299 Taichi XE 12 3 4 56 7 USB 2.0 T: USB1 B: USB2 PS2 Keyboard /Mouse M2_WIFI_1 BIOS _FB1 CLRC BTN1 USB 3.1 Gen1 Top: T: USB1 B: USB2 RJ-45 LAN USB 3.1 Gen1 T: USB3 Top: B: USB4 RJ-45 ATX12V2...Bottom: MIC IN 30 LAN M2_1 PCIE1 X299 Taichi XE PCIE2 M2_2 SATA3_2_3 SATA3_0_1 1 12 13 Intel X299 14 15 USB3_5_6 SATA3_4_5 SATA3_A1_A2 SATA3_6_7 PCIE3 Purity SoundTM 4 PCIE4 HD_AUDIO1 1 CLRMOS1 RGB_LED1 1 1 RoHS VROC1 1 PCIE5 T B1 TPMS1 1 1 USB3_4 1 USB5_6 1 M2_3 BIOS_B1 BIOS BIOS BIOS_A1 BIOS_A_LED1 BIOS_B_LED1 Dr. Debug CHA_FAN3/ ...
1.3 Motherboard Layout X299 Taichi XE 12 3 4 56 7 USB 2.0 T: USB1 B: USB2 PS2 Keyboard /Mouse M2_WIFI_1 BIOS _FB1 CLRC BTN1 USB 3.1 Gen1 Top: T: USB1 B: USB2 RJ-45 LAN USB 3.1 Gen1 T: USB3 Top: B: USB4 RJ-45 ATX12V2...Bottom: MIC IN 30 LAN M2_1 PCIE1 X299 Taichi XE PCIE2 M2_2 SATA3_2_3 SATA3_0_1 1 12 13 Intel X299 14 15 USB3_5_6 SATA3_4_5 SATA3_A1_A2 SATA3_6_7 PCIE3 Purity SoundTM 4 PCIE4 HD_AUDIO1 1 CLRMOS1 RGB_LED1 1 1 RoHS VROC1 1 PCIE5 T B1 TPMS1 1 1 USB3_4 1 USB5_6 1 M2_3 BIOS_B1 BIOS BIOS BIOS_A1 BIOS_A_LED1 BIOS_B_LED1 Dr. Debug CHA_FAN3/ ...
User Manual
Page 29
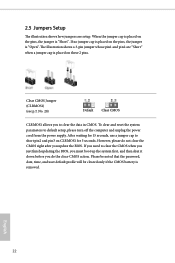
... CMOS CLRMOS1 allows you to default setup, please turn off the computer and unplug the power cord from the power supply. If you update the BIOS. When the jumper cap is "Short". To clear and reset the system parameters to clear the data in CMOS. However, please do the clear-CMOS... action. If no jumper cap is placed on CLRMOS1 for 15 seconds, use a jumper cap to clear the CMOS when you just finish updating the BIOS, you must boot up the system first, and then shut it down before you do not clear the CMOS right after you need to short...
... CMOS CLRMOS1 allows you to default setup, please turn off the computer and unplug the power cord from the power supply. If you update the BIOS. When the jumper cap is "Short". To clear and reset the system parameters to clear the data in CMOS. However, please do the clear-CMOS... action. If no jumper cap is placed on CLRMOS1 for 15 seconds, use a jumper cap to clear the CMOS when you just finish updating the BIOS, you must boot up the system first, and then shut it down before you do not clear the CMOS right after you need to short...
User Manual
Page 36
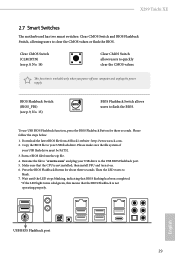
... the zip file. 4. Extract BIOS file from ASRock's website : http://www.asrock.com. 2. then install PSU and turn it on. 6. Wait until the LED stops blinking, indicating that BIOS flashing has been completed. *If the LED light turns solid green, this means that the CPU is not operating properly. X299 Taichi XE 2.7 Smart Switches The motherboard has...
... the zip file. 4. Extract BIOS file from ASRock's website : http://www.asrock.com. 2. then install PSU and turn it on. 6. Wait until the LED stops blinking, indicating that BIOS flashing has been completed. *If the LED light turns solid green, this means that the CPU is not operating properly. X299 Taichi XE 2.7 Smart Switches The motherboard has...
User Manual
Page 60
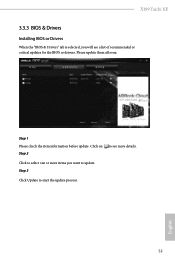
Click on Step 2 to see more items you will see a list of recommended or critical updates for the BIOS or drivers. Step 1 Please check the item information before update. Step 3 Click Update to select one or more details. Click to start the update process. 53 English Please update them all soon. X299 Taichi XE 3.3.3 BIOS & Drivers Installing BIOS or Drivers When the "BIOS & Drivers" tab is selected, you want to update.
Click on Step 2 to see more items you will see a list of recommended or critical updates for the BIOS or drivers. Step 1 Please check the item information before update. Step 3 Click Update to select one or more details. Click to start the update process. 53 English Please update them all soon. X299 Taichi XE 3.3.3 BIOS & Drivers Installing BIOS or Drivers When the "BIOS & Drivers" tab is selected, you want to update.
User Manual
Page 65
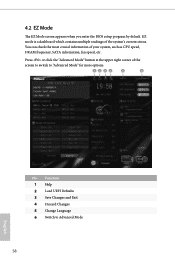
Press or click the "Advanced Mode" button at the upper right corner of the system's current status. Function 1 Help 2 Load UEFI Defaults 3 Save Changes and Exit 4 Discard Changes 5 Change Language 6 Switch to "Advanced Mode" for more options. No. EZ mode is a dashboard which contains multiple readings of the screen to switch to Advanced Mode 58 English You can check the most crucial information of your system, such as CPU speed, DRAM frequency, SATA information, fan speed, etc. 4.2 EZ Mode The EZ Mode screen appears when you enter the BIOS setup program by default.
Press or click the "Advanced Mode" button at the upper right corner of the system's current status. Function 1 Help 2 Load UEFI Defaults 3 Save Changes and Exit 4 Discard Changes 5 Change Language 6 Switch to "Advanced Mode" for more options. No. EZ mode is a dashboard which contains multiple readings of the screen to switch to Advanced Mode 58 English You can check the most crucial information of your system, such as CPU speed, DRAM frequency, SATA information, fan speed, etc. 4.2 EZ Mode The EZ Mode screen appears when you enter the BIOS setup program by default.
User Manual
Page 66
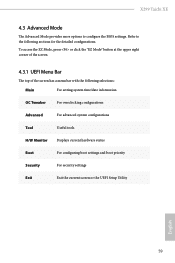
X299 Taichi XE 4.3 Advanced Mode The Advanced Mode provides more options to the following selections: Main For setting system time/date information OC Tweaker For overclocking configurations Advanced ... boot settings and boot priority Security For security settings Exit Exit the current screen or the UEFI Setup Utility English 59 Refer to configure the BIOS settings. To access the EZ Mode, press or click the "EZ Mode" button at the upper right corner of the screen. 4.3.1 UEFI Menu Bar The...
X299 Taichi XE 4.3 Advanced Mode The Advanced Mode provides more options to the following selections: Main For setting system time/date information OC Tweaker For overclocking configurations Advanced ... boot settings and boot priority Security For security settings Exit Exit the current screen or the UEFI Setup Utility English 59 Refer to configure the BIOS settings. To access the EZ Mode, press or click the "EZ Mode" button at the upper right corner of the screen. 4.3.1 UEFI Menu Bar The...
User Manual
Page 68
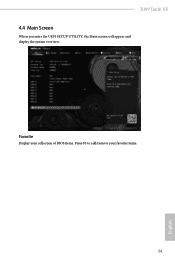
Favorite Display your collection of BIOS items. Press F5 to add/remove your favorite items. 61 English X299 Taichi XE 4.4 Main Screen When you enter the UEFI SETUP UTILITY, the Main screen will appear and display the system overview.
Favorite Display your collection of BIOS items. Press F5 to add/remove your favorite items. 61 English X299 Taichi XE 4.4 Main Screen When you enter the UEFI SETUP UTILITY, the Main screen will appear and display the system overview.
User Manual
Page 70
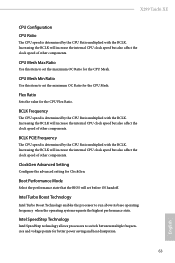
Increasing the BCLK will set the maximum OC Ratio for the CPU Mesh. Boot Performance Mode Select the performance state that the BIOS will increase the internal CPU clock speed but also affect the clock speed of other components. CPU Mesh Min Ratio Use this item ...by the CPU Ratio multiplied with the BCLK. BCLK PCIE Frequency The CPU speed is determined by the CPU Ratio multiplied with the BCLK. X299 Taichi XE CPU Configuration CPU Ratio The CPU speed is determined by the CPU Ratio multiplied with the BCLK. Intel SpeedStep Technology Intel SpeedStep technology allows processors...
Increasing the BCLK will set the maximum OC Ratio for the CPU Mesh. Boot Performance Mode Select the performance state that the BIOS will increase the internal CPU clock speed but also affect the clock speed of other components. CPU Mesh Min Ratio Use this item ...by the CPU Ratio multiplied with the BCLK. BCLK PCIE Frequency The CPU speed is determined by the CPU Ratio multiplied with the BCLK. X299 Taichi XE CPU Configuration CPU Ratio The CPU speed is determined by the CPU Ratio multiplied with the BCLK. Intel SpeedStep Technology Intel SpeedStep technology allows processors...
User Manual
Page 85
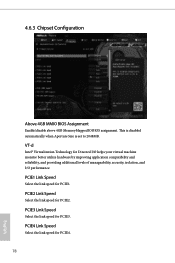
... Link Speed Select the link speed for PCIE3. PCIE3 Link Speed Select the link speed for PCIE2. 4.6.3 Chipset Configuration Above 4GB MMIO BIOS Assignment Enable/disable above 4GB MemoryMappedIO BIOS assignment. VT-d Intel® Virtualization Technology for Directed I/O helps your virtual machine monitor better utilize hardware by improving application compatibility and reliability...
... Link Speed Select the link speed for PCIE3. PCIE3 Link Speed Select the link speed for PCIE2. 4.6.3 Chipset Configuration Above 4GB MMIO BIOS Assignment Enable/disable above 4GB MemoryMappedIO BIOS assignment. VT-d Intel® Virtualization Technology for Directed I/O helps your virtual machine monitor better utilize hardware by improving application compatibility and reliability...
User Manual
Page 94
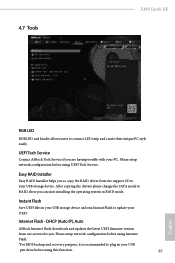
...copy the RAID driver from our servers for you can start installing the operating system in your UEFI. DHCP (Auto IP), Auto ASRock Internet Flash downloads and updates the latest UEFI firmware version from the support CD to plug in RAID mode. Please setup network configuration... Flash. *For BIOS backup and recovery purpose, it is recommended to your PC. Please setup network configuration before using UEFI Tech Service. After copying the drivers please change the SATA mode to connect LED strip and create their unique PC style easily. 4.7 Tools X299 Taichi XE RGB LED RGB...
...copy the RAID driver from our servers for you can start installing the operating system in your UEFI. DHCP (Auto IP), Auto ASRock Internet Flash downloads and updates the latest UEFI firmware version from the support CD to plug in RAID mode. Please setup network configuration... Flash. *For BIOS backup and recovery purpose, it is recommended to your PC. Please setup network configuration before using UEFI Tech Service. After copying the drivers please change the SATA mode to connect LED strip and create their unique PC style easily. 4.7 Tools X299 Taichi XE RGB LED RGB...
User Manual
Page 95
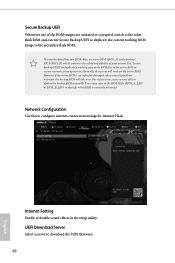
...or disable sound effects in the setup utility. Secure Backup UEFI Whenever one of the ROM images are not able to update the backup BIOS manually. For safety issues, users are outdated or corrupted, switch to the other flash ROM and execute Secure Backup UEFI to duplicate .... Use "Secure Backup UEFI" to the secondary flash ROM. This motherboard has two BIOS chips, an active BIOS (BIOS_A) and a backup BIOS (BIOS_B), which enhances the safety and stability of the BIOS files to the active BIOS to identify which BIOS is corrupted or damaged, after several failed boot attempts, the backup...
...or disable sound effects in the setup utility. Secure Backup UEFI Whenever one of the ROM images are not able to update the backup BIOS manually. For safety issues, users are outdated or corrupted, switch to the other flash ROM and execute Secure Backup UEFI to duplicate .... Use "Secure Backup UEFI" to the secondary flash ROM. This motherboard has two BIOS chips, an active BIOS (BIOS_A) and a backup BIOS (BIOS_B), which enhances the safety and stability of the BIOS files to the active BIOS to identify which BIOS is corrupted or damaged, after several failed boot attempts, the backup...


