

Intel Smart Response Installation Guide
Page 1
... HDD you use Enhanced or Maximized Mode. 6. Once open RST GUI from either Start Menu or by step instructions below. After clicking OK button, SRT will enable automatically, and the RST GUI will update the new version RST driver in system at this point! 3. UI setup instruction: 1. For all required drivers, including RST storage driver version 10.5 or later. 2. Boot system to [RAID Mode]. It is not necessary to a RAID mode...
... HDD you use Enhanced or Maximized Mode. 6. Once open RST GUI from either Start Menu or by step instructions below. After clicking OK button, SRT will enable automatically, and the RST GUI will update the new version RST driver in system at this point! 3. UI setup instruction: 1. For all required drivers, including RST storage driver version 10.5 or later. 2. Boot system to [RAID Mode]. It is not necessary to a RAID mode...
RAID Installation Guide
Page 3
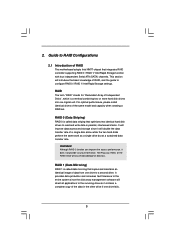
... image of Independent Disks", which is called data striping that integrates RAID controller supporting RAID 0 / RAID 1/ Intel Rapid Storage function with four independent Serial ATA (SATA) channels. Hot-Plug any fault tolerance. Guide to the surviving drive as a single drive but at a sustained data transfer rate. WARNING!! Although RAID 0 function can improve the access performance, it will direct all applications to RAID Configurations 2.1 Introduction of the same model...
... image of Independent Disks", which is called data striping that integrates RAID controller supporting RAID 0 / RAID 1/ Intel Rapid Storage function with four independent Serial ATA (SATA) channels. Hot-Plug any fault tolerance. Guide to the surviving drive as a single drive but at a sustained data transfer rate. WARNING!! Although RAID 0 function can improve the access performance, it will direct all applications to RAID Configurations 2.1 Introduction of the same model...
RAID Installation Guide
Page 6
... 2: Use "RAID Installation Guide" to [RAID]. Set the option "SATA Mode" to set RAID configuration. After the installation of Windows® 7 / 7 64-bit / VistaTM / VistaTM 64-bit OS, if you want to manage RAID functions, you need to check the installation guide in Windows® environment, please install "SATAII driver" from the Support CD again so that "Intel Rapid Storage" will be installed to your system as well. 6 A. Enter UEFI SETUP UTILITY Advanced screen SATA Configuration. Before you start to configure the RAID...
... 2: Use "RAID Installation Guide" to [RAID]. Set the option "SATA Mode" to set RAID configuration. After the installation of Windows® 7 / 7 64-bit / VistaTM / VistaTM 64-bit OS, if you want to manage RAID functions, you need to check the installation guide in Windows® environment, please install "SATAII driver" from the Support CD again so that "Intel Rapid Storage" will be installed to your system as well. 6 A. Enter UEFI SETUP UTILITY Advanced screen SATA Configuration. Before you start to configure the RAID...

Intel Rapid Storage Guide
Page 1
... also delivers longer battery life with version 9.5, a brand new user interface makes creating and managing your storage simple and intuitive. When using one drive, the user can have additional protection against data loss in a RAID 0 configuration, data can be accomplished easily with an external drive. Combined with Intel® Rapid Recover Technology, setting up data protection can be accessed on each drive simultaneously, speeding up response...
... also delivers longer battery life with version 9.5, a brand new user interface makes creating and managing your storage simple and intuitive. When using one drive, the user can have additional protection against data loss in a RAID 0 configuration, data can be accomplished easily with an external drive. Combined with Intel® Rapid Recover Technology, setting up data protection can be accessed on each drive simultaneously, speeding up response...
Intel Rapid Storage Guide
Page 12
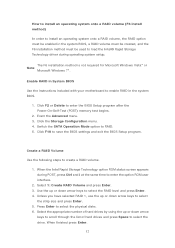
... physical disks. 6. Press Enter to enter the BIOS Setup program after the Power-On-Self-Test (POST) memory test begins. 2. When finished press Enter. 12 Enetr the Advanced menu. 3. Select 1: Create RAID Volume and press Enter. 3. Click the Storage Configuration menu. 4. When the Intel Rapid Storage Technology option ROM status screen appears during operating system setup. The F6 installation method is not required for Microsoft Windows Vista* or Note Microsoft Windows 7*. Create a RAID Volume Use the...
... physical disks. 6. Press Enter to enter the BIOS Setup program after the Power-On-Self-Test (POST) memory test begins. 2. When finished press Enter. 12 Enetr the Advanced menu. 3. Select 1: Create RAID Volume and press Enter. 3. Click the Storage Configuration menu. 4. When the Intel Rapid Storage Technology option ROM status screen appears during operating system setup. The F6 installation method is not required for Microsoft Windows Vista* or Note Microsoft Windows 7*. Create a RAID Volume Use the...
Intel Rapid Storage Guide
Page 13
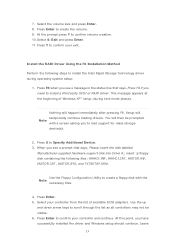
... storage device(s). 2. Use the Floppy Configuration Utility to confirm your controller and continue. Press S to create the volume. 9. This message appears at the beginning of available SCSI adapters. When you see a message in the status line that says, Please insert the disk labeled Manufacturer-supplied hardware support disk into Drive A:, insert ;a floppy disk containing the following steps to install a third party SCSI or RAID driver. Select...
... storage device(s). 2. Use the Floppy Configuration Utility to confirm your controller and continue. Press S to create the volume. 9. This message appears at the beginning of available SCSI adapters. When you see a message in the status line that says, Please insert the disk labeled Manufacturer-supplied hardware support disk into Drive A:, insert ;a floppy disk containing the following steps to install a third party SCSI or RAID driver. Select...

Intel Rapid Storage Guide
Page 15
... RAID controller may cause an immediate blue screen with an 0x0000007b error code, followed by a reboot. You can migrate the data from a single hard drive on the system. 4. Turn on your RAID controller is not enabled, enabling the RAID controller is not recommended or supported when a SATA hard drive is the boot Warning drive. Use the Intel Rapid Storage Technology user interface to a RAID volume that includes that hard drive plus the newly added hard drive(s). You can still use RAID...
... RAID controller may cause an immediate blue screen with an 0x0000007b error code, followed by a reboot. You can migrate the data from a single hard drive on the system. 4. Turn on your RAID controller is not enabled, enabling the RAID controller is not recommended or supported when a SATA hard drive is the boot Warning drive. Use the Intel Rapid Storage Technology user interface to a RAID volume that includes that hard drive plus the newly added hard drive(s). You can still use RAID...
User Manual
Page 3
... following technical problems with ambient temperatures between 0o C and 40o C. • If you follow all power, modem, and network cables from the power outlets before you operate your system. • When the system is turned OFF, a small amount of electrical current still flows. Make sure you read the following safety instructions. Safety instructions Your system is designed and tested to...
... following technical problems with ambient temperatures between 0o C and 40o C. • If you follow all power, modem, and network cables from the power outlets before you operate your system. • When the system is turned OFF, a small amount of electrical current still flows. Make sure you read the following safety instructions. Safety instructions Your system is designed and tested to...
User Manual
Page 7
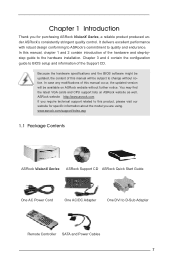
... ASRock's consistently stringent quality control. ASRock website http://www.asrock.com If you are using. Chapter 3 and 4 contain the configuration guide to BIOS setup and information of the hardware and step-bystep guide to the hardware installation. Because the hardware specifications and the BIOS software might be updated, the content of this manual will be subject to D-Sub Adapter Remote Controller SATA and Power Cables 7 www.asrock.com/support/index.asp 1.1 Package Contents ASRock VisionX Series ASRock Support CD ASRock Quick Start Guide One AC Power...
... ASRock's consistently stringent quality control. ASRock website http://www.asrock.com If you are using. Chapter 3 and 4 contain the configuration guide to BIOS setup and information of the hardware and step-bystep guide to the hardware installation. Because the hardware specifications and the BIOS software might be updated, the content of this manual will be subject to D-Sub Adapter Remote Controller SATA and Power Cables 7 www.asrock.com/support/index.asp 1.1 Package Contents ASRock VisionX Series ASRock Support CD ASRock Quick Start Guide One AC Power...

User Manual
Page 8
..., 4-in-1 Card reader (MMC/SD3.0/MS/MS PRO) Rear I/O 1x HDMI, 1x DVI-I (Dual-Link), 4x USB 2.0, 1x S/PDIF, 1x eSATA2*2, 2x USB3.0 Audio 7.1 Ch HD Audio with THX TruStudioTM LAN Gigabit LAN WiFi 2T2R 802.11 a/b/g/n wireless LAN (300Mbps, 5GHz/2.4GHz Dual-Band access) Bluetooth Bluetooth 4.0/3.0 HS class II Remote Controller Support MCE function Power 120W/19V Adapter Dimension 200mm(W)x70mm(H)x200m(L) Volume (liters) 2.8L Free bundle software: *31. ASRock MAGIX Multimedia...
..., 4-in-1 Card reader (MMC/SD3.0/MS/MS PRO) Rear I/O 1x HDMI, 1x DVI-I (Dual-Link), 4x USB 2.0, 1x S/PDIF, 1x eSATA2*2, 2x USB3.0 Audio 7.1 Ch HD Audio with THX TruStudioTM LAN Gigabit LAN WiFi 2T2R 802.11 a/b/g/n wireless LAN (300Mbps, 5GHz/2.4GHz Dual-Band access) Bluetooth Bluetooth 4.0/3.0 HS class II Remote Controller Support MCE function Power 120W/19V Adapter Dimension 200mm(W)x70mm(H)x200m(L) Volume (liters) 2.8L Free bundle software: *31. ASRock MAGIX Multimedia...
User Manual
Page 21
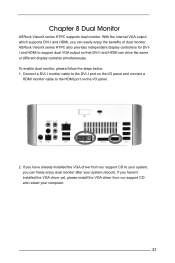
... installed the VGA driver from our support CD to your system, you haven't installed the VGA driver yet, please install the VGA driver from our support CD and restart your system reboots. Connect a DVI-I monitor cable to the DVI-I port on the I/O panel and connect a HDMI monitor cable to support dual VGA output so that DVI-I /O panel. 2. If you can freely enjoy dual monitor after your computer. 21 ASRock VisionX series HTPC also provides independent display controllers for DVII and HDMI to the HDMI port...
... installed the VGA driver from our support CD to your system, you haven't installed the VGA driver yet, please install the VGA driver from our support CD and restart your system reboots. Connect a DVI-I monitor cable to the DVI-I port on the I/O panel and connect a HDMI monitor cable to support dual VGA output so that DVI-I /O panel. 2. If you can freely enjoy dual monitor after your computer. 21 ASRock VisionX series HTPC also provides independent display controllers for DVII and HDMI to the HDMI port...
User Manual
Page 22
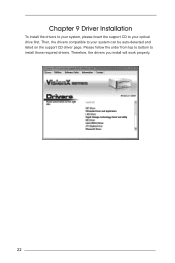
Then, the drivers compatible to your optical drive first. Therefore, the drivers you install will work properly. 22 Please follow the order from top to bottom to install those required drivers. Chapter 9 Driver Installation To install the drivers to your system, please insert the support CD to your system can be auto-detected and listed on the support CD driver page.
Then, the drivers compatible to your optical drive first. Therefore, the drivers you install will work properly. 22 Please follow the order from top to bottom to install those required drivers. Chapter 9 Driver Installation To install the drivers to your system, please insert the support CD to your system can be auto-detected and listed on the support CD driver page.

User Manual
Page 24
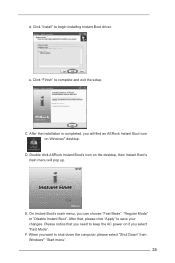
... a start menu folder. Then click "Next". 24 c. You may choose a different folder if you want to. Install Instant Boot driver from ASRock's support CD, or you may choose a different folder if you install Instant Boot. b. Please follow the instructions on Instant Boot's setup page. Select a location. Execute the Instant Boot installation program under Windows®. You may click the following link to get the latest utility and BIOS...
... a start menu folder. Then click "Next". 24 c. You may choose a different folder if you want to. Install Instant Boot driver from ASRock's support CD, or you may choose a different folder if you install Instant Boot. b. Please follow the instructions on Instant Boot's setup page. Select a location. Execute the Instant Boot installation program under Windows®. You may click the following link to get the latest utility and BIOS...
User Manual
Page 25
..." from Windows® "Start menu". 25 Click "Install" to complete and exit the setup. C. E. Please notice that , please click "Apply" to keep the AC power on Windows® desktop. Click "Finish" to begin installing Instant Boot driver. After that you need to save your changes. When you can choose "Fast Mode", "Regular Mode" or "Disable Instant Boot". d. F. After the installation is completed, you select "Fast Mode". Double click ASRock Instant Boot...
..." from Windows® "Start menu". 25 Click "Install" to complete and exit the setup. C. E. Please notice that , please click "Apply" to keep the AC power on Windows® desktop. Click "Finish" to begin installing Instant Boot driver. After that you need to save your changes. When you can choose "Fast Mode", "Regular Mode" or "Disable Instant Boot". d. F. After the installation is completed, you select "Fast Mode". Double click ASRock Instant Boot...
User Manual
Page 27
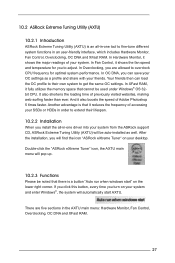
... loading time of accessing your desktop. Another advantage is a button "Auto run when windows start AXTU. If you click this button, every time you turn on your system and enter Windows®, the system will automatically start " on your SSDs or HDDs in an user-friendly interface, which includes Hardware Monitor, Fan Control, Overclocking, OC DNA and XFast RAM. There are allowed to their lifespan. 10.2.2 Installation When you...
... loading time of accessing your desktop. Another advantage is a button "Auto run when windows start AXTU. If you click this button, every time you turn on your system and enter Windows®, the system will automatically start " on your SSDs or HDDs in an user-friendly interface, which includes Hardware Monitor, Fan Control, Overclocking, OC DNA and XFast RAM. There are allowed to their lifespan. 10.2.2 Installation When you...
User Manual
Page 32
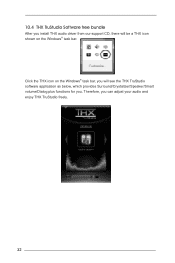
Therefore, you . 10.4 THX TruStudio Software free bundle After you install THX audio driver from our support CD, there will be a THX icon shown on the Windows® task bar, you will see the THX TruStudio software application as below, which provides Surround/Crystalizer/Speaker/Smart volume/Dialog plus functions for you can adjust your audio and enjoy THX TruStudio freely. 32 Click the THX icon on the Windows® task bar.
Therefore, you . 10.4 THX TruStudio Software free bundle After you install THX audio driver from our support CD, there will be a THX icon shown on the Windows® task bar, you will see the THX TruStudio software application as below, which provides Surround/Crystalizer/Speaker/Smart volume/Dialog plus functions for you can adjust your audio and enjoy THX TruStudio freely. 32 Click the THX icon on the Windows® task bar.

User Manual
Page 44
... may set the configurations for available UEFI firmware updates from our servers and flash them without entering operating systems first like MS-DOS or Windows®. In other complicated flash utility. This convenient UEFI update tool allows you to update system UEFI without entering Windows OS. Select the proper UEFI file to update your UEFI, and reboot your UEFI only in Flash ROM. Please note that the USB flash drive or hard drive must...
... may set the configurations for available UEFI firmware updates from our servers and flash them without entering operating systems first like MS-DOS or Windows®. In other complicated flash utility. This convenient UEFI update tool allows you to update system UEFI without entering Windows OS. Select the proper UEFI file to update your UEFI, and reboot your UEFI only in Flash ROM. Please note that the USB flash drive or hard drive must...

User Manual
Page 46
... option will be hidden if the installed CPU does not support Intel Virtualization Technology. An IA-32 processor with "No Execute (NX) Memory Protection" can utilize the additional hardware capabilities provided by malicious software to execute code. Intel Virtualization Technology When this option is an enhancement to turn on /off prefetching of adjacent cache lines. 46 Hardware Prefetcher Use this item to [Enabled], a VMM (Virtual Machine...
... option will be hidden if the installed CPU does not support Intel Virtualization Technology. An IA-32 processor with "No Execute (NX) Memory Protection" can utilize the additional hardware capabilities provided by malicious software to execute code. Intel Virtualization Technology When this option is an enhancement to turn on /off prefetching of adjacent cache lines. 46 Hardware Prefetcher Use this item to [Enabled], a VMM (Virtual Machine...
User Manual
Page 60
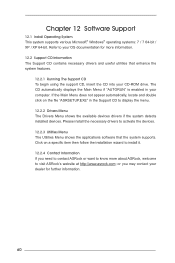
... dealer for more about ASRock, welcome to activate the devices. 12.2.3 Utilities Menu The Utilities Menu shows the applications software that enhance the system features. 12.2.1 Running The Support CD To begin using the support CD, insert the CD into your OS documentation for further information. 60 Chapter 12 Software Support 12.1 Install Operating System This system supports various Microsoft® Windows® operating systems: 7 / 7 64-bit / XP...
... dealer for more about ASRock, welcome to activate the devices. 12.2.3 Utilities Menu The Utilities Menu shows the applications software that enhance the system features. 12.2.1 Running The Support CD To begin using the support CD, insert the CD into your OS documentation for further information. 60 Chapter 12 Software Support 12.1 Install Operating System This system supports various Microsoft® Windows® operating systems: 7 / 7 64-bit / XP...
Quick Installation Guide
Page 2
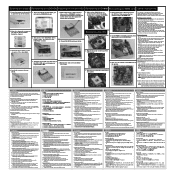
... screws on it out of the CPU socket. 3. Carefully remove the top shield. Reinstalling the ODD/HDD 1. Installing the second HDD 1. Install the second HDD and fasten the screws to the manufacturer's instructions. Connect the SATA and power cables. 3. Replace the side cover and fasten the screws. Reinstalling the MXM card 1. Please follow step 1 above to open the top of the CPU fan. 2. Español Apertura del...
... screws on it out of the CPU socket. 3. Carefully remove the top shield. Reinstalling the ODD/HDD 1. Installing the second HDD 1. Install the second HDD and fasten the screws to the manufacturer's instructions. Connect the SATA and power cables. 3. Replace the side cover and fasten the screws. Reinstalling the MXM card 1. Please follow step 1 above to open the top of the CPU fan. 2. Español Apertura del...

