

Intel Smart Response Installation Guide
Page 1
... RAID ROM. Boot system to a RAID mode system, then install all performance testing, chose "Maximized" mode. 7. For all required drivers, including RST storage driver version 10.5 or later. 2. Intel Smart Response Technology Installation Guide This motherboard supports Intel Smart Response Technology. UI setup instruction: 1. Once open RST GUI from either Start Menu or by step instructions below. When pop-up menu appears, chose which SSD you wish to use as the Cache device...
... RAID ROM. Boot system to a RAID mode system, then install all performance testing, chose "Maximized" mode. 7. For all required drivers, including RST storage driver version 10.5 or later. 2. Intel Smart Response Technology Installation Guide This motherboard supports Intel Smart Response Technology. UI setup instruction: 1. Once open RST GUI from either Start Menu or by step instructions below. When pop-up menu appears, chose which SSD you wish to use as the Cache device...
User Manual
Page 3
.... • The system performance changes. Do not block or cover these openings. Make sure you leave plenty of space around the system for information technology equipment. No disassembly NOTE: The warranty does not apply to products (including HDD, ODD, memory and warranty seal) that you follow all power, modem, and network cables from the power outlets before you use • Do not...
.... • The system performance changes. Do not block or cover these openings. Make sure you leave plenty of space around the system for information technology equipment. No disassembly NOTE: The warranty does not apply to products (including HDD, ODD, memory and warranty seal) that you follow all power, modem, and network cables from the power outlets before you use • Do not...

User Manual
Page 5
... Specifications 8 1.3 System Motherboard Components 9 1.4 Rear Panel Connections 11 1.5 System Chassis 12 1.6 Remote Controller 13 2 Opening the chassis 14 3 Reinstalling the ODD/HDD 15 4 Installing the second HDD 16 5 Reinstalling the DIMMs 18 6 Reinstalling the CPU 19 7 Driver Installation 20 8 UTILITY MEMU 21 8.1 Instant Boot 21 8.1.1 Introduction 21 8.1.2 Installation 22 8.2 ASRock Extreme Tuning Utility (AXTU 25 8.2.1 Introduction 25 8.2.2 Installation 25 8.2.3 Function 25 8.3 Symantec Norton AntiVirus Software free bundle (Trial version 29 8.4 THX TruStudio Software...
... Specifications 8 1.3 System Motherboard Components 9 1.4 Rear Panel Connections 11 1.5 System Chassis 12 1.6 Remote Controller 13 2 Opening the chassis 14 3 Reinstalling the ODD/HDD 15 4 Installing the second HDD 16 5 Reinstalling the DIMMs 18 6 Reinstalling the CPU 19 7 Driver Installation 20 8 UTILITY MEMU 21 8.1 Instant Boot 21 8.1.1 Introduction 21 8.1.2 Installation 22 8.2 ASRock Extreme Tuning Utility (AXTU 25 8.2.1 Introduction 25 8.2.2 Installation 25 8.2.3 Function 25 8.3 Symantec Norton AntiVirus Software free bundle (Trial version 29 8.4 THX TruStudio Software...
User Manual
Page 7
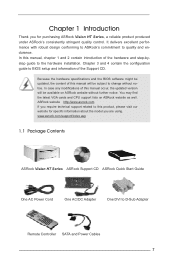
... purchasing ASRock Vision HT Series, a reliable product produced under ASRock's consistently stringent quality control. You may find the latest VGA cards and CPU support lists on ASRock website without notice. Because the hardware specifications and the BIOS software might be updated, the content of this manual will be subject to change without further notice. Chapter 3 and 4 contain the configuration guide to BIOS setup and information of the hardware and step-bystep guide to this manual, chapter...
... purchasing ASRock Vision HT Series, a reliable product produced under ASRock's consistently stringent quality control. You may find the latest VGA cards and CPU support lists on ASRock website without notice. Because the hardware specifications and the BIOS software might be updated, the content of this manual will be subject to change without further notice. Chapter 3 and 4 contain the configuration guide to BIOS setup and information of the hardware and step-bystep guide to this manual, chapter...
User Manual
Page 8
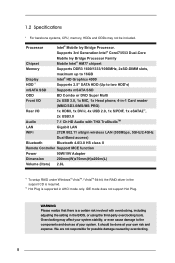
... phone, 4-in-1 Card reader (MMC/SD3.0/MS/MS PRO) Rear I/O 1x HDMI, 1x DVI-I, 4x USB 2.0, 1x S/PDIF, 1x eSATA2*2, 2x USB3.0 Audio 7.1 Ch HD Audio with THX TruStudioTM LAN Gigabit LAN WiFi 2T2R 802.11 a/b/g/n wireless LAN (300Mbps, 5GHz/2.4GHz Dual-Band access) Bluetooth Bluetooth 4.0/3.0 HS class II Remote Controller Support MCE function Power 90W/19V Adapter Dimension 200mm(W)x70mm(H)x200m(L) Volume (liters) 2.8L *1 To setup RAID under Windows® VistaTM...
... phone, 4-in-1 Card reader (MMC/SD3.0/MS/MS PRO) Rear I/O 1x HDMI, 1x DVI-I, 4x USB 2.0, 1x S/PDIF, 1x eSATA2*2, 2x USB3.0 Audio 7.1 Ch HD Audio with THX TruStudioTM LAN Gigabit LAN WiFi 2T2R 802.11 a/b/g/n wireless LAN (300Mbps, 5GHz/2.4GHz Dual-Band access) Bluetooth Bluetooth 4.0/3.0 HS class II Remote Controller Support MCE function Power 90W/19V Adapter Dimension 200mm(W)x70mm(H)x200m(L) Volume (liters) 2.8L *1 To setup RAID under Windows® VistaTM...

User Manual
Page 12
Power ON/OFF button with status indicator 32. Microphone 29. USB3.0 ports: USB devices 30. 4-in Optical Disc Drive 12 Headphone 28. Slot-in -1 Card reader (MMC/SD3.0/MS/MS Pro) 31. 1.5 System Chassis 27.
Power ON/OFF button with status indicator 32. Microphone 29. USB3.0 ports: USB devices 30. 4-in Optical Disc Drive 12 Headphone 28. Slot-in -1 Card reader (MMC/SD3.0/MS/MS Pro) 31. 1.5 System Chassis 27.
User Manual
Page 20
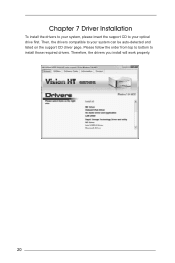
Please follow the order from top to bottom to install those required drivers. Then, the drivers compatible to your optical drive first. Therefore, the drivers you install will work properly. 20 Chapter 7 Driver Installation To install the drivers to your system, please insert the support CD to your system can be auto-detected and listed on the support CD driver page.
Please follow the order from top to bottom to install those required drivers. Then, the drivers compatible to your optical drive first. Therefore, the drivers you install will work properly. 20 Chapter 7 Driver Installation To install the drivers to your system, please insert the support CD to your system can be auto-detected and listed on the support CD driver page.
User Manual
Page 22
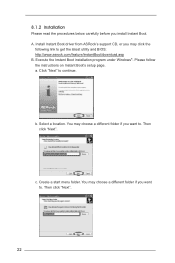
... the instructions on Instant Boot's setup page. Click "Next" to get the latest utility and BIOS: http://www.asrock.com/feature/InstantBoot/download.asp B. b. 8.1.2 Installation Please read the procedures below carefully before you want to . Install Instant Boot driver from ASRock's support CD, or you want to . You may choose a different folder if you may choose a different folder if you install Instant Boot. Select a location. c. a. A. Then...
... the instructions on Instant Boot's setup page. Click "Next" to get the latest utility and BIOS: http://www.asrock.com/feature/InstantBoot/download.asp B. b. 8.1.2 Installation Please read the procedures below carefully before you want to . Install Instant Boot driver from ASRock's support CD, or you want to . You may choose a different folder if you may choose a different folder if you install Instant Boot. Select a location. c. a. A. Then...
User Manual
Page 23
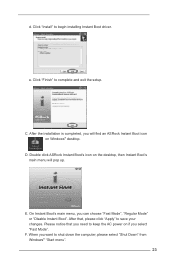
... menu, you will find an ASRock Instant Boot icon on the desktop, then Instant Boot's main menu will pop up. After that you need to keep the AC power on if you want to complete and exit the setup. When you select "Fast Mode". C. E. Click "Finish" to shut down the computer, please select "Shut Down" from Windows® "Start menu". 23 F. After the installation...
... menu, you will find an ASRock Instant Boot icon on the desktop, then Instant Boot's main menu will pop up. After that you need to keep the AC power on if you want to complete and exit the setup. When you select "Fast Mode". C. E. Click "Finish" to shut down the computer, please select "Shut Down" from Windows® "Start menu". 23 F. After the installation...
User Manual
Page 25
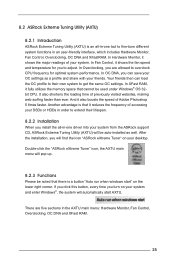
... user-friendly interface, which includes Hardware Monitor, Fan Control, Overclocking, OC DNA and XFastRAM. In XFast RAM, it fully utilizes the memory space that cannot be auto-installed as a profile and share with your desktop. And it reduces the frequency of your system and enter Windows®, the system will automatically start " on your system. There are allowed to get the same OC settings...
... user-friendly interface, which includes Hardware Monitor, Fan Control, Overclocking, OC DNA and XFastRAM. In XFast RAM, it fully utilizes the memory space that cannot be auto-installed as a profile and share with your desktop. And it reduces the frequency of your system and enter Windows®, the system will automatically start " on your system. There are allowed to get the same OC settings...

User Manual
Page 30
Therefore, you . Click the THX icon on the Windows® task bar, you will be a THX icon shown on the Windows® task bar. 8.4 THX TruStudio Software free bundle After you install THX audio driver from our support CD, there will see the THX TruStudio software application as below, which provides Surround/Crystalizer/Speaker/Smart volume/Dialog plus functions for you can adjust your audio and enjoy THX TruStudio freely. 30
Therefore, you . Click the THX icon on the Windows® task bar, you will be a THX icon shown on the Windows® task bar. 8.4 THX TruStudio Software free bundle After you install THX audio driver from our support CD, there will see the THX TruStudio software application as below, which provides Surround/Crystalizer/Speaker/Smart volume/Dialog plus functions for you can adjust your audio and enjoy THX TruStudio freely. 30
User Manual
Page 37
... H/W Monitor To display current hardware status Boot To set up the default system device to locate and load the Operating System Security To set up the computer. You can also use the UEFI SETUP UTILITY to get into the sub screen. You may also restart by pressing the reset button on . If you start up the security features Exit To exit the current screen or the UEFI SETUP UTILITY Use < > key or < > key...
... H/W Monitor To display current hardware status Boot To set up the default system device to locate and load the Operating System Security To set up the computer. You can also use the UEFI SETUP UTILITY to get into the sub screen. You may also restart by pressing the reset button on . If you start up the security features Exit To exit the current screen or the UEFI SETUP UTILITY Use < > key or < > key...

User Manual
Page 44
... the installed CPU does not support Intel Virtualization Technology. This option will be hidden if the current CPU does not support No-Excute Memory Protection. Hardware Prefetcher Use this item to the IA-32 Intel Architecture. No-Execution (NX) Memory Protection Technology is set to turn on /off the MLC streamer prefetcher. Intel Virtualization Technology When this item to [Enabled], a VMM (Virtual Machine Architecture...
... the installed CPU does not support Intel Virtualization Technology. This option will be hidden if the current CPU does not support No-Excute Memory Protection. Hardware Prefetcher Use this item to the IA-32 Intel Architecture. No-Execution (NX) Memory Protection Technology is set to turn on /off the MLC streamer prefetcher. Intel Virtualization Technology When this item to [Enabled], a VMM (Virtual Machine Architecture...
User Manual
Page 57
....2.3 Utilities Menu The Utilities Menu shows the applications software that enhance the system features. 10.2.1 Running The Support CD To begin using the support CD, insert the CD into your dealer for more about ASRock, welcome to visit ASRock's website at http://www.asrock.com; Please install the necessary drivers to display the menu. 10.2.2 Drivers Menu The Drivers Menu shows the available devices drivers if the system detects installed devices. Chapter 10 Software Support 10.1 Install Operating...
....2.3 Utilities Menu The Utilities Menu shows the applications software that enhance the system features. 10.2.1 Running The Support CD To begin using the support CD, insert the CD into your dealer for more about ASRock, welcome to visit ASRock's website at http://www.asrock.com; Please install the necessary drivers to display the menu. 10.2.2 Drivers Menu The Drivers Menu shows the available devices drivers if the system detects installed devices. Chapter 10 Software Support 10.1 Install Operating...
Quick Installation Guide
Page 2
Then install the second HDD and fasten the screws to disassemble the optical drive. After the chassis is opened , you use an. 4. Replace the rack into beam or view directly with ambient temperatures between 0˚C and 40˚C. • If you will see the top shield inside the chassis. 2. Do not block or cover these openings. Make sure you read the following technical problems with...
Then install the second HDD and fasten the screws to disassemble the optical drive. After the chassis is opened , you use an. 4. Replace the rack into beam or view directly with ambient temperatures between 0˚C and 40˚C. • If you will see the top shield inside the chassis. 2. Do not block or cover these openings. Make sure you read the following technical problems with...
RAID Installation Guide
Page 6
... If you want to use both "RAID Installation Guide" and "Intel Rapid Storage Information" for proper configuration. Enter UEFI SETUP UTILITY Advanced screen SATA Configuration. Before you start to configure the RAID function, you need to check the installation guide in the Support CD for RAID configuration. Please refer to the document in the Support CD, "Guide to SATA Hard Disks Installation and RAID Configuration", which is located in the folder at the following path: .. \ RAID Installation Guide STEP 3: Install Windows® 7 / 7 64-bit...
... If you want to use both "RAID Installation Guide" and "Intel Rapid Storage Information" for proper configuration. Enter UEFI SETUP UTILITY Advanced screen SATA Configuration. Before you start to configure the RAID function, you need to check the installation guide in the Support CD for RAID configuration. Please refer to the document in the Support CD, "Guide to SATA Hard Disks Installation and RAID Configuration", which is located in the folder at the following path: .. \ RAID Installation Guide STEP 3: Install Windows® 7 / 7 64-bit...

Intel Rapid Storage Guide
Page 1
... Power Management (LPM), which can reduce the power consumption of the chipset and Serial ATA (SATA) hard drive. 1 Combined with Intel® Rapid Recover Technology, setting up data protection can be accessed on each drive simultaneously, speeding up response time on data-intensive applications. AHCI also delivers longer battery life with an external drive. By combining from two to six drives in the event of a hard drive failure...
... Power Management (LPM), which can reduce the power consumption of the chipset and Serial ATA (SATA) hard drive. 1 Combined with Intel® Rapid Recover Technology, setting up data protection can be accessed on each drive simultaneously, speeding up response time on data-intensive applications. AHCI also delivers longer battery life with an external drive. By combining from two to six drives in the event of a hard drive failure...
Intel Rapid Storage Guide
Page 12
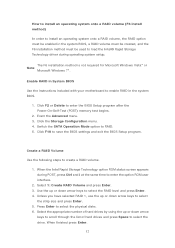
... motherboard to select the RAID level and press Enter. 4. Switch the SATA Operation Mode option to select the physical disks. 6. Click F2 or Delete to save the BIOS settings and exit the BIOS Setup program. Use the up or down arrow keys to select the drive. Click F10 to enter the BIOS Setup program after the Power-On-Self-Test (POST) memory test begins. 2. When the Intel Rapid Storage Technology option ROM status screen appears during operating...
... motherboard to select the RAID level and press Enter. 4. Switch the SATA Operation Mode option to select the physical disks. 6. Click F2 or Delete to save the BIOS settings and exit the BIOS Setup program. Use the up or down arrow keys to select the drive. Click F10 to enter the BIOS Setup program after the Power-On-Self-Test (POST) memory test begins. 2. When the Intel Rapid Storage Technology option ROM status screen appears during operating...
Intel Rapid Storage Guide
Page 13
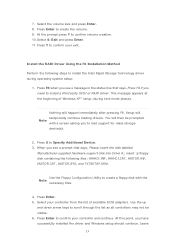
... Windows setup should continue. Select your controller from the list of Windows XP* setup (during operating system setup: 1. Press Enter to scroll through the list as all controllers may not be prompted Note with the Note necessary files. 4. Use the up and down arrow keys to create the volume. 9. Setup will happen immediately after pressing F6. Use the Floppy Configuration Utility to load support for mass storage device(s). 2. Install the RAID Driver Using...
... Windows setup should continue. Select your controller from the list of Windows XP* setup (during operating system setup: 1. Press Enter to scroll through the list as all controllers may not be prompted Note with the Note necessary files. 4. Use the up and down arrow keys to create the volume. 9. Setup will happen immediately after pressing F6. Use the Floppy Configuration Utility to load support for mass storage device(s). 2. Install the RAID Driver Using...

Intel Rapid Storage Guide
Page 15
... screen with an 0x0000007b error code, followed by a reboot. Install Intel® Rapid Storage Technology. 2. Turn on your system does not have a RAID ICH, you will not be able to use RAID Note without installing a third-party RAID controller card. • Your RAID controller is already installed? If your RAID controller is not enabled, enabling the RAID controller is not recommended or supported when a SATA hard drive is already installed, you can also create a new RAID volume using the newly added hard drives...
... screen with an 0x0000007b error code, followed by a reboot. Install Intel® Rapid Storage Technology. 2. Turn on your system does not have a RAID ICH, you will not be able to use RAID Note without installing a third-party RAID controller card. • Your RAID controller is already installed? If your RAID controller is not enabled, enabling the RAID controller is not recommended or supported when a SATA hard drive is already installed, you can also create a new RAID volume using the newly added hard drives...

