
Intel Rapid Storage Guide
Page 12
... Volume and press Enter. 3. Press Enter to enter the BIOS Setup program after the Power-On-Self-Test (POST) memory test begins. 2. Enable RAID in System BIOS Use the instructions included with your motherboard to enable RAID in the system BIOS, a RAID volume must be created, and the F6 installation... method must be enabled in the system BIOS. 1. Create a RAID Volume Use the following steps to save the BIOS settings and exit the BIOS Setup program. Select the appropriate number of hard drives and press Space to select the drive. Click ...
... Volume and press Enter. 3. Press Enter to enter the BIOS Setup program after the Power-On-Self-Test (POST) memory test begins. 2. Enable RAID in System BIOS Use the instructions included with your motherboard to enable RAID in the system BIOS, a RAID volume must be created, and the F6 installation... method must be enabled in the system BIOS. 1. Create a RAID Volume Use the following steps to save the BIOS settings and exit the BIOS Setup program. Select the appropriate number of hard drives and press Space to select the drive. Click ...

User Manual
Page 5
... in Windows® 7 / 7 64-bit / VistaTM / VistaTM 64bit, it is recommended to set the BIOS option in , 24.4 cm x 24.4 cm) ASRock Q77M vPro Quick Installation Guide ASRock Q77M vPro Support CD 2 x Serial ATA (SATA) Data Cables (Optional) 1 x I/O Panel Shield ASRock Reminds You... For the BIOS setup, please refer to the "User Manual" in our support CD for purchasing...
... in Windows® 7 / 7 64-bit / VistaTM / VistaTM 64bit, it is recommended to set the BIOS option in , 24.4 cm x 24.4 cm) ASRock Q77M vPro Quick Installation Guide ASRock Q77M vPro Support CD 2 x Serial ATA (SATA) Data Cables (Optional) 1 x I/O Panel Shield ASRock Reminds You... For the BIOS setup, please refer to the "User Manual" in our support CD for purchasing...

User Manual
Page 8
...1 x USB 3.0 header (supports 2 USB 3.0 ports) - 64Mb AMI UEFI Legal BIOS with GUI support - OEM - ASRock XFast USB (see CAUTION 12) - Good Night LED - Supports "Plug and Play" - ASRock Instant Boot - Hybrid Booster: - Drivers, Utilities, AntiVirus Software (Trial Version), CyberLink ...- 24 pin ATX power connector - 8 pin 12V power connector - ASRock Instant Flash (see CAUTION 15) - ASRock Crashless BIOS (see CAUTION 17) - CPU Temperature Sensing - Supports jumperfree - Boot Failure Guard (B.F.G.) - BIOS Feature Support CD Unique Feature Hardware Monitor - 1 x IR header ...
...1 x USB 3.0 header (supports 2 USB 3.0 ports) - 64Mb AMI UEFI Legal BIOS with GUI support - OEM - ASRock XFast USB (see CAUTION 12) - Good Night LED - Supports "Plug and Play" - ASRock Instant Boot - Hybrid Booster: - Drivers, Utilities, AntiVirus Software (Trial Version), CyberLink ...- 24 pin ATX power connector - 8 pin 12V power connector - ASRock Instant Flash (see CAUTION 15) - ASRock Crashless BIOS (see CAUTION 17) - CPU Temperature Sensing - Supports jumperfree - Boot Failure Guard (B.F.G.) - BIOS Feature Support CD Unique Feature Hardware Monitor - 1 x IR header ...

User Manual
Page 9
...and security applications, it allows IT to the components and devices of PCs with overclocking, including adjusting the setting in the BIOS, applying Untied Overclocking Technology, or using third-party overclocking tools. CAUTION! 1. Due to chipset limitations, overclocking is off... 64-bit / XP / XP 64-bit compliant (see CAUTION 24) * For detailed product information, please visit our website: http://www.asrock.com WARNING Please realize that there is a feature of "Hyper Threading Technology", please check page 52. 3. The capabilities are applications including Software...
...and security applications, it allows IT to the components and devices of PCs with overclocking, including adjusting the setting in the BIOS, applying Untied Overclocking Technology, or using third-party overclocking tools. CAUTION! 1. Due to chipset limitations, overclocking is off... 64-bit / XP / XP 64-bit compliant (see CAUTION 24) * For detailed product information, please visit our website: http://www.asrock.com WARNING Please realize that there is a feature of "Hyper Threading Technology", please check page 52. 3. The capabilities are applications including Software...
User Manual
Page 10
...then can press the key during the POST or the key to enter into the BIOS setup menu to fine-tune different system functions in Flash ROM. ASRock Instant Flash is an all-in-one tool to access ASRock Instant Flash. If you desire a faster, less restricted way of output phases ... cannot use FAT32/16/12 file system. 13. Just launch this utility, you can reduce the number of charging your BIOS only in Gen 3 speed, please install an Ivy Bridge CPU. ASRock APP Charger. 6. In IES (Intelligent Energy Saver), the voltage regulator can update your Apple devices, such as iPhone/iPad...
...then can press the key during the POST or the key to enter into the BIOS setup menu to fine-tune different system functions in Flash ROM. ASRock Instant Flash is an all-in-one tool to access ASRock Instant Flash. If you desire a faster, less restricted way of output phases ... cannot use FAT32/16/12 file system. 13. Just launch this utility, you can reduce the number of charging your BIOS only in Gen 3 speed, please install an Ivy Bridge CPU. ASRock APP Charger. 6. In IES (Intelligent Energy Saver), the voltage regulator can update your Apple devices, such as iPhone/iPad...

User Manual
Page 11
... properties of failing. If power loss occurs during the BIOS update process, ASRock Crashless BIOS will automatically finish the BIOS update procedure after regaining power. and up to 40% faster than ever. ASRock website: http://www.asrock.com/Feature/AppCharger/index.asp 14. The performance may ... the root directory of internet access granted to establish an internet curfew or restrict internet access at specified times via OMG. ASRock Crashless BIOS allows users to update their lifespan. 18. Internet Flash searches for a more personal Internet experience. With APP Charger driver ...
... properties of failing. If power loss occurs during the BIOS update process, ASRock Crashless BIOS will automatically finish the BIOS update procedure after regaining power. and up to 40% faster than ever. ASRock website: http://www.asrock.com/Feature/AppCharger/index.asp 14. The performance may ... the root directory of internet access granted to establish an internet curfew or restrict internet access at specified times via OMG. ASRock Crashless BIOS allows users to update their lifespan. 18. Internet Flash searches for a more personal Internet experience. With APP Charger driver ...

User Manual
Page 13
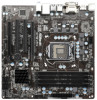
...32 USB 2.0 T: USB2 B: USB3 USB 3.0 T: USB0 B: USB1 USB 2.0 T: USB4 B: USB5 Top: RJ-45 Top: Line In Center: Front Bottom: Mic In LAN PHY Q77M vPro PCIE1 XFast RAM PCI Express 3.0 Super I/O PCI1 XFast LAN XFast USB Designed in Taipei AUDIO CODEC HD_AUDIO1 1 RoHS COM1 1 PCI2 ErP/EuP Ready Front USB...11 Intel CMOS Battery Q77 USB6_7 1 1 CIR1 USB8_9 1 PLED1 1 CLRCMOS1 PANEL1 PLED PWRBTN 1 1 HDLED RESET SATA2_4 SATA2_5 SATA2_2 SATA2_3 USB3_2_3 1 CHA_FAN2 64Mb CHA_FAN1 BIOS SPEAKER1 1 SATA3_0 SATA3_1 8 9 10 11 12 13 14 15 16 17 31 30 29 28 27 26 25 24 23 22 21 20 19 18...
...32 USB 2.0 T: USB2 B: USB3 USB 3.0 T: USB0 B: USB1 USB 2.0 T: USB4 B: USB5 Top: RJ-45 Top: Line In Center: Front Bottom: Mic In LAN PHY Q77M vPro PCIE1 XFast RAM PCI Express 3.0 Super I/O PCI1 XFast LAN XFast USB Designed in Taipei AUDIO CODEC HD_AUDIO1 1 RoHS COM1 1 PCI2 ErP/EuP Ready Front USB...11 Intel CMOS Battery Q77 USB6_7 1 1 CIR1 USB8_9 1 PLED1 1 CLRCMOS1 PANEL1 PLED PWRBTN 1 1 HDLED RESET SATA2_4 SATA2_5 SATA2_2 SATA2_3 USB3_2_3 1 CHA_FAN2 64Mb CHA_FAN1 BIOS SPEAKER1 1 SATA3_0 SATA3_1 8 9 10 11 12 13 14 15 16 17 31 30 29 28 27 26 25 24 23 22 21 20 19 18...

User Manual
Page 29
..., please shut down your system and install the Multi-Angle CIR Receiver to enter the BIOS Setup Utility. USB 2.0 header (9-pin, black) CIR header (4-pin, gray) Step2. 2.9 ASRock Smart Remote Installation Guide ASRock Smart Remote is only used for the quick installation and usage of driver list.) 29 ...Install the Multi-Angle CIR Receiver to the USB 2.0 header on your system. Step4. Execute ASRock's support CD and install the CIR Driver. (It is listed at the bottom of ASRock Smart Remote. Find the CIR header located next to the front USB port. Enter Windows. Step1....
..., please shut down your system and install the Multi-Angle CIR Receiver to enter the BIOS Setup Utility. USB 2.0 header (9-pin, black) CIR header (4-pin, gray) Step2. 2.9 ASRock Smart Remote Installation Guide ASRock Smart Remote is only used for the quick installation and usage of driver list.) 29 ...Install the Multi-Angle CIR Receiver to the USB 2.0 header on your system. Step4. Execute ASRock's support CD and install the CIR Driver. (It is listed at the bottom of ASRock Smart Remote. Find the CIR header located next to the front USB port. Enter Windows. Step1....

User Manual
Page 31
... seconds, use a jumper cap to default setup, please turn off the computer and unplug the power cord from the power supply. If you update the BIOS. The illustration shows a 3-pin jumper whose pin1 and pin2 are setup. Jumper Clear CMOS Jumper (CLRCMOS1) (see p.13, No. 23) Setting Default Clear CMOS Description... Note: CLRCMOS1 allows you to clear the CMOS when you just finish updating the BIOS, you must boot up the system first, and then shut it down before you do not clear the CMOS right after you need to clear...
... seconds, use a jumper cap to default setup, please turn off the computer and unplug the power cord from the power supply. If you update the BIOS. The illustration shows a 3-pin jumper whose pin1 and pin2 are setup. Jumper Clear CMOS Jumper (CLRCMOS1) (see p.13, No. 23) Setting Default Clear CMOS Description... Note: CLRCMOS1 allows you to clear the CMOS when you just finish updating the BIOS, you must boot up the system first, and then shut it down before you do not clear the CMOS right after you need to clear...

User Manual
Page 59
... ME to enable/disable hide un-configure ME without password. PET Progress Use this item to enable/disable PET Events progress to enable/disable BIOS hotkey press. BIOS Hotkey Pressed Use this item to recieve PET events or not. Amt Wait Timer Set timer to enable/disable trigger CIRA boot. Activate Remote.... Un-Configure ME Use this item to enable/disable MEBx selection screen. MEBx Selection Screen Use this item to enable/disable Intel(R) Active Management Technology BIOS Extension.
... ME to enable/disable hide un-configure ME without password. PET Progress Use this item to enable/disable PET Events progress to enable/disable BIOS hotkey press. BIOS Hotkey Pressed Use this item to recieve PET events or not. Amt Wait Timer Set timer to enable/disable trigger CIRA boot. Activate Remote.... Un-Configure ME Use this item to enable/disable MEBx selection screen. MEBx Selection Screen Use this item to enable/disable Intel(R) Active Management Technology BIOS Extension.

User Manual
Page 64
3.4.11 Trusted Computing TPM Support Enable or disable BIOS support for security device. 64
3.4.11 Trusted Computing TPM Support Enable or disable BIOS support for security device. 64

User Manual
Page 70
... (with SP1 or above). 2. Installing OS on a large size HDD (>2TB). Choose the item "UEFI:xxx" to boot in AHCI Mode This motherboard adopts UEFI BIOS that allows Windows® OS to boot. 4. Please make sure to install the operating system. 1. Set AHCI Mode in UEFI Setup Utility > Advanced > Storage Configuration...
... (with SP1 or above). 2. Installing OS on a large size HDD (>2TB). Choose the item "UEFI:xxx" to boot in AHCI Mode This motherboard adopts UEFI BIOS that allows Windows® OS to boot. 4. Please make sure to install the operating system. 1. Set AHCI Mode in UEFI Setup Utility > Advanced > Storage Configuration...

User Manual
Page 71
... (with SP2 or above) or Windows® 7 64-bit (with SP1 or above). 2. Start Windows® Installation. You can download the driver from ASRock's website and unzip the file into a USB flash disk. When you see "Where do you want to "Intel RAID Installation Guide" file for you have... copied in RAID Mode This motherboard adopts UEFI BIOS that allows Windows® OS to the optical drive. Install Windows® VistaTM 64-bit / 7 64-bit: A. Please refer to install Windows?" D. ...
... (with SP2 or above) or Windows® 7 64-bit (with SP1 or above). 2. Start Windows® Installation. You can download the driver from ASRock's website and unzip the file into a USB flash disk. When you see "Where do you want to "Intel RAID Installation Guide" file for you have... copied in RAID Mode This motherboard adopts UEFI BIOS that allows Windows® OS to the optical drive. Install Windows® VistaTM 64-bit / 7 64-bit: A. Please refer to install Windows?" D. ...

Quick Installation Guide
Page 2
... USB0 B: USB1 USB 2.0 T: USB4 B: USB5 Top: RJ-45 Top: Line In Center: Front Bottom: Mic In LAN PHY Q77M vPro PCIE1 XFast RAM PCI Express 3.0 Super I/O PCI1 XFast LAN XFast USB Designed in Taipei AUDIO CODEC HD_AUDIO1 1 RoHS COM1 1 PCI2...CIR1 USB8_9 1 PLED1 1 CLRCMOS1 PANEL1 PLED PWRBTN 1 1 HDLED RESET SATA2_4 SATA2_5 SATA2_2 SATA2_3 USB3_2_3 1 CHA_FAN2 64Mb CHA_FAN1 BIOS SPEAKER1 1 SATA3_0 SATA3_1 8 9 10 11 12 13 14 15 16 17 31 30 29 28 27 26 25 ...) 35 PCI Express 3.0 x16 Slot (PCIE1, Black) 18 SATA3 Connector (SATA3_1, Gray) 2 ASRock Q77M vPro Motherboard English
... USB0 B: USB1 USB 2.0 T: USB4 B: USB5 Top: RJ-45 Top: Line In Center: Front Bottom: Mic In LAN PHY Q77M vPro PCIE1 XFast RAM PCI Express 3.0 Super I/O PCI1 XFast LAN XFast USB Designed in Taipei AUDIO CODEC HD_AUDIO1 1 RoHS COM1 1 PCI2...CIR1 USB8_9 1 PLED1 1 CLRCMOS1 PANEL1 PLED PWRBTN 1 1 HDLED RESET SATA2_4 SATA2_5 SATA2_2 SATA2_3 USB3_2_3 1 CHA_FAN2 64Mb CHA_FAN1 BIOS SPEAKER1 1 SATA3_0 SATA3_1 8 9 10 11 12 13 14 15 16 17 31 30 29 28 27 26 25 ...) 35 PCI Express 3.0 x16 Slot (PCIE1, Black) 18 SATA3 Connector (SATA3_1, Gray) 2 ASRock Q77M vPro Motherboard English

Quick Installation Guide
Page 4
... / VistaTM / VistaTM 64bit, it is recommended to set the BIOS option in the Support CD. For the BIOS setup, please refer to the "User Manual" in , 24.4 cm x 24.4 cm) ASRock Q77M vPro Quick Installation Guide ASRock Q77M vPro Support CD 2 x Serial ATA (SATA) Data Cables (Optional) 1 x I/O Panel Shield ASRock Reminds You... Introduction Thank you are using. It delivers...
... / VistaTM / VistaTM 64bit, it is recommended to set the BIOS option in the Support CD. For the BIOS setup, please refer to the "User Manual" in , 24.4 cm x 24.4 cm) ASRock Q77M vPro Quick Installation Guide ASRock Q77M vPro Support CD 2 x Serial ATA (SATA) Data Cables (Optional) 1 x I/O Panel Shield ASRock Reminds You... Introduction Thank you are using. It delivers...

Quick Installation Guide
Page 7
... Flash (see CAUTION 12) - Boot Failure Guard (B.F.G.) - CPU Temperature Sensing - ASRock Instant Boot - ASRock Instant Flash (see CAUTION 20) - ASRock XFast RAM (see CAUTION 18) - ASRock Crashless BIOS (see CAUTION 17) - Good Night LED - SMBIOS 2.3.1 Support - ASRock U-COP (see CAUTION 14) - Chassis Temperature Sensing English 7 ASRock Q77M vPro Motherboard Supports "Plug and Play" - Supports jumperfree - Drivers, Utilities, AntiVirus Software...
... Flash (see CAUTION 12) - Boot Failure Guard (B.F.G.) - CPU Temperature Sensing - ASRock Instant Boot - ASRock Instant Flash (see CAUTION 20) - ASRock XFast RAM (see CAUTION 18) - ASRock Crashless BIOS (see CAUTION 17) - Good Night LED - SMBIOS 2.3.1 Support - ASRock U-COP (see CAUTION 14) - Chassis Temperature Sensing English 7 ASRock Q77M vPro Motherboard Supports "Plug and Play" - Supports jumperfree - Drivers, Utilities, AntiVirus Software...

Quick Installation Guide
Page 8
...Vcore OS - We are applications including Software Monitor, PC Health Center, Data Backup & Restore, Energy Saver and USB Blocker. 8 ASRock Q77M vPro Motherboard About the settings of "Hyper Threading Technology", please check page 52 of the "User Manual" in platform capabilities, popular third-party... processors. Intel® Active Management Technology 8.0 is a certain risk involved with overclocking, including adjusting the setting in the BIOS, applying Untied Overclocking Technology, or using third-party overclocking tools. CPU/Chassis Quiet Fan (Allows Chassis Fan Speed Auto- ...
...Vcore OS - We are applications including Software Monitor, PC Health Center, Data Backup & Restore, Energy Saver and USB Blocker. 8 ASRock Q77M vPro Motherboard About the settings of "Hyper Threading Technology", please check page 52 of the "User Manual" in platform capabilities, popular third-party... processors. Intel® Active Management Technology 8.0 is a certain risk involved with overclocking, including adjusting the setting in the BIOS, applying Untied Overclocking Technology, or using third-party overclocking tools. CPU/Chassis Quiet Fan (Allows Chassis Fan Speed Auto- ...
Quick Installation Guide
Page 9
... may be less than 4GB for the reservation for optimal system performance. ASRock Extreme Tuning Utility (AXTU) is a BIOS flash utility embedded in Gen 3 speed, please install an Ivy Bridge CPU. ASRock website: http://www.asrock.com 12. You can press the key during the POST or the... of the three monitors only. You can update your computer 9 ASRock Q77M vPro Motherboard English In OC DNA, you can reduce the number of charging your friends. Please be enabled at PCI Express Gen 2 speed. 9. This convenient BIOS update tool allows you desire a faster, less restricted way of ...
... may be less than 4GB for the reservation for optimal system performance. ASRock Extreme Tuning Utility (AXTU) is a BIOS flash utility embedded in Gen 3 speed, please install an Ivy Bridge CPU. ASRock website: http://www.asrock.com 12. You can press the key during the POST or the... of the three monitors only. You can update your computer 9 ASRock Q77M vPro Motherboard English In OC DNA, you can reduce the number of charging your friends. Please be enabled at PCI Express Gen 2 speed. 9. This convenient BIOS update tool allows you desire a faster, less restricted way of ...

Quick Installation Guide
Page 10
..., a new function for internet browsers, is included into an enhanced view for available UEFI firmware updates from our 10 ASRock Q77M vPro Motherboard English To use ASRock SmartView feature, please make sure your OS version is Windows® 7 / 7 64 bit / VistaTM / VistaTM 64 bit, and your ... accessing your SSDs or HDDs in the root directory of the device. 16. If power loss occurs during the BIOS update process, ASRock Crashless BIOS will automatically finish the BIOS update procedure after regaining power. You may depend on -the-go. Traffic Shaping: You can boost USB storage ...
..., a new function for internet browsers, is included into an enhanced view for available UEFI firmware updates from our 10 ASRock Q77M vPro Motherboard English To use ASRock SmartView feature, please make sure your OS version is Windows® 7 / 7 64 bit / VistaTM / VistaTM 64 bit, and your ... accessing your SSDs or HDDs in the root directory of the device. 16. If power loss occurs during the BIOS update process, ASRock Crashless BIOS will automatically finish the BIOS update procedure after regaining power. You may depend on -the-go. Traffic Shaping: You can boost USB storage ...

Quick Installation Guide
Page 26
Install the Multi-Angle CIR Receiver to enter the BIOS Setup Utility. Make sure the option "CIR Controller" is set to the USB 2.0 header (as below for ASRock motherboards with a CIR header. Step4. Step1. Connect the front USB cable to [Enabled]. (Advanced -> Super IO Configuration ->...front USB port then try again. Boot up your system. 2.9 ASRock Smart Remote Installation Guide ASRock Smart Remote is only used for the quick installation and usage of driver list.) English 26 ASRock Q77M vPro Motherboard Enter Windows. Please make sure the wire assignments and the ...
Install the Multi-Angle CIR Receiver to enter the BIOS Setup Utility. Make sure the option "CIR Controller" is set to the USB 2.0 header (as below for ASRock motherboards with a CIR header. Step4. Step1. Connect the front USB cable to [Enabled]. (Advanced -> Super IO Configuration ->...front USB port then try again. Boot up your system. 2.9 ASRock Smart Remote Installation Guide ASRock Smart Remote is only used for the quick installation and usage of driver list.) English 26 ASRock Q77M vPro Motherboard Enter Windows. Please make sure the wire assignments and the ...


