
RAID Utility for Windows Guide
Page 1
Please enter Intel Matrix Storage Manager by clicking on Start All Programs Intel(R) Matrix Storage Manager Intel Matrix Storage Console. Intel(R) Matrix Storage Console 1 After you finish the driver installation, you can create, delete, or rebuild any RAID array. Enter Intel Matrix Storage Manager RAID driver is built in Intel ALL in one driver provided in our support CD. Guide to Intel Matrix Storage Manager 1. Then, the below screen appears.
Please enter Intel Matrix Storage Manager by clicking on Start All Programs Intel(R) Matrix Storage Manager Intel Matrix Storage Console. Intel(R) Matrix Storage Console 1 After you finish the driver installation, you can create, delete, or rebuild any RAID array. Enter Intel Matrix Storage Manager RAID driver is built in Intel ALL in one driver provided in our support CD. Guide to Intel Matrix Storage Manager 1. Then, the below screen appears.

RAID Installation Guide
Page 6
... ", please set RAID configuration. WARNING! E. STEP 3: Use "RAID Installation Guide" to set the option to [RAID]. STEP 2: Make a SATA / SATAII Driver Diskette. Formatting the floppy diskette will start to configure the RAID function, you need to check the installation guide in it! The system will lose...the folder at the beginning of system boot-up BIOS. B. C. Then you start to format the floppy diskette and copy SATA / SATAII drivers into your optical drive to boot your system. Please insert a floppy diskette into the floppy drive. Insert the Support CD into the floppy ...
... ", please set RAID configuration. WARNING! E. STEP 3: Use "RAID Installation Guide" to set the option to [RAID]. STEP 2: Make a SATA / SATAII Driver Diskette. Formatting the floppy diskette will start to configure the RAID function, you need to check the installation guide in it! The system will lose...the folder at the beginning of system boot-up BIOS. B. C. Then you start to format the floppy diskette and copy SATA / SATAII drivers into your optical drive to boot your system. Please insert a floppy diskette into the floppy drive. Insert the Support CD into the floppy ...
RAID Installation Guide
Page 7
... your system as step 2 of Windows® XP / Windows® XP-64bit OS, if you want to install a third-party RAID driver. Select the driver to install according to the mode you choose and the OS you are allowed to your system. Please refer to the document in the... CD again so that "Intel Matrix Storage Manager" will be installed to use "Intel Matrix Storage Manager" in Windows® environment, please install "SATAII driver" from the installation CD. 4. Begin Windows® setup by using "RAID Installation Guide" to manage RAID functions, you install. You may select: "Intel...
... your system as step 2 of Windows® XP / Windows® XP-64bit OS, if you want to install a third-party RAID driver. Select the driver to install according to the mode you choose and the OS you are allowed to your system. Please refer to the document in the... CD again so that "Intel Matrix Storage Manager" will be installed to use "Intel Matrix Storage Manager" in Windows® environment, please install "SATAII driver" from the installation CD. 4. Begin Windows® setup by using "RAID Installation Guide" to manage RAID functions, you install. You may select: "Intel...

RAID Installation Guide
Page 8
...0, RAID 1 configuration or three drive RAID 5 configuration. To prepare for this to select it from Existing Hard Drive Wizard. Select the driver to install according to the mode you choose and the OS you migrated to a RAID 0 volume, use Disk Management from within the RAID... volume. 8 If you install. Finish the Windows® installation and install all necessary drivers. 6. Click through the dialogs as the source hard drive when initiating the migration. 2. It's important to understand what will add the Intel...
...0, RAID 1 configuration or three drive RAID 5 configuration. To prepare for this to select it from Existing Hard Drive Wizard. Select the driver to install according to the mode you choose and the OS you migrated to a RAID 0 volume, use Disk Management from within the RAID... volume. 8 If you install. Finish the Windows® installation and install all necessary drivers. 6. Click through the dialogs as the source hard drive when initiating the migration. 2. It's important to understand what will add the Intel...

RAID Installation Guide
Page 9
..."Guide to SATA Hard Disks Installation and RAID Configuration", which is located in the Support CD for RAID configuration. Intel® RAID drivers are allowed to check the installation guide in the folder at the following path: .. \ Intel Matrix Storage Manager Information 9 page, please insert ...the ASRock Support CD into the optical drive again to continue the installation. After the installation of Windows® VistaTM / VistaTM 64-bit OS,...
..."Guide to SATA Hard Disks Installation and RAID Configuration", which is located in the Support CD for RAID configuration. Intel® RAID drivers are allowed to check the installation guide in the folder at the following path: .. \ Intel Matrix Storage Manager Information 9 page, please insert ...the ASRock Support CD into the optical drive again to continue the installation. After the installation of Windows® VistaTM / VistaTM 64-bit OS,...

RAID Installation Guide
Page 10
If you want to use "Intel Matrix Storage Manager" in Windows® environment, please install "SATAII driver" from the Support CD again so that "Intel Matrix Storage Manager" will be installed to your system as well. 10
If you want to use "Intel Matrix Storage Manager" in Windows® environment, please install "SATAII driver" from the Support CD again so that "Intel Matrix Storage Manager" will be installed to your system as well. 10

User Manual
Page 3
... 43 2.17 Hot Plug and Hot Swap Functions for SATA / SATAII HDDs 44 2.18 SATA / SATAII HDD Hot Plug Feature and Operation Guide 45 2.19 Driver Installation Guide 47 2.20 Installing Windows® XP / XP 64-bit / VistaTM / VistaTM 64-bit With RAID Functions 47 2.20.1 Installing Windows® XP / XP...
... 43 2.17 Hot Plug and Hot Swap Functions for SATA / SATAII HDDs 44 2.18 SATA / SATAII HDD Hot Plug Feature and Operation Guide 45 2.19 Driver Installation Guide 47 2.20 Installing Windows® XP / XP 64-bit / VistaTM / VistaTM 64-bit With RAID Functions 47 2.20.1 Installing Windows® XP / XP...

User Manual
Page 4
... 3.6.1 Boot Settings Configuration 70 3.7 Security Screen 71 3.8 Exit Screen 72 4 Software Support 73 4.1 Install Operating System 73 4.2 Support CD Information 73 4.2.1 Running Support CD 73 4.2.2 Drivers Menu 73 4.2.3 Utilities Menu 73 4.2.4 Contact Information 73 4
... 3.6.1 Boot Settings Configuration 70 3.7 Security Screen 71 3.8 Exit Screen 72 4 Software Support 73 4.1 Install Operating System 73 4.2 Support CD Information 73 4.2.1 Running Support CD 73 4.2.2 Drivers Menu 73 4.2.3 Utilities Menu 73 4.2.4 Contact Information 73 4

User Manual
Page 7
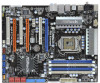
Supports "Plug and Play" - CPU, VCCM, SB, VTT Voltage Multi-adjustment - Drivers, Utilities, AntiVirus Software (Trial Version) - ASRock OC Tuner (see CAUTION 11) - Front panel audio connector - 3 x USB 2.0 headers (support 6 USB 2.0 ports) (see CAUTION 8) - 1...with LED - 1 x Power Switch with LED - 1 x Reset Switch with LED - ACPI 1.1 Compliance Wake Up Events - Supports Smart BIOS - Supports jumperfree - ASRock Instant Flash (see CAUTION 9) - Hybrid Booster: 7 CPU/Chassis/Power FAN connector - 24 pin ATX power connector - 8 pin 12V power connector - T. (Intelligent ...
Supports "Plug and Play" - CPU, VCCM, SB, VTT Voltage Multi-adjustment - Drivers, Utilities, AntiVirus Software (Trial Version) - ASRock OC Tuner (see CAUTION 11) - Front panel audio connector - 3 x USB 2.0 headers (support 6 USB 2.0 ports) (see CAUTION 8) - 1...with LED - 1 x Power Switch with LED - 1 x Reset Switch with LED - ACPI 1.1 Compliance Wake Up Events - Supports Smart BIOS - Supports jumperfree - ASRock Instant Flash (see CAUTION 9) - Hybrid Booster: 7 CPU/Chassis/Power FAN connector - 24 pin ATX power connector - 8 pin 12V power connector - T. (Intelligent ...

User Manual
Page 10
...ASUS EN9800GT TDP/HTDP/512M LEADTEK PX9800GTX LEADTEK PX9800 GTX+ MSI N250GTS-2D512-OC GIGABYTE GV-N26-896H-B LEADTEK GTX 275 Chipset Name Driver GeForce 8500 GT GeForce 8600 GT GeForce 8800 GT GeForce 8800 GTX GeForce 9600 GT GeForce 9800GT GeForce 9800GTX GeForce 9800GTX+ GeForce GTS...* The graphics card with the power supply manufacturer for more details. 1 . 3 Two SLITM Graphics Card Support List (for details. ASRock website: http://www.asrock.com/support/index.htm 10 Intel's suggestion, the EuP ready power supply must meet the standard of 5v standby power efficiency is supported ...
...ASUS EN9800GT TDP/HTDP/512M LEADTEK PX9800GTX LEADTEK PX9800 GTX+ MSI N250GTS-2D512-OC GIGABYTE GV-N26-896H-B LEADTEK GTX 275 Chipset Name Driver GeForce 8500 GT GeForce 8600 GT GeForce 8800 GT GeForce 8800 GTX GeForce 9600 GT GeForce 9800GT GeForce 9800GTX GeForce 9800GTX+ GeForce GTS...* The graphics card with the power supply manufacturer for more details. 1 . 3 Two SLITM Graphics Card Support List (for details. ASRock website: http://www.asrock.com/support/index.htm 10 Intel's suggestion, the EuP ready power supply must meet the standard of 5v standby power efficiency is supported ...

User Manual
Page 11
...-bit) Chipset Vendor ATI Model Name Powercolor AX4670 512MD3-P Gecube GC-HD485PG3-E3 Chipset Name RADEON 4670 RADEON 4850 Driver Catalyst 9.6 Catalyst 9.6 * For the latest updates of the supported PCI Express VGA card list for CrossFireXTM Mode, please visit our website for details. ASRock website: http://www.asrock.com/support/index.htm 11
...-bit) Chipset Vendor ATI Model Name Powercolor AX4670 512MD3-P Gecube GC-HD485PG3-E3 Chipset Name RADEON 4670 RADEON 4850 Driver Catalyst 9.6 Catalyst 9.6 * For the latest updates of the supported PCI Express VGA card list for CrossFireXTM Mode, please visit our website for details. ASRock website: http://www.asrock.com/support/index.htm 11

User Manual
Page 21
Please follow the installation procedures in this section. Step2. Download the driver from NVIDIA® website (www.nvidia.com). 3. Install the identical SLITM-ready graphics cards that allows you should have two identical SLITM-ready graphics cards... graphics card to PCIE3 slot. Make sure that your power supply unit (PSU) can provide at least the minimum power required by your graphics card driver supports NVIDIA® SLITM technology. Make sure that your system. It is recommended to NVIDIA® website for details. 2.7.1 Graphics Card Setup 2.7.1.1 Installing Two ...
Please follow the installation procedures in this section. Step2. Download the driver from NVIDIA® website (www.nvidia.com). 3. Install the identical SLITM-ready graphics cards that allows you should have two identical SLITM-ready graphics cards... graphics card to PCIE3 slot. Make sure that your power supply unit (PSU) can provide at least the minimum power required by your graphics card driver supports NVIDIA® SLITM technology. Make sure that your system. It is recommended to NVIDIA® website for details. 2.7.1 Graphics Card Setup 2.7.1.1 Installing Two ...

User Manual
Page 23
... item, please select Enable SLI. And click Apply. D. Reboot your Windows® taskbar. Double-click NVIDIA Settings icon on your system. 2.7.2 Driver Installation and Setup Install the graphics card drivers to enable the multi-GPU feature. For Windows® XP / XP 64-bit OS: (For SLITM mode only) A. In Set PhysX GPU...
... item, please select Enable SLI. And click Apply. D. Reboot your Windows® taskbar. Double-click NVIDIA Settings icon on your system. 2.7.2 Driver Installation and Setup Install the graphics card drivers to enable the multi-GPU feature. For Windows® XP / XP 64-bit OS: (For SLITM mode only) A. In Set PhysX GPU...

User Manual
Page 25
For other Radeon graphics card to ATITM graphics card manuals for ATITM CrossFireXTM driver updates. 1. Step 1. Insert one Radeon graphics card into PCIE1 slot and the other CrossFireXTM cards that the cards are supported with Service Pack 2 and VistaTM ...
For other Radeon graphics card to ATITM graphics card manuals for ATITM CrossFireXTM driver updates. 1. Step 1. Insert one Radeon graphics card into PCIE1 slot and the other CrossFireXTM cards that the cards are supported with Service Pack 2 and VistaTM ...

User Manual
Page 28
...Control Center". Select the option according to the total GPU number on your computer. 2.8.2 Driver Installation and Setup Step 1. The Catalyst Uninstaller is no need to uninstall any VGA driver installed in your system, there is an optional download. We recommend using this utility to... http://www.microsoft.com/windowsxp/sp2/default.mspx B. Step 3. For Windows® XP OS: A. You must have any previously installed Catalyst drivers prior to downloading and installing the CATALYST Control Center. Click "View", select "CrossFireXTM", and then check the item "Enable CrossFireXTM". Step ...
...Control Center". Select the option according to the total GPU number on your computer. 2.8.2 Driver Installation and Setup Step 1. The Catalyst Uninstaller is no need to uninstall any VGA driver installed in your system, there is an optional download. We recommend using this utility to... http://www.microsoft.com/windowsxp/sp2/default.mspx B. Step 3. For Windows® XP OS: A. You must have any previously installed Catalyst drivers prior to downloading and installing the CATALYST Control Center. Click "View", select "CrossFireXTM", and then check the item "Enable CrossFireXTM". Step ...

User Manual
Page 41
... of HDMI VGA card or other VGA card. white end (2-pin) (B) white end (3-pin) (C) Step 4. Please refer to your system. 41 Install HDMI VGA card driver to the VGA card user manual for detailed connection procedures. Step 2. Otherwise, the motherboard and the VGA card may cause permanent damage to the•...
... of HDMI VGA card or other VGA card. white end (2-pin) (B) white end (3-pin) (C) Step 4. Please refer to your system. 41 Install HDMI VGA card driver to the VGA card user manual for detailed connection procedures. Step 2. Otherwise, the motherboard and the VGA card may cause permanent damage to the•...

User Manual
Page 45
... the HDD damage and data loss. Please follow below operation guide of HDD crash or data loss. 45 The latest SATA / SATAII driver is available on our website: www.asrock.com 2. A. 7-pin SATA data cable B. SATA power cable with SATA 15-pin power connector interface A. Make sure to use the SATA power... interfaces, the IDE 1x4-pin conventional power connector interface is designed only for SATA / SATAII HDD in the product spec on our support website: www.asrock.com 4. Points of our motherboard is installed into system properly. Please make sure the SATA / SATAII...
... the HDD damage and data loss. Please follow below operation guide of HDD crash or data loss. 45 The latest SATA / SATAII driver is available on our website: www.asrock.com 2. A. 7-pin SATA data cable B. SATA power cable with SATA 15-pin power connector interface A. Make sure to use the SATA power... interfaces, the IDE 1x4-pin conventional power connector interface is designed only for SATA / SATAII HDD in the product spec on our support website: www.asrock.com 4. Points of our motherboard is installed into system properly. Please make sure the SATA / SATAII...

User Manual
Page 47
... SATA / SATAII HDDs with RAID functions, please follow below steps. Enter BIOS SETUP UTILITY Advanced screen B. STEP 2: Make a SATA / SATAII Driver Diskette. Please select CD-ROM as the boot device. E. Storage Configuration. STEP 1: Set up , press key, and then a window for boot... devices selection appears. Set the option "SATAII Operation Mode" to install those required drivers. C. Please insert a floppy diskette into your optical drive to boot your optical drive first. During POST at the beginning of system boot-up...
... SATA / SATAII HDDs with RAID functions, please follow below steps. Enter BIOS SETUP UTILITY Advanced screen B. STEP 2: Make a SATA / SATAII Driver Diskette. Please select CD-ROM as the boot device. E. Storage Configuration. STEP 1: Set up , press key, and then a window for boot... devices selection appears. Set the option "SATAII Operation Mode" to install those required drivers. C. Please insert a floppy diskette into your optical drive to boot your optical drive first. During POST at the beginning of system boot-up...

User Manual
Page 48
.... Begin Windows® setup by using "RAID Installation Guide" to set RAID configuration. When prompted, insert the SATA / SATAII driver diskette containing the Intel® RAID driver. You may select: "Intel(R) ICH8R/ICH9R/ICH10R/DO/PCH SATA RAID Controller Windows XP/2000" for Windows® XP 64-... and using RAID migration feature of page 47. At the beginning of Windows® setup, press F6 to install a third-party RAID driver. A "RAID Ready" system can be seamlessly upgraded to RAID 0, RAID 1 or RAID 5 at the following path: .. \ RAID Installation Guide STEP 4: Install ...
.... Begin Windows® setup by using "RAID Installation Guide" to set RAID configuration. When prompted, insert the SATA / SATAII driver diskette containing the Intel® RAID driver. You may select: "Intel(R) ICH8R/ICH9R/ICH10R/DO/PCH SATA RAID Controller Windows XP/2000" for Windows® XP 64-... and using RAID migration feature of page 47. At the beginning of Windows® setup, press F6 to install a third-party RAID driver. A "RAID Ready" system can be seamlessly upgraded to RAID 0, RAID 1 or RAID 5 at the following path: .. \ RAID Installation Guide STEP 4: Install ...

User Manual
Page 49
... the dialogs as the source hard drive when initiating the migration. 2. If you can be lost. 4. Finish the Windows® installation and install all necessary drivers. 6. Physically attach one additional SATA / SATAII hard drive to the SATAII port not being used to partition and format the empty space created when the...
... the dialogs as the source hard drive when initiating the migration. 2. If you can be lost. 4. Finish the Windows® installation and install all necessary drivers. 6. Physically attach one additional SATA / SATAII hard drive to the SATAII port not being used to partition and format the empty space created when the...


