RAID Installation Guide
Page 7
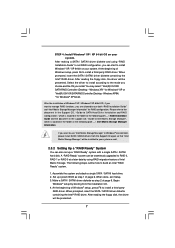
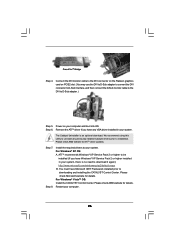
...(R) ICH10R SATA RAID Controller (Desktop - The following path: .. \ RAID Installation Guide and the document in the support CD, "Guide to Intel Matrix Storage Manager", which is located in the folder at the following steps outline how to install a third-party RAID driver. Set up a "RAID Ready" system with a single SATA / SATAII hard disk. STEP 4: Install Windows® XP / XP 64-bit OS on your system. At the beginning of Windows® setup, press F6...
...(R) ICH10R SATA RAID Controller (Desktop - The following path: .. \ RAID Installation Guide and the document in the support CD, "Guide to Intel Matrix Storage Manager", which is located in the folder at the following steps outline how to install a third-party RAID driver. Set up a "RAID Ready" system with a single SATA / SATAII hard disk. STEP 4: Install Windows® XP / XP 64-bit OS on your system. At the beginning of Windows® setup, press F6...
RAID Installation Guide
Page 8
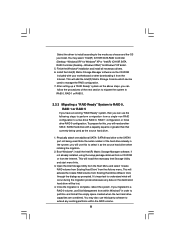
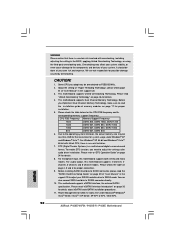
After setting up a "RAID Ready" system as the source hard drive when initiating the migration. 2. Boot Windows®, install the Intel(R) Matrix Storage Manager software, if not already installed, using the setup package obtained from a CD-ROM or from the Actions menu. Open the Intel Storage Utility from the Start Menu and select "Create RAID volume from Existing Hard Drive" from the Internet. Select the driver to install according to the mode you choose and...
After setting up a "RAID Ready" system as the source hard drive when initiating the migration. 2. Boot Windows®, install the Intel(R) Matrix Storage Manager software, if not already installed, using the setup package obtained from a CD-ROM or from the Actions menu. Open the Intel Storage Utility from the Start Menu and select "Create RAID volume from Existing Hard Drive" from the Internet. Select the driver to install according to the mode you choose and...
User Manual
Page 9
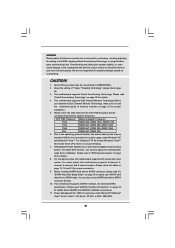
... also connect SATA hard disk to adjust the settings after audio driver installation. Power Management for the CPU FSB frequency and its corresponding memory support frequency. WARNING Please realize that there is a certain risk involved with 64-bit CPU, there is a multi-channel digital surround sound format. Please check the table below for USB 2.0 works fine under Windows® XP and Windows® VistaTM. This motherboard supports eSATAII interface, the external SATAII specification. This motherboard supports Untied Overclocking Technology.
... also connect SATA hard disk to adjust the settings after audio driver installation. Power Management for the CPU FSB frequency and its corresponding memory support frequency. WARNING Please realize that there is a certain risk involved with 64-bit CPU, there is a multi-channel digital surround sound format. Please check the table below for USB 2.0 works fine under Windows® XP and Windows® VistaTM. This motherboard supports eSATAII interface, the external SATAII specification. This motherboard supports Untied Overclocking Technology.

User Manual
Page 12
... USB/WiFi Header (USB/WIFI, Yellow) 31 PCI Express x1 Slot (PCIE4) 32 Front Panel Audio Header (HD_AUDIO1, Lime) 33 PCI Express x1 Slot (PCIE3) 34 Internal Audio Connector: CD1 (Black) 35 PCI Express 2.0 x16 Slot (PCIE2, Green) 36 PCI Express x1 Slot (PCIE1) 37 ATX 12V Connector (ATX12V1) 38 eSATAII Connector (eSATAII_TOP (Port 4), Orange) 12 1.4 Motherboard Layout (P45XE) 1 2 3 45 6 7 22.4cm (8.8 in) eSATAII_TOP (Port 4) eSATAII_BOTTOM (Port 5) PS2 Mouse PS2 Keyboard SPDIF Coaxial SPDIF Optical CPU_FAN1 1 PS2_USB_PWR1 DDRII_B1 (64 bit, 240-pin module) DDRII_B2 (64 bit...
... USB/WiFi Header (USB/WIFI, Yellow) 31 PCI Express x1 Slot (PCIE4) 32 Front Panel Audio Header (HD_AUDIO1, Lime) 33 PCI Express x1 Slot (PCIE3) 34 Internal Audio Connector: CD1 (Black) 35 PCI Express 2.0 x16 Slot (PCIE2, Green) 36 PCI Express x1 Slot (PCIE1) 37 ATX 12V Connector (ATX12V1) 38 eSATAII Connector (eSATAII_TOP (Port 4), Orange) 12 1.4 Motherboard Layout (P45XE) 1 2 3 45 6 7 22.4cm (8.8 in) eSATAII_TOP (Port 4) eSATAII_BOTTOM (Port 5) PS2 Mouse PS2 Keyboard SPDIF Coaxial SPDIF Optical CPU_FAN1 1 PS2_USB_PWR1 DDRII_B1 (64 bit, 240-pin module) DDRII_B2 (64 bit...
User Manual
Page 26
Step 6. We recommend using this utility to your computer. 26 Step 8. Install the required drivers to uninstall any VGA driver installed in your system, there is an optional download. For Windows® XP OS: A. For Windows® VistaTM OS: Install the CATALYST Control Center. CrossFireTM Bridge Step 4. Connect the DVI monitor cable to the DVI connector on the Radeon graphics card on your system. Step 7. Please check AMD website for details...
Step 6. We recommend using this utility to your computer. 26 Step 8. Install the required drivers to uninstall any VGA driver installed in your system, there is an optional download. For Windows® XP OS: A. For Windows® VistaTM OS: Install the CATALYST Control Center. CrossFireTM Bridge Step 4. Connect the DVI monitor cable to the DVI connector on the Radeon graphics card on your system. Step 7. Please check AMD website for details...

User Manual
Page 35
... pin definition of PCI Express VGA card. For the proper installation of HDMI VGA card, please refer to the installation guide on HDMI VGA card, please refer to the user manual of HDTV and HDMI VGA card vendor for connector usage in advance. For example, this motherboard. A complete HDMI system requires a HDMI VGA card and a HDMI ready motherboard with a HDMI_SPDIF header, which provides an interface between any compatible digital audio/ video source, such as a set-top box, DVD player, A/V receiver and a compatible digital audio or video monitor...
... pin definition of PCI Express VGA card. For the proper installation of HDMI VGA card, please refer to the installation guide on HDMI VGA card, please refer to the user manual of HDTV and HDMI VGA card vendor for connector usage in advance. For example, this motherboard. A complete HDMI system requires a HDMI VGA card and a HDMI ready motherboard with a HDMI_SPDIF header, which provides an interface between any compatible digital audio/ video source, such as a set-top box, DVD player, A/V receiver and a compatible digital audio or video monitor...

User Manual
Page 44
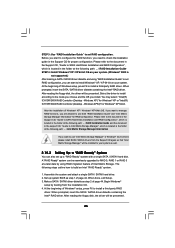
... floppy drive. When you want to format and copy files [YN]? Please select CD-ROM as ", please set the option to the OS you want to install Windows® XP / XP 64-bit on your system. Then, the drivers compatible to your system can work properly. 2.18 Installing Windows® XP / XP 64-bit / VistaTM / VistaTM 64-bit With RAID Functions (For P45XE-WiFiN / P45XE-R Only) If you install. D. B. Enter BIOS SETUP UTILITY Advanced screen IDE Configuration...
... floppy drive. When you want to format and copy files [YN]? Please select CD-ROM as ", please set the option to the OS you want to install Windows® XP / XP 64-bit on your system. Then, the drivers compatible to your system can work properly. 2.18 Installing Windows® XP / XP 64-bit / VistaTM / VistaTM 64-bit With RAID Functions (For P45XE-WiFiN / P45XE-R Only) If you install. D. B. Enter BIOS SETUP UTILITY Advanced screen IDE Configuration...
User Manual
Page 45
... booting from the Support CD again so that "Intel Matrix Storage Manager" will be installed to install a third-party RAID driver. At the beginning of Windows® setup, press F6 to set up system BIOS as step 2 of page 44. Please refer to the document in the Support CD for RAID configuration. After reading the floppy disk, the driver will be presented. When prompted, insert the SATA / SATAII driver...
... booting from the Support CD again so that "Intel Matrix Storage Manager" will be installed to install a third-party RAID driver. At the beginning of Windows® setup, press F6 to set up system BIOS as step 2 of page 44. Please refer to the document in the Support CD for RAID configuration. After reading the floppy disk, the driver will be presented. When prompted, insert the SATA / SATAII driver...

User Manual
Page 47
... Matrix Storage Manager" will be installed to your SATA / SATAII HDDs with RAID functions, please follow the instruction to continue the installation. STEP 2: Use "RAID Installation Guide" to set the option to check the installation guide in the Support CD for RAID configuration. After the installation of Windows® VistaTM / VistaTM 64-bit OS, if you need to [RAID]. STEP 1: Set up BIOS. A. page, please insert the ASRock Support CD into the optical drive again to install Windows®...
... Matrix Storage Manager" will be installed to your SATA / SATAII HDDs with RAID functions, please follow the instruction to continue the installation. STEP 2: Use "RAID Installation Guide" to set the option to check the installation guide in the Support CD for RAID configuration. After the installation of Windows® VistaTM / VistaTM 64-bit OS, if you need to [RAID]. STEP 1: Set up BIOS. A. page, please insert the ASRock Support CD into the optical drive again to install Windows®...
User Manual
Page 63
...Enabled] [Enabled] [Disabled] [Enabled] [Auto] [Disabled] Select the over clock mode. +F1 F9 F10 ESC Select Screen Select Item Change Option General Help Load Defaults Save and Exit Exit v02.54 (C) Copyright 1985-2005, American Megatrends, Inc. If you select [I .O.T.] and [Optimized]. PCIE Frequency (MHz) Use this motherboard. Enhance Halt State All processors support the Halt State (C1). 3.4.2CPU Configuration BIOS SETUP UTILITY Advanced CPU Configuration Overclock Mode CPU Frequency (MHz) PCIE Frequency (MHz) Boot Failure Guard Spread Spectrum Ratio Actual Value Ratio CMOS Setting...
...Enabled] [Enabled] [Disabled] [Enabled] [Auto] [Disabled] Select the over clock mode. +F1 F9 F10 ESC Select Screen Select Item Change Option General Help Load Defaults Save and Exit Exit v02.54 (C) Copyright 1985-2005, American Megatrends, Inc. If you select [I .O.T.] and [Optimized]. PCIE Frequency (MHz) Use this motherboard. Enhance Halt State All processors support the Halt State (C1). 3.4.2CPU Configuration BIOS SETUP UTILITY Advanced CPU Configuration Overclock Mode CPU Frequency (MHz) PCIE Frequency (MHz) Boot Failure Guard Spread Spectrum Ratio Actual Value Ratio CMOS Setting...
User Manual
Page 64
... system that enabling this function. The CPU C-state is set the "Power Schemes" as "Portable/Laptop" to [Enabled] if using Microsoft® Windows® XP, VistaTM, or Linux kernel version 2.4.18 or higher. An IA-32 processor with "No Execute (NX) Memory Protection" can switch between multiple frequency and voltage points to be hidden if the installed CPU does not support Hyper-Threading technology. This option will be...
... system that enabling this function. The CPU C-state is set the "Power Schemes" as "Portable/Laptop" to [Enabled] if using Microsoft® Windows® XP, VistaTM, or Linux kernel version 2.4.18 or higher. An IA-32 processor with "No Execute (NX) Memory Protection" can switch between multiple frequency and voltage points to be hidden if the installed CPU does not support Hyper-Threading technology. This option will be...

User Manual
Page 65
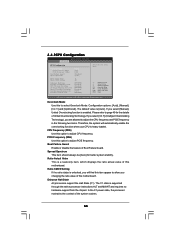
...Feature Use this option is selected, the motherboard will allow remapping of DRAM clocks for memory compatibility when it is set to the platform and CPU shared resource restrictions. DRAM Frequency If [Auto] is [Disabled]. Flexibility Option The default value of memory accessing. DRAM tRP This controls the number of overlapped PCI memory above the total physical memory. The default value is [Disabled]. 3.4.3Chipset Configuration BIOS SETUP UTILITY Advanced Chipset Settings Memory Remap Feature [Disabled] DRAM Frequency [Auto] Flexibility Option [Disabled] Standard Memory...
...Feature Use this option is selected, the motherboard will allow remapping of DRAM clocks for memory compatibility when it is set to the platform and CPU shared resource restrictions. DRAM Frequency If [Auto] is [Disabled]. Flexibility Option The default value of memory accessing. DRAM tRP This controls the number of overlapped PCI memory above the total physical memory. The default value is [Disabled]. 3.4.3Chipset Configuration BIOS SETUP UTILITY Advanced Chipset Settings Memory Remap Feature [Disabled] DRAM Frequency [Auto] Flexibility Option [Disabled] Standard Memory...
User Manual
Page 67
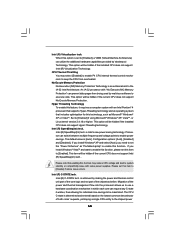
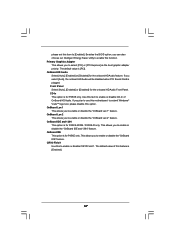
... disable this option. Besides the BIOS option, you to enable this function. Primary Graphics Adapter This allows you can also choose our Intelligent Energy Saver utility to select [PCI] or [PCI Express] as the boot graphic adapter priority. The default value is for P45XE only. Use this feature is plugged. OnBoard IDE and 1394 This option is for the onboard HD Audio feature. OnBoard IDE This option is [PCI]. CIR10 Field 1 Use this to enable or disable CD...
... disable this option. Besides the BIOS option, you to enable this function. Primary Graphics Adapter This allows you can also choose our Intelligent Energy Saver utility to select [PCI] or [PCI Express] as the boot graphic adapter priority. The default value is for P45XE only. Use this feature is plugged. OnBoard IDE and 1394 This option is for the onboard HD Audio feature. OnBoard IDE This option is [PCI]. CIR10 Field 1 Use this to enable or disable CD...
User Manual
Page 69
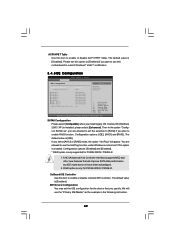
... default value is [IDE]. Configuration options: [IDE], [AHCI] and [RAID]. OnBoard IDE Controller Use this item to enable or disable ACPI HPET Table. AHCI (Advanced Host Controller Interface) supports NCQ and other new features that you are allowed to use the Hot Plug function under Windows environment if this motherboard to submit Windows® VistaTM certification. 3.4.5IDE Configuration BIOS SETUP UTILITY Advanced IDE Configuration SATAII Configuration Configure SATAII as SATAII 1 SATAII 2 SATAII 3 SATAII 4 SATAII 5 SATAII 6 IDE1 Master IDE1 Slave AHCI CD/DVD Boot...
... default value is [IDE]. Configuration options: [IDE], [AHCI] and [RAID]. OnBoard IDE Controller Use this item to enable or disable ACPI HPET Table. AHCI (Advanced Host Controller Interface) supports NCQ and other new features that you are allowed to use the Hot Plug function under Windows environment if this motherboard to submit Windows® VistaTM certification. 3.4.5IDE Configuration BIOS SETUP UTILITY Advanced IDE Configuration SATAII Configuration Configure SATAII as SATAII 1 SATAII 2 SATAII 3 SATAII 4 SATAII 5 SATAII 6 IDE1 Master IDE1 Slave AHCI CD/DVD Boot...
User Manual
Page 73
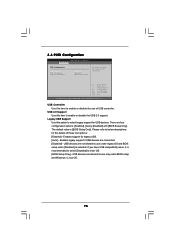
... allowed to select legacy support for legacy USB. [Auto] - If you have USB compatibility issue, it is [BIOS Setup Only]. The default value is recommended to select [Disabled] to below descriptions for the details of USB controller. Please refer to enter OS. [BIOS Setup Only] - 3.4.9USB Configuration BIOS SETUP UTILITY Advanced USB Configuration USB Controller USB 2.0 Support Legacy USB Support [Enabled] [Enabled] [BIOS Setup Only] To enable or disable the onboard USB controllers. +F1 F9 F10 ESC Select Screen Select Item Change Option General Help Load Defaults Save and Exit...
... allowed to select legacy support for legacy USB. [Auto] - If you have USB compatibility issue, it is [BIOS Setup Only]. The default value is recommended to select [Disabled] to below descriptions for the details of USB controller. Please refer to enter OS. [BIOS Setup Only] - 3.4.9USB Configuration BIOS SETUP UTILITY Advanced USB Configuration USB Controller USB 2.0 Support Legacy USB Support [Enabled] [Enabled] [BIOS Setup Only] To enable or disable the onboard USB controllers. +F1 F9 F10 ESC Select Screen Select Item Change Option General Help Load Defaults Save and Exit...
User Manual
Page 76
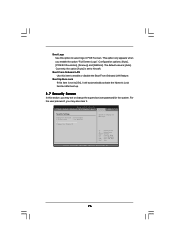
...Megatrends, Inc. 76 BIOS SETUP UTILITY Main Smart Advanced H/W Monitor Boot Security Exit Security Settings Supervisor Password : Not Installed User Password : Not Installed Change Supervisor Password Change User Password Install or Change the password. For the user password, you enable the option "Full Screen Logo". The default value is [Auto]. Boot From Onboard LAN Use this option to select logo in POST screen. Boot Logo Use this item to enable or disable the Boot From Onboard LAN feature. Configuration options: [Auto], [PCIE2.0 Revolution], [Scenery] and [ASRock].
...Megatrends, Inc. 76 BIOS SETUP UTILITY Main Smart Advanced H/W Monitor Boot Security Exit Security Settings Supervisor Password : Not Installed User Password : Not Installed Change Supervisor Password Change User Password Install or Change the password. For the user password, you enable the option "Full Screen Logo". The default value is [Auto]. Boot From Onboard LAN Use this option to select logo in POST screen. Boot Logo Use this item to enable or disable the Boot From Onboard LAN feature. Configuration options: [Auto], [PCIE2.0 Revolution], [Scenery] and [ASRock].

User Manual
Page 78
... motherboard settings and hardware options vary, use the setup procedures in your OS documentation for more about ASRock, welcome to display the menus. 4.2.2 Drivers Menu The Drivers Menu shows the available devices drivers if the system detects installed devices. Please install the necessary drivers to your computer. Chapter 4: Software Support 4.1 Install Operating System This motherboard supports various Microsoft® Windows® operating systems: 2000 / XP / XP 64-bit / VistaTM / VistaTM 64-bit. The CD automatically displays...
... motherboard settings and hardware options vary, use the setup procedures in your OS documentation for more about ASRock, welcome to display the menus. 4.2.2 Drivers Menu The Drivers Menu shows the available devices drivers if the system detects installed devices. Please install the necessary drivers to your computer. Chapter 4: Software Support 4.1 Install Operating System This motherboard supports various Microsoft® Windows® operating systems: 2000 / XP / XP 64-bit / VistaTM / VistaTM 64-bit. The CD automatically displays...
Quick Installation Guide
Page 12
... SATAII hard disk drive to SATAII connector, please read "Untied Overclocking Technology" on page 34 for details about eSATAII and eSATAII installation procedures. 11. For microphone input, this motherboard supports 2-channel, 4- Please read the "SATAII Hard Disk Setup Guide" on page 4, 5 and 6 for proper connection. 9. For Windows® XP 64-bit and Windows® VistaTM 64-bit with overclocking, including adjusting the setting in the support CD. 3. This motherboard supports Dual Channel Memory Technology. Overclocking may be overclocked to SATAII connector...
... SATAII hard disk drive to SATAII connector, please read "Untied Overclocking Technology" on page 34 for details about eSATAII and eSATAII installation procedures. 11. For microphone input, this motherboard supports 2-channel, 4- Please read the "SATAII Hard Disk Setup Guide" on page 4, 5 and 6 for proper connection. 9. For Windows® XP 64-bit and Windows® VistaTM 64-bit with overclocking, including adjusting the setting in the support CD. 3. This motherboard supports Dual Channel Memory Technology. Overclocking may be overclocked to SATAII connector...
Quick Installation Guide
Page 22
... you have Microsoft .NET Framework installed prior to downloading and installing the CATALYST Control Center. We recommend using this utility to uninstall any VGA driver installed in your computer and boot into OS. Please check AMD website for details. Install the required drivers to installation. Connect the DVI monitor cable to the DVI connector on the Radeon graphics card on your system, there is an optional download. The Catalyst Uninstaller is no...
... you have Microsoft .NET Framework installed prior to downloading and installing the CATALYST Control Center. We recommend using this utility to uninstall any VGA driver installed in your computer and boot into OS. Please check AMD website for details. Install the required drivers to installation. Connect the DVI monitor cable to the DVI connector on the Radeon graphics card on your system, there is an optional download. The Catalyst Uninstaller is no...
Quick Installation Guide
Page 36
... 64-bit. otherwise, POST continues with the motherboard contains necessary drivers and useful utilities that FSB can operate under a more stable overclocking environment. For the detailed information about BIOS Setup, please refer to [Manual]. To begin using the Support CD, insert the CD into your computer. Before you enable Untied Overclocking function, please enter "Overclock Mode" option of BIOS setup to set the selection from the BIN folder in your CD-ROM drive...
... 64-bit. otherwise, POST continues with the motherboard contains necessary drivers and useful utilities that FSB can operate under a more stable overclocking environment. For the detailed information about BIOS Setup, please refer to [Manual]. To begin using the Support CD, insert the CD into your computer. Before you enable Untied Overclocking function, please enter "Overclock Mode" option of BIOS setup to set the selection from the BIN folder in your CD-ROM drive...


