
RAID Utility for Windows Guide
Page 1
Enter Intel Matrix Storage Manager RAID driver is built in Intel ALL in one driver provided in our support CD. Please enter Intel Matrix Storage Manager by clicking on Start All Programs Intel(R) Matrix Storage Manager Intel Matrix Storage Console. Guide to Intel Matrix Storage Manager 1. After you finish the driver installation, you can create, delete, or rebuild any RAID array. Then, the below screen appears. Intel(R) Matrix Storage Console 1
Enter Intel Matrix Storage Manager RAID driver is built in Intel ALL in one driver provided in our support CD. Please enter Intel Matrix Storage Manager by clicking on Start All Programs Intel(R) Matrix Storage Manager Intel Matrix Storage Console. Guide to Intel Matrix Storage Manager 1. After you finish the driver installation, you can create, delete, or rebuild any RAID array. Then, the below screen appears. Intel(R) Matrix Storage Console 1

RAID Utility for Windows Guide
Page 2
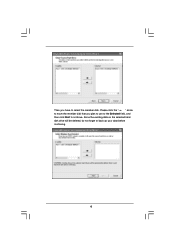
Intel(R) Matrix Storage Console Then, Create RAID Volume from Existing Hard Drive to continue. 2 Please click Next to create a RAID volume. Create RAID Volume Select Action Create RAID Volume from Existing Hard Drive Wizard pops up. 2.
Intel(R) Matrix Storage Console Then, Create RAID Volume from Existing Hard Drive to continue. 2 Please click Next to create a RAID volume. Create RAID Volume Select Action Create RAID Volume from Existing Hard Drive Wizard pops up. 2.

RAID Utility for Windows Guide
Page 3
To configure a new RAID volume, you have to select the source disk. The most typical strip size settings are: 4KB: For specialized usage models requiring 4KB strips 8KB: For specialized usage models requiring 8KB strips 16KB: Best for sequential transfers 32KB: Good for sequential transfers 64KB: Good general purpose strip size 128KB: Best performance for most desktops and workstations Then you need to continue. 3 Please click the " " arrow to move the source disk that you plan to use to the Selected field, and then click Next to key-in the Volume Name with 1-16 letters, select ...
To configure a new RAID volume, you have to select the source disk. The most typical strip size settings are: 4KB: For specialized usage models requiring 4KB strips 8KB: For specialized usage models requiring 8KB strips 16KB: Best for sequential transfers 32KB: Good for sequential transfers 64KB: Good general purpose strip size 128KB: Best performance for most desktops and workstations Then you need to continue. 3 Please click the " " arrow to move the source disk that you plan to use to the Selected field, and then click Next to key-in the Volume Name with 1-16 letters, select ...
RAID Utility for Windows Guide
Page 4
Since the existing data on the selected hard disk drive will be deleted, do not forget to select the member disk. Then you plan to use to the Selected field, and then click Next to continue. Please click the " " arrow to move the member disk that you have to back up your data before continuing. 4
Since the existing data on the selected hard disk drive will be deleted, do not forget to select the member disk. Then you plan to use to the Selected field, and then click Next to continue. Please click the " " arrow to move the member disk that you have to back up your data before continuing. 4

RAID Utility for Windows Guide
Page 5
Then click Next to specify. You may enter the amount in the space or use 100% of available array space to be used by the new RAID volume. It is recommended you use the slider to continue. 5 Specify the Volume Size. Specify the amount of the available space for the optimized usage.
Then click Next to specify. You may enter the amount in the space or use 100% of available array space to be used by the new RAID volume. It is recommended you use the slider to continue. 5 Specify the Volume Size. Specify the amount of the available space for the optimized usage.

RAID Utility for Windows Guide
Page 6
Please note that you click Finish, the existing data on the size of the disks being used and the strip size selected. Then, the migration process starts, which may take up to two hours to complete depending on the selected hard drive will be undone. Intel(R) Matrix Storage Console and select Show Migration Progress. 6 Start Creating RAID Volume from Existing Hard Drive Wizard. It is critical that as long as you backup all important data before this operation cannot be deleted and this step.
Please note that you click Finish, the existing data on the size of the disks being used and the strip size selected. Then, the migration process starts, which may take up to two hours to complete depending on the selected hard drive will be undone. Intel(R) Matrix Storage Console and select Show Migration Progress. 6 Start Creating RAID Volume from Existing Hard Drive Wizard. It is critical that as long as you backup all important data before this operation cannot be deleted and this step.

RAID Utility for Windows Guide
Page 7
After the migration process is completed, the below screen appears. Then you have to reboot your system to use the full capacity of the new volume. 7
After the migration process is completed, the below screen appears. Then you have to reboot your system to use the full capacity of the new volume. 7
RAID Utility for Windows Guide
Page 8
When using the continuous update policy, changes made to the data on the master drive while the system is not docked are automatically copied to the master drive. Note: The recovery volume can be restored to a previous state by copying the data on request update policy, the master drive data can be copied to a designated recovery drive. When using the on the recovery drive back to the recovery drive when the system is a feature of the two hard drives. 8 Recovery volume capacity will equal the size of the smaller of Intel Matrix Storage Manager. The master drive data can ...
When using the continuous update policy, changes made to the data on the master drive while the system is not docked are automatically copied to the master drive. Note: The recovery volume can be restored to a previous state by copying the data on request update policy, the master drive data can be copied to a designated recovery drive. When using the on the recovery drive back to the recovery drive when the system is a feature of the two hard drives. 8 Recovery volume capacity will equal the size of the smaller of Intel Matrix Storage Manager. The master drive data can ...

RAID Installation Guide
Page 1
Guide to RAID Configurations 3 2.1 Introduction of RAID 3 2.2 RAID Configuration Precautions 5 2.3 Installing Windows® XP / XP 64-bit / VistaTM / VistaTM 64-bit With RAID Functions 6 2.4 Setting the BIOS RAID Items 11 2.5 Configuring the Intel RAID BIOS 11 2.6 Deleting RAID Volume 15 1 Guide to SATA Hard Disks Installation 2 1.1 Serial ATA (SATA) Hard Disks Installation 2 2. Guide to SATA Hard Disks Installation and RAID Configuration 1.
Guide to RAID Configurations 3 2.1 Introduction of RAID 3 2.2 RAID Configuration Precautions 5 2.3 Installing Windows® XP / XP 64-bit / VistaTM / VistaTM 64-bit With RAID Functions 6 2.4 Setting the BIOS RAID Items 11 2.5 Configuring the Intel RAID BIOS 11 2.6 Deleting RAID Volume 15 1 Guide to SATA Hard Disks Installation 2 1.1 Serial ATA (SATA) Hard Disks Installation 2 2. Guide to SATA Hard Disks Installation and RAID Configuration 1.
RAID Installation Guide
Page 2
For SATA installation guide, please refer to SATA Hard Disks Installation 1.1 Serial ATA (SATA) Hard Disks Installation Intel ICH10R southbridge chipset supports Serial ATA (SATA) hard disks with RAID functions, including RAID 0, RAID 1, RAID 10, RAID 5, and Intel Matrix Storage. Please read the RAID configurations in the support CD. 1. Guide to Serial ATA (SATA) Hard Disks Installation of "User Manual" in this motherboard for internal storage devices. You may install SATA hard disks on this guide carefully according to create RAID on SATA ports. 2 This section will guide you how to...
For SATA installation guide, please refer to SATA Hard Disks Installation 1.1 Serial ATA (SATA) Hard Disks Installation Intel ICH10R southbridge chipset supports Serial ATA (SATA) hard disks with RAID functions, including RAID 0, RAID 1, RAID 10, RAID 5, and Intel Matrix Storage. Please read the RAID configurations in the support CD. 1. Guide to Serial ATA (SATA) Hard Disks Installation of "User Manual" in this motherboard for internal storage devices. You may install SATA hard disks on this guide carefully according to create RAID on SATA ports. 2 This section will guide you how to...
RAID Installation Guide
Page 3
RAID The term "RAID" stands for "Redundant Array of data from one drive to read and write data in the other drive if one logical unit. It will improve data access and storage since the disk array management software will direct all applications to the surviving drive as a single drive but at a sustained data transfer rate. RAID 1 (Data Mirroring) RAID 1 is called data mirroring that integrates RAID controller supporting RAID 0 / RAID 1/ Intel Matrix Storage / RAID 10 / RAID 5 function with four independent Serial ATA (SATA) channels. WARNING!! Guide to RAID Configurations ...
RAID The term "RAID" stands for "Redundant Array of data from one drive to read and write data in the other drive if one logical unit. It will improve data access and storage since the disk array management software will direct all applications to the surviving drive as a single drive but at a sustained data transfer rate. RAID 1 (Data Mirroring) RAID 1 is called data mirroring that integrates RAID controller supporting RAID 0 / RAID 1/ Intel Matrix Storage / RAID 10 / RAID 5 function with four independent Serial ATA (SATA) channels. WARNING!! Guide to RAID Configurations ...

RAID Installation Guide
Page 4
This configuration has the same fault tolerance as mirroring alone. RAID 5 RAID 5 stripes both data and parity information across three or more hard disk drives. This technology also allows you to create a RAID 0 and RAID 1 set using only two identical hard disk drives. RAID 10 RAID 10 is required for faulttolerance as RAID 1, and has the same overhead for this setup. 4 A minimum of three identical hard disk drives for this setup. The Intel Matrix Storage technology creates two partitions on each hard disk drive to create a virtual RAID 0 and RAID 1 sets. In some instances...
This configuration has the same fault tolerance as mirroring alone. RAID 5 RAID 5 stripes both data and parity information across three or more hard disk drives. This technology also allows you to create a RAID 0 and RAID 1 set using only two identical hard disk drives. RAID 10 RAID 10 is required for faulttolerance as RAID 1, and has the same overhead for this setup. 4 A minimum of three identical hard disk drives for this setup. The Intel Matrix Storage technology creates two partitions on each hard disk drive to create a virtual RAID 0 and RAID 1 sets. In some instances...
RAID Installation Guide
Page 5
For example, if one hard disk has an 80GB storage capacity and the other hard disk has 60GB, the maximum storage capacity for the 80GB-drive becomes 60GB, and the total storage capacity for data protection (the new drive must be of the same size. Please verify the status of your hard disks before you set up your data first before you create RAID functions. 2.2 RAID Configurations Precautions 1. Please backup your new RAID array. For example, if one hard disk has an 80GB storage capacity and the other hard disk has 60GB, the maximum storage capacity for the RAID 1 set ...
For example, if one hard disk has an 80GB storage capacity and the other hard disk has 60GB, the maximum storage capacity for the 80GB-drive becomes 60GB, and the total storage capacity for data protection (the new drive must be of the same size. Please verify the status of your hard disks before you set up your data first before you create RAID functions. 2.2 RAID Configurations Precautions 1. Please backup your new RAID array. For example, if one hard disk has an 80GB storage capacity and the other hard disk has 60GB, the maximum storage capacity for the RAID 1 set ...
RAID Installation Guide
Page 6
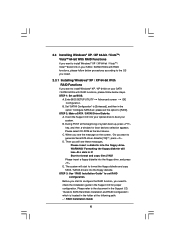
B. STEP 2: Make a SATA / SATAII Driver Diskette. D. B. When you see these messages, Please insert a diskette into the floppy diskette. E. Before you start to format the floppy diskette and copy SATA / SATAII drivers into the floppy drive. 2.3 Installing Windows® XP / XP 64-bit / VistaTM / VistaTM 64-bit With RAID Functions If you want to install Windows® XP / XP 64-bit / VistaTM / VistaTM 64-bit OS on your system. Please insert a floppy diskette into your optical drive to boot your SATA / SATAII HDDs with RAID functions, please follow below ...
B. STEP 2: Make a SATA / SATAII Driver Diskette. D. B. When you see these messages, Please insert a diskette into the floppy diskette. E. Before you start to format the floppy diskette and copy SATA / SATAII drivers into the floppy drive. 2.3 Installing Windows® XP / XP 64-bit / VistaTM / VistaTM 64-bit With RAID Functions If you want to install Windows® XP / XP 64-bit / VistaTM / VistaTM 64-bit OS on your system. Please insert a floppy diskette into your optical drive to boot your SATA / SATAII HDDs with RAID functions, please follow below ...
RAID Installation Guide
Page 7
Windows XP64) " for Windows® XP or "Intel(R) ICH10R SATA RAID Controller (Desktop - The following path: .. \ Intel Matrix Storage Manager Information If you can also set up system BIOS as step 1 of Windows® setup, press F6 to install a third-party RAID driver. Set up a "RAID Ready" system with a single SATA / SATAII hard disk. At the beginning of page 6. After making a SATA / SATAII driver diskette and using RAID migration feature of Windows setup, press F6 to install a third-party RAID driver. At the beginning of Intel Matrix Storage. Please refer to the document ...
Windows XP64) " for Windows® XP or "Intel(R) ICH10R SATA RAID Controller (Desktop - The following path: .. \ Intel Matrix Storage Manager Information If you can also set up system BIOS as step 1 of Windows® setup, press F6 to install a third-party RAID driver. Set up a "RAID Ready" system with a single SATA / SATAII hard disk. At the beginning of page 6. After making a SATA / SATAII driver diskette and using RAID migration feature of Windows setup, press F6 to install a third-party RAID driver. At the beginning of Intel Matrix Storage. Please refer to the document ...
RAID Installation Guide
Page 8
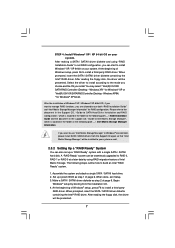
you will need another SATA / SATAII hard drive with your motherboard or after downloading it as the source hard drive. 1. Boot Windows®, install the Intel(R) Matrix Storage Manager software, if not already installed, using the setup package obtained from a CD-ROM or from the Actions menu. You may select: "Intel(R) ICH10R SATA RAID Controller (Desktop - Physically attach one additional SATA / SATAII hard drive to the SATAII port not being used to manage the RAID configuration. 7. Open the Intel Storage Utility from the Start Menu and select "Create RAID ...
you will need another SATA / SATAII hard drive with your motherboard or after downloading it as the source hard drive. 1. Boot Windows®, install the Intel(R) Matrix Storage Manager software, if not already installed, using the setup package obtained from a CD-ROM or from the Actions menu. You may select: "Intel(R) ICH10R SATA RAID Controller (Desktop - Physically attach one additional SATA / SATAII hard drive to the SATAII port not being used to manage the RAID configuration. 7. Open the Intel Storage Utility from the Start Menu and select "Create RAID ...
RAID Installation Guide
Page 9
... the folder at the following path: .. \ RAID Installation Guide STEP 3: Install Windows® VistaTM / VistaTM 64-bit OS on your system. A. page, please insert the ASRock Support CD into the optical drive again to continue the installation. B. Set "SATAII Configuration" to [Enhanced], and then in the folder at the following path...
... the folder at the following path: .. \ RAID Installation Guide STEP 3: Install Windows® VistaTM / VistaTM 64-bit OS on your system. A. page, please insert the ASRock Support CD into the optical drive again to continue the installation. B. Set "SATAII Configuration" to [Enhanced], and then in the folder at the following path...
RAID Installation Guide
Page 10
If you want to use "Intel Matrix Storage Manager" in Windows® environment, please install SATA / SATAII drivers from the Support CD again so that "Intel Matrix Storage Manager" will be installed to your system as well. 10
If you want to use "Intel Matrix Storage Manager" in Windows® environment, please install SATA / SATAII drivers from the Support CD again so that "Intel Matrix Storage Manager" will be installed to your system as well. 10
RAID Installation Guide
Page 11
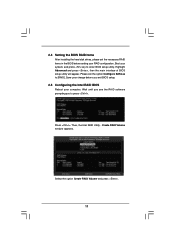
Save your RAID configuration. Press . 2.4 Setting the BIOS RAID Items After installing the hard disk drives, please set the option Configure SATA as to [RAID]. Please set the necessary RAID items in the BIOS before setting your change before you to enter BIOS setup utility. Create RAID Volume window appears. Wait until you see the RAID software prompting you exit BIOS setup. 2.5 Configuring the Intel RAID BIOS Reboot your system, and press key to press . Then, the Intel RAID Utility - Highlight Advanced and press , then the main interface of BIOS setup utility will appear...
Save your RAID configuration. Press . 2.4 Setting the BIOS RAID Items After installing the hard disk drives, please set the option Configure SATA as to [RAID]. Please set the necessary RAID items in the BIOS before setting your change before you to enter BIOS setup utility. Create RAID Volume window appears. Wait until you see the RAID software prompting you exit BIOS setup. 2.5 Configuring the Intel RAID BIOS Reboot your system, and press key to press . Then, the Intel RAID Utility - Highlight Advanced and press , then the main interface of BIOS setup utility will appear...
RAID Installation Guide
Page 12
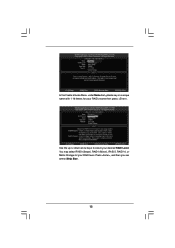
Press , and then you can select Strip Size. 12 You may select RAID0 (Stripe), RAID1 (Mirror), RAID 5, RAID 10, or Matrix Storage for your RAID volume then press . Volume0 Use the up or down arrow keys to select your RAID level. Volume0 In the Create Volume Menu, under Name item, please key-in a unique name with 1-16 letters for your desired RAID Level.
Press , and then you can select Strip Size. 12 You may select RAID0 (Stripe), RAID1 (Mirror), RAID 5, RAID 10, or Matrix Storage for your RAID volume then press . Volume0 Use the up or down arrow keys to select your RAID level. Volume0 In the Create Volume Menu, under Name item, please key-in a unique name with 1-16 letters for your desired RAID Level.
